Nice work man, I can see the design starting to take shape!
- COMPETITIONS
- THE COMPETITION ARCHIVES
- RRBBO OFFICIAL COMPETITIONS
- BUILD OFF 12 (2017)
- BUILD OFF 12 BUILD JOURNALS
You are using an out of date browser. It may not display this or other websites correctly.
You should upgrade or use an alternative browser.
You should upgrade or use an alternative browser.
Cut, chop, shuffle, let's see what happens!
- Thread starter auditech10
- Start date


Help Support Rat Rod Bikes Bicycle Forum:
This site may earn a commission from merchant affiliate
links, including eBay, Amazon, and others.
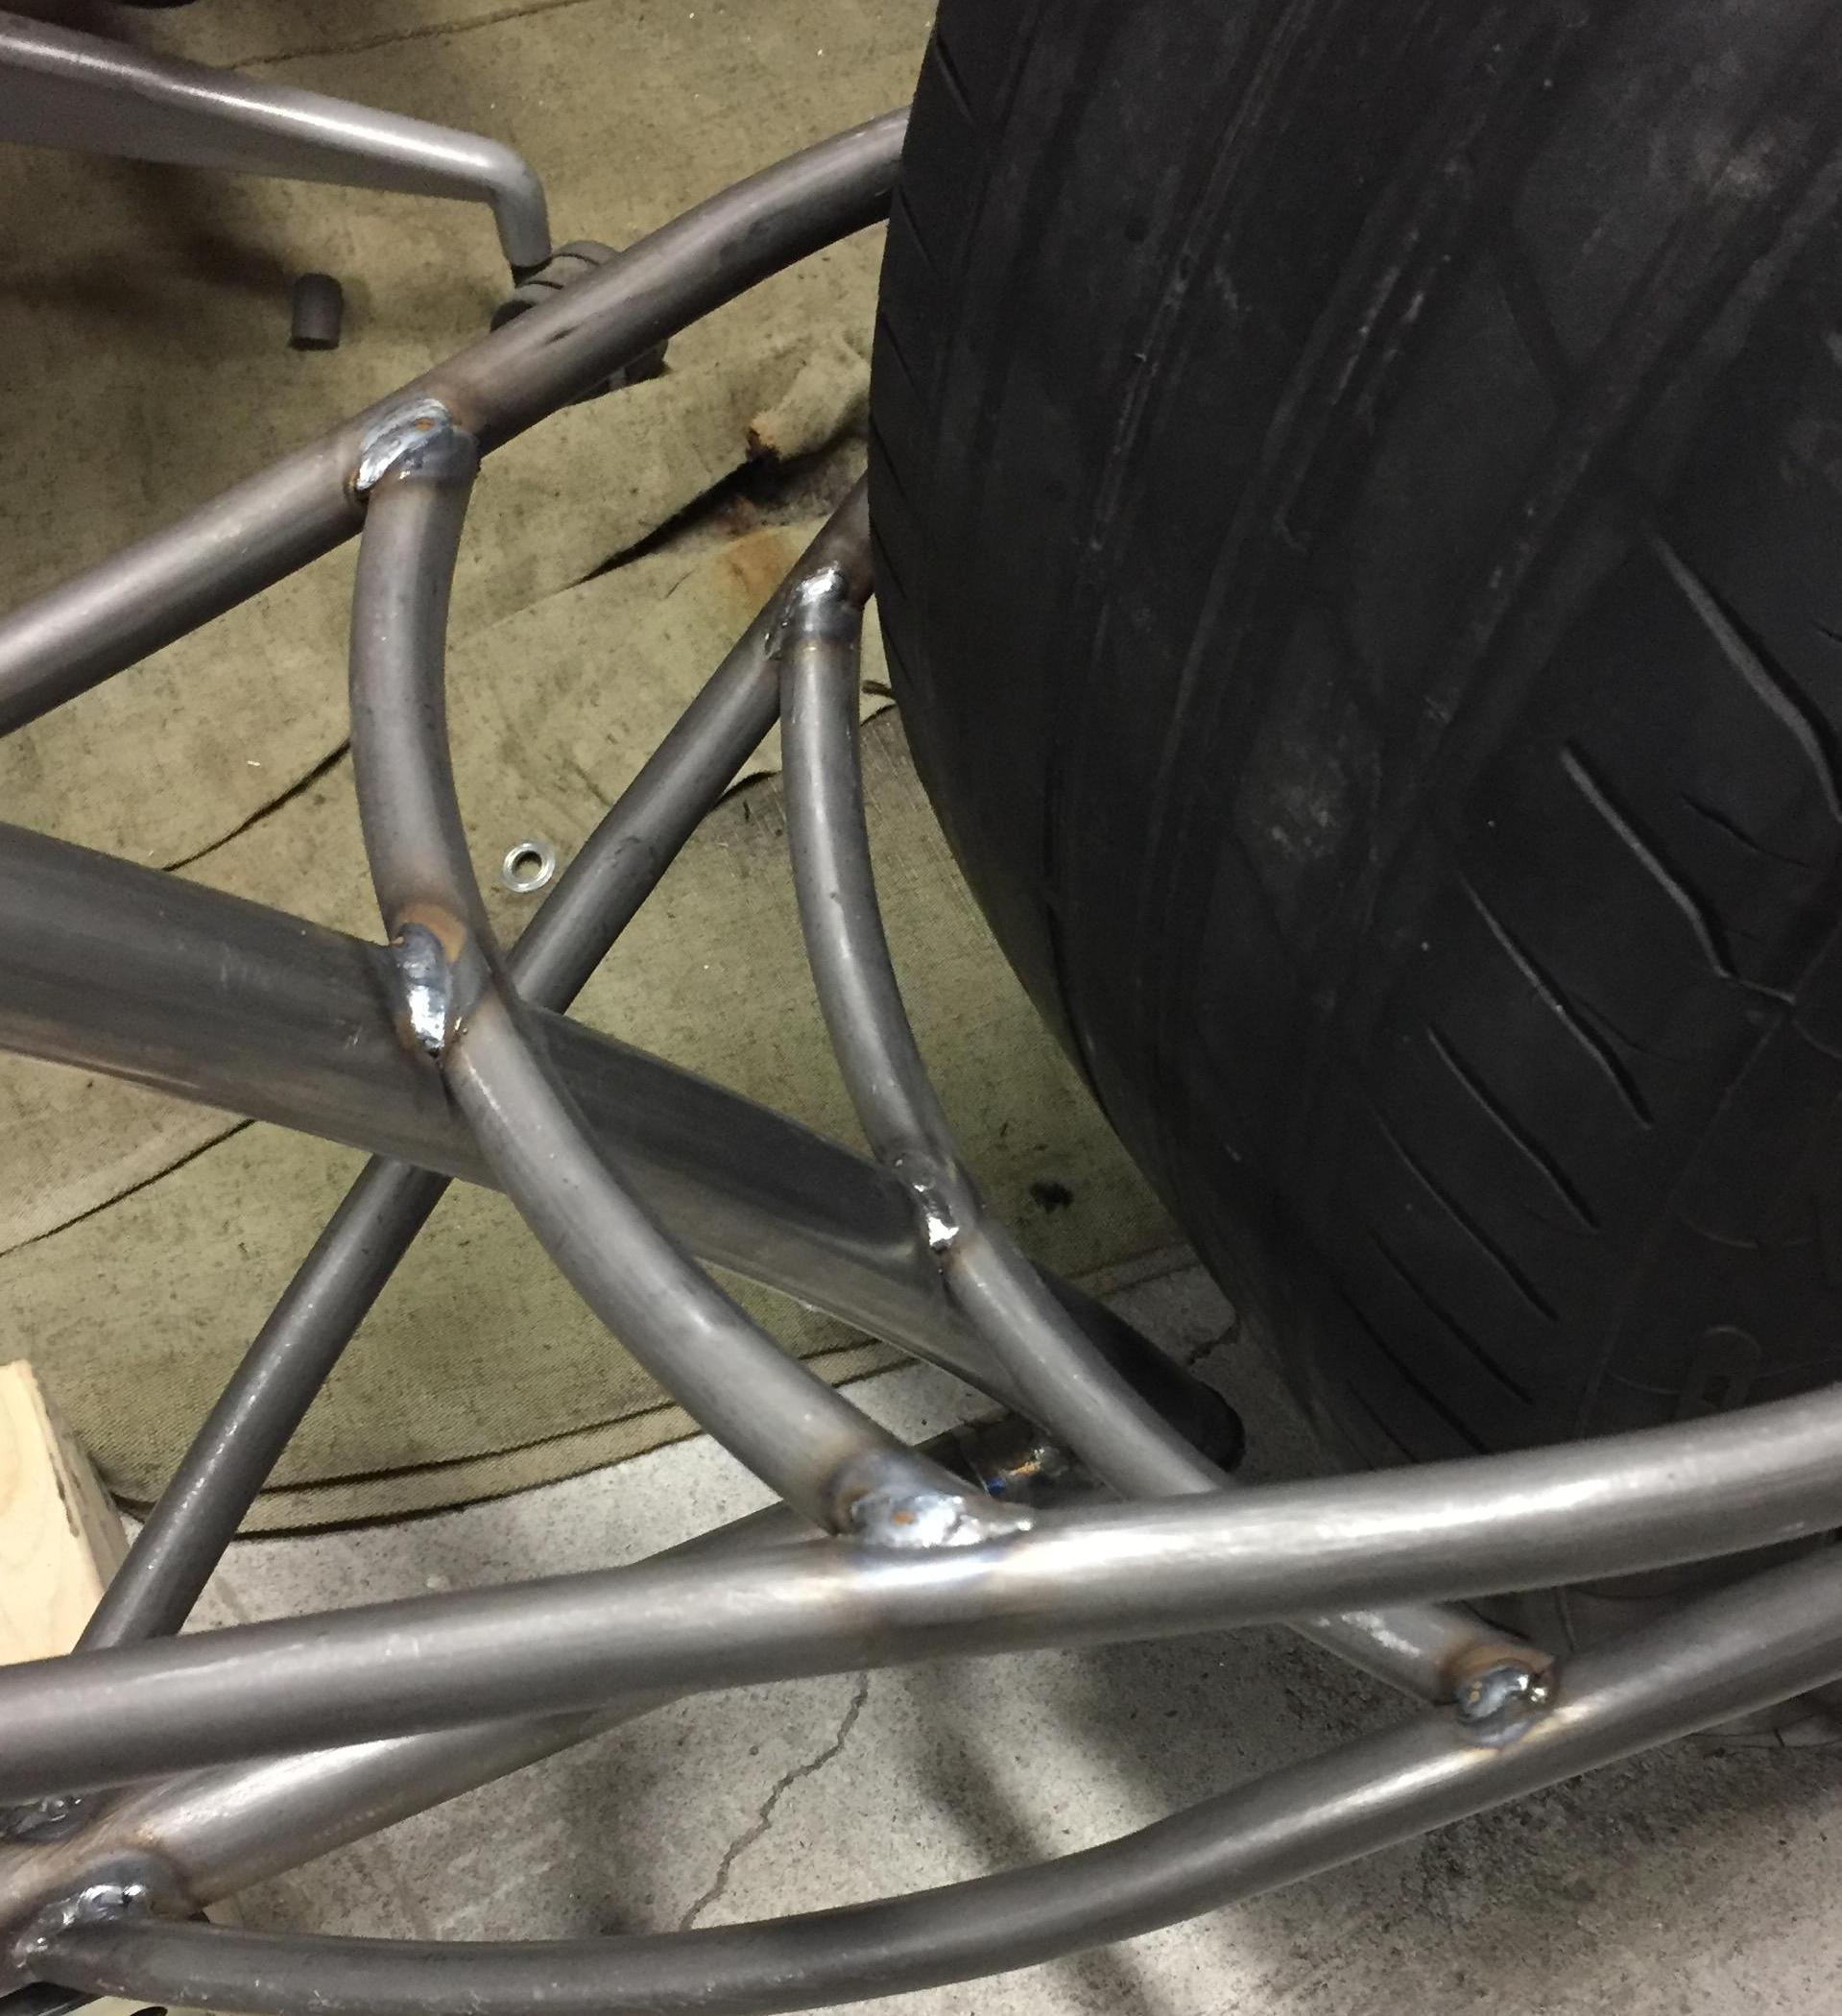
My last post didn't appear to actually post, so I will try again. This will be 3 days worth of progress, so bear with me. There will be a lot of pictures, and a few words, my favorite type of reading material. I'll start with the supports for both rear stays. I'm still worried the back end may flex too much, but I'll cross that bridge when I get there.
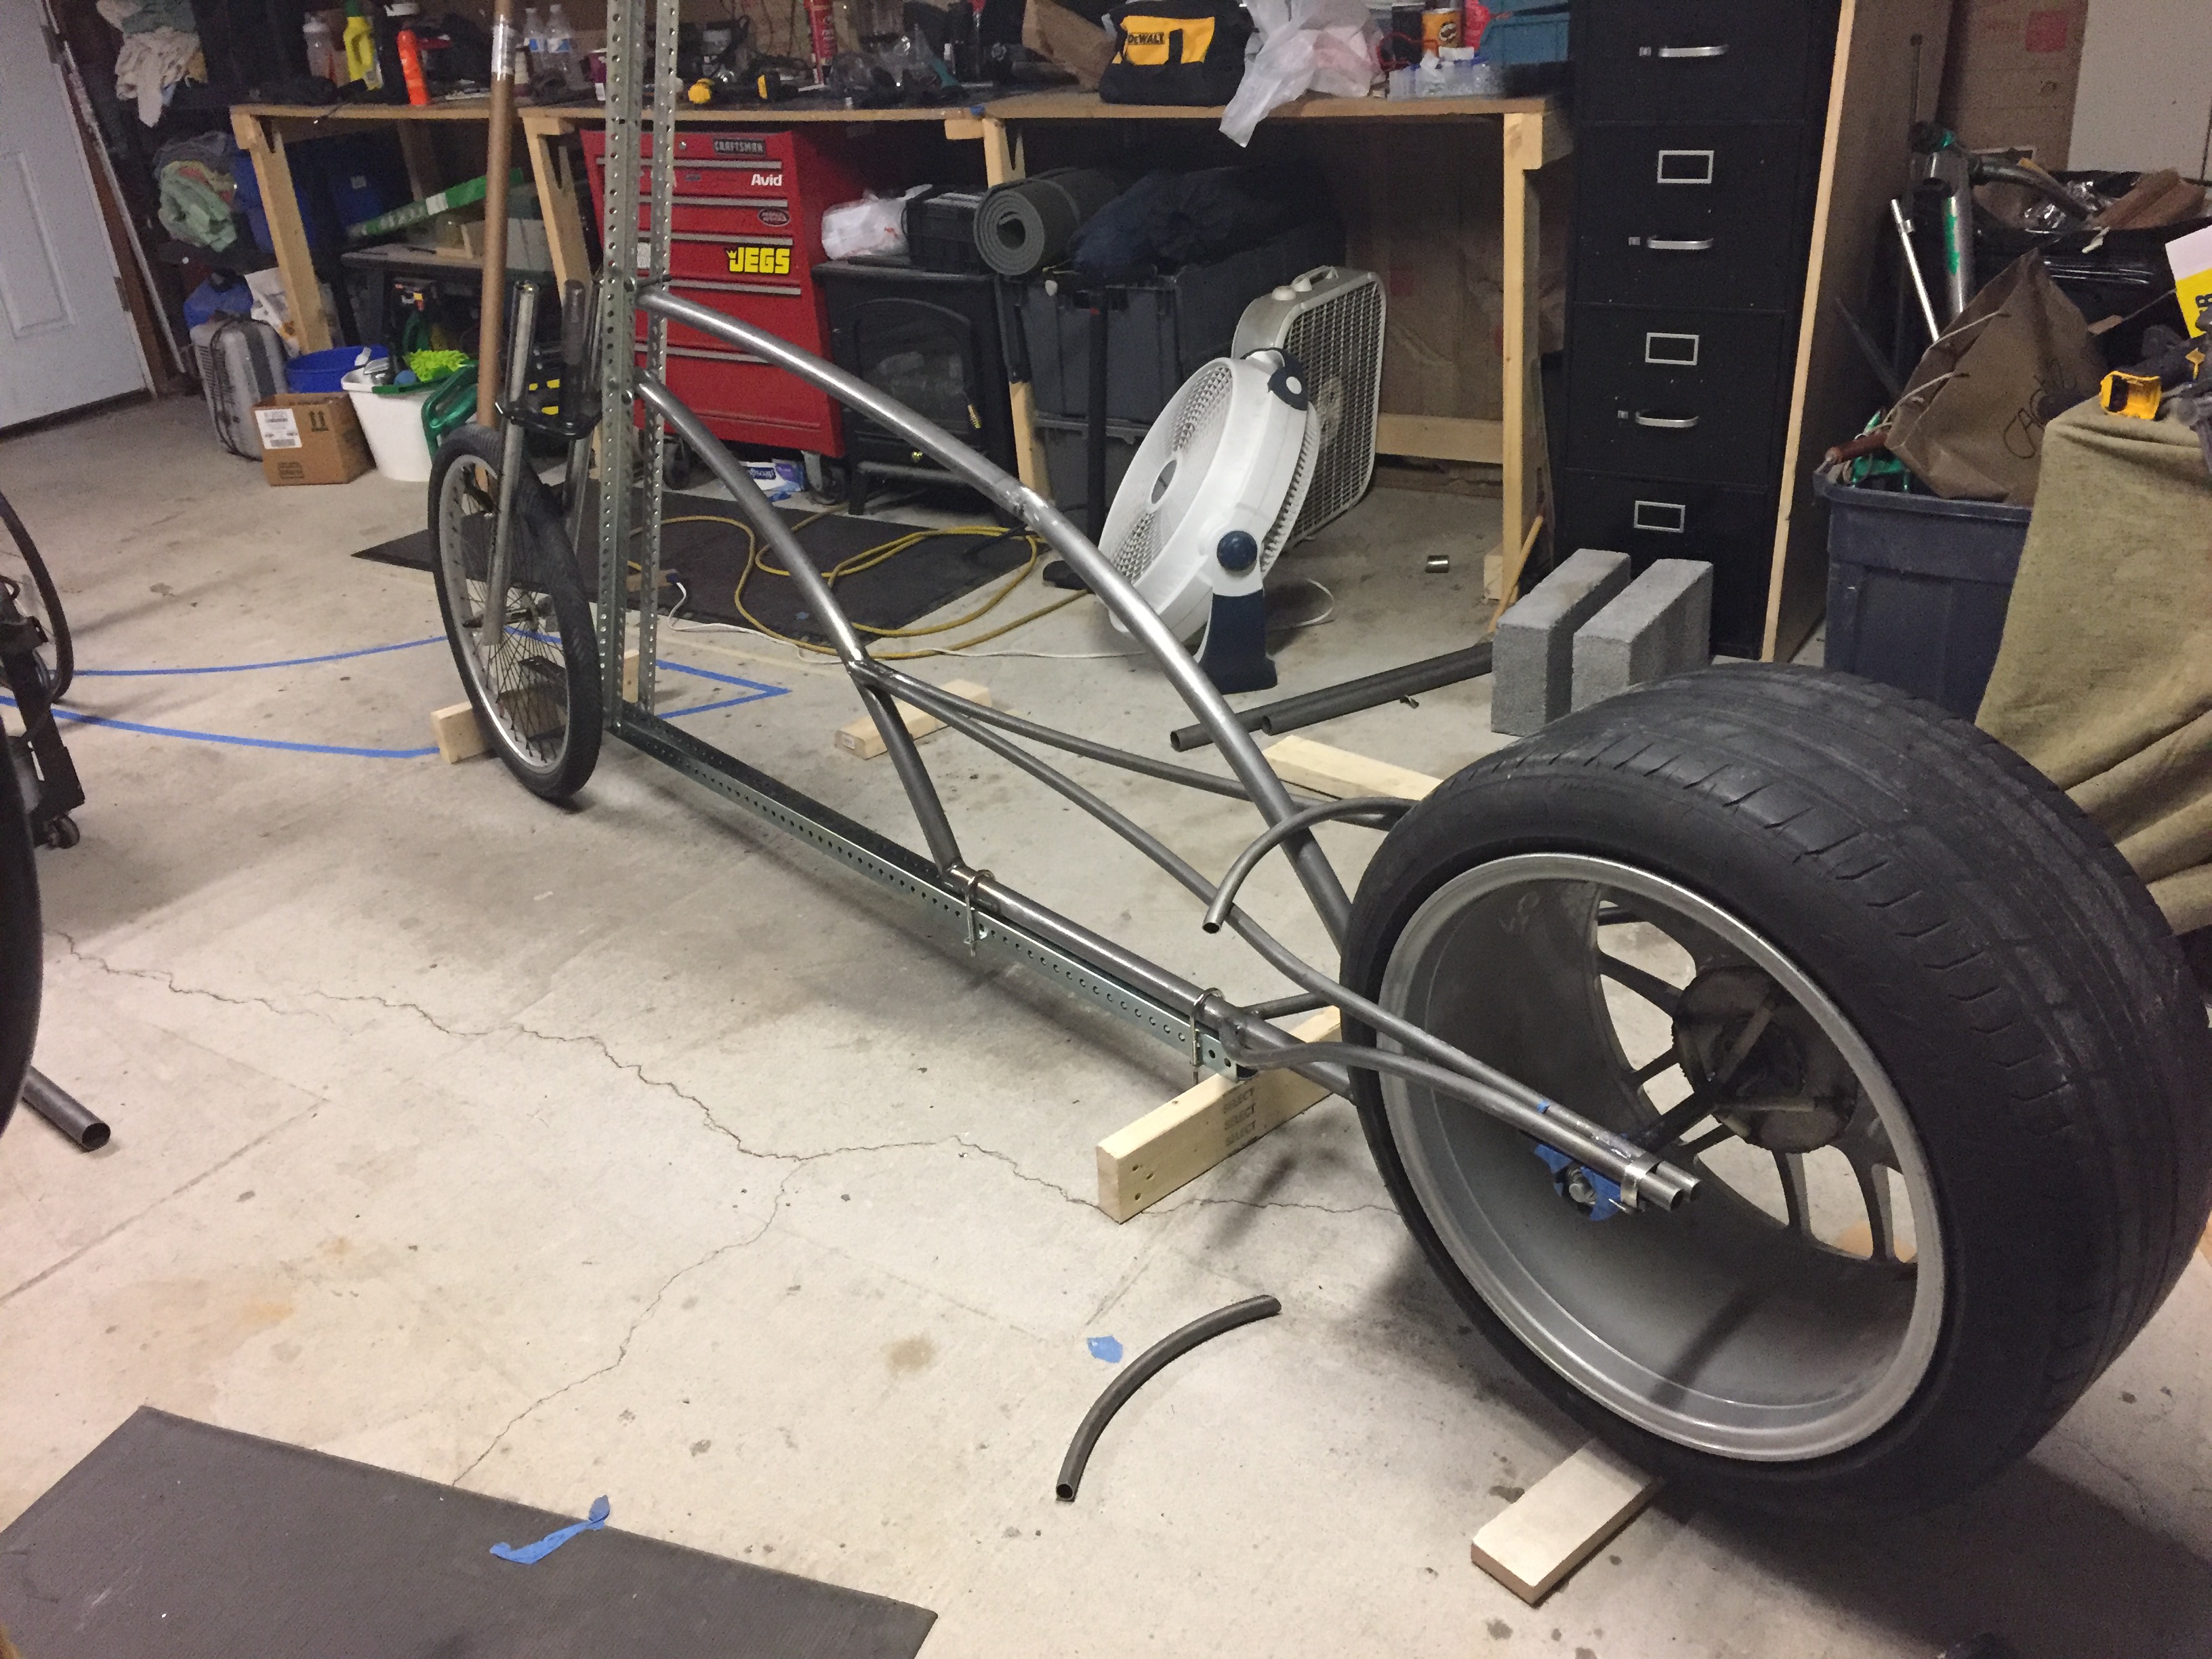
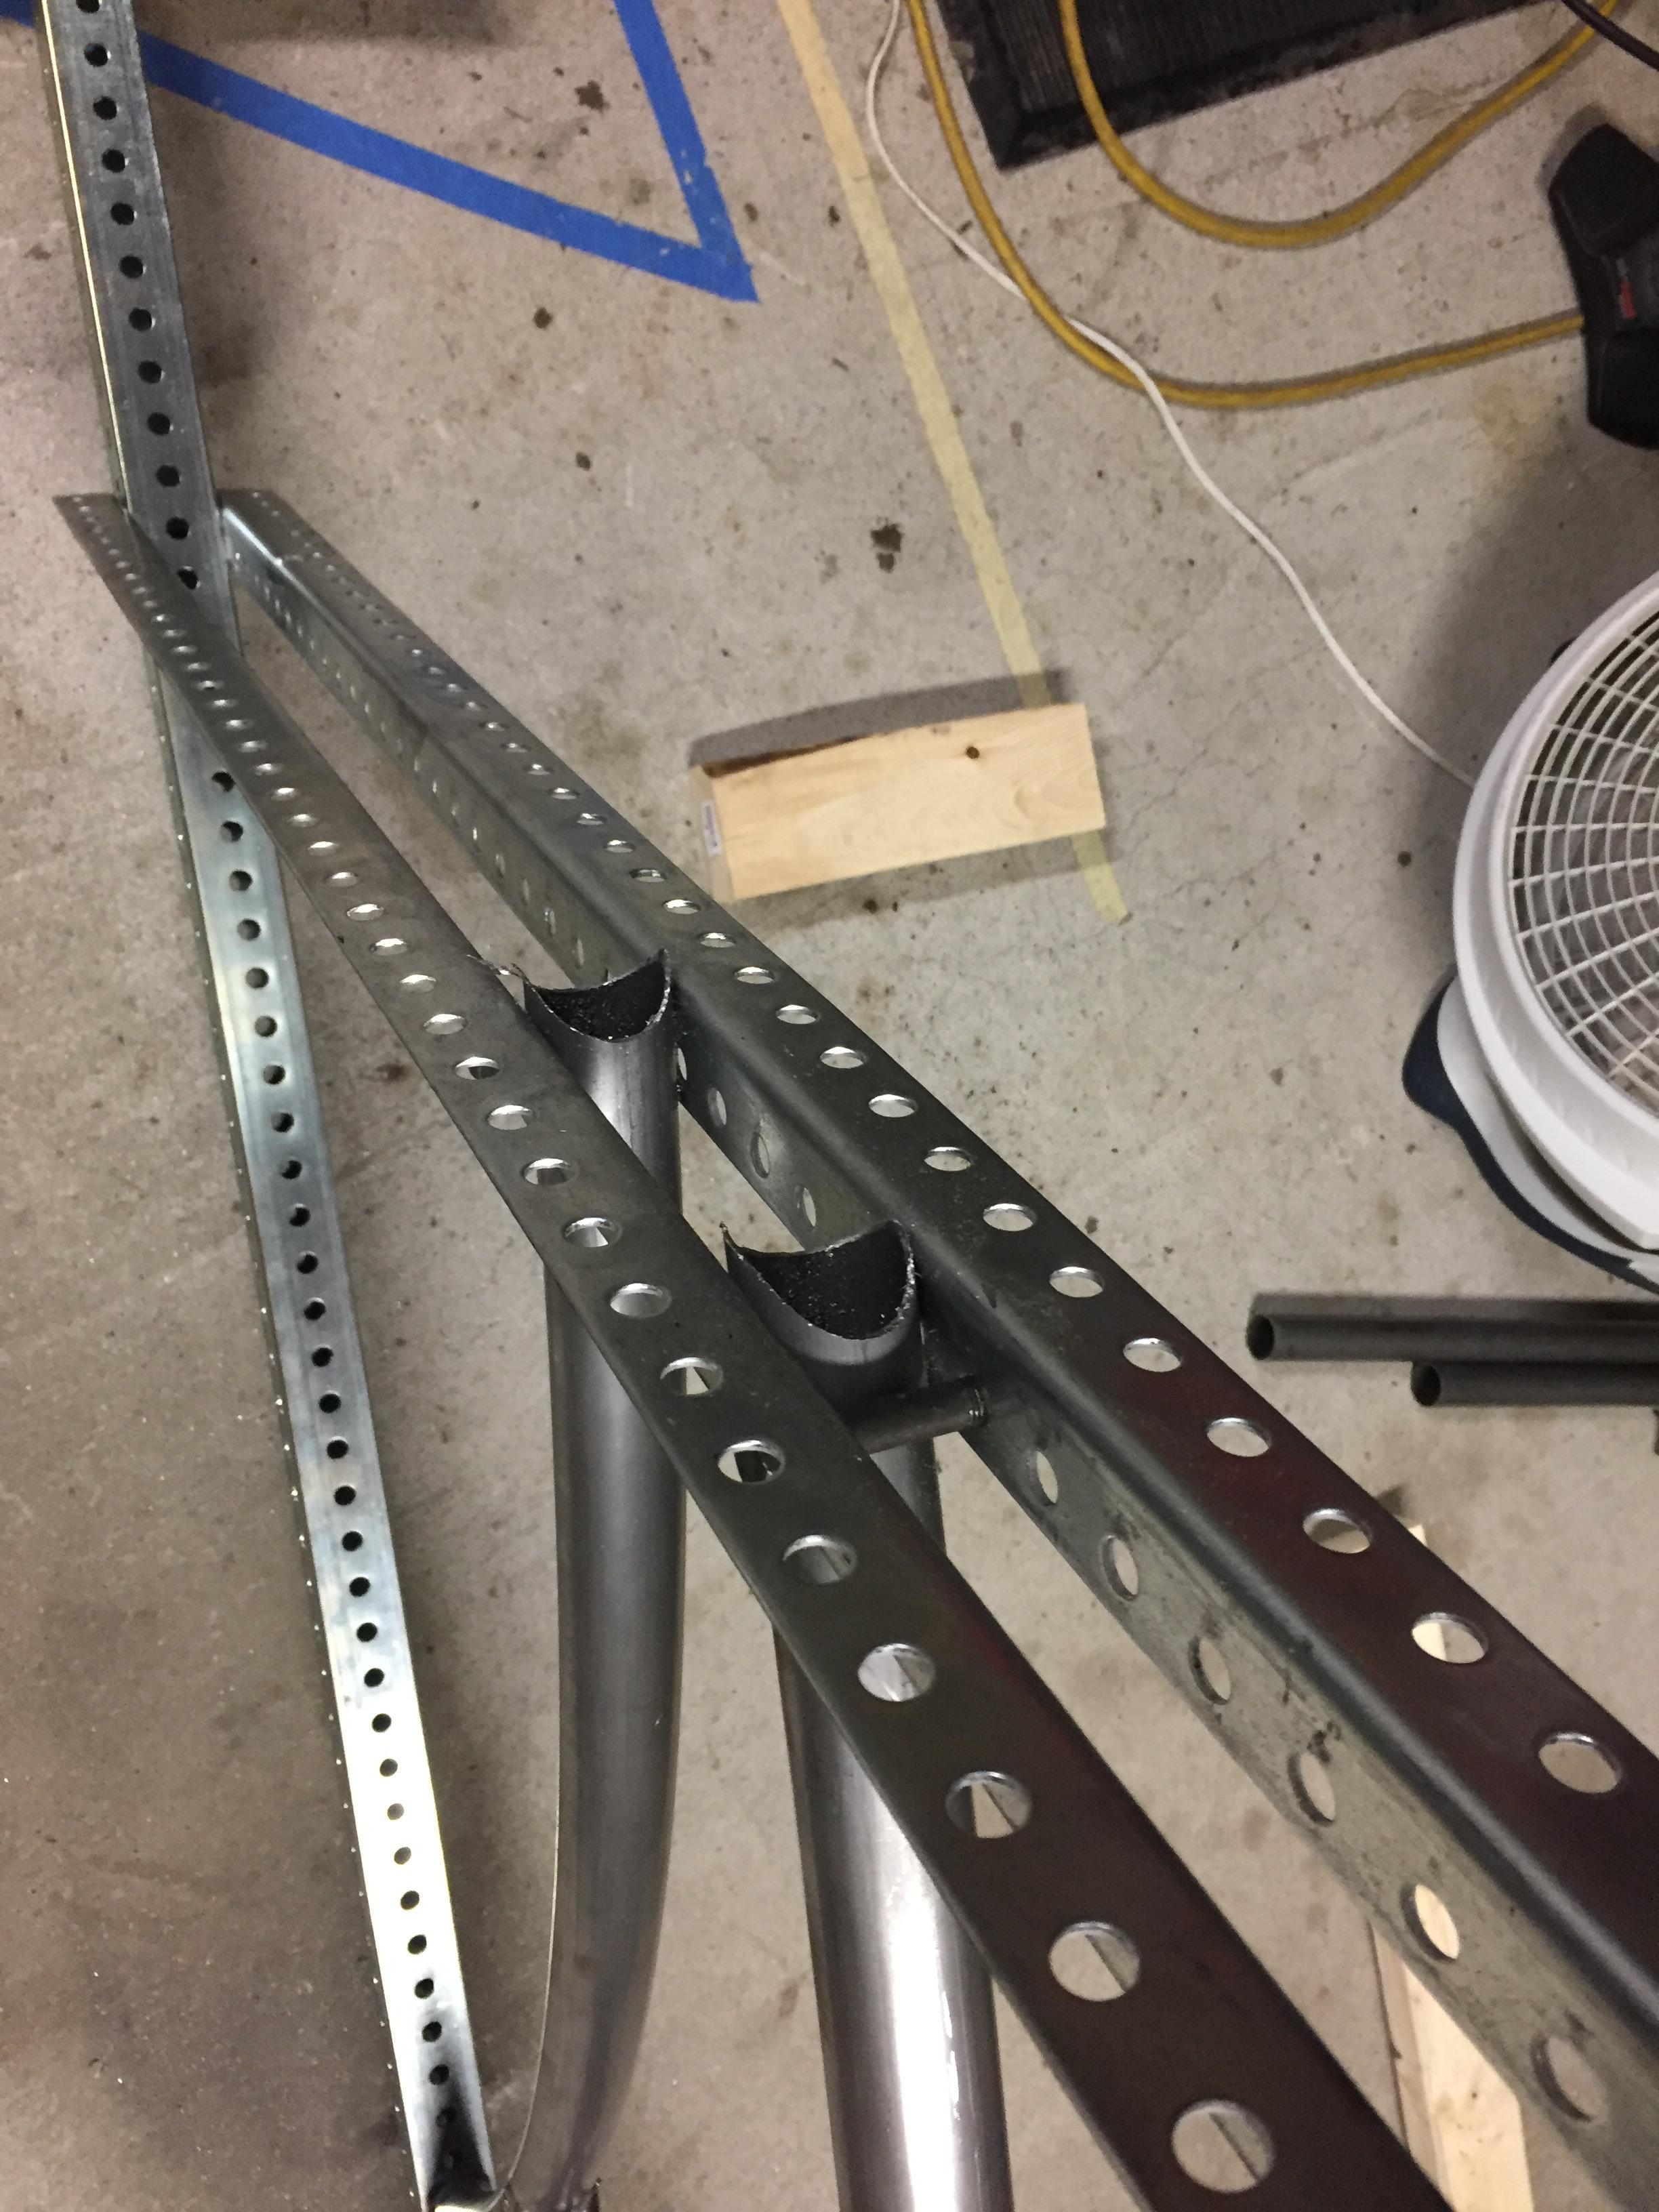
For the front end of the bike, I built a simple jig to make sure everything stays aligned to the rest of the frame. I also helped a lot when mocking up tubes during the mitering process, I wish I would have built it sooner. I placed the front fork on the jig to get an idea of the wheelbase. It confirmed what I suspected, It is looonnnggg.
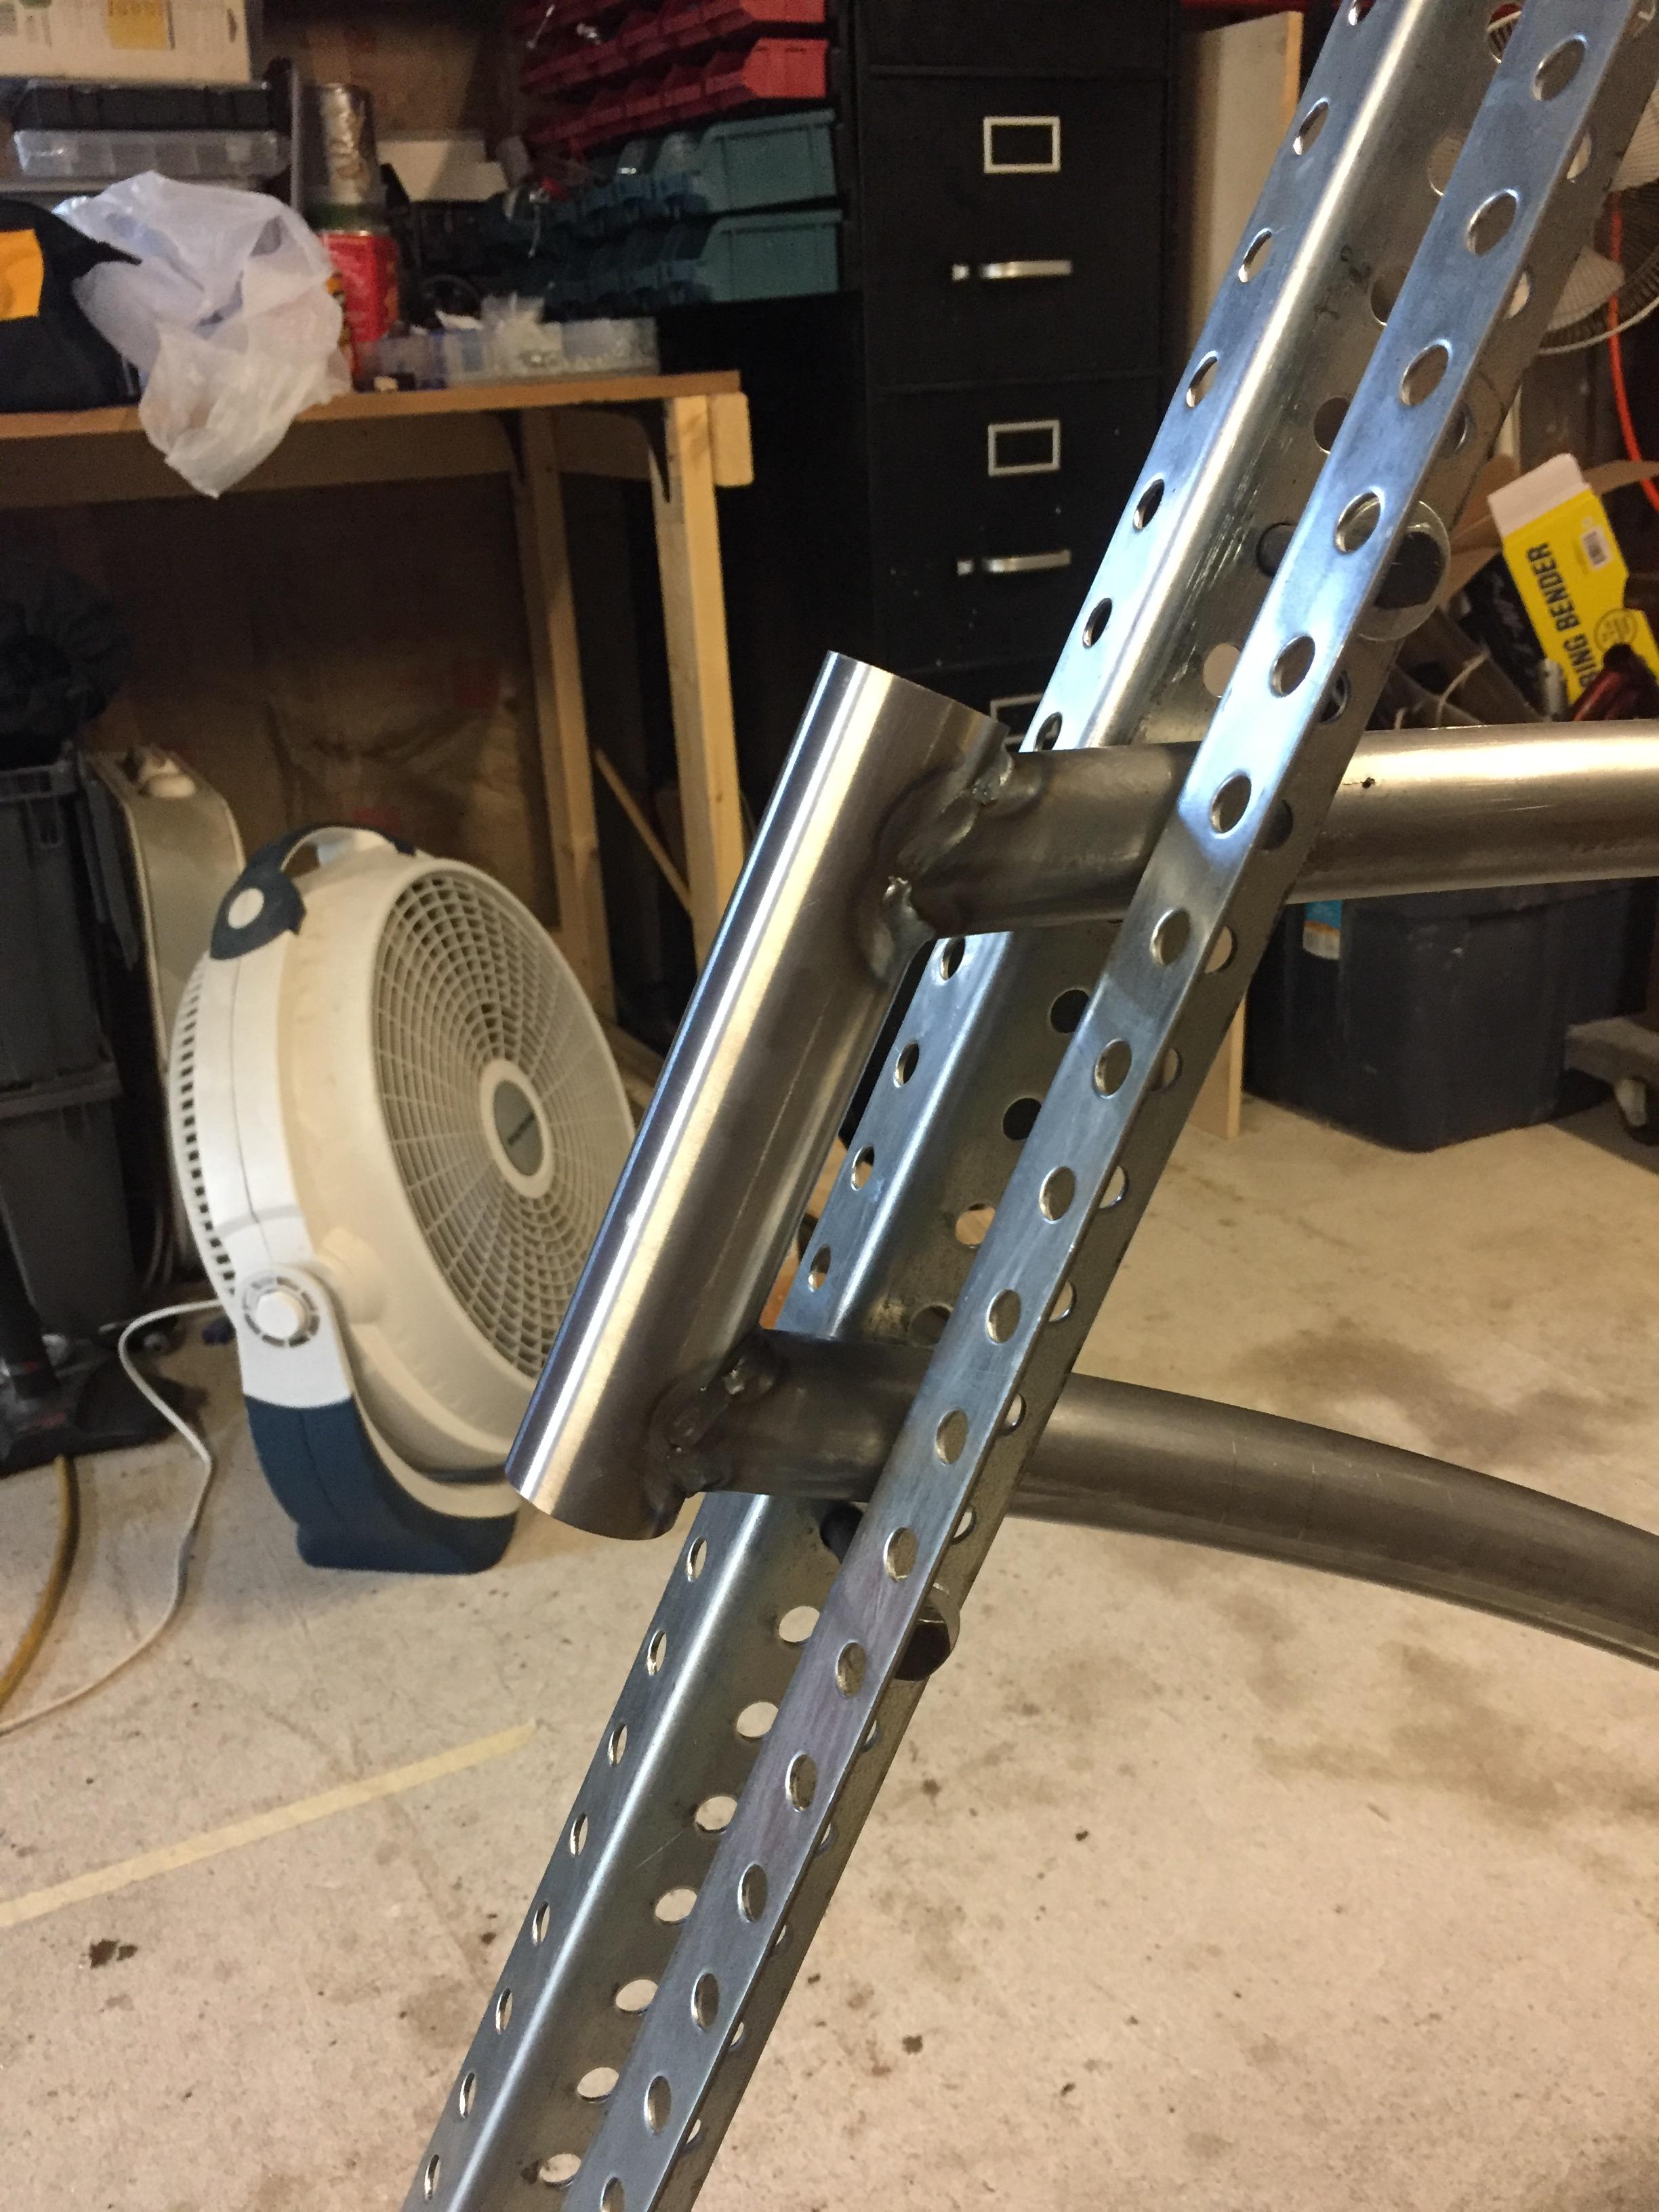
The jig also helped with mitering the head tube. A hole saw placed on the jig and I was able to drill straight down through both tubes, a little filing and we are good to go.
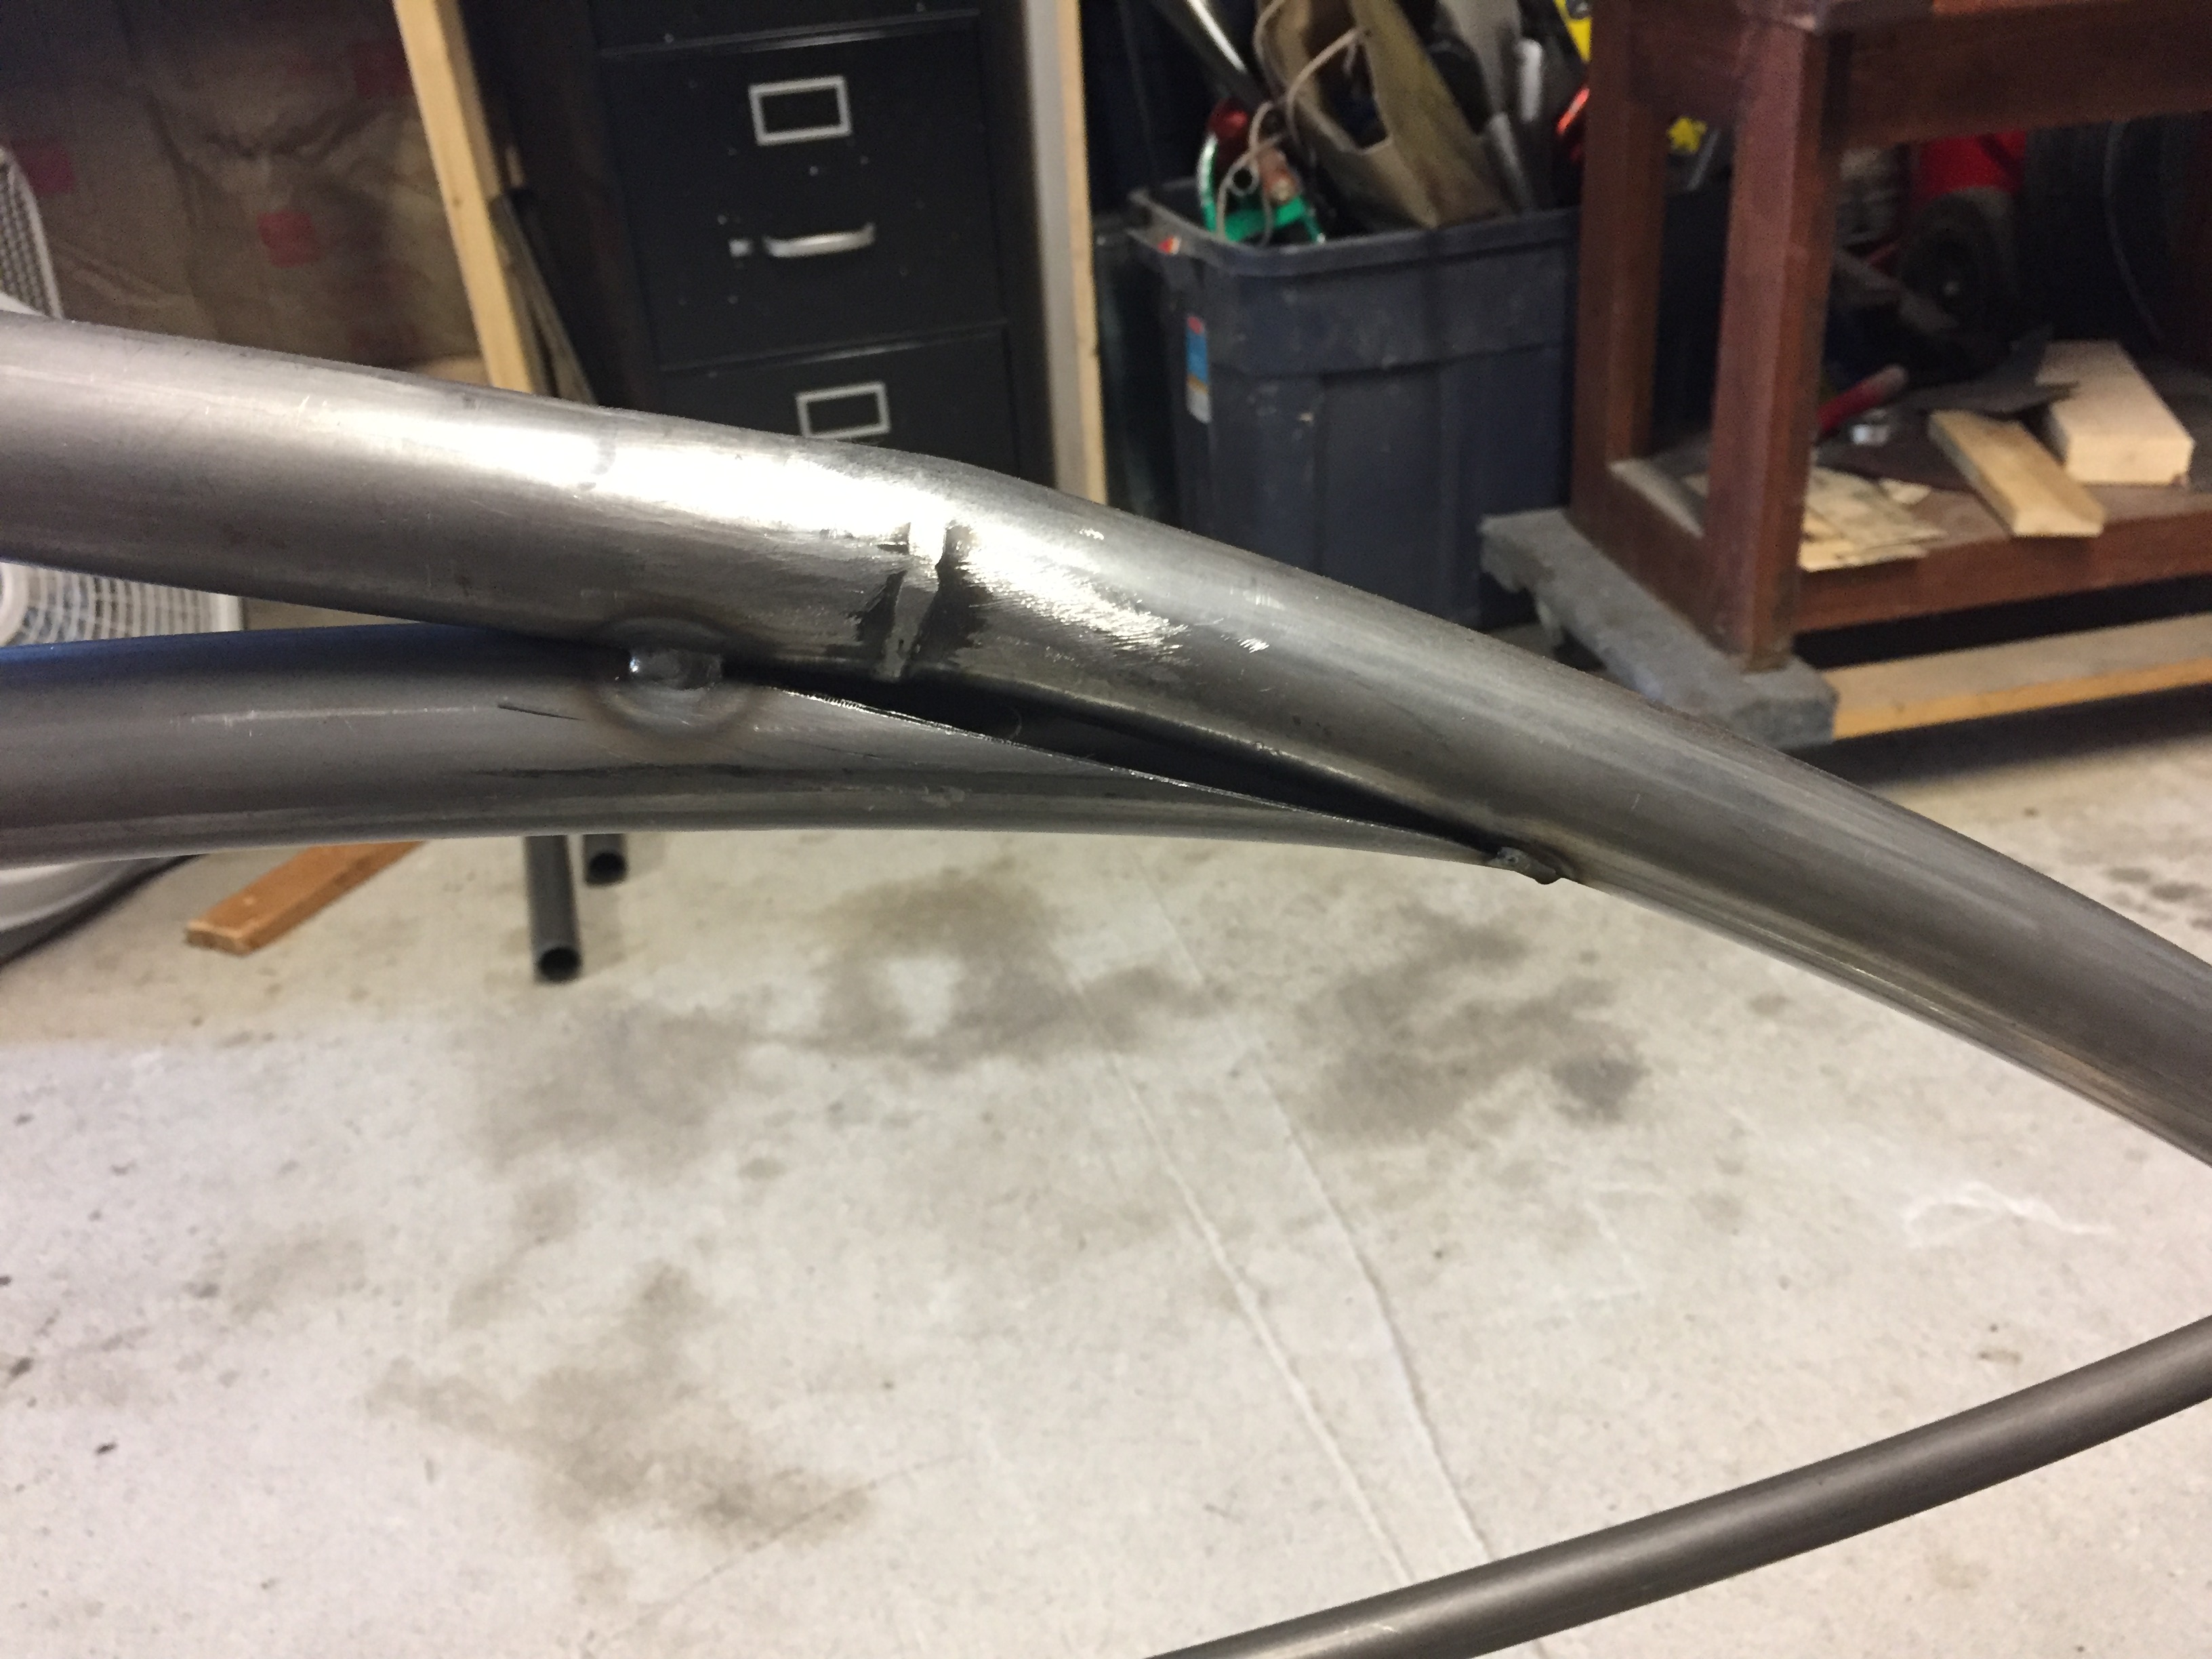
Here is a picture of the head tube tacked in place.
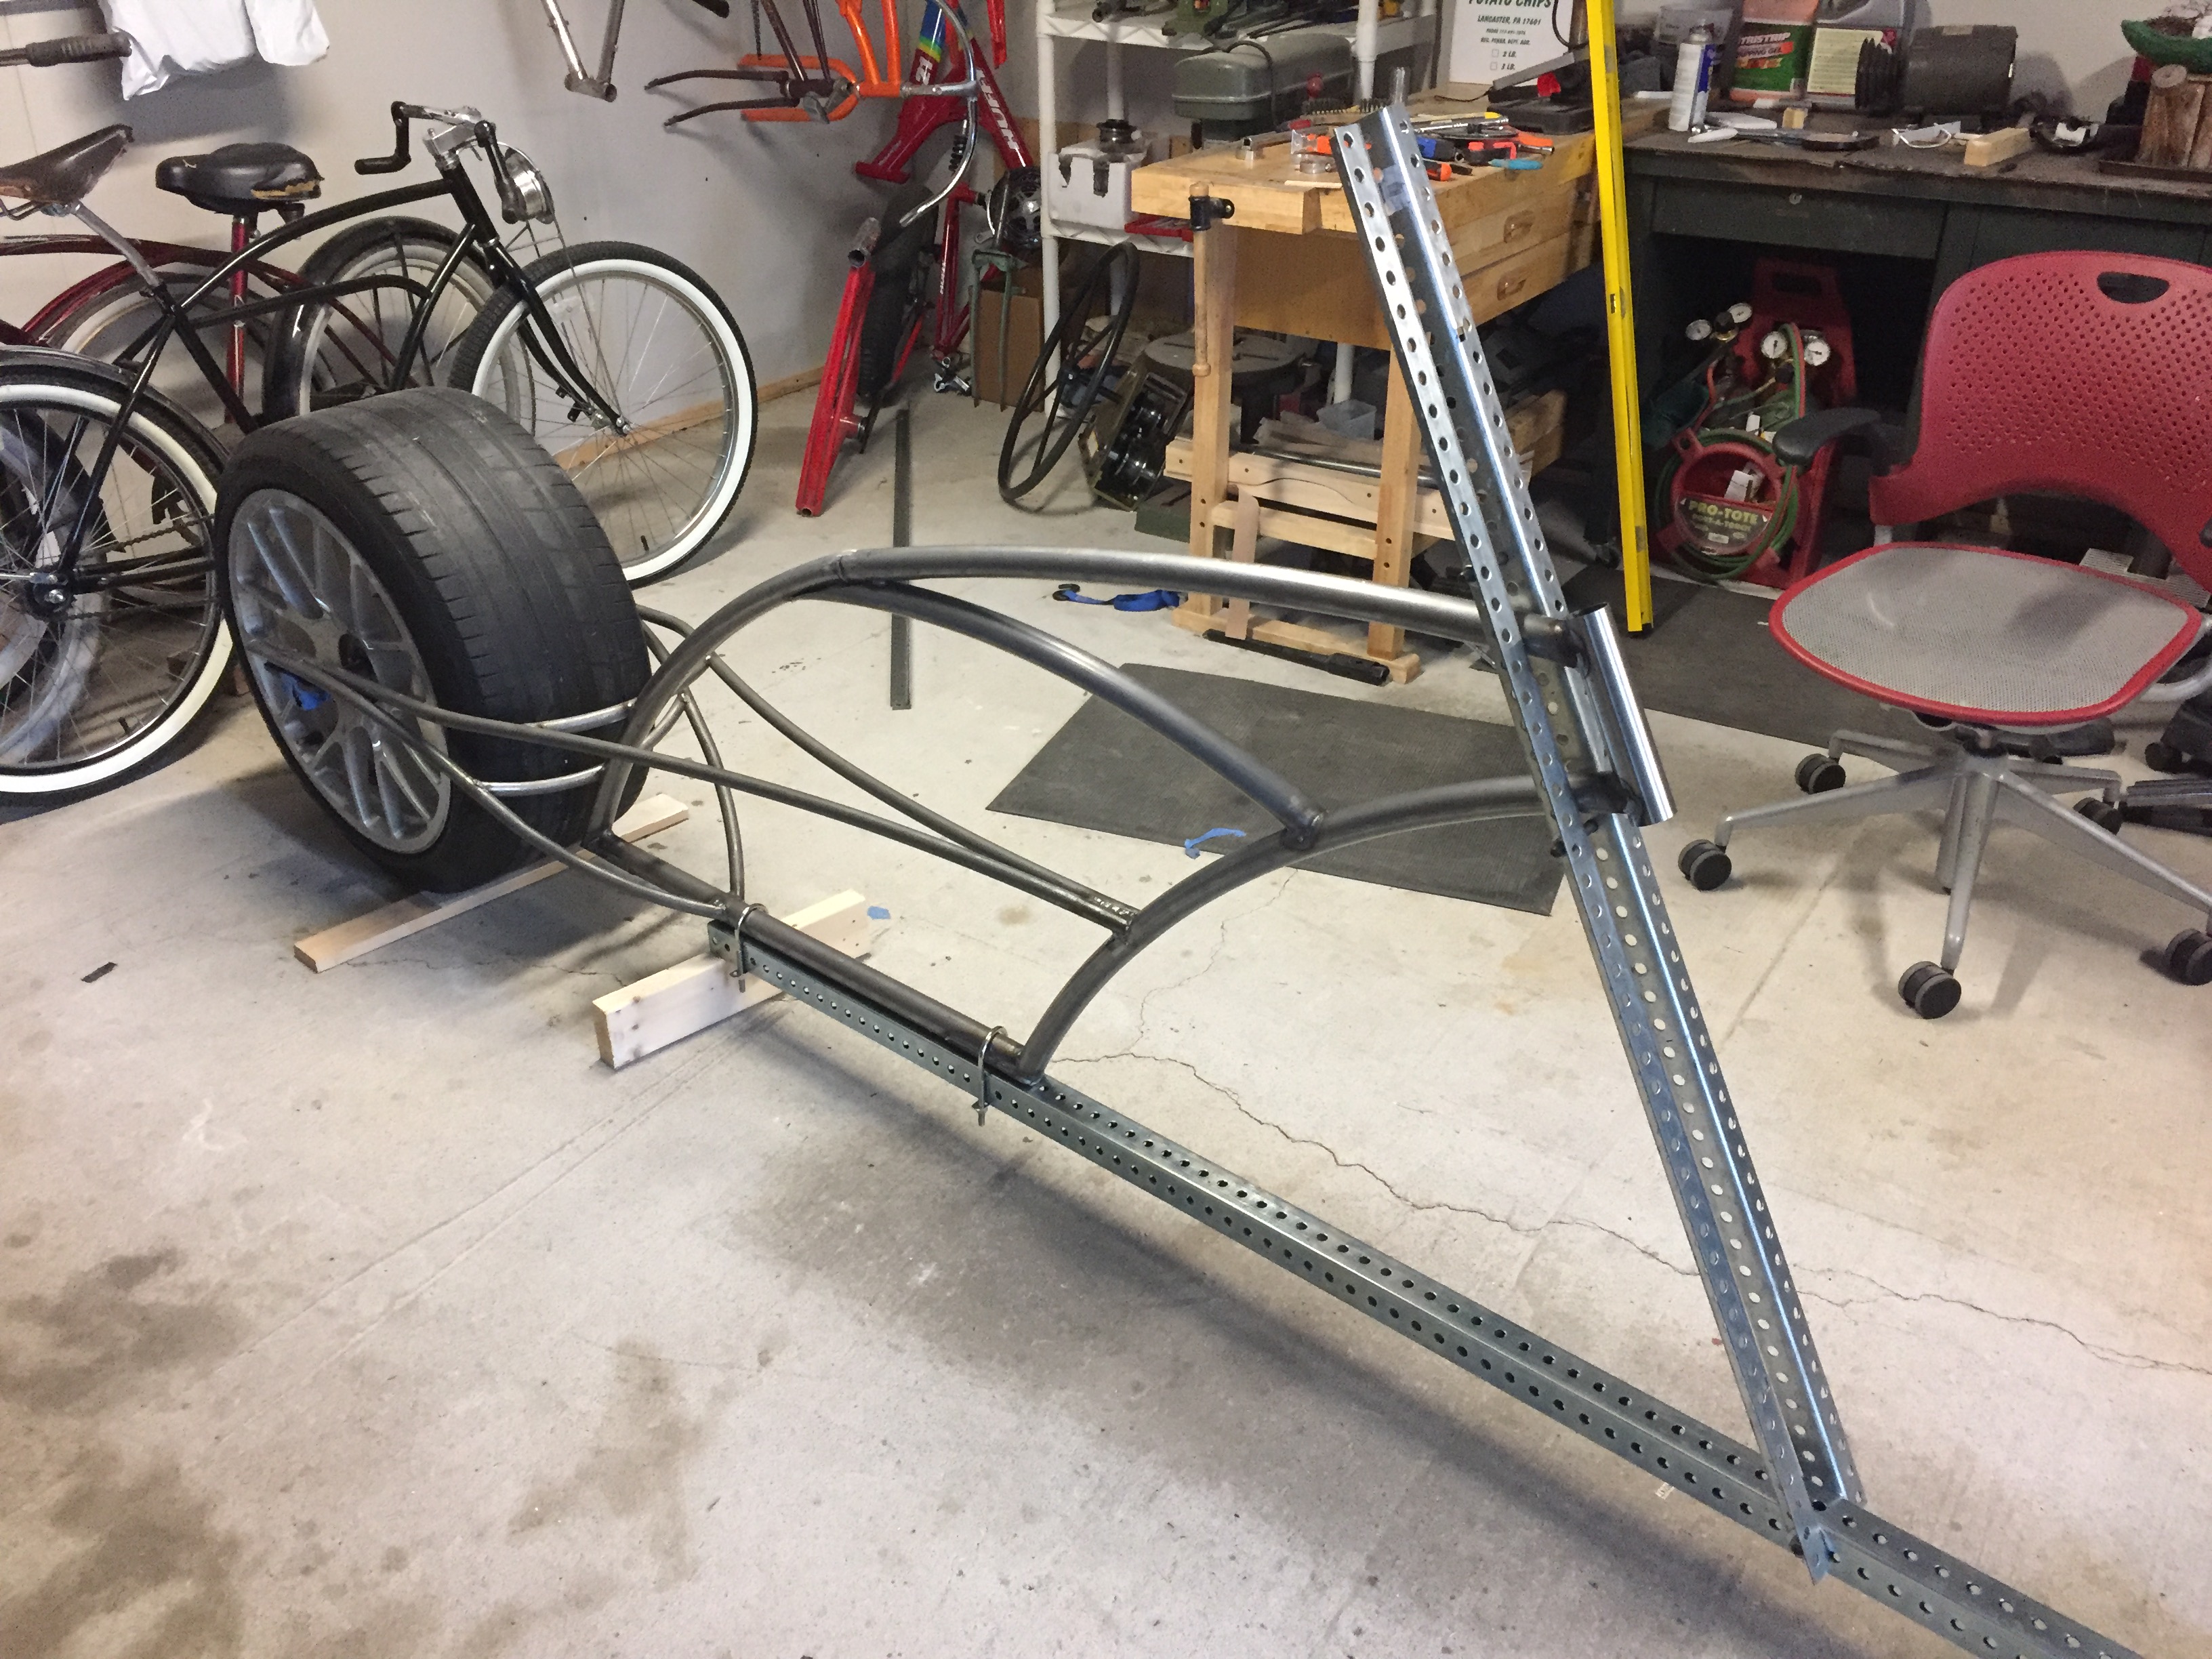
I decided to put a tube between the top and down tube to further brace the frame. The rear of the tube will meet at the junction of the two top tubes to act as a support. The seat bracket will also be placed at that junction.
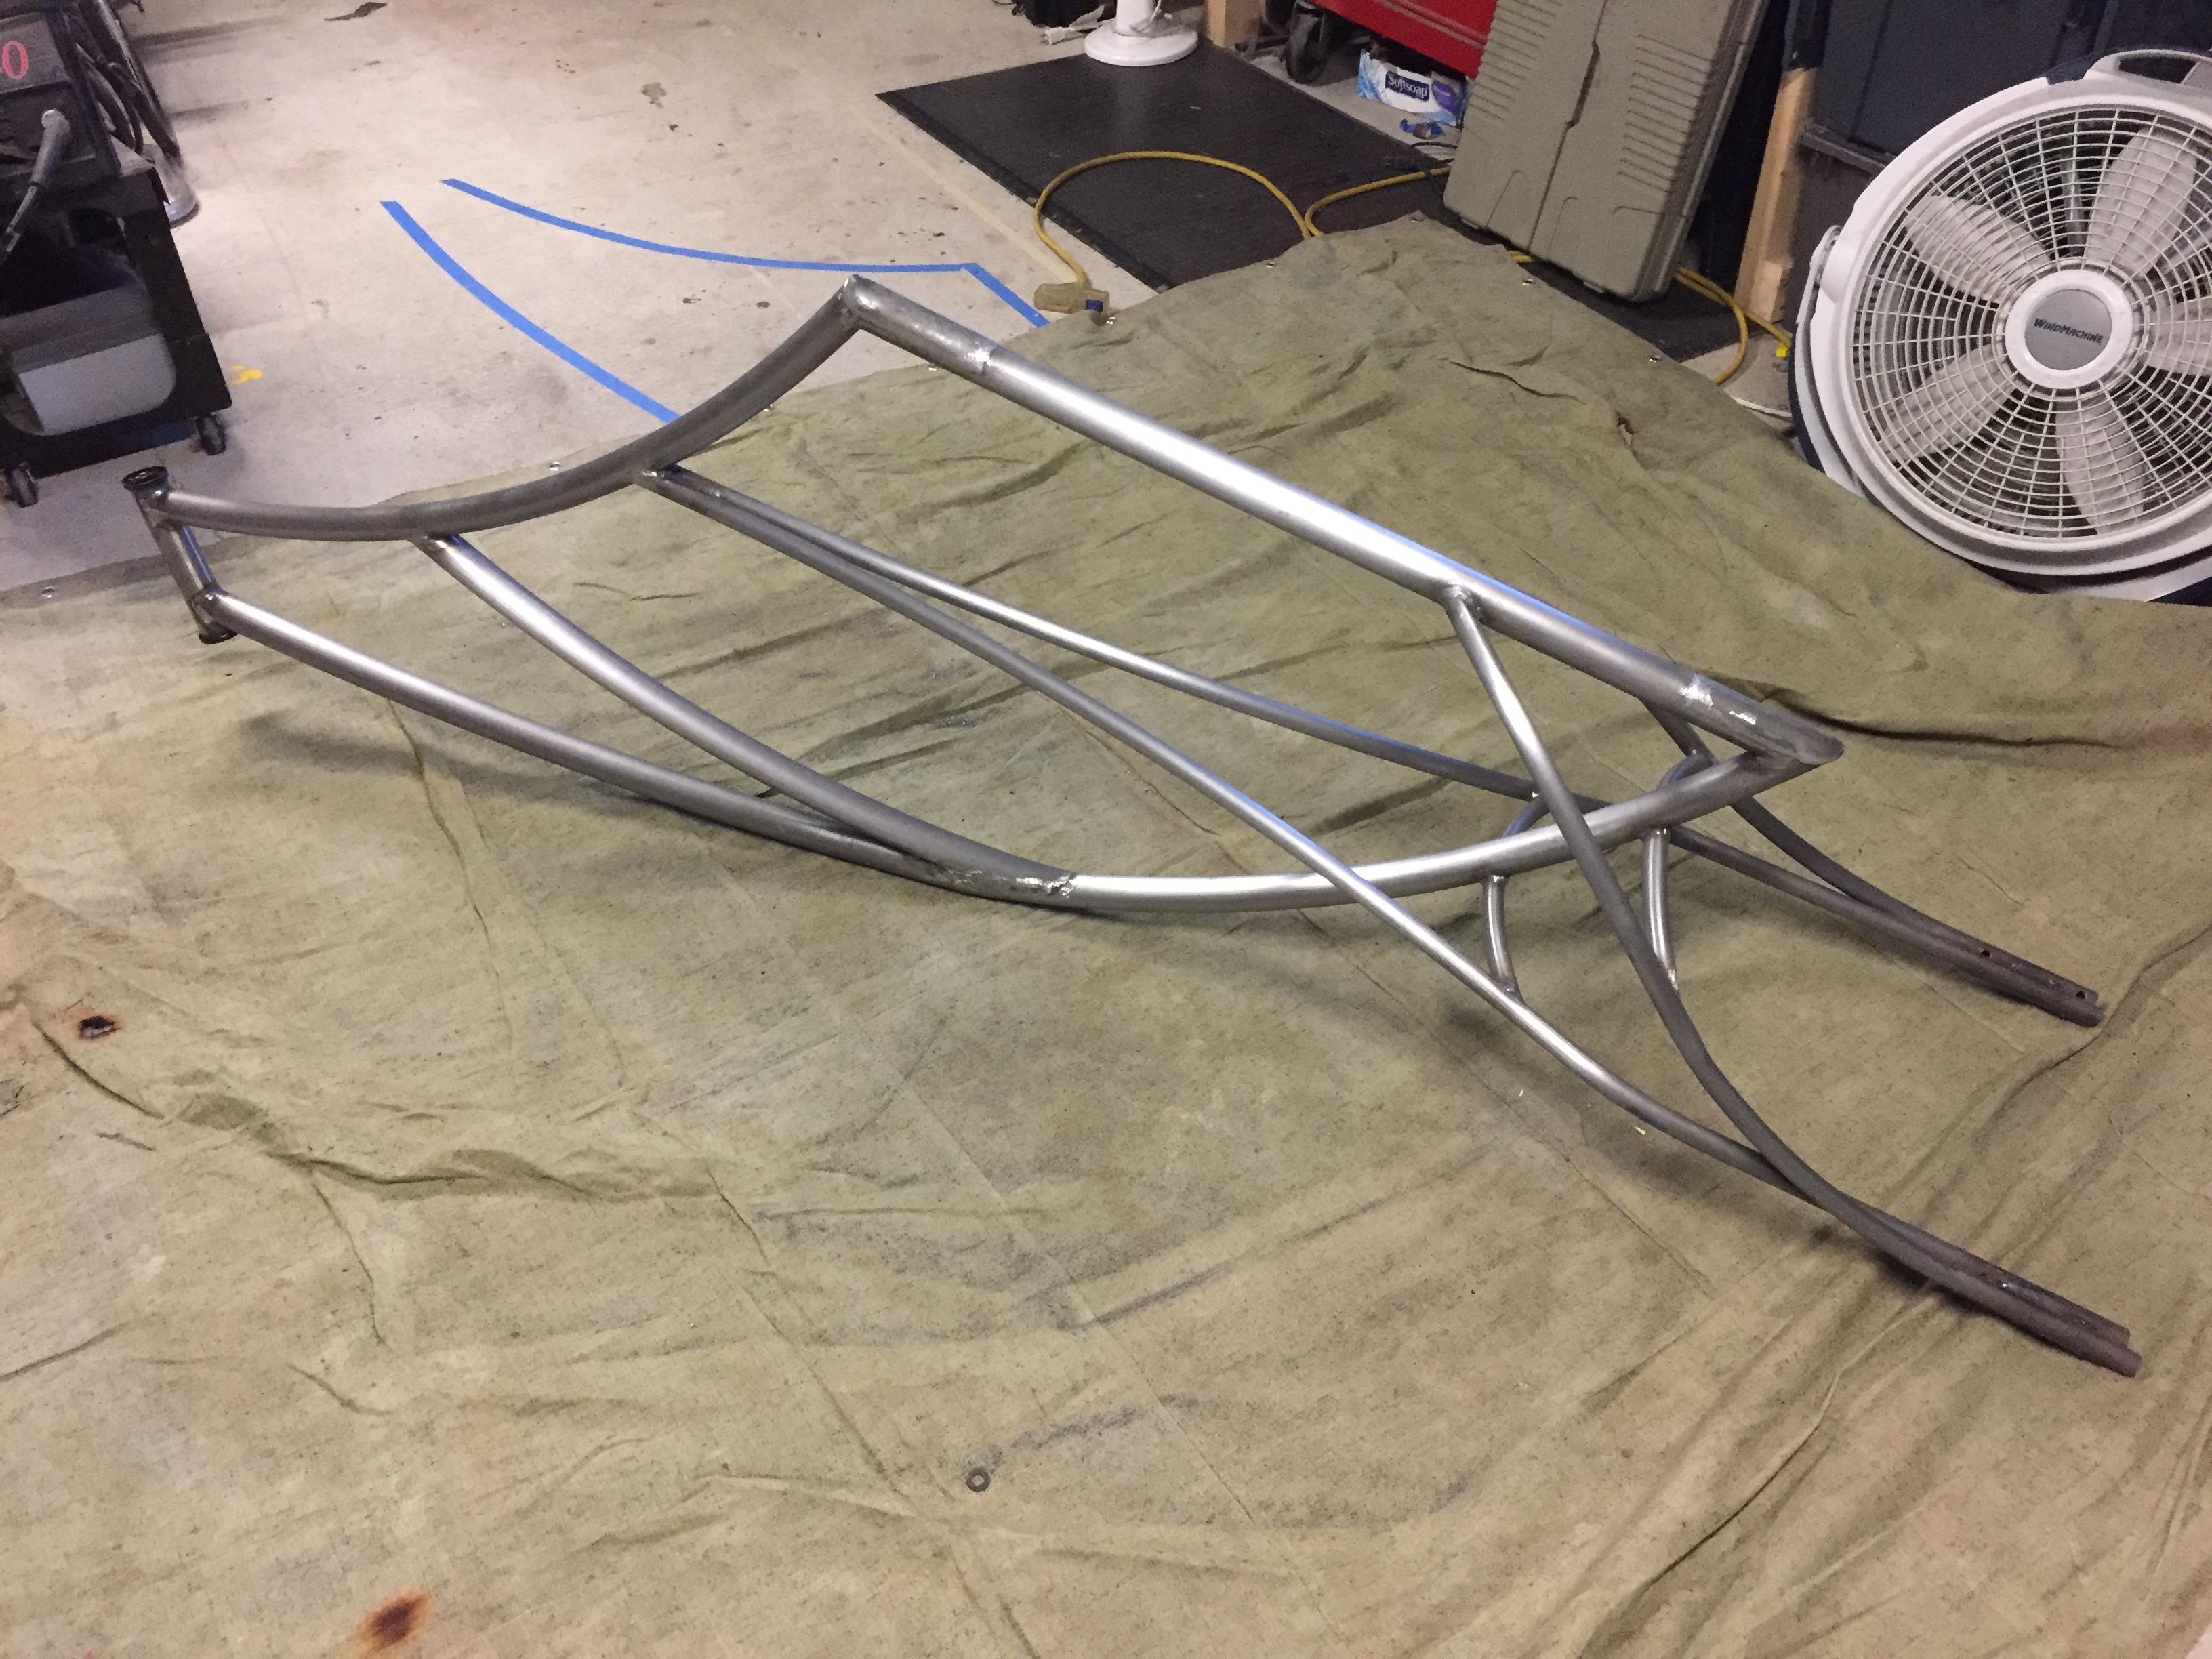
And here is a final picture of the frame. All final welding, and brackets for the seat, hub, and crack are yet to come. I am very happy with how it turned out. I told myself I wasn't going to hold back, and I feel I did all I could do with my current set of skills.
For the front end of the bike, I built a simple jig to make sure everything stays aligned to the rest of the frame. I also helped a lot when mocking up tubes during the mitering process, I wish I would have built it sooner. I placed the front fork on the jig to get an idea of the wheelbase. It confirmed what I suspected, It is looonnnggg.
The jig also helped with mitering the head tube. A hole saw placed on the jig and I was able to drill straight down through both tubes, a little filing and we are good to go.
Here is a picture of the head tube tacked in place.
I decided to put a tube between the top and down tube to further brace the frame. The rear of the tube will meet at the junction of the two top tubes to act as a support. The seat bracket will also be placed at that junction.
And here is a final picture of the frame. All final welding, and brackets for the seat, hub, and crack are yet to come. I am very happy with how it turned out. I told myself I wasn't going to hold back, and I feel I did all I could do with my current set of skills.
Last edited:
Looks like you have already surpassed your 'current set of skills' ...! Wow! That's one sweet looking frame. Nice work with the jig rigging. That angle iron with the holes makes it so adjustable and multi-purpose.
I think someone mentioned this before, but that rear wheel / tire looks like it came off a giant Hot Wheels car!
Looking forward to your next steps....RaT oN!
I think someone mentioned this before, but that rear wheel / tire looks like it came off a giant Hot Wheels car!
Looking forward to your next steps....RaT oN!
@LukeTheJoker would be proud.

WOW! That is a pretty huge step in the progress of your build!
This is so sick! Love the scale and flow of your design!
MO FATTA
MO BETTA
This is so sick! Love the scale and flow of your design!
MO FATTA
MO BETTA
You're rocking it dude. The only way to expand your skills is to continue to do things you've never done before. I love it.
Carl.
Carl.
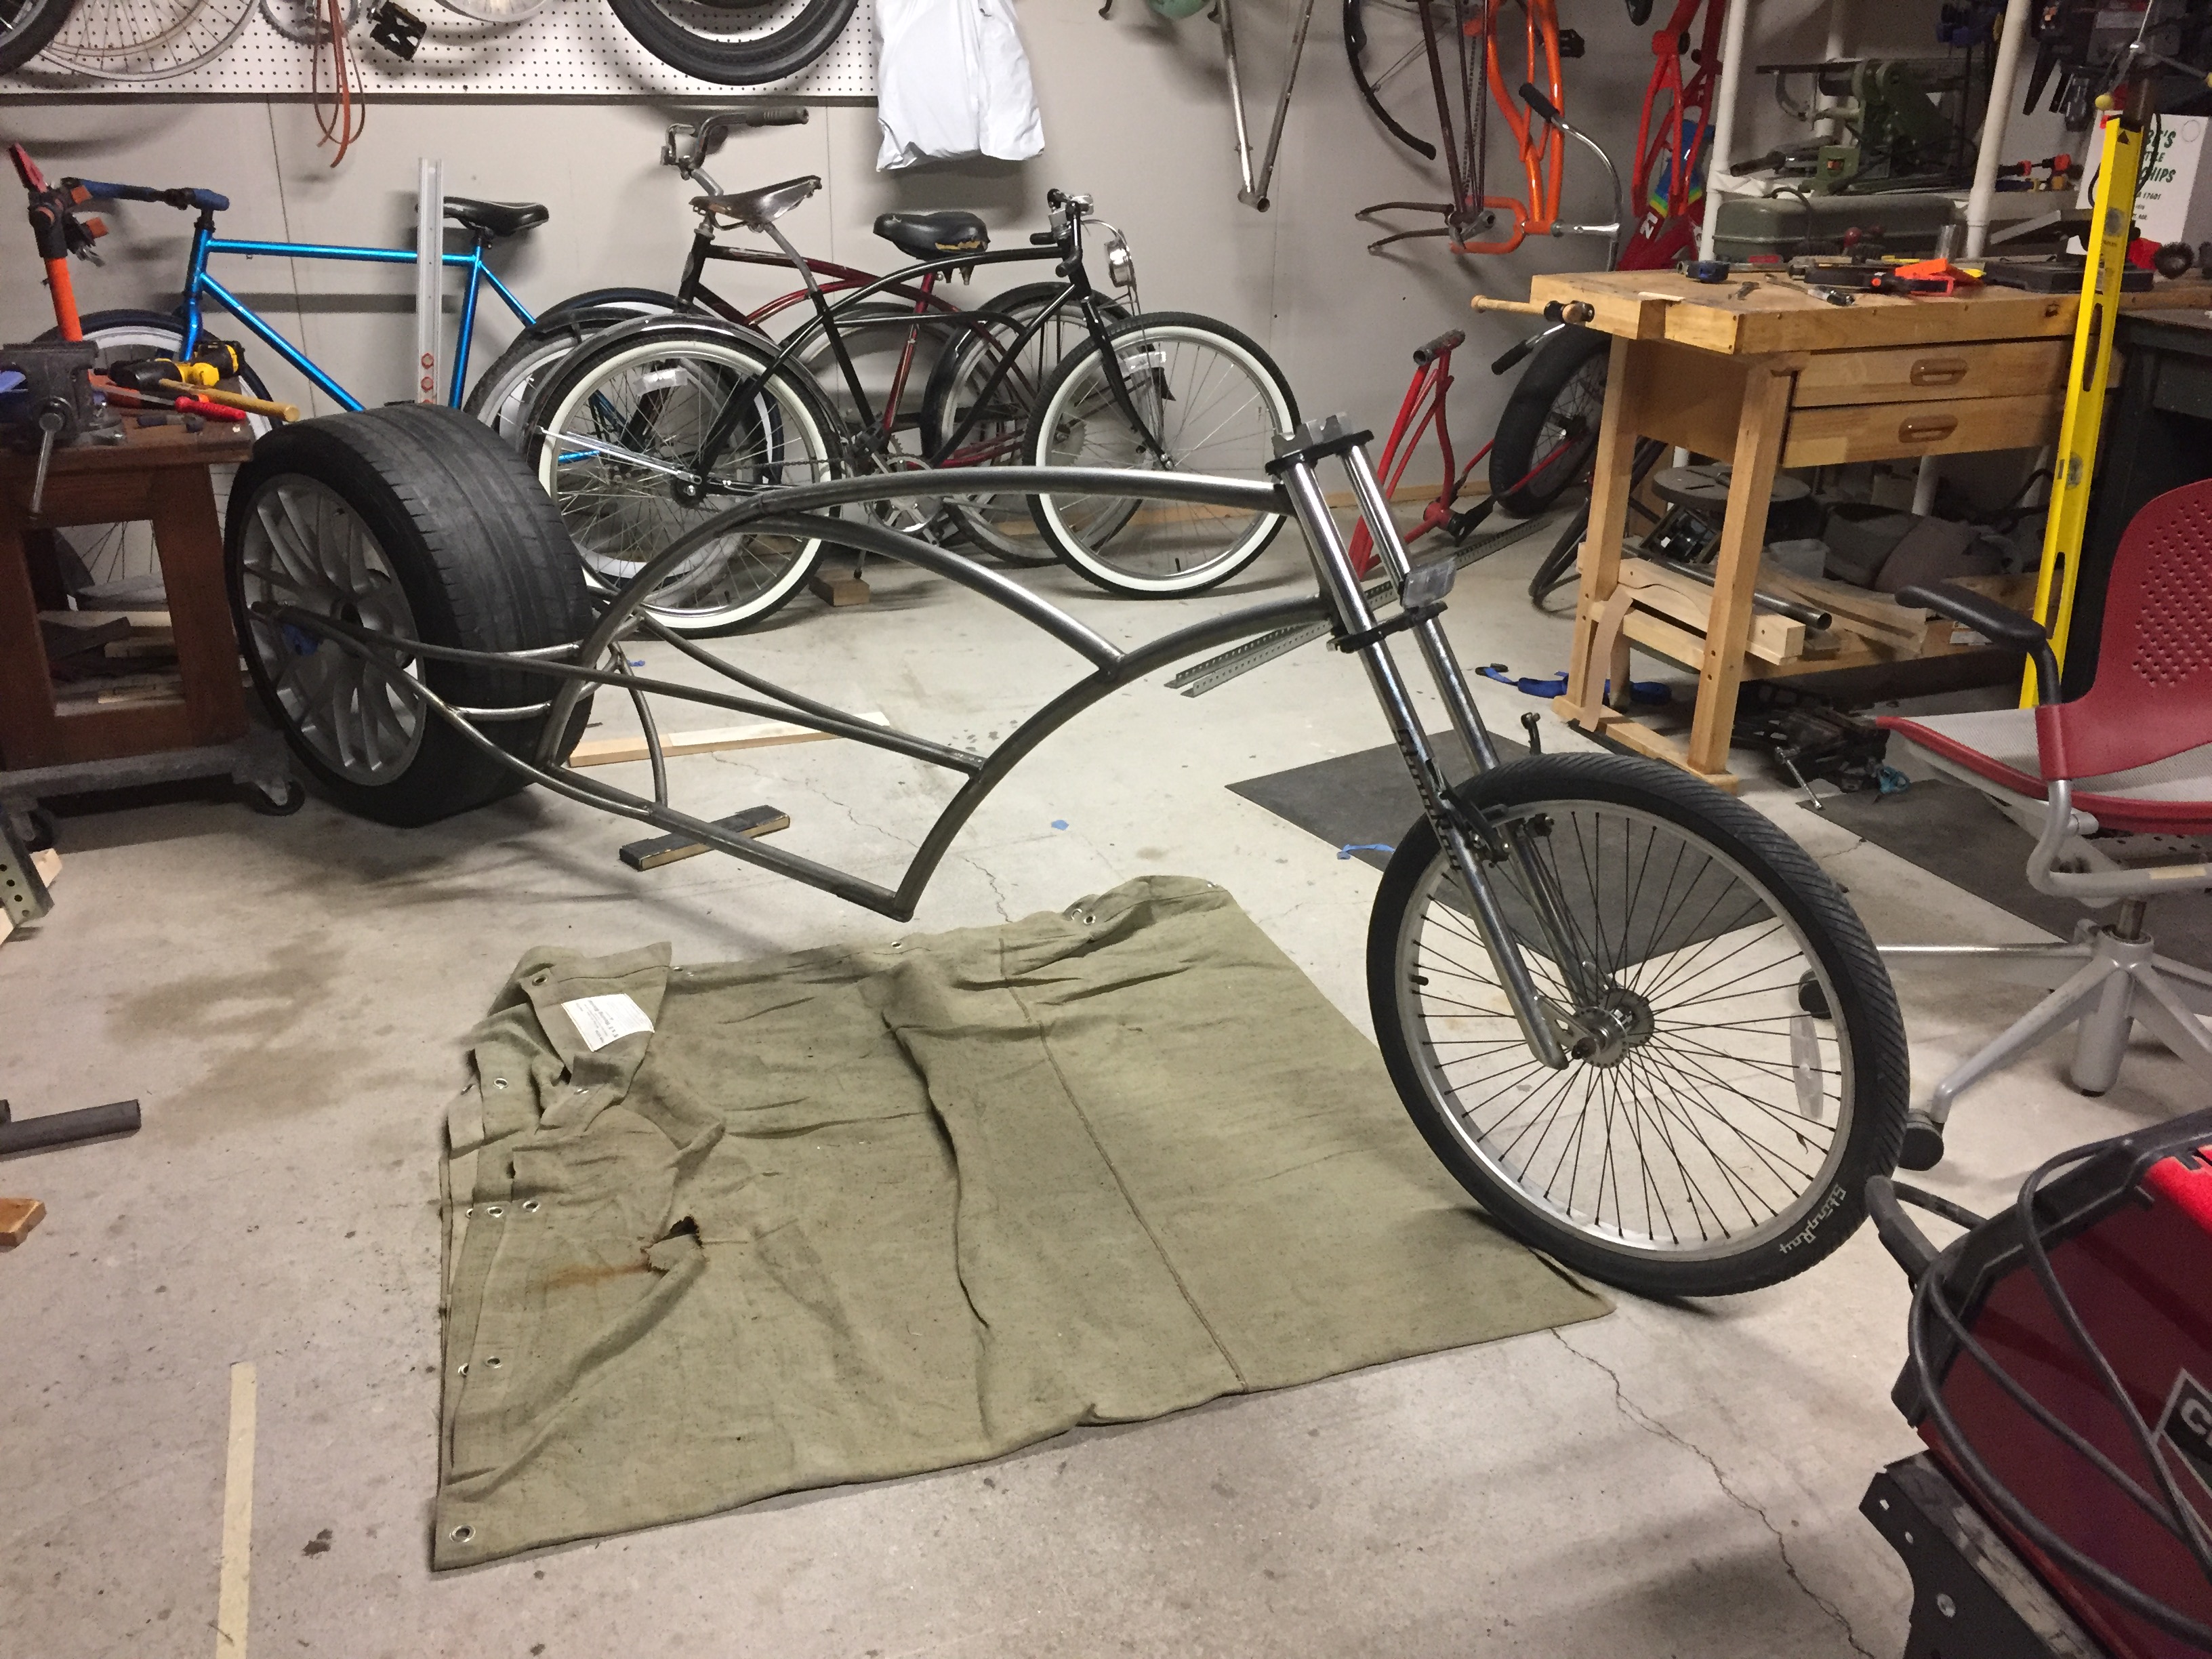
Head tube reamed and cups installed, I had to throw the fork on it! Its officially a roller! No kickstand needed, haha. I stood on the bottom tube and jumped up and down to test its durability, frame flex is a non-issue, such a relief.
I want to take this time to thank everyone thus far for all the kind words and encouragement. This group of guys and girls continue to amaze me with the amount of positive feedback that is thrown out on the regular!
I want to take this time to thank everyone thus far for all the kind words and encouragement. This group of guys and girls continue to amaze me with the amount of positive feedback that is thrown out on the regular!
Last edited:
Beautiful, sweeping lines!
Seat placement was something that has been worrying me. I wanted something with some adjustment, but I knew it was going to be hard on a bike like this. Here's what I came up with.
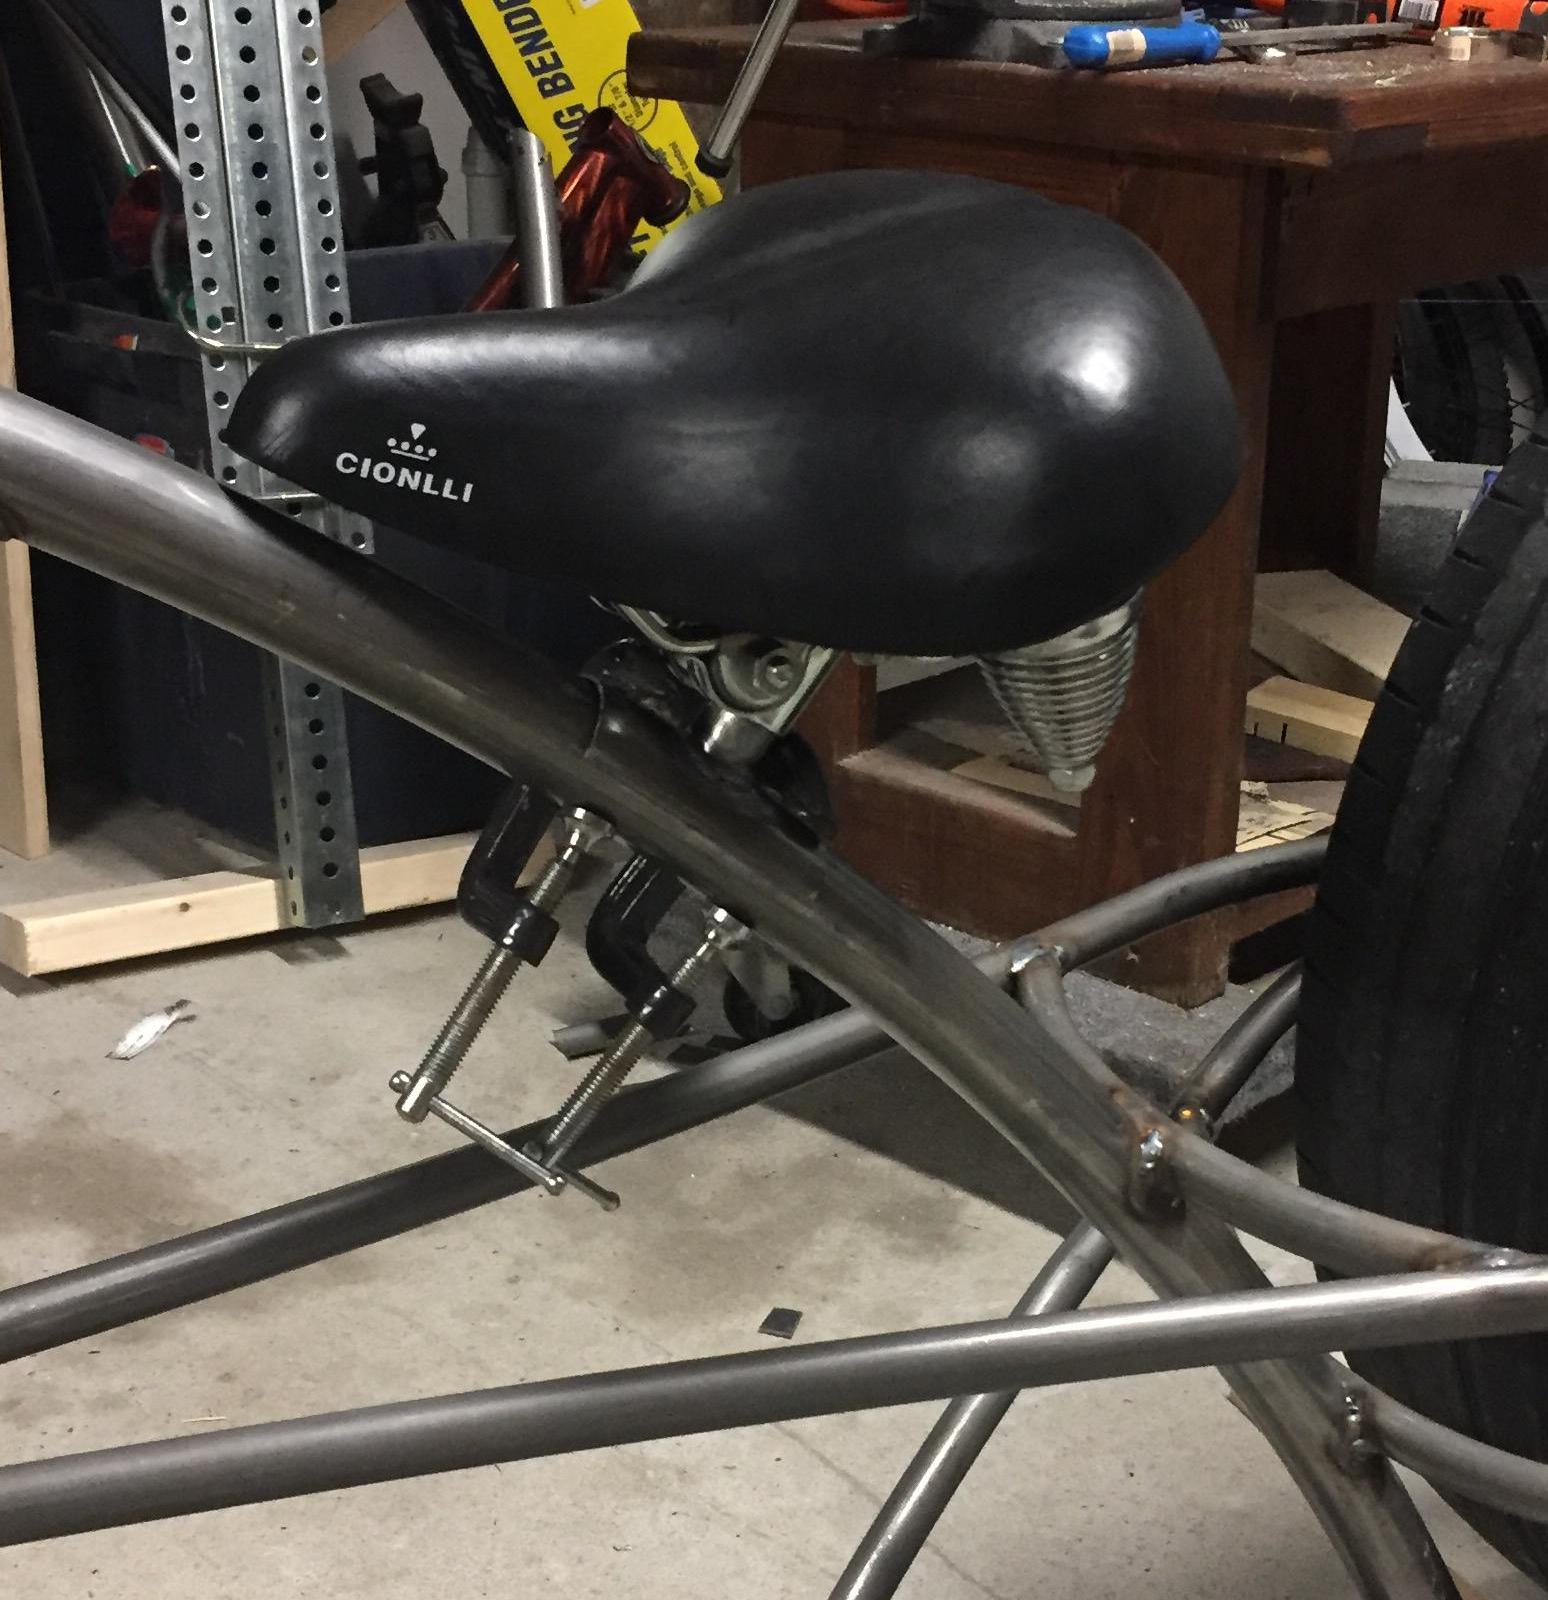
I took a seat post, cut it down, and welded it to a scrap tube cut in half. I am going to add clamps to the half pipe, so it can be moved on the frame. There is about 3 inches of adjustment up and down on the seat post, and the clamp can be flipped on the seat rails.
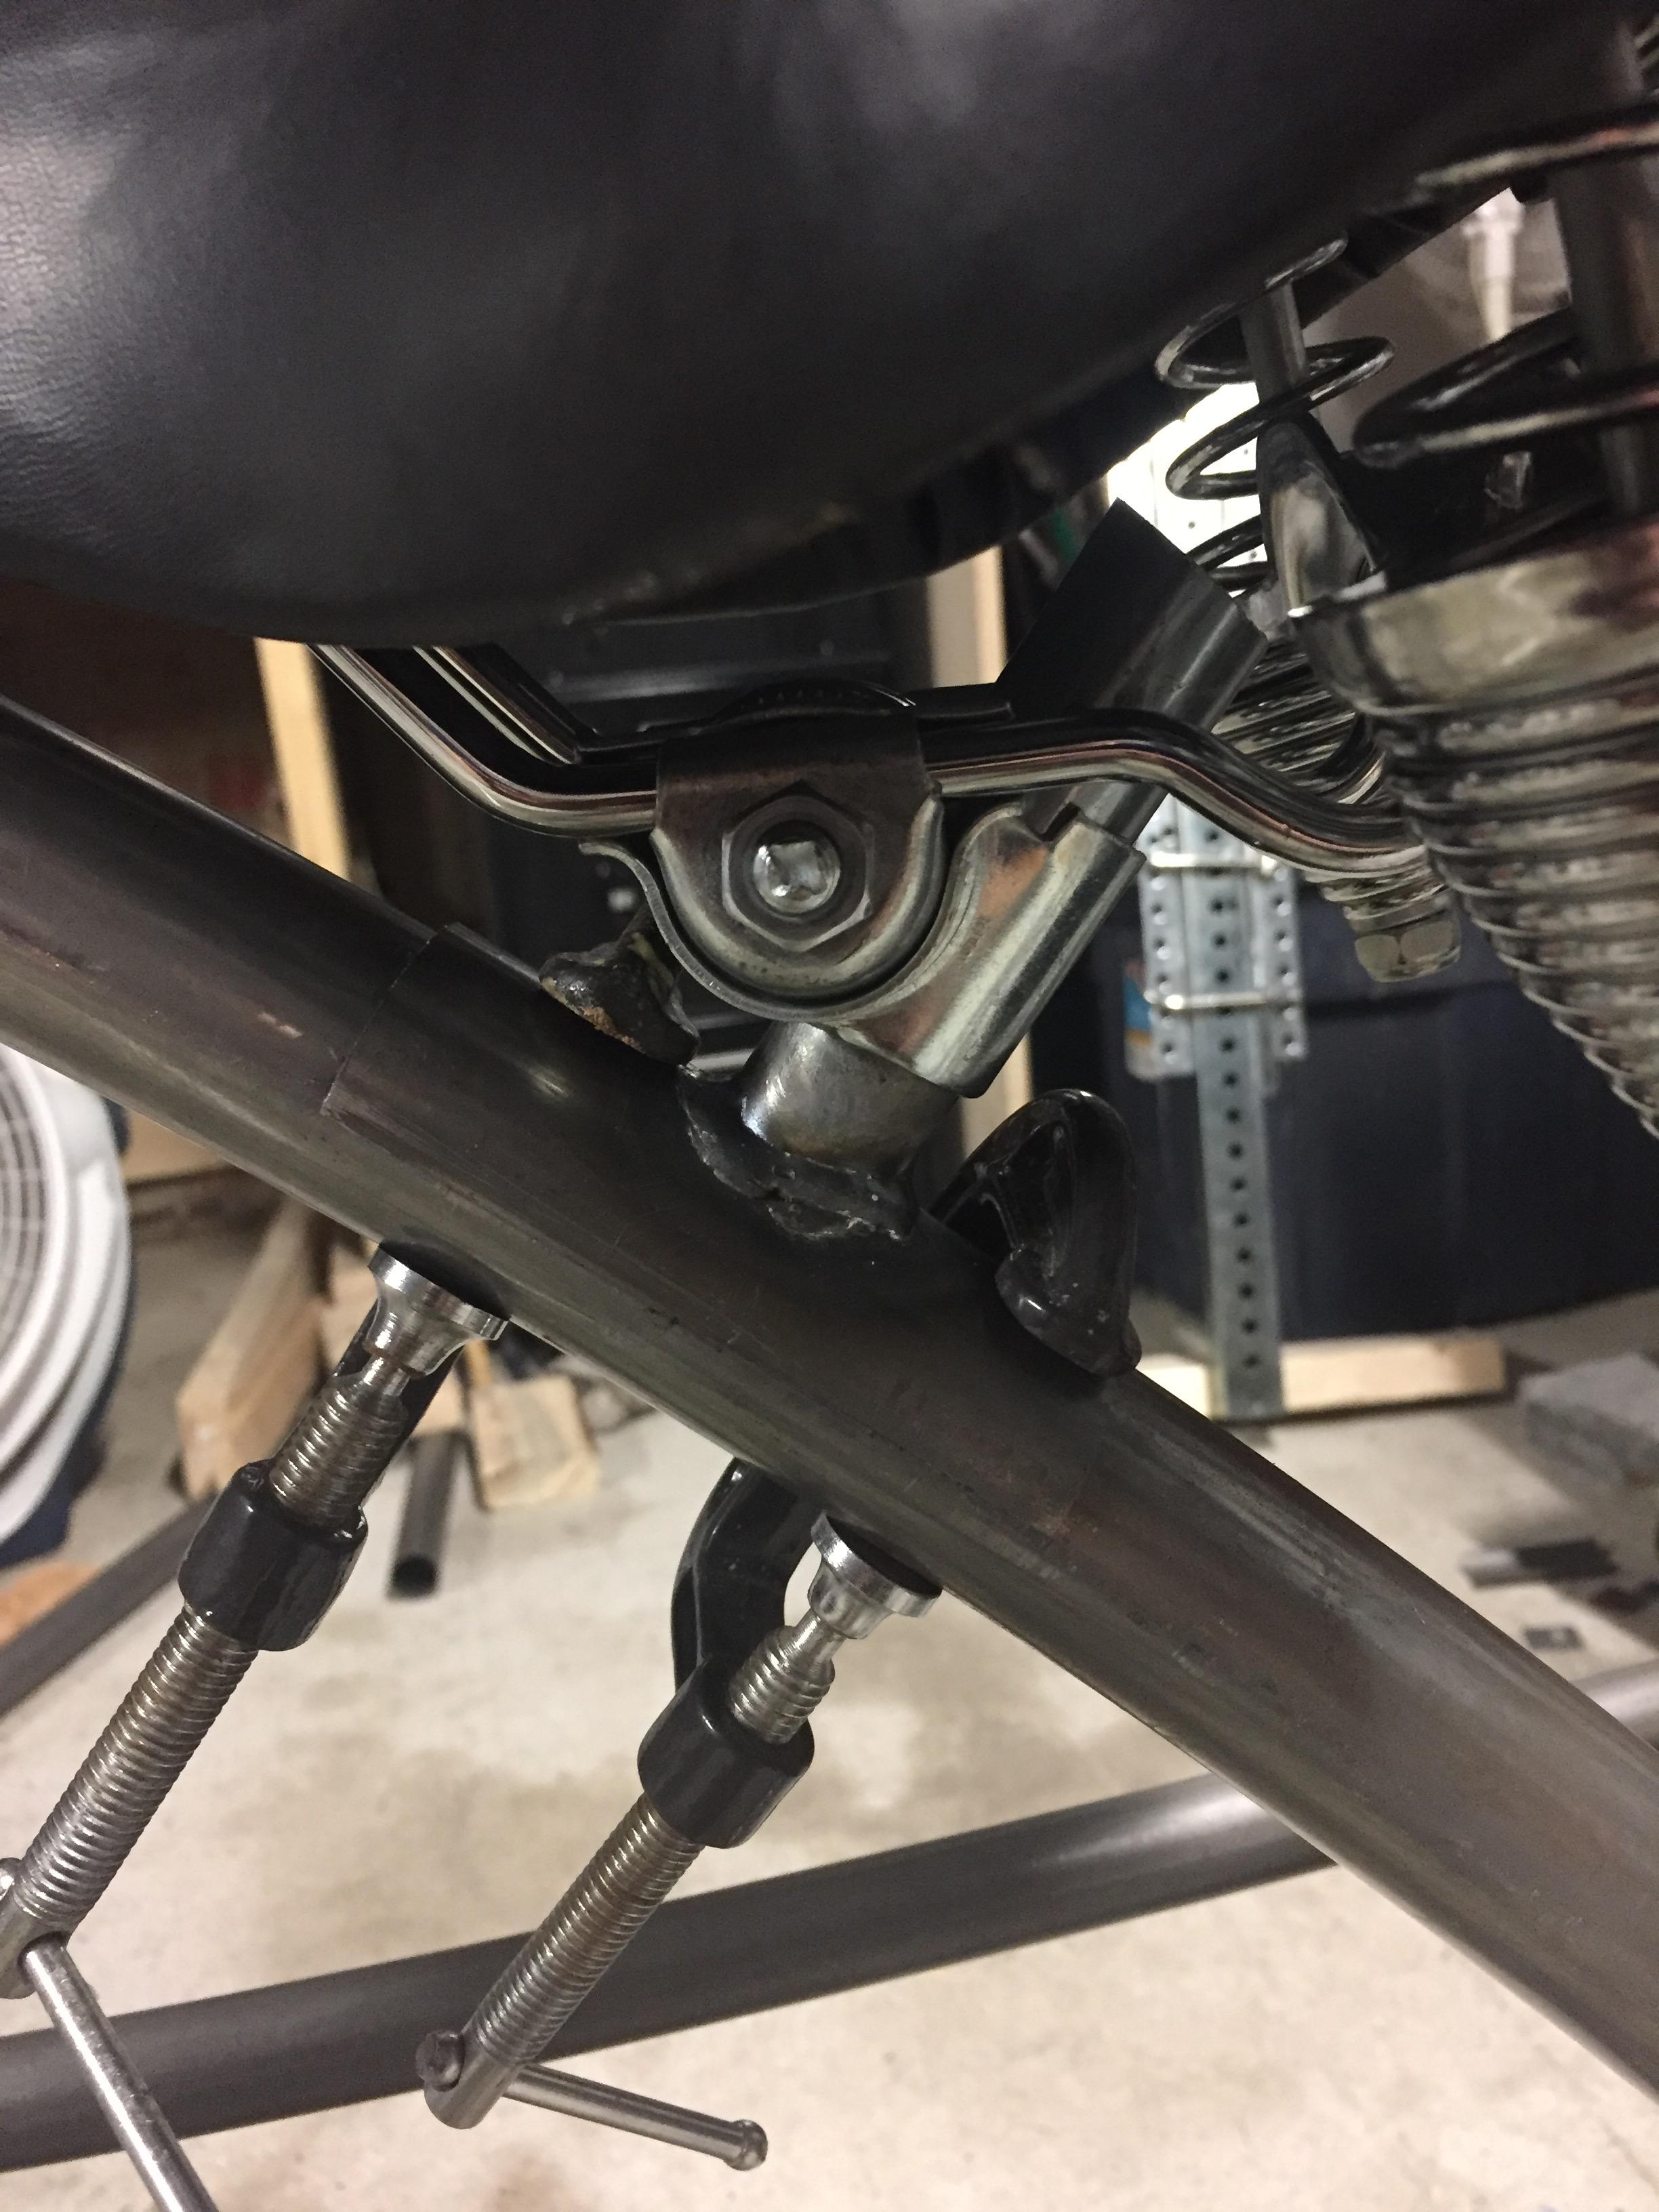
I also added plates to the end of each of the rear stays for the bearings to be bolted to.
I took a seat post, cut it down, and welded it to a scrap tube cut in half. I am going to add clamps to the half pipe, so it can be moved on the frame. There is about 3 inches of adjustment up and down on the seat post, and the clamp can be flipped on the seat rails.
I also added plates to the end of each of the rear stays for the bearings to be bolted to.
Last edited:
Great workmanship and engineering! Metal work is second to none.
WOW! its gonna be amazing!
Here is the final iteration of the seat mount. I had a few setbacks, the day in general was kinda crappy. I wanted to finish something, just so it wasn't a complete waste. I think it looks pretty decent.

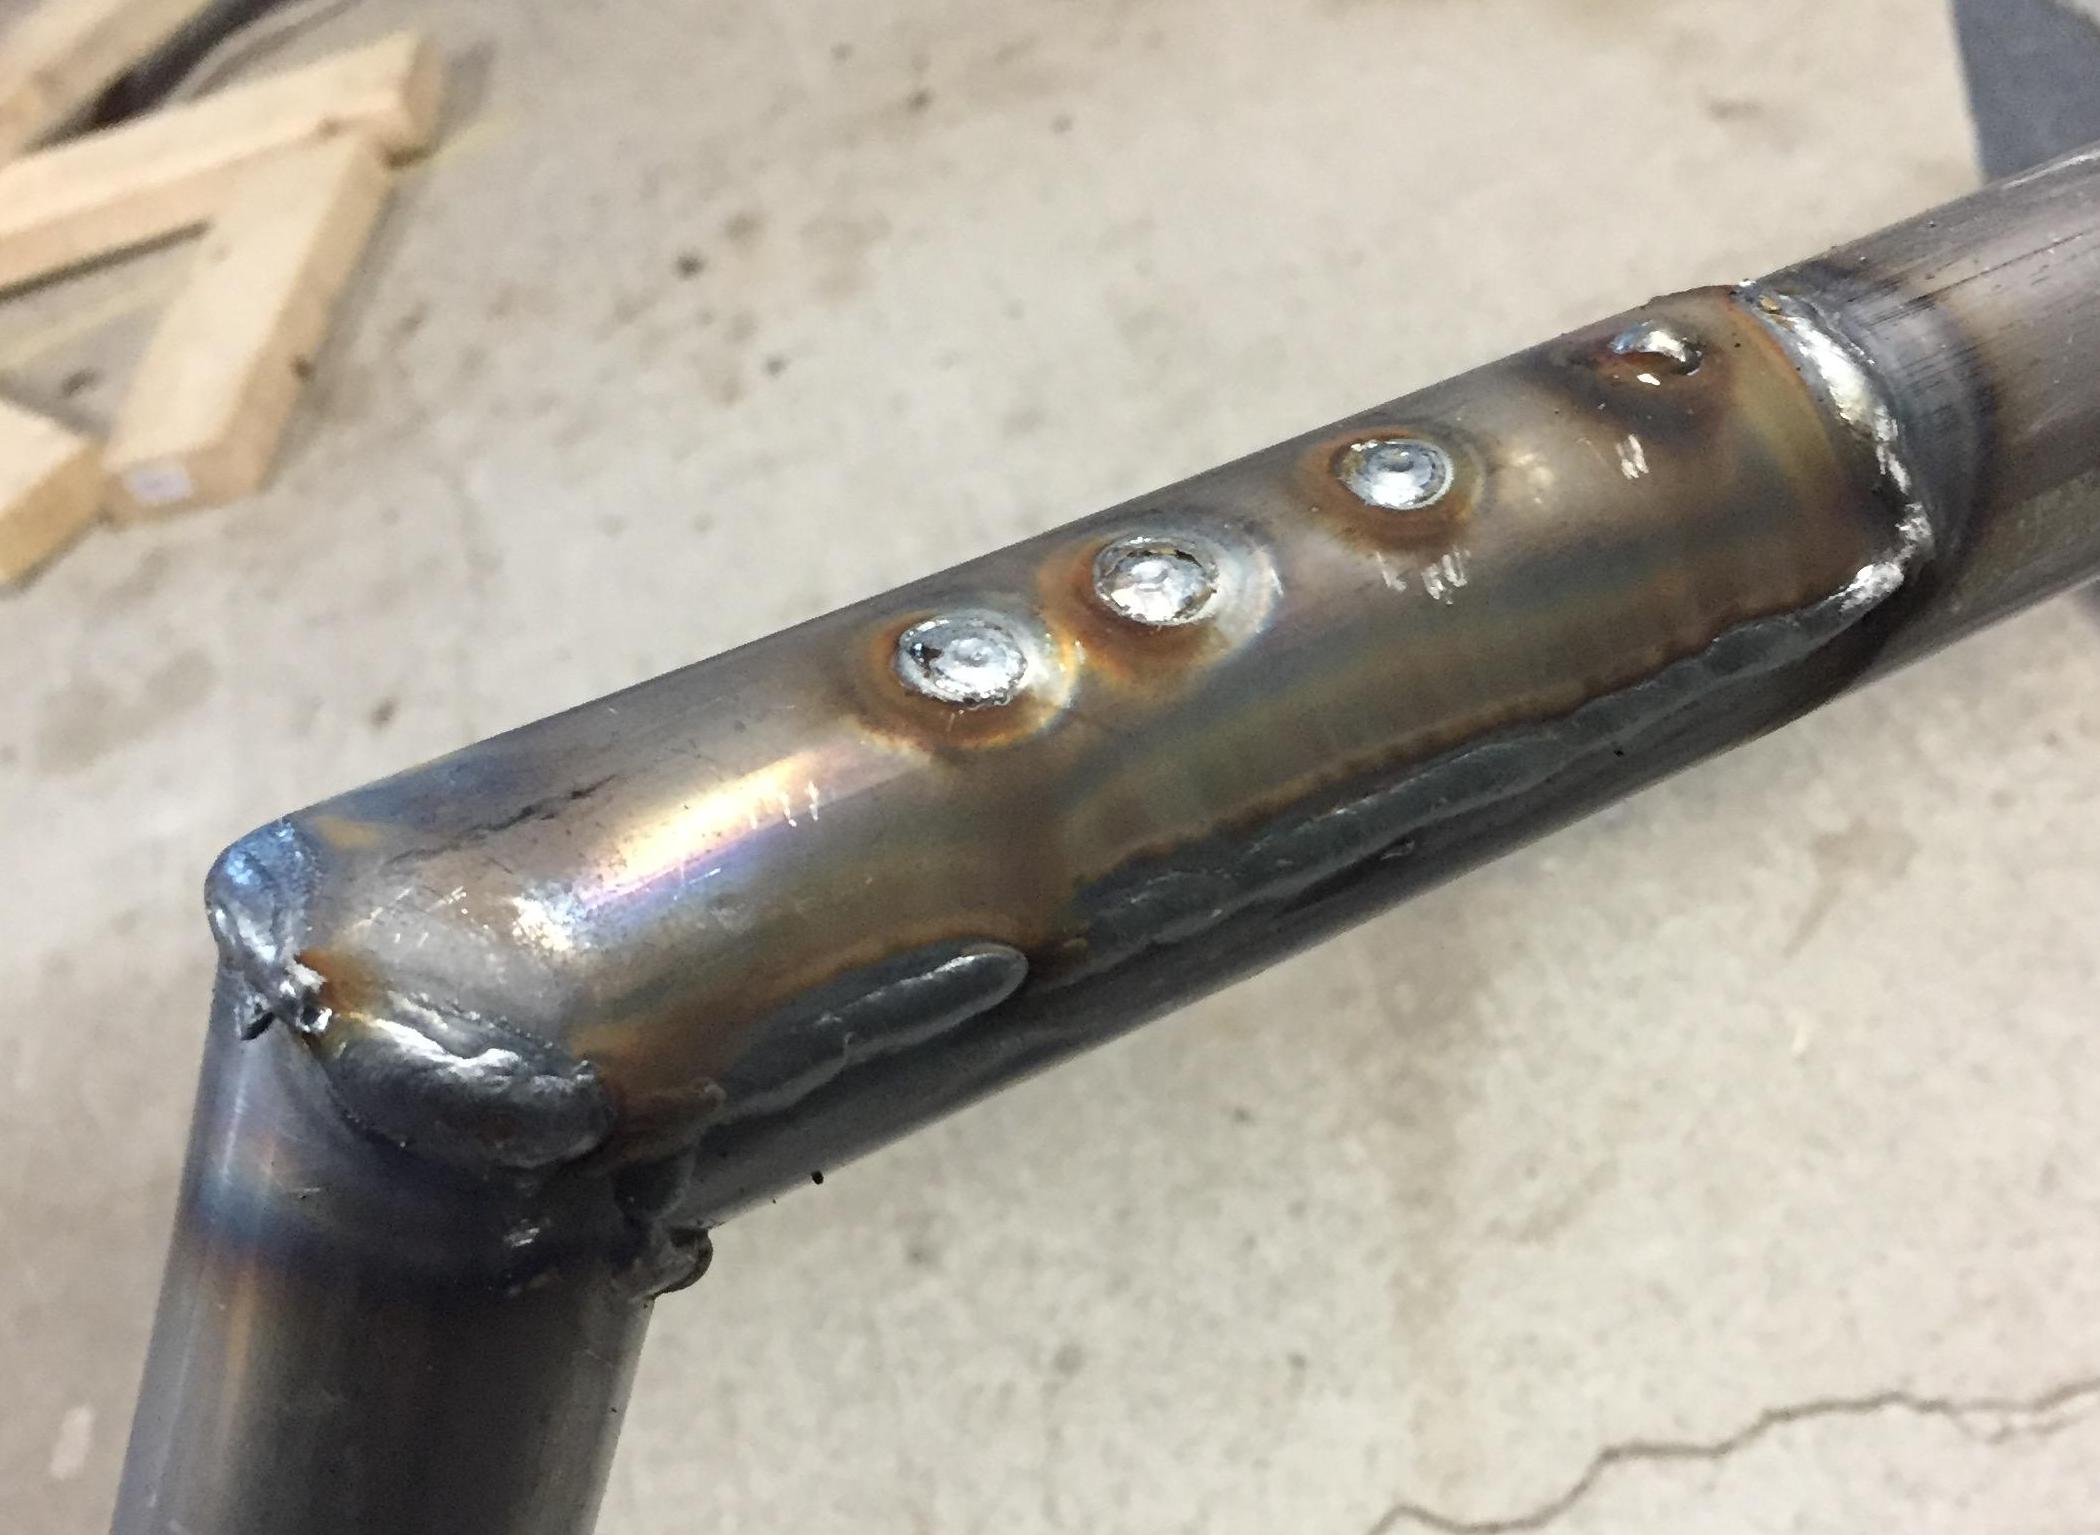
I also found some sheet steel and closed off the gap in the top tubes. The welds aren't pretty, but an angle grinder will change that pretty quickly.
I think this afternoon will be spent cleaning up welds. Not much more I can do until the rear hub arrives.
I also found some sheet steel and closed off the gap in the top tubes. The welds aren't pretty, but an angle grinder will change that pretty quickly.
I think this afternoon will be spent cleaning up welds. Not much more I can do until the rear hub arrives.
Last edited:
Totally forgot somebody was doing a bike with a GT3 wheel on it!...Subscribed.
Amazing work. Looks really really good.
Amazing work. Looks really really good.
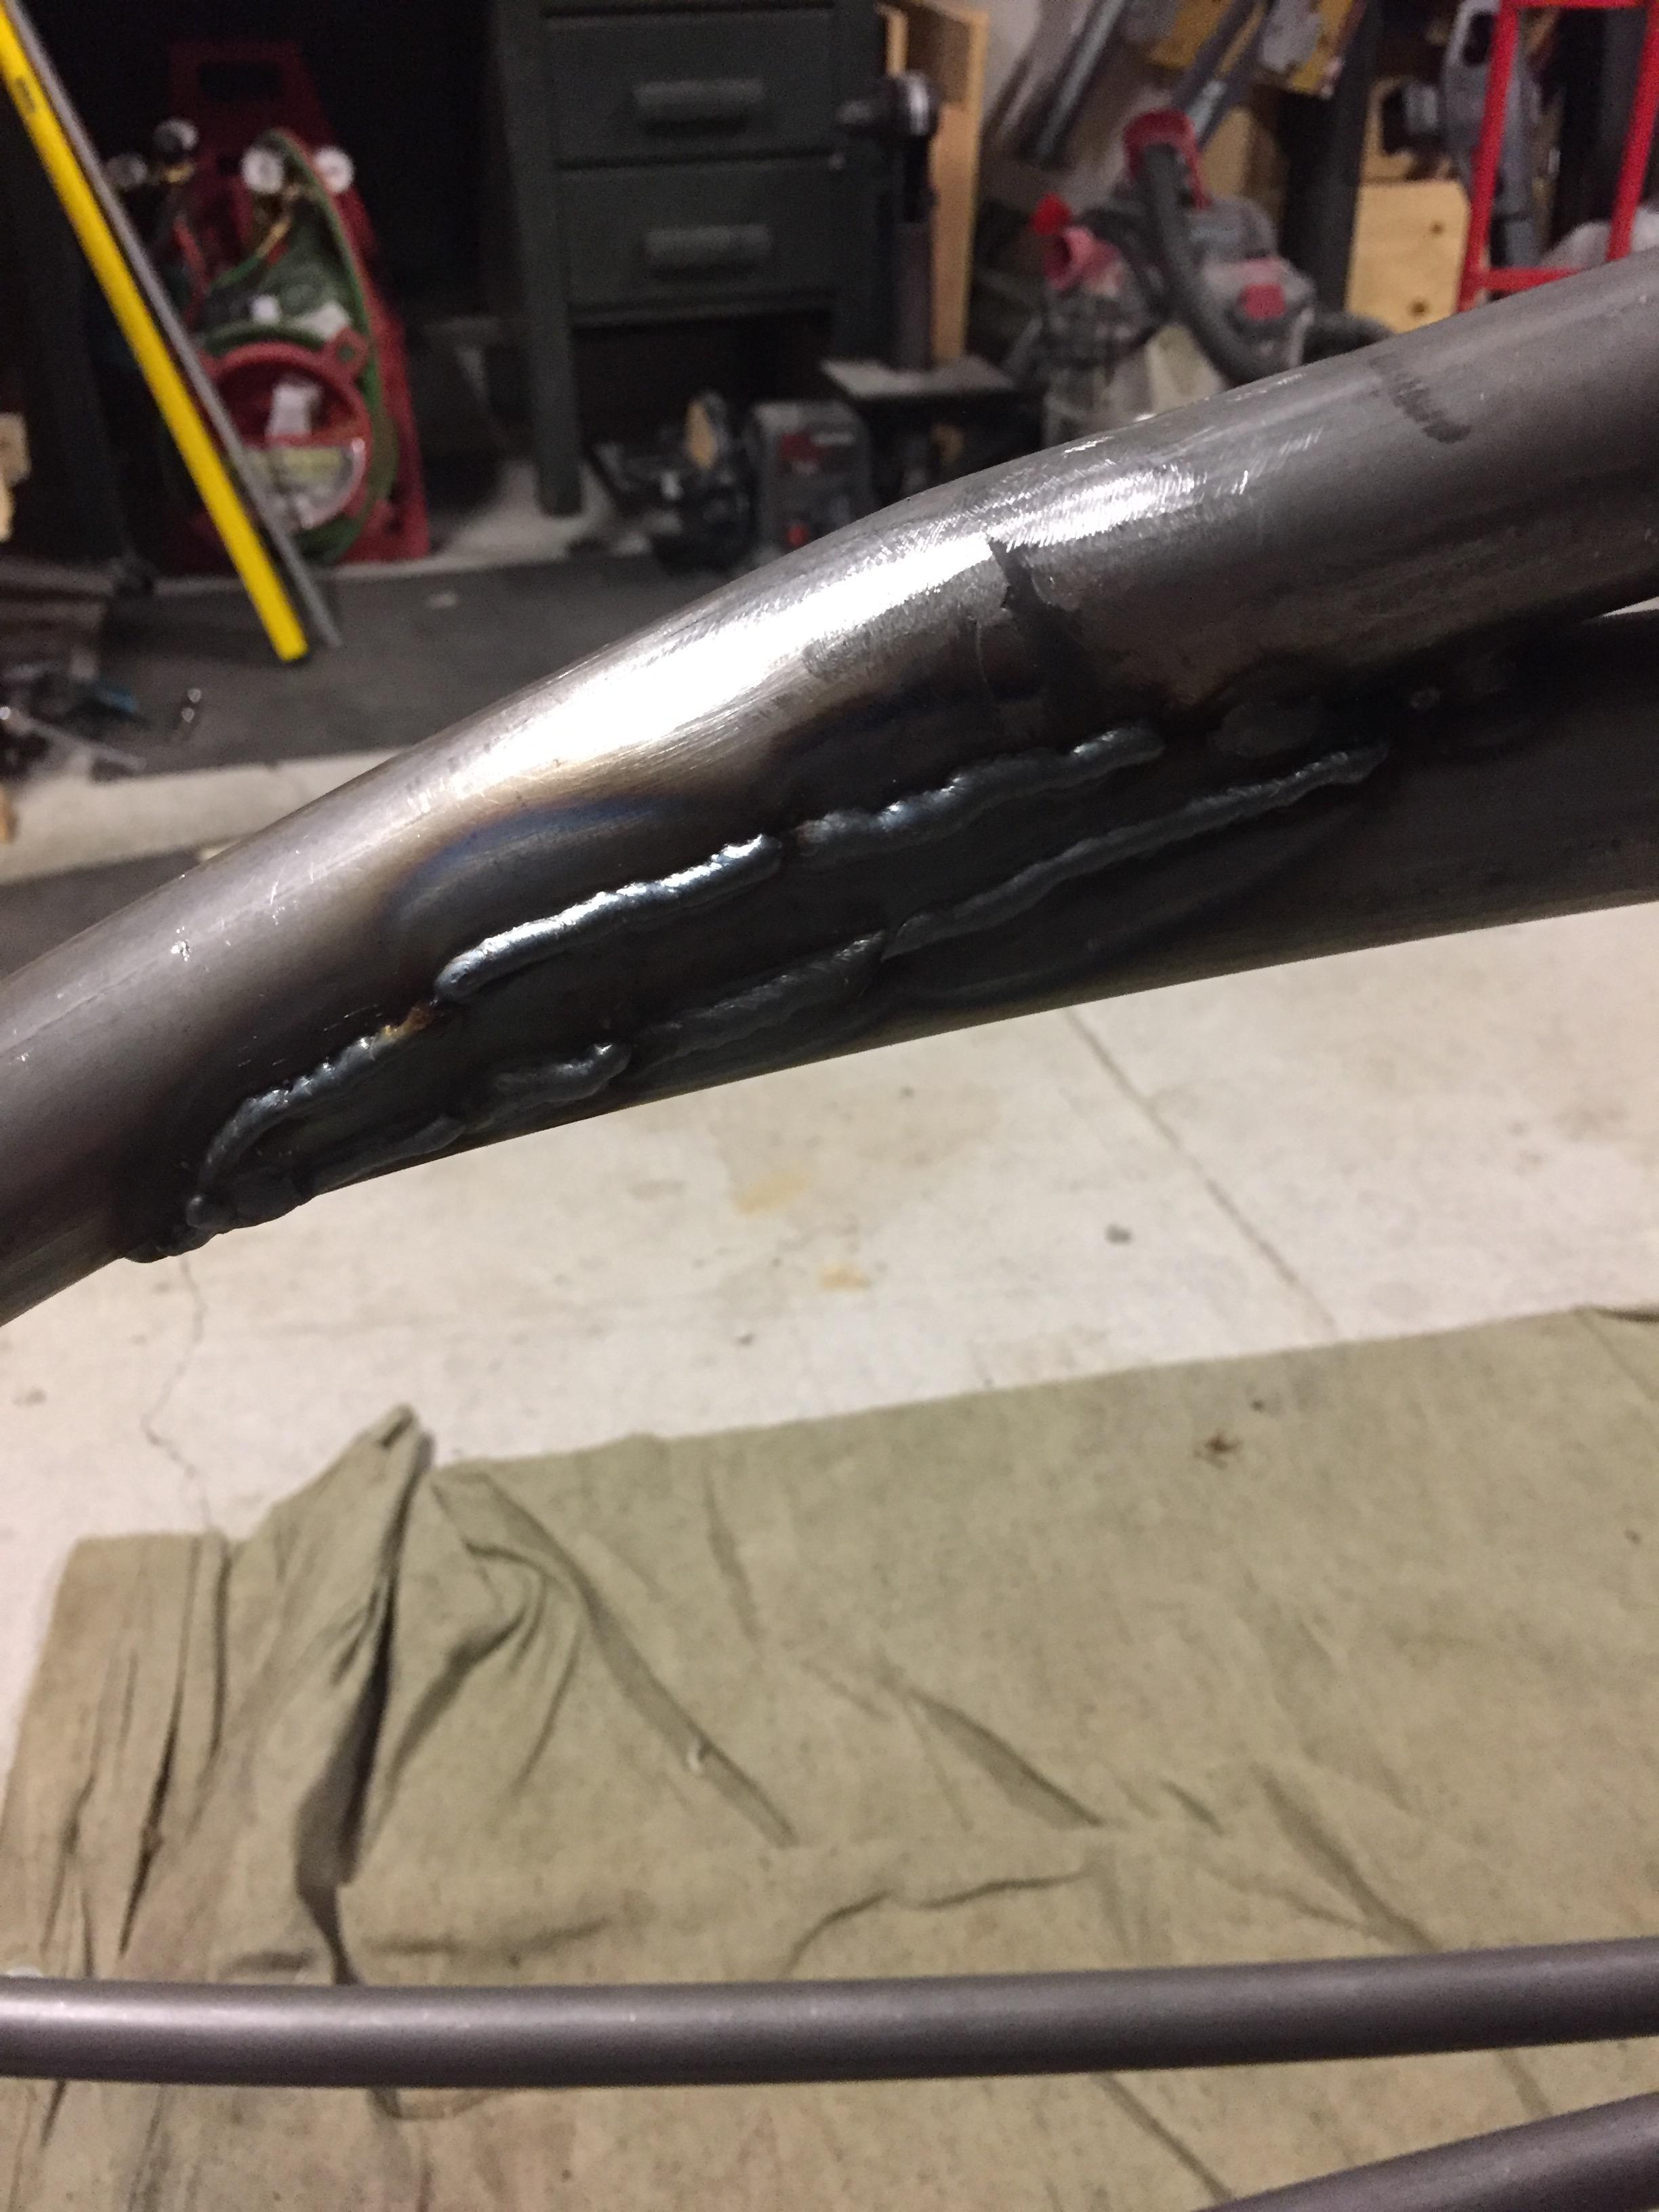
Started cleaning up welds, got about halfway through the frame when my hands started going numb. 30 minutes of holding an angle grinder will do that. I'm focusing on the sides of the welds, I plan on smoothing out the junctions with body filler.

This build needs a futuristic headlight, I found a gas discharge headlight in the trash at work, so I tore it apart and yanked the projector unit out of it. I plan on building a bucket to house it in. I'm not sure if I want to use a factory bulb and a 12v battery pack, or a smaller LED bulb with a 9v battery. I'm leaning towards the LED/9v because I would be able to place everything inside the bucket. I've used that combo in another light and it worked well, and the projector lens should amplify and concentrate the beam.
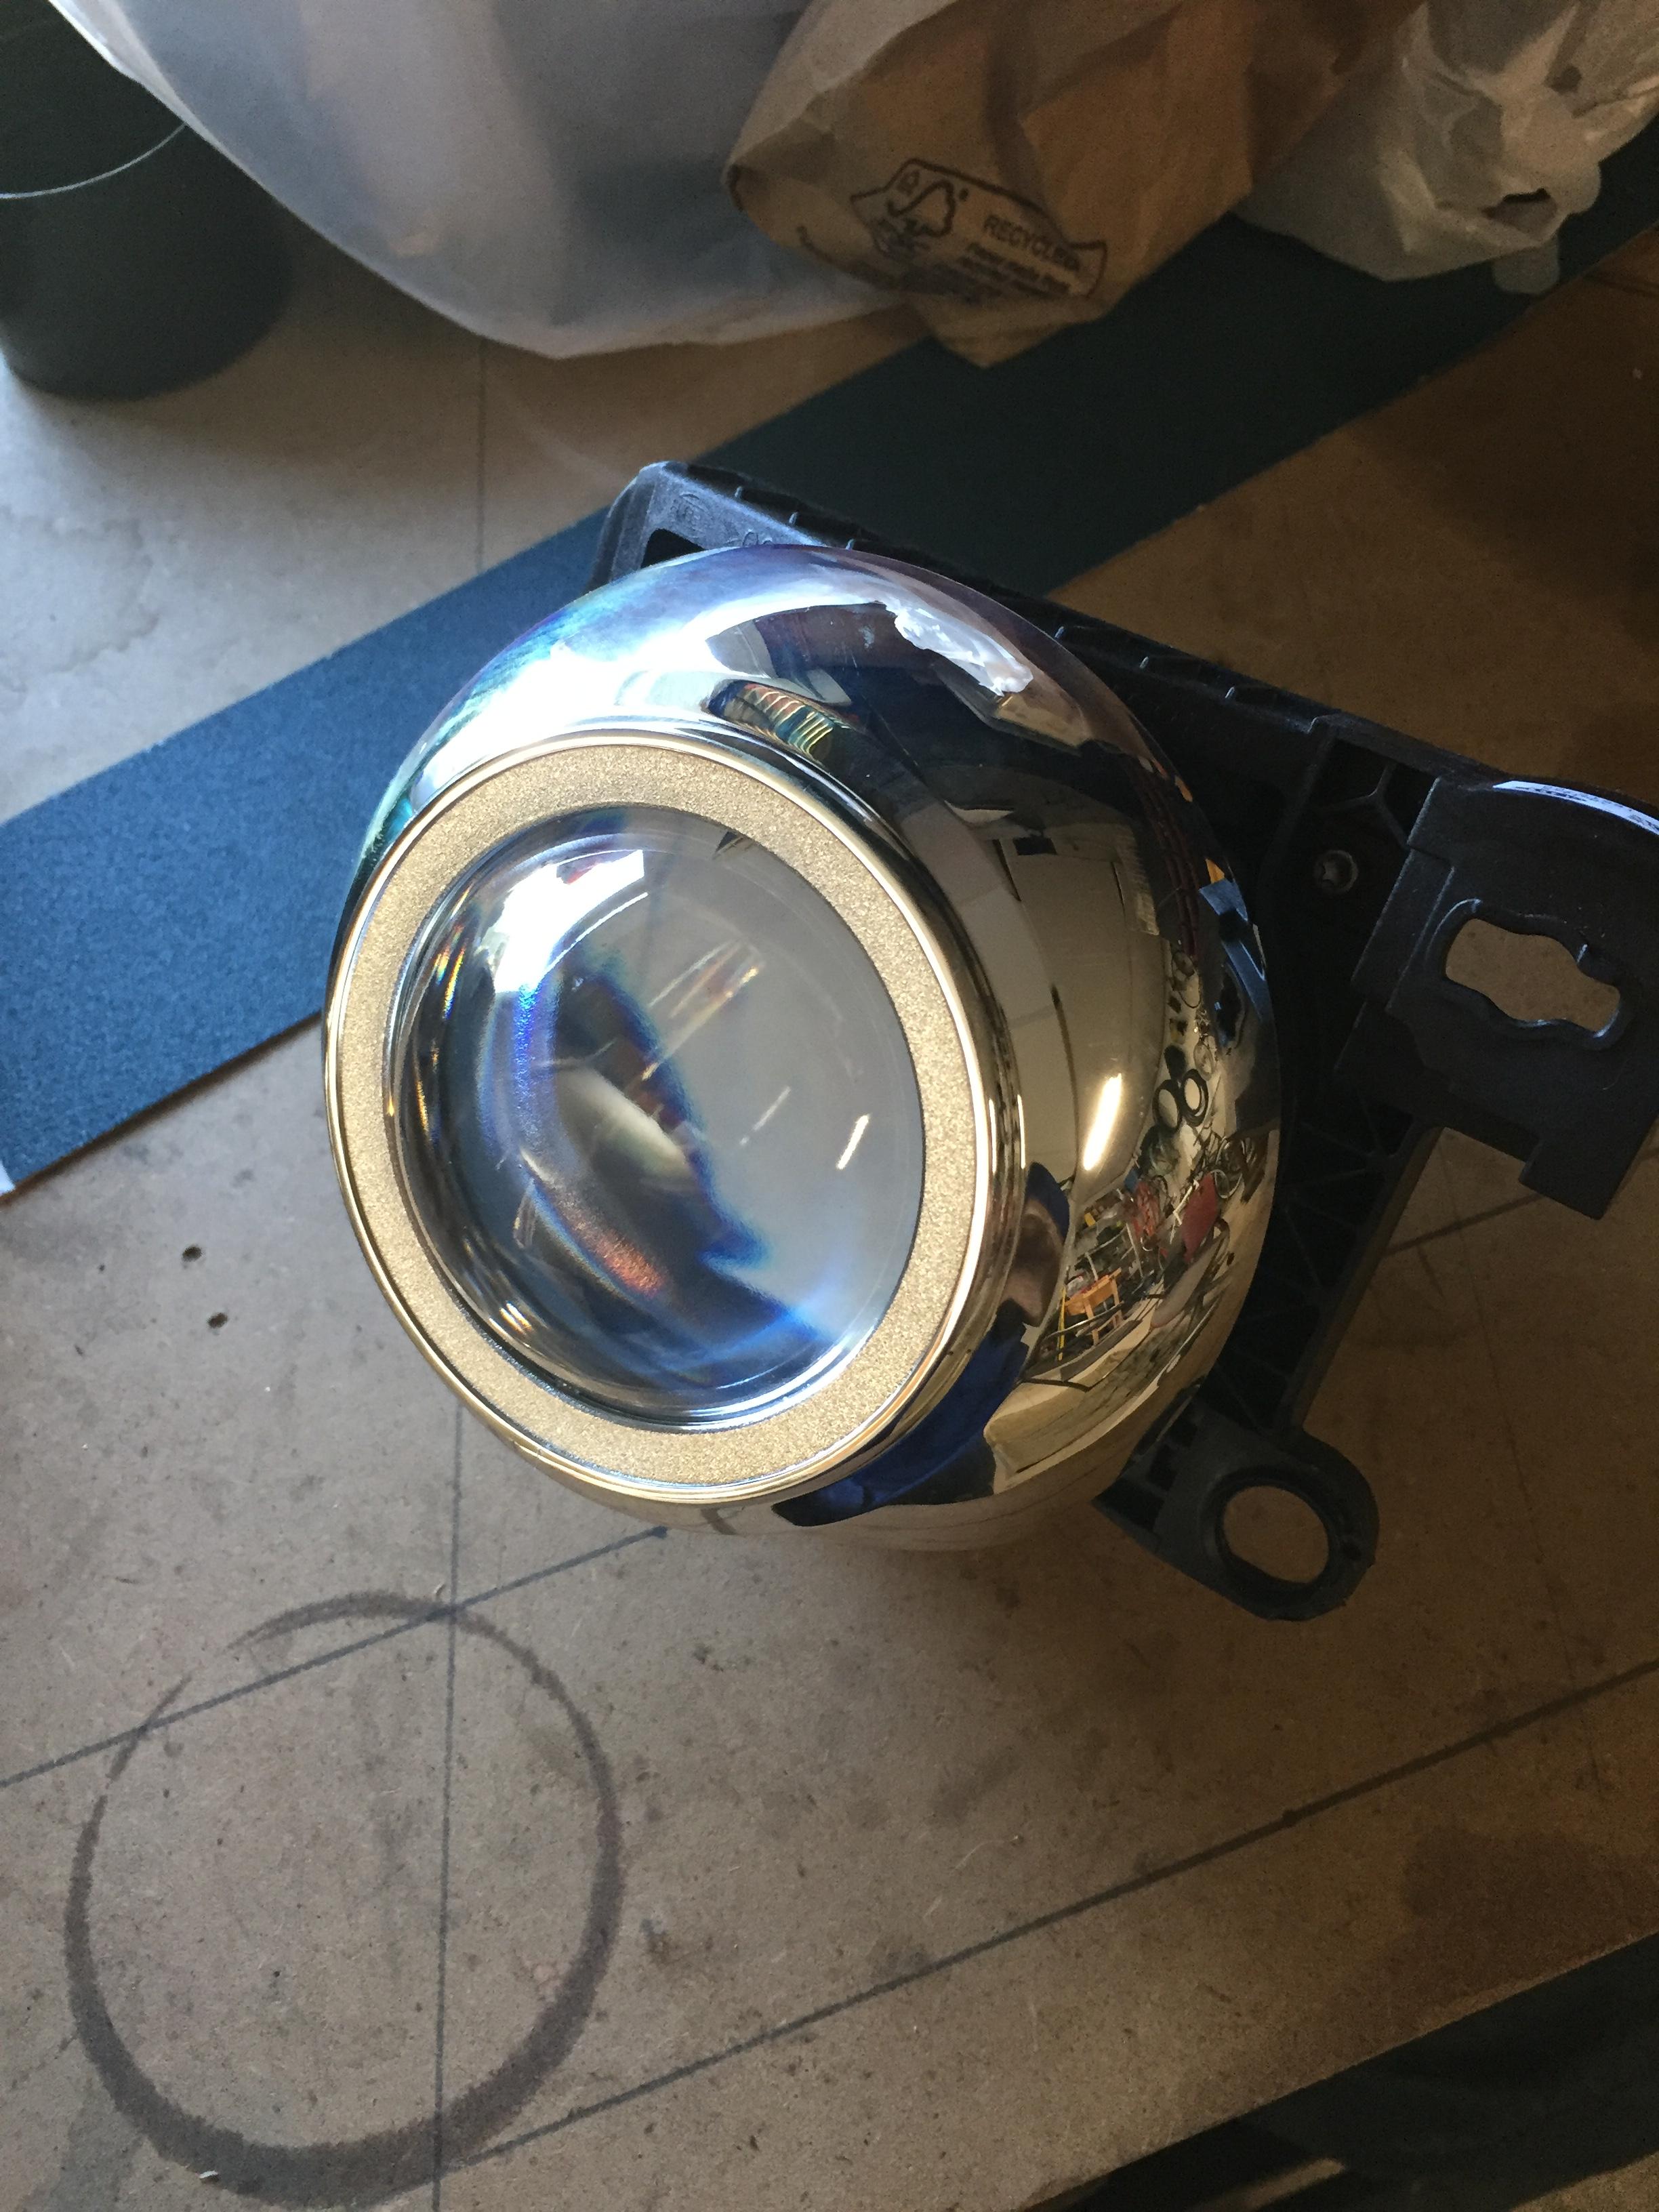
This build needs a futuristic headlight, I found a gas discharge headlight in the trash at work, so I tore it apart and yanked the projector unit out of it. I plan on building a bucket to house it in. I'm not sure if I want to use a factory bulb and a 12v battery pack, or a smaller LED bulb with a 9v battery. I'm leaning towards the LED/9v because I would be able to place everything inside the bucket. I've used that combo in another light and it worked well, and the projector lens should amplify and concentrate the beam.
Last edited:
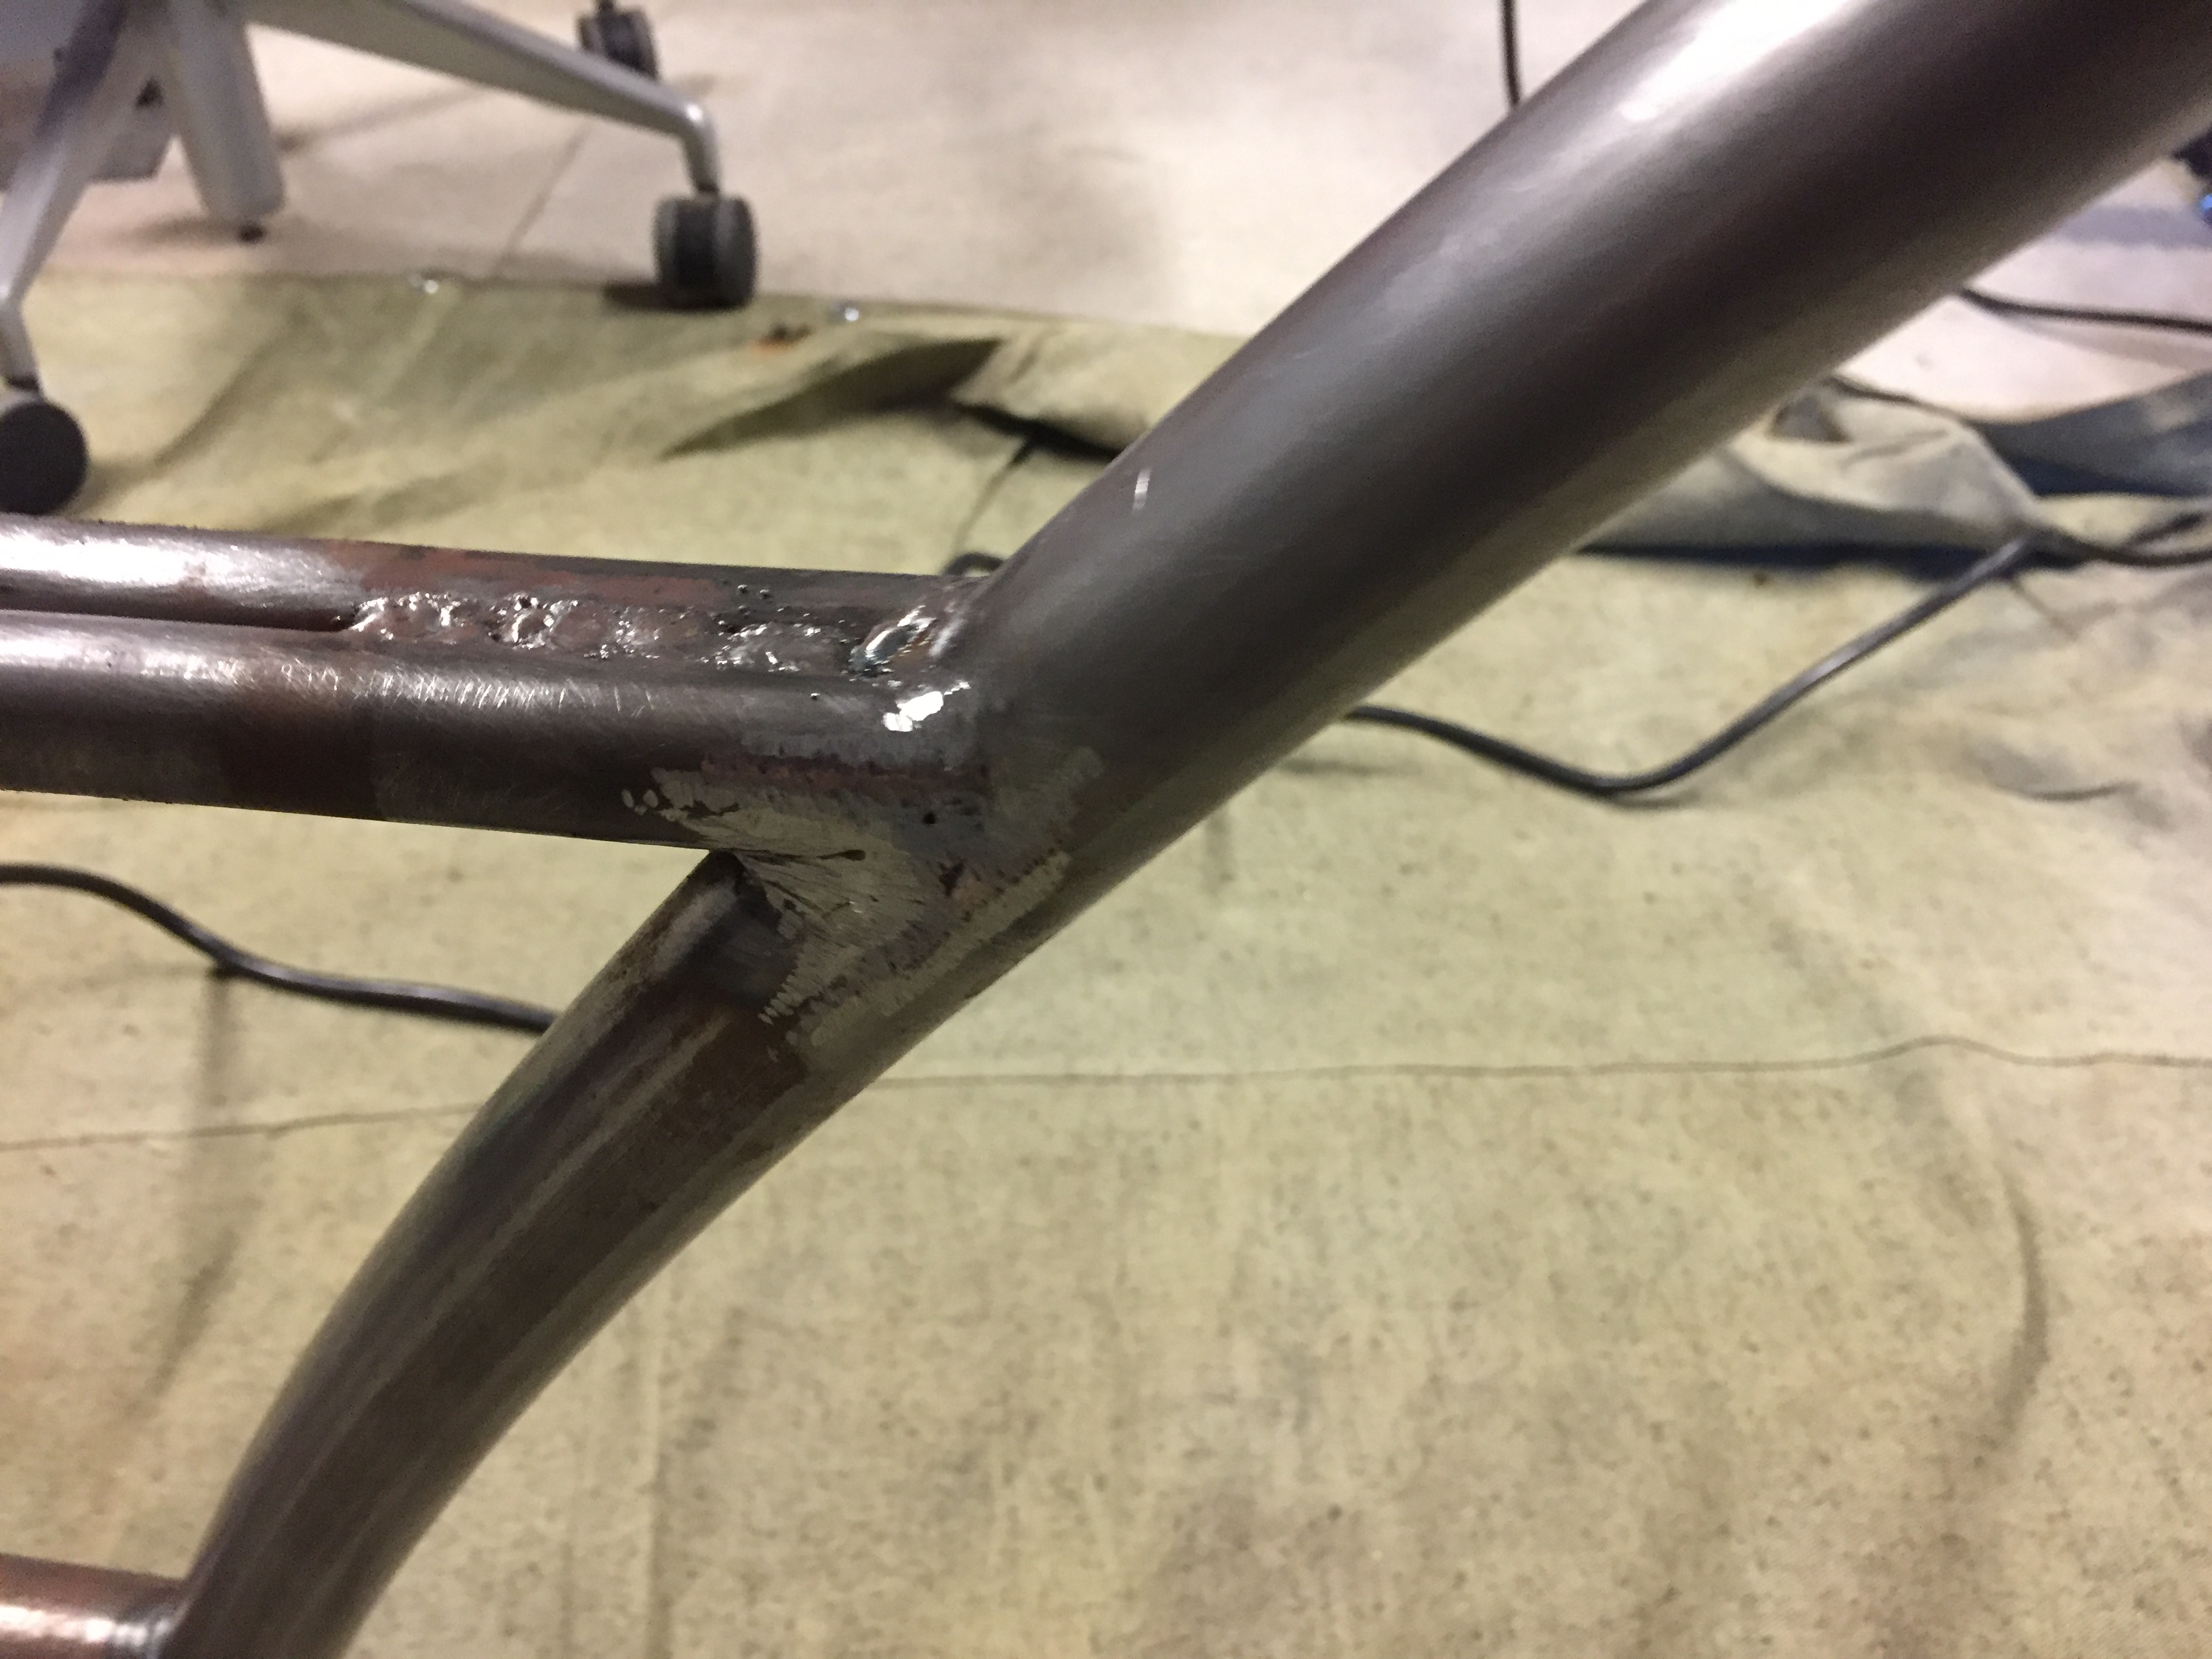
The welds are cleaned, and the frame has been prepped for primer. Still waiting for the hub, the missing piece of the puzzle.
I think I am going to re-evaluate the rear hub, try a different way to tighten everything down. I also want to paint the wheel. I'm thinking basic flat black inside, and polished spoke face should make it pop.
I think I am going to re-evaluate the rear hub, try a different way to tighten everything down. I also want to paint the wheel. I'm thinking basic flat black inside, and polished spoke face should make it pop.
Last edited:
Looking awesome! Do you use a flapper wheel on your little grinder? makes a huge difference in fatigue IMO..
I used a grinding wheel, I'll try a flapper wheel next time. I was afraid it wouldn't hold up to the amount of material removal that was needed. Thanks for the tip!
Great looking frame/bike!
Speaking of bike, I may have missed it, but are you waiting on the rear hub before positioning the bottom bracket?
Sent from my iPhone using Tapatalk
Speaking of bike, I may have missed it, but are you waiting on the rear hub before positioning the bottom bracket?
Sent from my iPhone using Tapatalk