Al Fur

Rat Rod Bikes Bicycle Forum

Help Support Rat Rod Bikes Bicycle Forum:

This site may earn a commission from merchant affiliate links, including eBay, Amazon, and others.
Well this is more like the colour I want the bike to be, resembling one of the many shades of dark red that Romet seemed to use. The fork proved to be the simplest part to paint, and I had no problems with it at all
AIL4fc8IgEaemA0smR9VWeT0zBo3XaccRIxrKRjBO1AaLseacywhQwmn_czuDY3OK4xP0IsCc7fHFjKRMDF0miP8NW27yLU_1cYFU-FAmHrPTwF8WviqCfXT2Ibkv4EvDuY7Je3ieujMmtwEmQ2UwxwITxsf=w665-h963-s-no


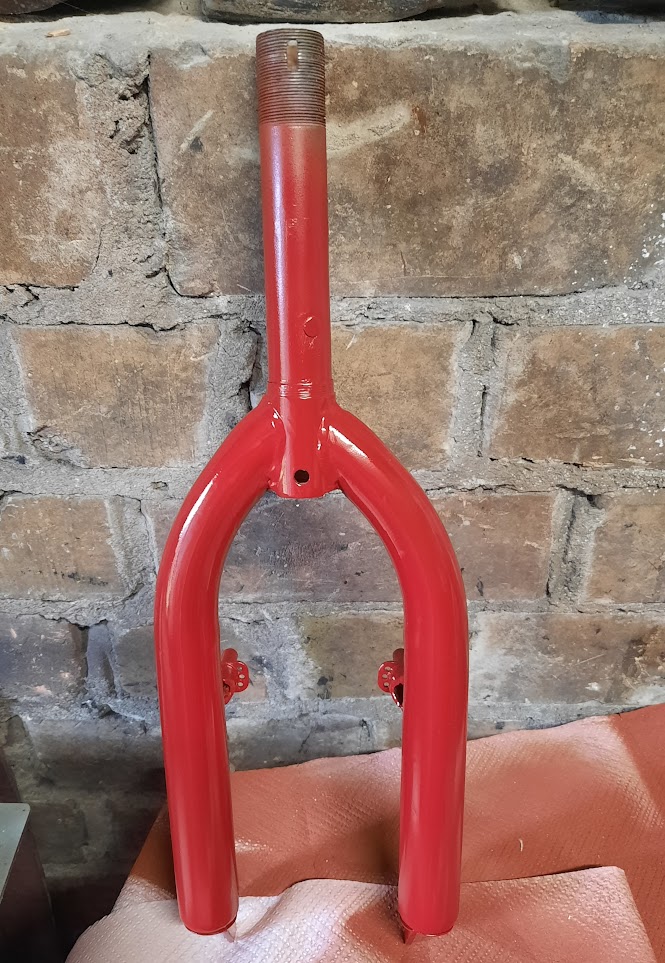
Although the two pieces of the frame are the same colour, neither is quite like each other or the photo of the forks. Such is what happens when using a phone to take pictures, because pretty much else in the picture looks right.

AIL4fc9ULCRMRpo5EsO0JMinT_Ao4RlGI71ZIr_feER3k7zyoul_rNJoIxqKMiVDOaC0XliJjlvZM6tquta8yQMOxAb4p-GT3zoUo_Kiv4K8QDClxCrrItRJNXJwzHa5pgfQUySQR0x8IVEHE6SkNPxDYYOW=w1299-h963-s-no


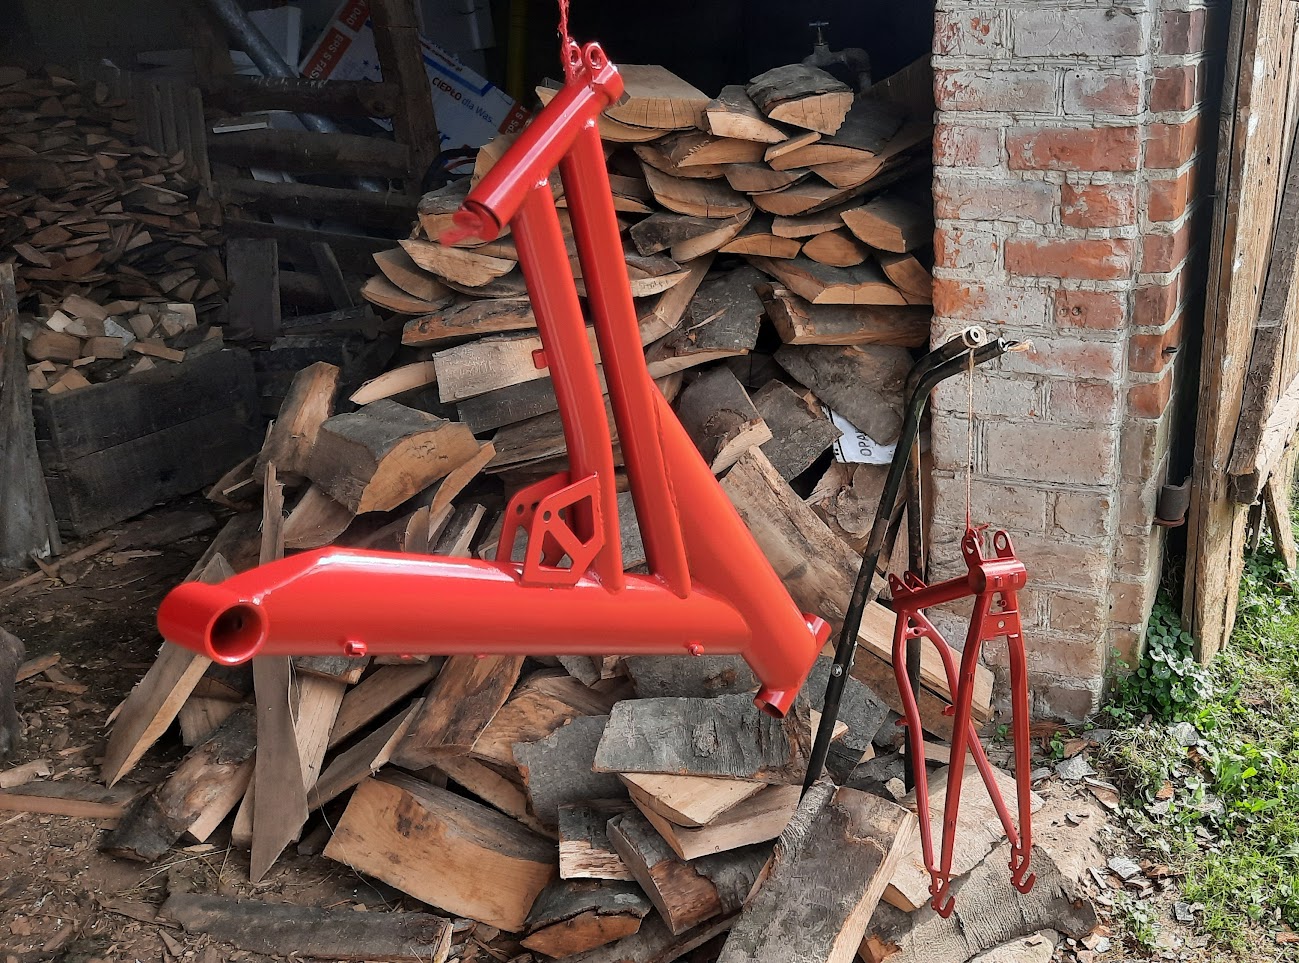
The original red I sprayed on these was blotchy as the can was playing up, and although the can I used for the top coat sprayed better I had several cases of the paint wrinkling up. So I had to rub both of these parts down again places and give them another coat, making sure that I waited until the sun came around to this side of the barn and for the metal to warm up.

I am considering using the old mower handles currently supporting the back piece of the frame as the rear saddle support frame. That mower still worked, even though it was tiny, our area of grass huge and the fact that it only had three out of the original four wheels. We will see about those handles, as they bolt together half way up and I do not yet have a welder to make that a more permanent joint.

I also need to chop all that wood in that pile a bit finer, as it is in the way at the moment.
 
So here we are, painting is over. It was a difficult process for some reason, perhaps because of the weather, the paint or who knows what else, but if I really cared enough to sell the bike then it might be something to worry about... ;)

The good side is that I like the colour and the colour seems to like the bike. The original over-bright red on the main part of the frame and the yellow on the rear part almost seemed too gaudy.

I cleaned up the bits that join the two frame halves together and then made the frame whole again. The joint where the spring should go is temporarily held together so that I can put the forks and wheels in, because I need to decide how long I can make this bike with an 18" and 26" wheel combination without the pedals hitting the ground, and to discover whether I actually have cranks that are short enough to make this happen. I am probably going to join the frames together with something made out of wood, partly for convenience and partly because I wonder whether it will be stiff enough to work.

AIL4fc8p-GrZp_UFKiU6djE0E7ZAgQPBxJviRT-6P9t9vRzfQ6kjbFeBIeHx4whbLAEmlFaYu9JaxI1aQ4BN8cOCPqsx-Q17NMM5gGQfn0umlD8P_X3iBh-V7qsSBQpYfAAmpOn7DMCSYHdoKRXDOguKfVjT=w1675-h942-s-no


Zenit does have a pair of short cranks on it, which I am going to replace with full length ones, and I do have a pair of very, very short cranks that came off one of the kids bikes that I have taken apart recently. The latter might not be particularly practical, and are very unlikely to allow the bike to be ridden down our steep and rutted entrance onto the road - but the road itself is wide, almost flat, straight, quiet and very long.

As the intended front wheel is currently on my last bike, I had to use the rear wheel to see how everything looks. Luckily I have not stripped this wheel down yet, as it is unlikely that I will need such a small rear wheel on any of my projects - and built-up wheels take up too much room on my wall hooks. Anyway, once they are stripped down, the less you think about what they came from, which makes it easier to view the parts as potentially useful things on other projects.

At the moment, with the parts laid on my bike building bench (aka former coffee table), the front fork angle seems very steep, which makes me think that I will not be riding this bike down the hill at the end of the road, along where it winds through the wood, to get (eventually) to the "shop" in the next village.

This shop is interesting, although not in the way that makes it any more interesting than in any other village shop in rural eastern Poland, because prior to Communism shops tended to be built into people's houses and things like that, but the sixties and seventies brought new ideas and concepts that could be built cheaply from the newly available materials, and definitely be considered part of the new socialist system. Well, whatever, this one still looks very agricultural inside, all the beer and other drinks are stacked up in the middle of the floor, and there are a couple of benches for people to sit and talk or drink. There is even a shelter around the back for that quiet drink away from your tiny farm.

AIL4fc8w9LkrmuINodmkfNcJNfcrzhAGsbisORCYyP0urq-Tn8TR6PA0AaV6P-A4vuK1fr56zKxdLm0hJG-tilrez0v6hoM_9ro02zvdkl-ONzQb1drZF2s4b8IXuCQZw5qLEKkdLS7YhT2O32e9jz3XF4GZ=w572-h942-s-no


Anyways, I like those extra holes near where the wheel mounts, as I could bolt on some kind of extension to push the wheel forward and down. First, though, I need to strip down my last bike and the one I am going to rebuild over the winter so I can use their parts.
 
I have started swopping parts around on my bikes to better prepare them and allow the excess to be used on this build. Now this Romet 'Kawelero' Zenit had a very short set of cranks that I modified from some kids bike I had, and while it was fun stripping the beat up plastic from them and using my angle grinder for the first time to grind them down to a smooth finish, they were too short.

Since taking the cranks off you can see the BB I actually pinched from the bike I built in the Spring, the Zasada. These old Romets had either a two piece or three piece crank, which I am fond of even though they were really old tech, and since I do not have enough good ones left I wanted to try out this newer style of BB. I might actually get another of these types of BB so that I can exchange the cranks for my low mileage Romet that I usually fold and chuck in the back of the car in case I rebuild another frame in the future for resale.

ADCreHcK1OFaBOD-AC2Z491mnShnw6Th-0qyJeLfOzSTVAd4NQxlQOypYtGgK-5jiVM43vAAcu8FcfscIzOFMjGxiYpRm8DzZkplJSVwzKvjC-U9Hjp9kRVAxPh5tVw0oH8otSZ3j50t8_E3O8ui1SWGqAlR=w707-h942-s-no


This is my Zasada, with the full length crank arms I stripped the plastic off a few months ago - and the new BB I actually purchased a couple of years ago and had never used. These cranks will go on Zenit, and that BB eventually on my other Romet.

AIL4fc_MPrB-xt8BGGe4mSWua1t7udXPVdC93j4BvG8ZQBgyTF08XRvK07_PKrbtoTkKu25jIVGcKPMtRf4aakIO_C3swAHXqDHln2CmVqnak_OTS7mY5Dp0Mj05tP3qAe0InEn6enn76SRQu-hW8NueYVqV=w621-h942-s-no


Here are the two sets of cranks, and you can see how much they differ in length. The longer ones will go on Zenit, and I may use the other set on this build, or I might use something else. You can see that the longer crank one also has a slightly larger sprocket, and when I fitted it onto Zenit I did not have to extend the chain at all.

I am also going to fit the 7 speed derailleur from my latest bike onto Zenit instead of the 6 speed one I have on at the moment, just because I can - especially since it came with only 3 gears fitted (at the factory) on a 5 speed hub.

AIL4fc9s51B4fdSe0ddJRah6X4Af_VEogiakWTdRXWL70uaornAkg9oXil0IiGE1Zs5rDAboUNYDP37LBKgTgh4h3I5JF1ZfMGIxv0MIG_yVXJCtBB-OMSAxYAtXB5Weh8Zmk_LR-1pJAQr0YiG8eFKV8MpT=w831-h942-s-no


Kowalewo is a village that used to have a Communist era Romet factory (no. 5?) sitting right beside it, I think making all the step-through framed bikes. The factory has gone, but the bikes it built are rising in price from the scrap-level prices they were at for many years.
 
I have been stripping down my previous build, now that the summer is over and I have ridden it enough up and down our road, as there are various components that I am planning on using for this build, the front light needs to go on one of my bikes in the city and it is getting crowded in my workshop. I know that I could store it in one of my barns, but I want bikes around me that I actually ride and can survive being ridden off road, rather than sitting there getting dusty. After I rebuilt Zenit last year I made some further changes and have since been enjoying riding it through the wood on the other side of the road.

I just enjoy building bikes, even though many of them are impractical in my life.

Stripping down the not needed bikes into parts also means I can use them again.

AIL4fc-W0Ku1luKfqSCFOS4H9N-Wl1HNDikIk-dLpge5FWxZf-35nhHeMDeRgGHHucomOxhDAwAO9wv6fel5Ol-DwU-AE0WO_kRZc-7kwmMbSwUZTcexTmcLNPLo1ZVqs5zQ4k2JWYe1aZ4E8z2RQlzTl8Gk=w1472-h942-s-no


So here we have a pretty bare frame and a bunch of built and restored parts, some of which I am going to be using here.

The crankset on the right is planned to go on one off my Jubilats, which I bought new many years ago, back in about 2005, which is neither marked as a Romet or even as a Jubilat. Romet was being bought out by another company at around that time, and is doing quite well these days as a brand. Anyway, the Romet crankset is a two-piece unit, with a single piece BB shaft, crank and sprocket that is no longer made, and I have already sold one set to someone who needed it. This sprocket, cranks and a BB will be replacing it, and I will be cleaning up the Romet one for the day that I need it, along with the Romet 3-piece crankset that I already have stored away.

AIL4fc-TPDJFlWhcuKxdg7lHDiGmQxftaEHxkpQRH7d7aVBeaMup2cusihPlQRNpl5INSrVzVKbETB2oZdxYwqEVH0OoUZpE2uItaQxGAieVqvg5_UdO5VWVnEE6OVSm75pHtOJn-fxji6b-fO-c7PsL9G9j=w754-h942-s-no


Anyway, the Zasada frame will be off to the wooden barn, along with two other frames, to make more room here.
 
The sole wheel I got on my B'twin is a 26" aluminium one, and, along with the 24" aluminium wheel that I have fitted to one of my Jubilats, they might be a nice pair to use on a future build. It has a 7 speed derailleur fitted that I am considering using on this build, so it made sense to remove it now as that also means the wheel will take up less room on my wheel rack. I like to strip all my unused bikes down as far as possible, as that means it is easier to use the parts on other builds without caring where they come from.

AIL4fc8qfFufAiJAkXy5dxLtbhNTCWDRvYOcZBqFkgA3x3E93y0_Oh1ERJPo1XxK15hcnLW8e96-wAhLuvS5mgs_S3pWci2WdnID-WjB2AHokbRZWNTynpC_u0UoAE4Cf1IyHUEmUGGBIdLXcgEVU4Gdv7ww=w1570-h942-s-no


I made this derailleur hub removal tool using a set of pipes and a sliding T-bar with a socket on it, and a socket to fit the special tool. I could have built something smaller that bolts onto the wall, but then I might need to take it somewhere. A couple of years ago I broke the rather cheap vice I had in my garage while trying to remove the hub on one of my neighbour's bikes, so I built this and have not had a problem since.

ADCreHeo1i59XQKls-k1ImNfXBERo7UKyH9unlck5JuX13FwOp5961_kVHR1Xnss-EUXVX0YqNczxMVh9yMmiifuH8YE_ZjXw9dHxWOpQKgKNQcOPJIHnzGljhrjo2XODEpKq5iRDHW3OUsS2Pjq_bdW9JEz=w815-h942-s-no


Behind the hub was one of those clear plastic plates designed to prevent damage to the spokes if the chain slips behind the hub - and you can see that evidently happened at some stage...

The plastic ones are a bit ugly, but I have a rather worn out one in red plastic with 'Romet' on it that I am very fond off - it sits on the shelf above my monitor.

ADCreHfb2oQ6YkvV5wvlfW_2vR9_o2HR_T0iKicJfmDYMh6Dcjo1QqUE79OzcO30k6_0KnMvscDNDXA0KYA1GxmCZjTQaABqT2msYKd8BifoPwMQHzyJ2edNcLt-fzwK9hCkOSRzMLMHQS5rVeyb08vlozVj=w811-h942-s-no


Now that all the bits and pieces are being stored away, I can start to select what bits I am going to use on this build.
 
So back to the actual bike...

I twiddled around with some lock ties and a bit of wood to fix what stance I think the bike should have. I really either need another coffee table that is a bit longer or something on the ends to stop the bikes from trying to roll off, as it all gets a bit jiggly on there sometimes.

ADCreHdbpP80vDiGbzpxSgoonG_J8Ww44mQmGoEa3FY3IoeTeT_EwWIy1bkmQfFDe40qchZUsnPZCbBXRfn2VAiEhYJWvrIFxkppKGBz3TXHd3C5LGTlJKAqaRl73VJTGFC7gLRRffoROOUP4Ygx8tTFQ1Xg=w1314-h942-s-no


The front wheel is so small that the steering head is almost vertical, but I do not have many forks that can fit such a really short headstock. Romet bikes designed back in the 1960s have really long ones, which were still being used for some of the frames I have as late as about 2010. In theory I could fit my most recent set of forks, but the bearings are so much bigger and I have yet to remove the cups from the frame. Anyway, I kind of like the wheels and forks off this kids' bike.

ADCreHeLAtsTOmR4EJ-LRRq_H0ZcLu3doZorQ4l3MrRjNubQeObbQTpvKwN6JROZ4v2SLkIb2BpTbDXshE9s9HLLA8cH3a0MCYISNb7Gh1Q_3Q2lBfWltKBRytTsuWG_JVZ2NdTiLX0HSBA995fhmmt5-BVI=w1291-h942-s-no


I think this crank arm also came off the same kids' bike as the front fork and wheel, as it is quite a bit shorter than your average adults' bike. Until last week they were on my Zenit, but I stripped the plastic off another set of cranks to use on my last build, and now I have swopped them over to Zenit so that the short ones are ready for this build.

ADCreHeLiMlilzzYuQG5v1Hmr6N_6vEULsG0RJZMhm7tmQZJc2iUmwiJMHy3KrM3Z0jKzvfdJNLQRFYB21s473GCsBmN7c72qiyaMrAbxBhJO9f97veRQ8hs8IOkBFSpuIAwDg-fjp3erRnOKFLjAmBuAd2G=w839-h942-s-no


One of the things I love about continually building and stripping my bikes is that my two permanent builds keep being modified to make them better.

Anyway, I would not mind looking for an old tractor headlight, as this frame is just kind of looking for something like that.
 
I have four small pieces of plywood that came off some furniture that one of my neighbours was throwing out, and I reckoned they were just big enough for what I want to do. I do not have much in the way of woodworking tools, but I am sure something can be done to make the result look alright.

Somehow.

ADCreHfi4keTWO3XjqdTCW2XdFCWegpoOIngWnjVxsqrLrY7Afwz60HlD63CcBC0Z9Hj4wLz0iw-nGA5u8BM4Ws7alv8MGSevlPf1950L8qjt-Z1cUo5JeMGxGwpQHSGoKTaP2qCZxHcA4nui7ZoydXr49r8=w740-h942-s-no


Since I will need a pair to fit in the gap, I temporarily bolted them together so that they both came out the same size. I only later realised that I could have made the cutting job a whole lot easier if I had countersunk one end of the pair of holes in one board so I could clamp the boards together with some countersunk bolts.

ADCreHduq-UOdwixiLB0-BMThXVbezlHm7eqUDhTOawGuzn5ek9MT9p18YnCbjGw3IW8WqenRx86cGwcDW5BXfY4wdzmnfaYJyidErMWQm1L5I8lHQJb7Cy9Lgu0Z8m-a6XMu9hOvFbX-db8Ba2v1T_Yv1MM=w854-h942-s-no


I roughly cut out the mount using my jigsaw and then found that the rear end would not fit in the bracket, and so I had to sand down that end of each board using my anglegrinder. Not the ideal tool, and I will try to tidy up the front end with my jigsaw first.

Now that is done the bike is free standing, and could at last be loosely termed a bike instead of a frame on wheels.

ADCreHe_xS0ZsFoujj7UyLdHJ1xOjUMTn4fohINtupTe7MBwGjBAPkxJg6vkSG1v3SpnLu3hA7W9JoFFFL9M8W4oFOKUqagvXMImeBR5TMSteBL5XTJjzpk13qYu6EXkC40Bsav4mcrbNROM_-M1tvoQsDmh=w719-h942-s-no


The next major piece of work that I need to get done is the saddle, and this time I have a decent piece of plywood to work from. The sides of the board are not parallel, but then neither will the sides of the seat be. I need to saw a whole bunch of slots so that I can bend the board to get the rear end of the seat to lift a bit - now do I use my hacksaw or my big wood saw?

ADCreHdPsS8ROYLcEdMrGB_dE-ZyMQSwaCeYmRD6quduuSQU41GrAeCrl3vya2yKwsoDXFP3N82yy1Ps6ZmAhVhSqs13KMgR9F7dM4XAHZAuTYcZ0f9dSSiUKbJ98ivcYWnR-LoVyiYZdhf6LZw60unzxttu=w1458-h942-s-no


And how long should I make the seat?
 
Here is a comparison between the short crank off one of my kids bikes and a typical adults one. I could almost use the latter as a side stand. I do have a really short pair of cranks that I must try out one day, just sitting in my crank storage box.

ADCreHdNh8h1ATgb00ySrE8pnFKY8R0EqSQv21aaYG5GjXjj1-fxt5Hk5Jk6jNfrR4Zb0TK4SqtnEwMscoPetSzw3MqlnPd3Uq8ZeBiNN3lCuzeWBxeUlqIhvQSZQrL9JMxRdc7swexXh6iqTdms9ZedhTGP=w757-h942-s-no


Here I was considering what length I should make the seat. I mean, I could make a super long one, some day, as I do have the materials needed to cover it.

ADCreHc567VimKvmm5qi7OM81b7KDarVSzjfyA4O-QSWb1CPsCdgIQge-PYIzay9jJ9gj6-tcxXznihJZkOh2GkthC-Mo6VlkDXzaN6l3cRX6KFPskK3lOPGNcIZQI4zlEBIT2__fO_hKP-qwQhPHgiQEX4P=w849-h942-s-no


To make a bend in the seat, I decided to try out cutting lots of grooves with my say. I could only choose between my hacksaw and my big hand saw. After some testing, I decided to go with the painful slowness of the hacksaw, as it jumped around less. I had to have a rest every 3-4 slots, and it was like 100+ strokes for each slot.

ADCreHdVHgAKiZJy0Mez3la--NzBN3NjtJQy2jUn7lPzDSFtllMGOfJy6ECgDd_3BW8ZYvwag0mGXWgB0Sqdtx5QtUs-lMvgiyZQKOBDcKB5pnaav7qPgIPmy1LJNgu6iSN-6E9uF_EP58FtzHwCziM3ZWjQ=w1297-h942-s-no


Filling those gaps with the glue was a problem, but at least I had bought a tie-down strap last year to do something that I can no longer remember, so getting a suitable bend was not a problem.

ADCreHcG4JrtbY03_NyTzHUZPYiiXxjl3auubd4-mgRjkOoe-BXY4ecUz5VKWzJYWinpJH4ZIBQRXEOtzYqnYDd6GFgqftbOamqsbpMbqiWYlCPzAUR13Ww-bHjJwR6p9dv1iEba5rbuW3dlGPmrHl7RDmQh=w861-h942-s-no


I still need to cut the seat to shape, and probably add a couple of stiffeners to that curve. I really could do with finding more furniture that uses plywood.
 
I handled a similar removal of the spring/shock on a rear suspension with a 1"ID pipe on my first MBBO
View attachment 249099
https://ratrodbikes.com/threads/mbbo-class-1-hot-purple-valiant-done.86526/post-866129
That is really nice, it still looks like a functioning part. :)

Mine still requires some work to make it a bit slimmer and tidier, which would all be easier with some good woodworking tools. But I am not bothered, as my project is more about minimising the things that I have to buy.
 
That is really nice, it still looks like a functioning part. :)

Mine still requires some work to make it a bit slimmer and tidier, which would all be easier with some good woodworking tools. But I am not bothered, as my project is more about minimising the things that I have to buy.
I can understand that. My budget is so tight on the MBBO this year as well. I've been using stuff I have on hand so far. I might have to break down and get some fabric dye, but it would be the first purchase since the buildoff started.
 
These are our two little companions, who decided to effectively leave there old homes and stay together with us. Such is the way with farm cats when the farms are all very narrow, next to each other, with equally thin fields behind each of them. She is a bit of a small cat, but he is huge, and in a fight you can hear him go 'roh-roh-roh-roh-roh' while the other one makes more normal cat sounds.

ADCreHfilO78yKY2EBKFZVVfKzfJN0ap8-Hx5u-EyJ0xZgcIU7RFKCp62-vHvHwEw3tGIzhZ81-qFhTCo2dY7pCMk55gO34uvmGNIT9UnvnOC9ve6uqA4MXOQ5-CdYMw2ggj6j2JsO0IcrFdLIXmqRlDRSZB=w1039-h942-s-no


So I got my old jigsaw out, Bosch, and at least 30 years old, to cut these stiffener pieces out. I usually use the jigsaw to cut up wood for the fire, so it was nice to use it for its intended purpose.

ADCreHcbnd_YG71DoI7OCTPxgvt2UqWlne8m6HQgPKDnRko8AWHkjrbx2dIxi63q3mo2oIZF3gog2lYkTpIQEd9ZK4mTgwXcMEcppDc65CuM8qxkQWjLhjq6sXglyqHTZUNauTWGujMYZhMljnLqiwbvY60V=w911-h942-s-no


And this was the underside, before I got my nearly one year old Bosch angle grinder out to nip the ends of these screws.

ADCreHeQIE2Tf-Ufs3c0ZazspplbhLXSqDvANkU1rG3Hl1jf8KV87vXIElU_7w2NlqwVF9MJQInplDmt9e7lrJkOLfe22Qs3IAYUOBv5MQ82plLo3ek1_IoYEIDVZ0D8T9WkYEty8AnV1a1i_y79ReOlkpVF=w818-h942-s-no


I have got some aluminium strip that is about the same width as the thickness of this board, but I would also like a real of something wider, maybe aluminium as it bends easily, to make a good edging around the board that the material can be folded over and stapled out of sight. The stapler should work well at that, I tried it earlier on a scrap piece of the ply.

I also need to cut a hole in the board at each end, so I can partly conceal the front mount and then make it easier to create the rear mounts.
 
I can understand that. My budget is so tight on the MBBO this year as well. I've been using stuff I have on hand so far. I might have to break down and get some fabric dye, but it would be the first purchase since the buildoff started.
I could do with some fabric dye as well, but it has been many, many years since I have done any of that, like 45 years. Maybe I should consider it, the seat cover material I used for my last seat is good, but too light colored for use on a bike.
 
Now I have cut out the shape of the seat, and the next stage will be to position all the support brackets, so that that the rear uprights end up vertical. I am going to cut a hole at the rear of the seat as I have no long pieces of threaded steel that I could somehow bolt on.

ADCreHeDdOnhFB31Ng-AH5Nz-_51wpqRxwreDmThM8do3SNUIAzQRsPymysXhSBXC6VwrRANFXNdCfFwCq6QDyeWM_23ItgqnAyrtoN1NyYIha9drO-zr6zdY-NiLeGjmhLZtr7tMF980qtIfe-dQDik7k4K=w811-h942-s-no


This time I decided that it was worth testing out some old leatherette kind of material, as I remembered that I had reused an old easy-chair / bed out of the main room in our house to create a temporary workbench in the main part of our brick barn. I think that it is actually going to be a permanent workbench as it is useful when cutting up non-choppable firewood, working on the mowers and stuff like that.

You can see the leatherette on this side but, to keep the bench looking at least semi-presentable, I cut a piece off the other side.

ADCreHcsNu0BEWfTRbfNUhp6pN4XEGAn63lZArnBpbIuEoq-CulM6pmb098aw4YmIcW4nOwwACc-FfNqSw6Ld19uNs_YIADssjEBMfAKzAQ8oQs24R-q7Xty57Qy9Xb_x1ZGGbb20gntXSHge3b5GOlaP0bJ=w729-h942-s-no


So here we have the piece.

It is a lot better than it looks, there is just one slightly-serious rub mark on it - other than the cobwebs and sawdust.

Hopefully I did not cut it too short.

ADCreHdK4Ze6zxP0h-UtgUJPFebuEytHw-iRrS-lq4i0MEfoqgQ5NKe2uwEncV_N041nCNDbDRNrj2SgQye9h_jg79zOW1qY5b3XEXepKz8noyvp6FWHLgQ6fVO_MH9atzFwAD2fTJg27uRB4tV6GjhlusuG=w817-h942-s-no


So progress on the seat is slow, as I want to minimise the amount of time, effort and money on buying stuff at specialist markets and websites. I especially want to make the best effort to use the things that I have rather than just becoming another product consumer. It just feels more fun using up the stuff I have or find lying around.
 
Parts and materials are very easy to get hereabouts, but even more so are cast off bikes and bits. Every bike I have built has at least something recovered from the street (or some canal.)

I am amassing quite a collection of used steel tubes and plates plus other oddities for my future projects.

We have a regular published schedule for tossing out big things like bikes and furniture. It makes this fortune hunting more civilized and organized.

Depending on the date, the published map shows where to look. :)
 
Now it was time to play with some expanded polystyrene. I should have just got a bigger bit from the main part of the barn, but I was not yet sure how I wanted or needed it to be placed, although there is still plenty of time to do that. It is just that when you have a really big bit it is really easy to cut it wrong.

ADCreHfQaWGjrfWMHkLM7HoY6J6G97S44f2qMMkNTD-nPeWzcQwTusPHDdLLG-bzhMuijOGq5_UcxCdAjDoD5L6j3IUHYcOhOzoC7BLTSL7gJh2EQ9Bqsr-2KV5k5yWldcLT5QWU8P17Lw5OzYBu3Z1fNWos=w1675-h942-s-no


This bit of a bodge up now means that I have a vision of how it should all go so that I do not feel those two bits of wood while I am riding it. I just need one chunk cut to suit the curve of the baseboard, with two slots cut into it, and a flatter top to the whole thing. I wish I had one of those hot wire things to cut through, but a saw will have to do.

ADCreHfZQiXEUH1hlGyQOyWlcnxPdZSLuusihiN_vQ7QUNZuH9Y37D5W36qQ8CtQmnMfrstGi4C2-_2rq34zX3iN825n3inKAQDcdnryub3YXQ29XSfC_ygeSgKWlrLdilUs5dkS-X7PpgZLPakHaph9WeN2=w973-h942-s-no


Here it is sitting on the frame, with one of the support rods from the handle of our formerly small 4 wheeled mower with 3 wheels that I used to cut our expanse of grass with. I am going to put the initial hole to support the seat just above the curve, but I still have to fit the handlebar to make sure that the seat does not end up too high.

Not that I do not want the handlebar to be too high, as I do not really want to replicate the high handlebar style of old bikes on this newer style of frame.

ADCreHeMNrsaqip7XBTF2rv0oxna3SrGQuJl18Je9emupZCc4VYBxW4c3pCD_SA1wG3BHhaXUYoedGFfc4aRXturfUI-GeIDfO2M0sCsx9e0pcCvrBdWBWKoKz45A6P28XW-XMO6kqbZpHIOcp1isKBe17e-=w1267-h942-s-no


I really need to choose and assemble the bars and stuff, and take a look at how the bike is coming together.
 
Parts and materials are very easy to get hereabouts, but even more so are cast off bikes and bits. Every bike I have built has at least something recovered from the street (or some canal.)

I am amassing quite a collection of used steel tubes and plates plus other oddities for my future projects.

We have a regular published schedule for tossing out big things like bikes and furniture. It makes this fortune hunting more civilized and organized.

Depending on the date, the published map shows where to look. :)

It all seems a tad more advanced than over here, as I would love to find a map with dates. Throwing out anything but the most decrepit furniture and stuff here is still a new thing, and the block that we live in when we are in the city is quite advanced as I see newer things thrown out there than I never see elsewhere. I mean, I have already picked up 4 bikes there over the past few years, mostly because it is people moving into the city from the countryside, discovering that their family is buying their kids bicycles etc. and having no real space to stash all this.

I keep checking out the furniture though, especially for anything based on plywood rather than chipboard, and now I am considering the furniture covering material to make seat covers for my bikes.
 
I found out by trial and error how easy it was to make a hotwire for foam cutting, and it worked the first time, better than I had imagined.

Aside from a battery, some random wood, wire, and tape, all you need is the a/c cord, heating element, and resistor wire from a hairdryer or a heat gun that has burned up electronics.

It seems that the chinese electronics fry very easily if you overheat the things, but the actual heater elements do last, So just about any one you find cast off should do even if somebody has stepped on it and it’s smashed on the outside.
 
Back
Top