SWB0 Vertigo Granny

Rat Rod Bikes Bicycle Forum

Help Support Rat Rod Bikes Bicycle Forum:

This site may earn a commission from merchant affiliate links, including eBay, Amazon, and others.
Joined
Sep 18, 2019
Messages
1,307
Reaction score
4,566
Location
Twente, the Netherlands


255480-download-1-.jpeg

Yes!!!


The start:
20231225_091351.jpg
 
Last edited:
Thanks to the idea from @ingola , I decided to give it a go. Granny is out of retirement!

This evening I got the bike in pieces in about half an hour.

I can't imagine this going to the scrapyard... the bike rides great (rear tire empties very slowly), nothing is worn or rusted badly.
Everything came of easy and the bottom bracket bearing turns perfectly smooth.

Pictures:


Smooth

20240101_195333.jpg

Lets Goo!!

20240101_200649.jpg

20240101_201005.jpg

Clean threads! Like new.


20240101_200802.jpg

Perfectly rusted cone. Time's signature.

20240101_202508.jpg


20240101_203022.jpg

Flipped frame!!


20240101_204431.jpg

Looking good.


20240101_205841.jpg

I have this lying about. USA bottom bracket pot.


20240101_205909.jpg

And cranks!


I have some neat ideas and no plans regarding looks yet. I'll let it evolve.
 
Thanks to the idea from @ingola , I decided to give it a go. Granny is out of retirement!

This evening I got the bike in pieces in about half an hour.

I can't imagine this going to the scrapyard... the bike rides great (rear tire empties very slowly), nothing is worn or rusted badly.
Everything came of easy and the bottom bracket bearing turns perfectly smooth.

Pictures:


View attachment 255451
Smooth

View attachment 255452
Lets Goo!!

View attachment 255453
View attachment 255455
Clean threads! Like new.


View attachment 255456
Perfectly rusted cone. Time's signature.

View attachment 255457

View attachment 255458
Flipped frame!!


View attachment 255459
Looking good.


View attachment 255460
I have this lying about. USA bottom bracket pot.


View attachment 255461
And cranks!


I have some neat ideas and no plans regarding looks yet. I'll let it evolve.
I knew it would look wicked
 
1000019200.jpg

Could not help myself.


1000019209.jpg

Never let these cranky builders near cranks!

1000019229.jpg

Velosteel/Torpedo leftover drivers (bearing races were shot) and two JIS crank pieces.

1000019230.jpg

Plans, trust me.
 
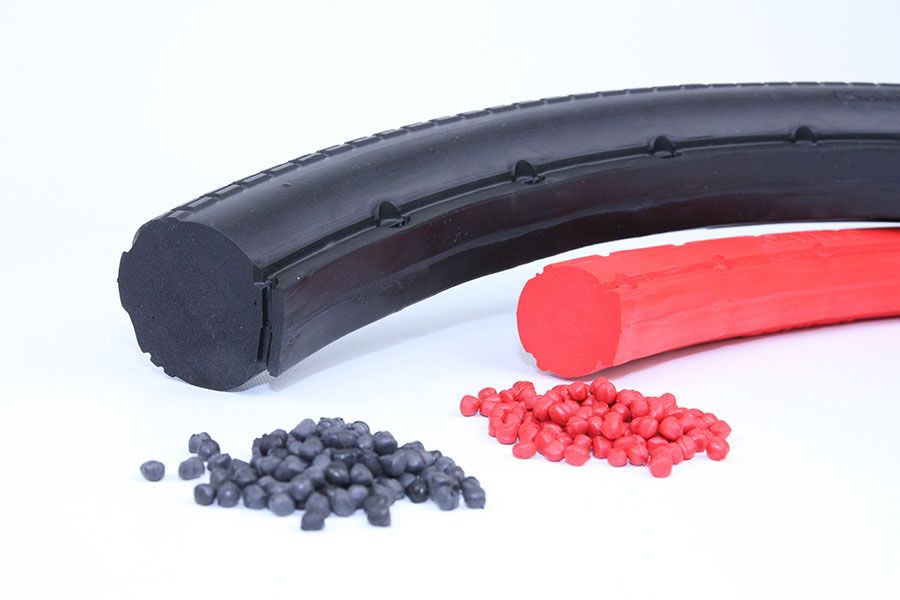
So I found some unused bike tires on a marketplace for this bike:
"Tannus Aither 1.1" in a 'cotton white' colour.
Really excited since they are 'normally' pretty expensive. And I can get an idea for the 'outward force on the rims' to see if these are OK for my 1940 wooden rim set I have lying on the attic for another project.

Picture of a black tire (not mine):
tannus_aither_1_1_01.jpg


Just some more thoughts and notes I'm meditating on regarding Granny:

  • At this point, I can build it with leftover scraps. I might buy some parts second hand or new like bearings, tires and grips.
  • The idea is to keep the budget as tight as possible. I will let you know how much I spent on this project.

  • I currently do not like the white frame colour, but I'll clean it first. I have many many spray cans in my shed.
  • I might spray paint the rims too.
 
1000019242.jpg

I did'nt have a JIS square taper shaft spare, so I made my own tool.

1000019243.jpg

Sheldon brown said 'two degrees'.

1000019245.jpg

1000019246.jpg

Fits like a glove!


That sound when the machine goes ON, fits perfectly in a 'Fear Factory' song.


1000019249.jpg

Spanning and aligning the driver.


I remember RRB likes sparks!


1000019257.jpg

Perfect fit.
Four degree conical/tapered fit.
Now I need to think about loctite 602 (with a little fine sand) and a press or welding it.

These parts fit on a stock JIS square taper shaft and a push-on three slot sprocket will fit perfectly.
Stay tuned to see where this is going ;)

This gon' be awesome!
 
These parts fit on a stock JIS square taper shaft and a push-on three slot sprocket will fit perfectly.
Stay tuned to see where this is going ;)

This gon' be awesome!e
If I'm guessing right this will become some overengineered completely bonkers but awesome contraption...
youtube videos GIF by Channel Frederator
 
Why a 4° conical fit, instead of a straight press or shrink fit? I'm just learning about some of this stuff so curious. I have a small little old Craftsman 6x18 lathe bought off a coworker and I need to get it up and running, this is inspiration!

Let's see...cog driver with a square taper...my guess is some sort of layshaft. Will be easy to swap around ratios! And you mention chain tensioning, so I suppose it'll go into an eccentric maybe, for managing tension to the crankset's chainwheel...which must be on the left unless you're flipping the rear wheel too.....this is going to be wild.
 
If I'm guessing right this will become some overengineered completely bonkers but awesome contraption...
youtube videos GIF by Channel Frederator
*Laughs hysterically* Yes! :grin:
Thank you! Yes it will.

Why a 4° conical fit, instead of a straight press or shrink fit? I'm just learning about some of this stuff so curious. I have a small little old Craftsman 6x18 lathe bought off a coworker and I need to get it up and running, this is inspiration!

Let's see...cog driver with a square taper...my guess is some sort of layshaft. Will be easy to swap around ratios! And you mention chain tensioning, so I suppose it'll go into an eccentric maybe, for managing tension to the crankset's chainwheel...which must be on the left unless you're flipping the rear wheel too.....this is going to be wild.
Thank you, I appreciate it.
The main reasons I went for a tapered fit are: Firstly, if you see the measurements of the original parts (post #6), I could not simply make them cilindrical in the lathe. The only diameter overlap is around 27mm, but then I would have a very small contact surface if you know what I mean.
(Let me know if you want a visual representation of my explanation, happy to help).
The second reason is, that conical pressed fittings are incredibly tight. I wanted the sprockets to be able to take the newtonmeter punishment.

Who do I talk to about getting a "totally confused" emoji added to our list? :doh:
:crazy::grin:

I like it. Flipped like that, it looks almost like a 2 bar swing bike.
That is not a bad idea...! Thanks!


Pictures below: Can you see where I'm going with this?
Build title: Chainz is plural :thumbsup:

I pressed the parts together with loctite 601 and a line of fine grit. Checked if it still turns without wobbling. If loctite doesnt do the trick, I will weld it.

1000019278.jpg

20240103_204310.jpg


There will be a seatpost welded on this spot, so the chain will rotate close to the seat.


So I wanted to remove the bottom bracket bearing and shaft so I could clean and prepare for paint.
But the plastic teeth were dry and instantly broke off...
Then the next option is fire:

1000019312.jpg

I got it out, need to carefully clean the bb threads.
 
Looks as if my thoughts were heading in the right direction...
...I love everything about your plan!

Inspector Gadget Dancing GIF
Thank you!

Solid rubber tires, bottom bracket, chains and sprockets are on its way to my house.
These tires are new and cost 70 euros a piece usually. I got them both for 40 euros, so very happy with that.

1000019337.jpg


Funny how I never would have built a bike in the direction its going, but I enjoy the flow and where it is heading!
 
*Laughs hysterically* Yes! :grin:
Thank you! Yes it will.


Thank you, I appreciate it.
The main reasons I went for a tapered fit are: Firstly, if you see the measurements of the original parts (post #6), I could not simply make them cilindrical in the lathe. The only diameter overlap is around 27mm, but then I would have a very small contact surface if you know what I mean.
(Let me know if you want a visual representation of my explanation, happy to help).
The second reason is, that conical pressed fittings are incredibly tight. I wanted the sprockets to be able to take the newtonmeter punishment.


:crazy::grin:


That is not a bad idea...! Thanks!


Pictures below: Can you see where I'm going with this?
Build title: Chainz is plural :thumbsup:

I pressed the parts together with loctite 601 and a line of fine grit. Checked if it still turns without wobbling. If loctite doesnt do the trick, I will weld it.

View attachment 255679
View attachment 255680

View attachment 255681
There will be a seatpost welded on this spot, so the chain will rotate close to the seat.


So I wanted to remove the bottom bracket bearing and shaft so I could clean and prepare for paint.
But the plastic teeth were dry and instantly broke off...
Then the next option is fire:

View attachment 255682
I got it out, need to carefully clean the bb threads.
I was hoping you were going this way loved where the chain guard was when you first flipped the bike
 

Latest posts

Back
Top