this is neat. I hope you're successful.
You are using an out of date browser. It may not display this or other websites correctly.
You should upgrade or use an alternative browser.
You should upgrade or use an alternative browser.
Old homemade Pennyfarthing basket case
- Thread starter sean1960
- Start date


Help Support Rat Rod Bikes Bicycle Forum:
This site may earn a commission from merchant affiliate
links, including eBay, Amazon, and others.
looks like the beginning of another cool build Sean
good luck
sean
good luck
sean
i agree Luke that's not something everyone knows and it would come in handy
nice craftsmanship going in this
Sean
nice craftsmanship going in this
Sean
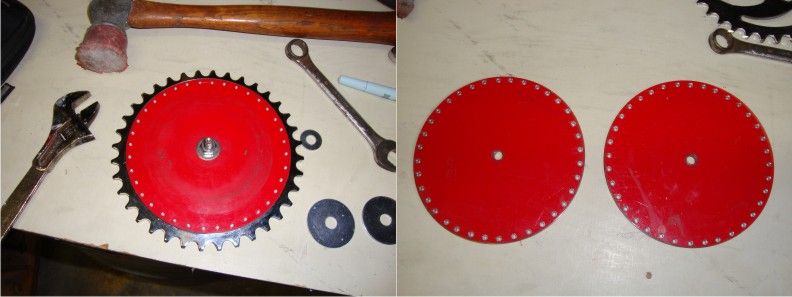
Today I scrounged around in the shop and found some scrap metal to start on my hub. I'm using a piece I cut off the bottom of an old two wheel dolly. I drew two five inch circles on it with a black marker. Using a bandsaw I cut out the two pieces. At this point I have two crudely cut circles. Each piece was carefully ground down close to the line with a hand grinder. After finding the center of each I drilled a 1/4 inch hole in them. With a one inch long 1/4-20 bolt for shank I chucked it up in a cordless drill. Using a belt sander I carefully finished grinding them to size.
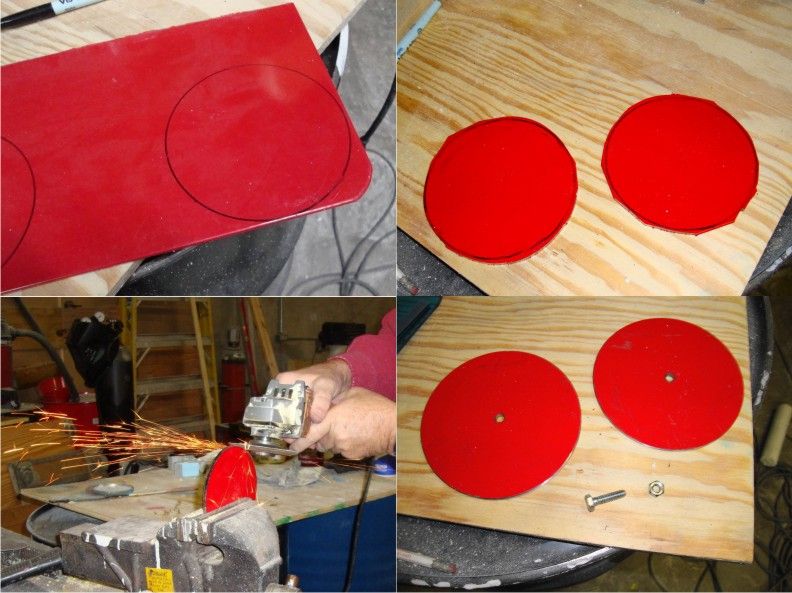
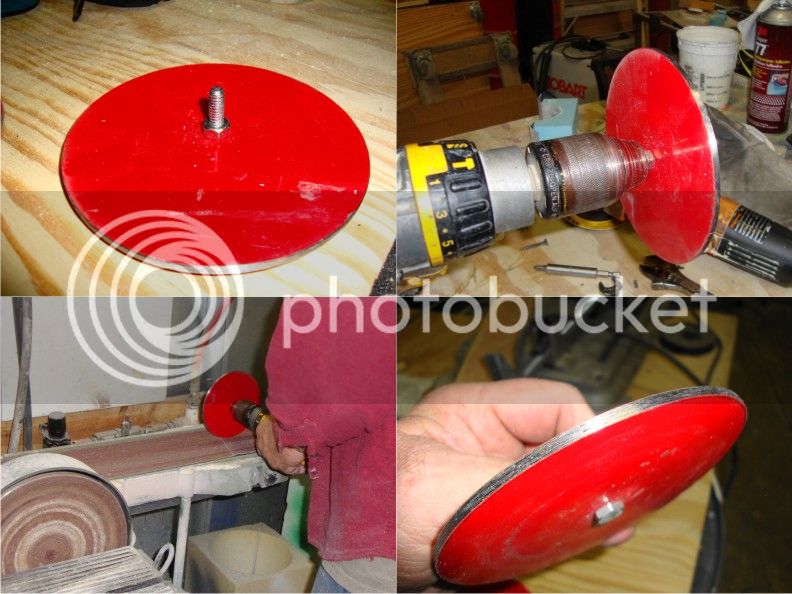
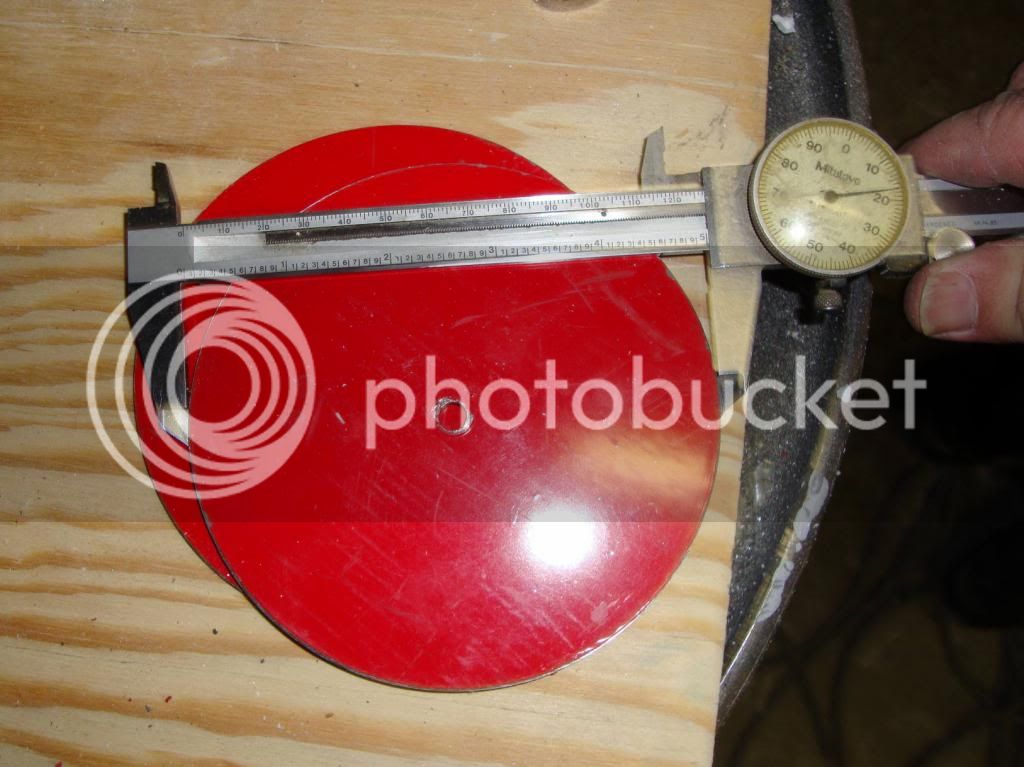
Not bad considering the method used to get to this point. Next I need to drill 36 holes around the perimeter of each one. That will be next weekend because I have to make a jig to keep the spacing correct between each hole. I need to find a 36 tooth sprocket to use has part of my jig. The jig will allow me to index the hub pieces around the proper distance for each spoke hole to be drilled. That's it for now until next weekend.
Not bad considering the method used to get to this point. Next I need to drill 36 holes around the perimeter of each one. That will be next weekend because I have to make a jig to keep the spacing correct between each hole. I need to find a 36 tooth sprocket to use has part of my jig. The jig will allow me to index the hub pieces around the proper distance for each spoke hole to be drilled. That's it for now until next weekend.
Love it!
Learning, watching...
Luke.
Learning, watching...
Luke.
Well I couldn't wait till next weekend. I had Monday off so I worked on the hub. I found a 36 tooth sprocket and a short length of chain to use on my indexing jig. On a scrap piece of wood I laid the sprocket down near one end of the board. I then put the short length of chain on to the sprocket and held it there and put a screw though each of the two outer links. You have to put a spacer under each end of the chain to keep the links level. Once you find where the center of the sprocket will be you have to countersink a hole in the wood big enough for the head of a bolt (top right photo). At this point I made a spacer out of ground down washers to fit the center of the sprocket (left photo 2nd row). I marked the first spoke hole location .100" from the edge of the hub. With the hub disk bolted to the sprocket with a 1/4-20 bolt and two large washers to keep everything level I drilled the holes. In the photo you can see that I did not drill all the way though I didn't want to get into the sprocket. I held the sprocket tight against the chain when drilling. Move the sprocket one tooth at a time and drill each hole. Also the board is clamped to the drill press.
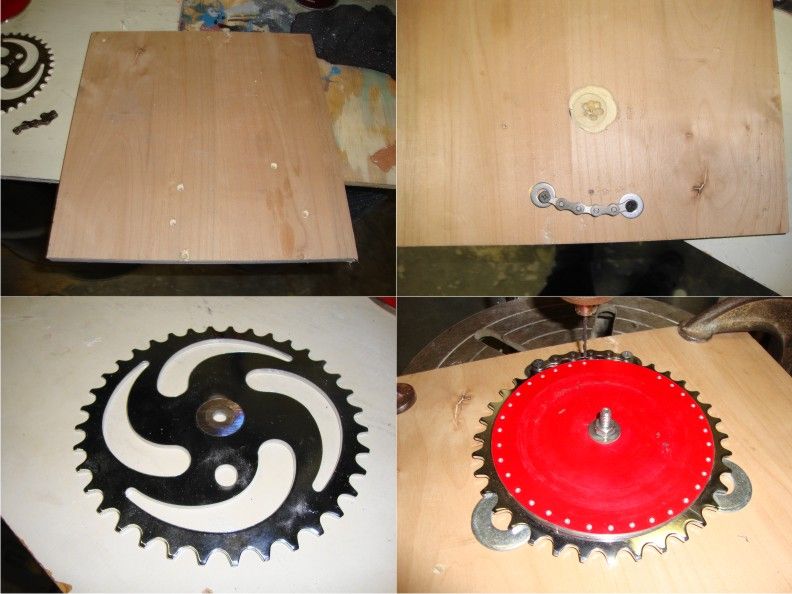
The bottom left photo is with all the holes started but not all the way though the disk. I finished drilling the each disk without the sprocket attached. The bottom right photo is the finished product. I still have some deburr work to do but I'm happy with the results. Two things I would do differently if I had to do these over again. 1st find my center drill (a 3/32 drill bit walks around to much). 2nd don't use a dull countersink to countersink the holes (causes huge burrs).
The bottom left photo is with all the holes started but not all the way though the disk. I finished drilling the each disk without the sprocket attached. The bottom right photo is the finished product. I still have some deburr work to do but I'm happy with the results. Two things I would do differently if I had to do these over again. 1st find my center drill (a 3/32 drill bit walks around to much). 2nd don't use a dull countersink to countersink the holes (causes huge burrs).
Looks good!
Luke.
Luke.
The Renaissance Man
__CERTIFIED DIVER__ (Open Water & Open Dumpster)
Staff member
Moderator
Pro Member
Good idea on the jig.
Progress has been slow. I am working on the spokes. It has been a challenge to say the least. Here is what they look like so far.
7 down 65 to go and that's just this end they all still need to be cut to length and threaded.
7 down 65 to go and that's just this end they all still need to be cut to length and threaded.
The Renaissance Man
__CERTIFIED DIVER__ (Open Water & Open Dumpster)
Staff member
Moderator
Pro Member
Are you creating the spokes from scratch? If so, what's the process?
Wicked engineering going into this build!!!!
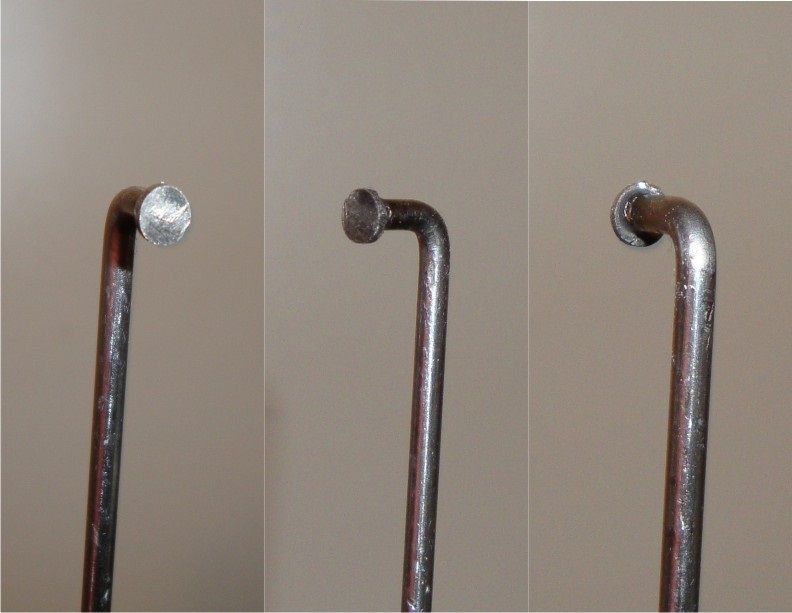
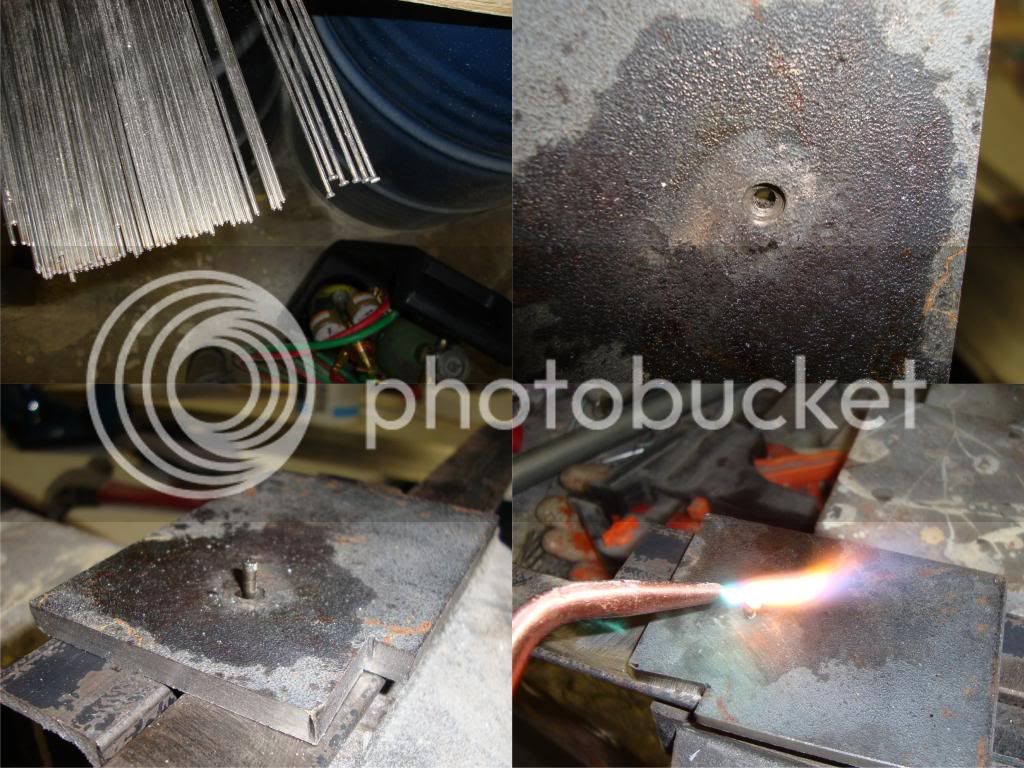
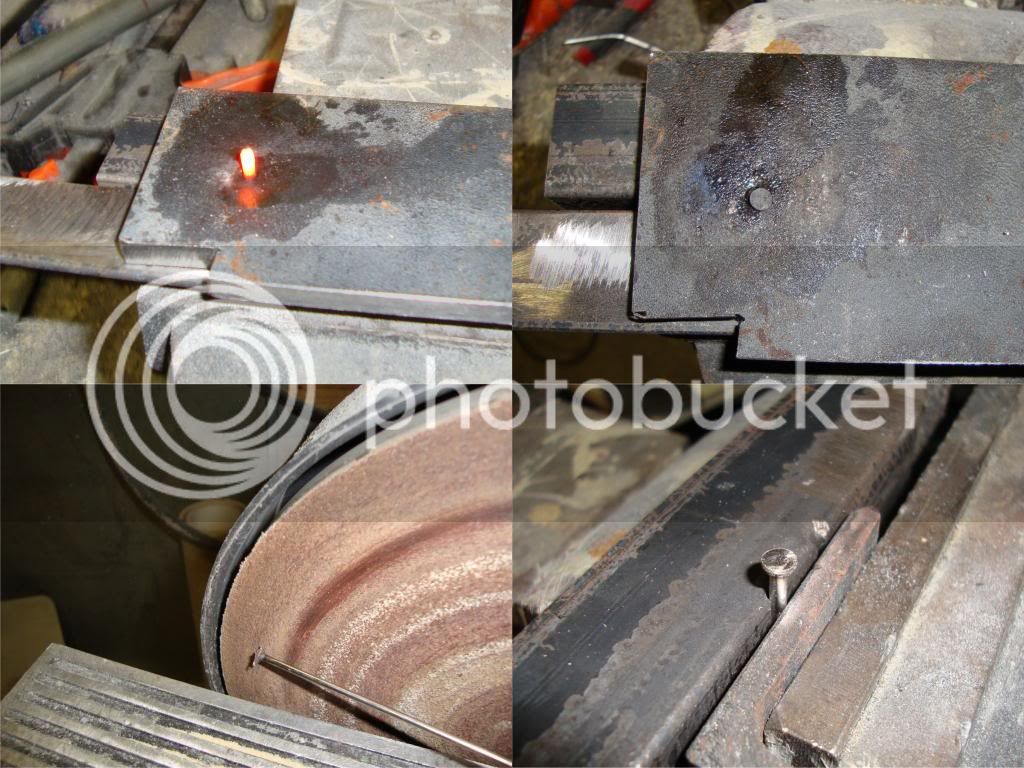
Here are some pictures of my crude but affective method of putting the heads on my spokes. I'm using 3/32" stainless steel welding rods for the spokes. The end of each rod needs to be heated and then formed. I'm sure I am no doubt affecting the integrity of the metal by heating it but I tried without the heat and had no success. I started by drilling a 3/32" hole though a piece of 1/4" steel and then countersunk that hole with a #15 drill about 1/16" deep (right photo first row). In the photos you see that the welding rod is clamped in the vice with about 3/8" to 7/16" of rod sticking out above the surface of the 1/4" plate. This is the area that will be heated so that it becomes malleable. At this point the rod can be struck with a hammer and forced into the countersunk hole of the plate. I used a product called nozzle dip to keep the two metals from trying to stick together. After this each spoke head is dressed up on the grinder. The final step is to bend the head over to the desired angle using a piece of metal and a hammer.
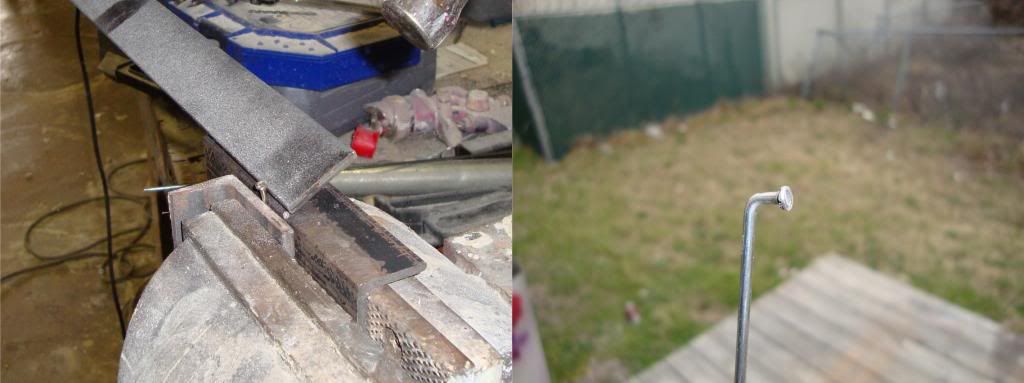
Next I will cut them to length and thread all 72 of them plus a few extras. Did I mention that this is very tedious work. I'll be glad when I am finished with the spokes.
Next I will cut them to length and thread all 72 of them plus a few extras. Did I mention that this is very tedious work. I'll be glad when I am finished with the spokes.
Very cool!
Awesome work Sean, really impressive results!
Luke.
Luke.