My rat rod wagons - #1

Rat Rod Bikes Bicycle Forum

Help Support Rat Rod Bikes Bicycle Forum:

This site may earn a commission from merchant affiliate links, including eBay, Amazon, and others.
Joined
Jan 30, 2010
Messages
547
Reaction score
33
Location
Boise, Idaho
Rating - 100%
1   0   0
I wanted a classic rusty neglected radio flyer type wagon for my son, but wanted it customize it, and not spend a bunch of money. I found one, and had a 'Deliverance' moment hen I got it in the Santa Cruz mountains (but that's an entirely different tale). Here it is as dragged home:
wagonrustywagon.jpg


and here it is disassembled:
wagondecontruct.jpg


Now this is the part where I always promise that I'll take 'in progress' pics, but so get involved in the build that getting the camera is the last thing on my mind. I can tell you that my cut off wheel/angle grinder was used, along with my impact driver, drill, and vise.
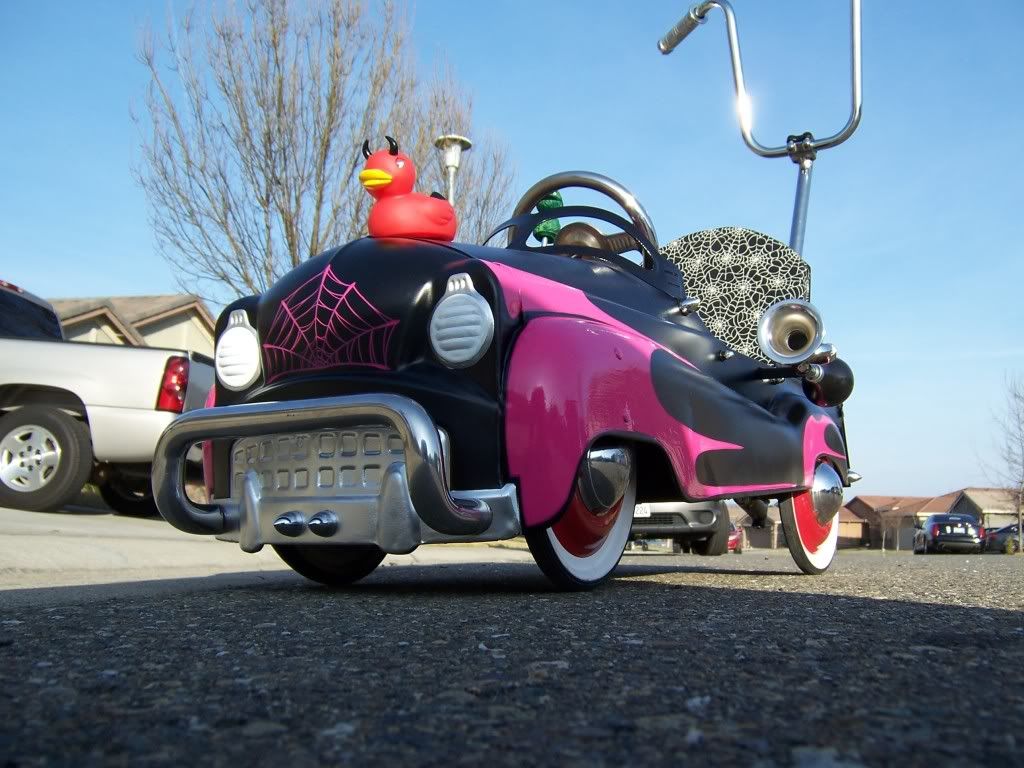
I don't have a welder. I ditched the original wheels in favor of bearing wagon wheels from orchard supply. Used Kilz to faux white wall them (I only did once pass; they've flaked a little since I took the picture, and these chinese wheels continue to offgas obnoxious fumes). I took the existing wheel struts and inverted them to get the low stance. I fabricated all new stake beds from oak and poplar. I used and assortment of 1/2 square tubing from a real estate 'for sale' sign, and some thick wire hangers to make the awning frame, and some old license plates for the seat back. Had some leftover faux snake skin fabric to make the rag top. I had my friend weld in an extension in the handlerod to save my arm and back when pulling it around.

wagon4.jpg


wagon5.jpg
 
Re: My rat rod wagons - #2

After making notes about what I would do differently, I started looking at this other wagon... I had bought this one solely so I could make a template for the stake beds.... but why let a perfectly ratty wagon go to waste?

wagon2-redradioflyer1.jpg


I did the wheel strut inversion again to get the stance, as well as swap the back wheels with new OSH bearing wheels. I cut out the broken parts of the stakebeds to make a half bed. For the seat back, I used perforated angle iron (the kind used for supporting garage doors) for the frame, and perforated sheet metal for the back. I had two sheets of vintage canvas from an odd thingamajig I got at the thrift store to make the rag top. This is an in progress shot; I'm upgrading the front wheels to new OSH wheels.

wagon2-2.jpg

wagon2-1.jpg

wagon2-3.jpg
 
Re: My rat rod wagons - #3 - TBD

The one drawback of these low profile wagons is that they bottom out on anything that isn't smoothly maintained paved cement or pavement.. which is about 50% of our roads and sidewalks in my town, and 80% of the local fairgrounds. I want to build something with a little more clearance. I have this pan that I acquired with the second stakebed wagon that will probably be the basis of my next build.

Green Greyhound:
wagongreengreyhound.jpg
 
very nice! I saw on craigslist the one for sale, and now I see there's another 8)
my next project is a swap meet wagon for my daughter and I, and I believe I have all the parts needed.
If it's not a huge secret, do you mind sharing how your steering is put together? the way I plan on lowering mine looks like more work than that.
I have one of her projects done, and after her wagon it'll be time to start thinking about her 1st bike!
100_3640.jpg
 
The first wagon is listed locally, but the second one isn't for sale; its my little boy's daily driver. We roll around the neighborhood almost every evening in it. Here's how it sits currently:
wgon2current.jpg


The steering isn't a secret; it might be too simple and crude but it works. I removed the stock steering yoke from the wagon, tossed the mounting plate and inverted the yoke. I grab flat bar or two, and form a crude leaf spring and mount it to the belly of the wagon. Then drill a hole in the end of the 'leaf spring', put the steering yoke on it (upside down, then put a bolt (along with washers and grease) through it. Pix:
wagonbottom3.jpg

waonbottom1.jpg

wagonbottom2.jpg


You'll have to dial in the ride height, depending on the curve of the leaf spring, the type of bolt, and number of washers used.
 
Re: My rat rod wagons - #4 ???

Oh, I picked a new wagon pan this week:

wagonaeroflite.jpg


Going to save this one for an extra super duper special project. (nothing in mind yet, it just is an awesome pan)
:D
 
My rat rod wagons - #4

I wanted something to take to the swap meets, and since swap meet grounds are not smooth meticulously maintained race ways, the low rider would constantly bottom out. So I needed something with clearance, could hold some stuff, and keep my boy dry/shady. So, scrounging got me these:
wagonscrap.jpg


and and few ideas.
 
My rat rod wagons - #4

cut off wheels are my friend, and a found lawnmower handle thrown into the mix, yielded this:
wagon9.jpg


wagon7.jpg


wagon8.jpg


The LED spot lights work, as well as the led bullet taillights.

It is a bit heavy, but my upper body gets a healthy workout dragging it around all day. It is unlikely to rollover, but if does, the rollbars are on there TIGHT.
 
Finally got my son's wagon "done". Thanks for the help with the front end. I wound up using the top piece of a leaf spring off an old pickup.


The side 'handlebars' .. are those custom cut, or repurposed from something else?

Georgeediii said:
Finally got my son's wagon "done". Thanks for the help with the front end. I wound up using the top piece of a leaf spring off an old pickup.
 
I cut the red pieces out of 3/4 MDF and hit them with the rattle can. I was trying to go for the "Pie Wagon" look.


I only intended to do one wagon for my son. After showing it to some friends, however, I soon had another wagon fall into my lap. Since I already had the other leaf spring to play with, I thought I might as well put another one together.


Back
Top