You are using an out of date browser. It may not display this or other websites correctly.
You should upgrade or use an alternative browser.
You should upgrade or use an alternative browser.
Tribute to our friends
- Thread starter Fireproof
- Start date


Help Support Rat Rod Bikes Bicycle Forum:
This site may earn a commission from merchant affiliate
links, including eBay, Amazon, and others.
Sir... and lady! You have definitely raised the bar! I need to get some plastic and start playing around with it. You two are just making stuff that is way too cool. Giving me all kinds of ideas (and a big wish list too :roll: ) I look forward to every update! maybe I'll meet you both one of these days.
Keep up the great work and keep dreaming up cool parts for the rest of us!
Keep up the great work and keep dreaming up cool parts for the rest of us!
- Joined
- Mar 10, 2009
- Messages
- 1,465
- Reaction score
- 1
Blinky goes retro!
Thanks pvwacko, and we like your Little Red Express Trike! And it’s guys like you who inspire guys like us. Oh and by the way, you been working on it lately? We hope to see it finished!
Check out Blinky's new retro vibe!
This is temporarily assembled; We plan on making a braket, painting it, and getting it pinstriped! 8)
Great job!
Keep rollin'
Keep rollin'
:shock: :shock: YOU GUYS ROCK! :shock: :shock: :mrgreen:
Fireproof said:Thanks pvwacko, and we like your Little Red Express Trike! And it’s guys like you who inspire guys like us. Oh and by the way, you been working on it lately? We hope to see it finished!
Spring break is 2 weeks away and I'm finally going to order the disc brakes so I hope to make progress then. Thanks for keeping on me about it.

I've been watching this build for a while now trying to uncover your secret and I think you may have finally let it slip in your last post...
Fingernail Polish! Its all so clear now, it must be true! The secret to all that is awesome is Painted Nails! I must run out at this very moment and get my own supply to use liberally on my builds! Thanks for revealing your secret!
In all seriousness, You are doing Amazing work! Not just for a youngster but for a grown up too! Most people just dont have the talent, skill, or willpower to accomplish what you are doing. Keep up the great work! I cant wait to see it finished let alone what your next project will be!
You two are going all out in this project... I LOVE IT :mrgreen: Great details and everything
- Joined
- Mar 10, 2009
- Messages
- 1,465
- Reaction score
- 1
Blinky . . . Right-On & Solid!
Thanks folks, for all the positive comments. Had a minor setback last weekend, so we didn’t get as much done as we wanted. We were hoping to have the fender mounting taken care of, but a couple parts needed modifying. We have a plan for it that will be put into action soon. Till then . . .
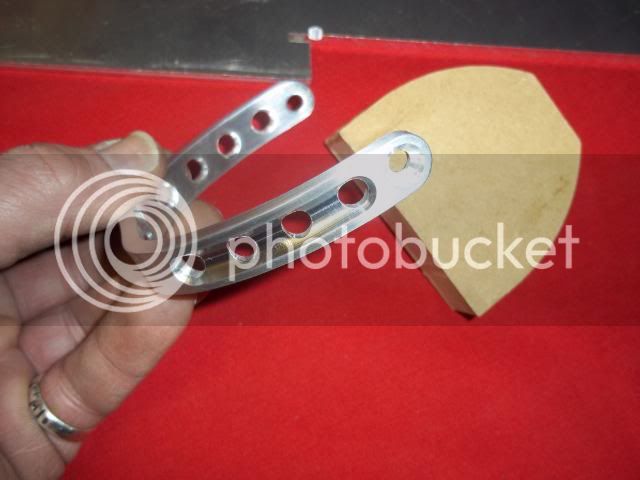
This is the bracket for Blinky. No nail polish, but I did the best I could anyway.
First, I cut a strip from the 3/16" aluminum plate (the table saw cuts that stuff like butter!), and used a 3/8' ball mill bit to make the recesses, and then I plunged into the recesses with a 1/4" end mill bit to make the holes. I used a countersink by hand to put a slight chamfer on each of the holes. In the background, you can see a piece of MDF that I cut to a pattern. I used that to put the bend in the aluminum strip by clamping them into the vise and tapping the aluminum around the MDF pattern with a rubber mallet.
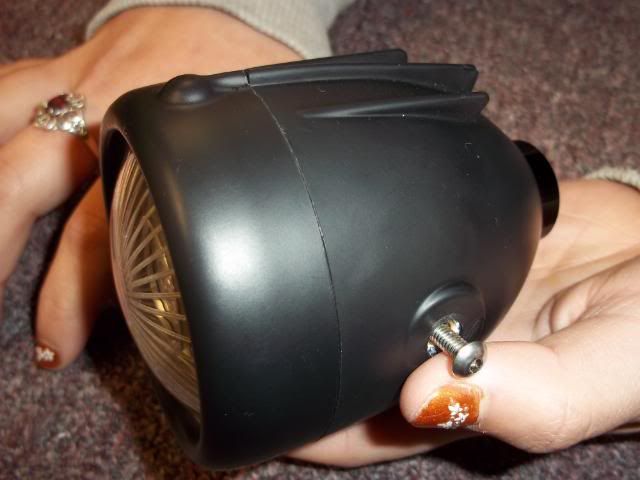
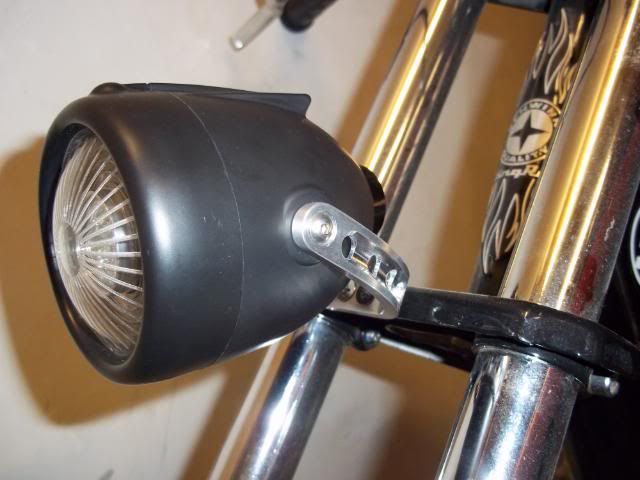
Here’s how it looks on a bike. This is little bro’s Schwinn acting as our fashion model. You can see that it simply bolts to where the original reflector was removed. In case you don’t recognize it anymore, the dark piece at the back of the headlight bucket is the actual end cap of the flashlight. The switch is sealed and built into the cap. Battery replacement is accomplished by removing the cap and pulling the battery cartridge out from the rear of the bucket. And with that, Blinky’s disguise is complete . . . no duct-tape or hose clamps required!
There’s still three or four items that have yet to be addressed, so I’ll be searching for some junk to use for making more detail parts during my lunch breaks . . . why waste time eating, right? :wink:
Now, if I can just remember to bring the camera!
Thanks folks, for all the positive comments. Had a minor setback last weekend, so we didn’t get as much done as we wanted. We were hoping to have the fender mounting taken care of, but a couple parts needed modifying. We have a plan for it that will be put into action soon. Till then . . .
This is the bracket for Blinky. No nail polish, but I did the best I could anyway.
First, I cut a strip from the 3/16" aluminum plate (the table saw cuts that stuff like butter!), and used a 3/8' ball mill bit to make the recesses, and then I plunged into the recesses with a 1/4" end mill bit to make the holes. I used a countersink by hand to put a slight chamfer on each of the holes. In the background, you can see a piece of MDF that I cut to a pattern. I used that to put the bend in the aluminum strip by clamping them into the vise and tapping the aluminum around the MDF pattern with a rubber mallet.
Here’s how it looks on a bike. This is little bro’s Schwinn acting as our fashion model. You can see that it simply bolts to where the original reflector was removed. In case you don’t recognize it anymore, the dark piece at the back of the headlight bucket is the actual end cap of the flashlight. The switch is sealed and built into the cap. Battery replacement is accomplished by removing the cap and pulling the battery cartridge out from the rear of the bucket. And with that, Blinky’s disguise is complete . . . no duct-tape or hose clamps required!
There’s still three or four items that have yet to be addressed, so I’ll be searching for some junk to use for making more detail parts during my lunch breaks . . . why waste time eating, right? :wink:
Now, if I can just remember to bring the camera!
Looks great.
Keep rollin'
Keep rollin'
bnbnbnbnbnbnbnbnbnbnbnbnbnbnbnbnbnbnbnbnbnbnf
sorry, my chin hit the keyboard when my jaw dropped! this is one of the most impressive builds ive ever seen. the reason i never posted before is after reading it im always speachless! 8)
sorry, my chin hit the keyboard when my jaw dropped! this is one of the most impressive builds ive ever seen. the reason i never posted before is after reading it im always speachless! 8)
YEAH!!! weight reducing holes :mrgreen: sorry they are my favorite
- Joined
- Mar 10, 2009
- Messages
- 1,465
- Reaction score
- 1
Rear fender mounting-step1
Thanks to you all for the nice comments . . . we truly appreciate them!
Hope you won’t mind a bunch of photos. This is how we started to get the fender mounting taken care of . . .
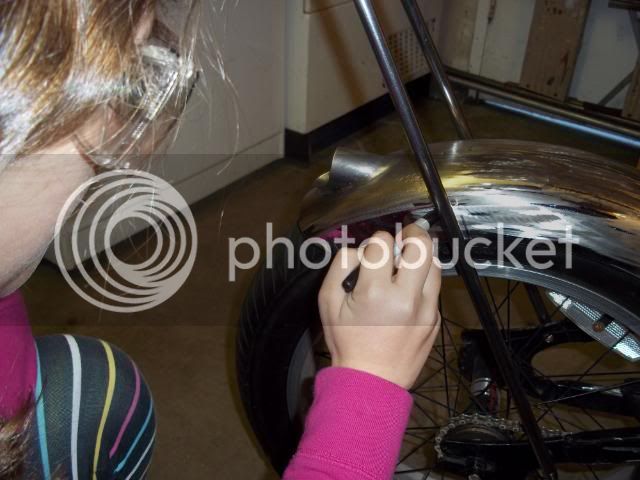
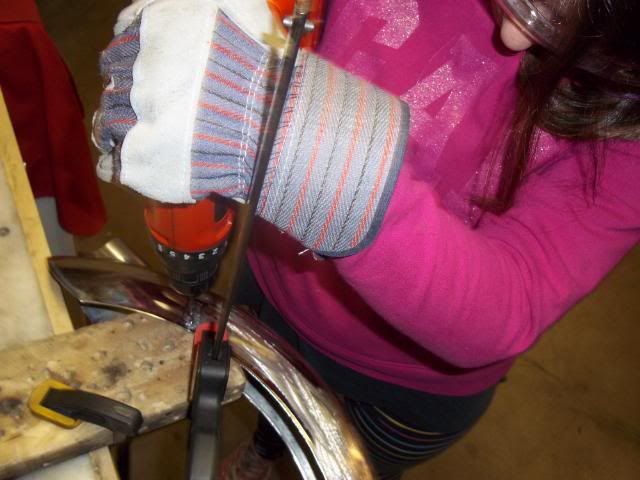
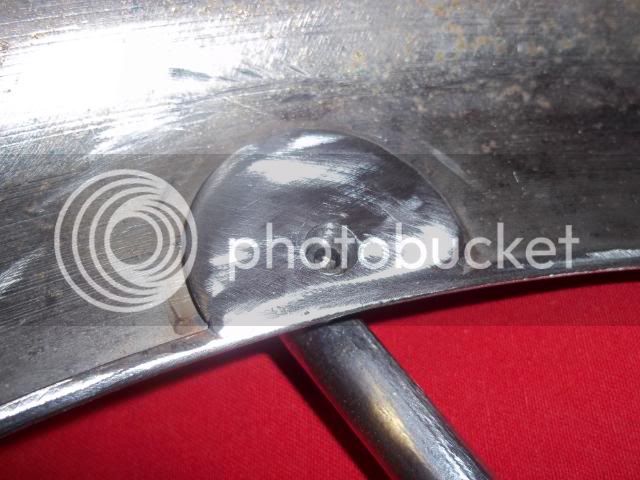
We positioned the sissy bar at an angle that looked right, then bolted it to the drop-outs. A chain is installed and the wheel is adjusted so that the chain is tight. The fender is sitting on the tire with ½" spacers to hold it above the tire. With every thing in place, we marked the fender on either side of the sissy bar with a Sharpie. The sissy bar was also marked . . . right at the bottom edge of the fender.
Measured up ½" from the bottom edge of the fender and drilled a hole between the marks . . . on each side of the fender.
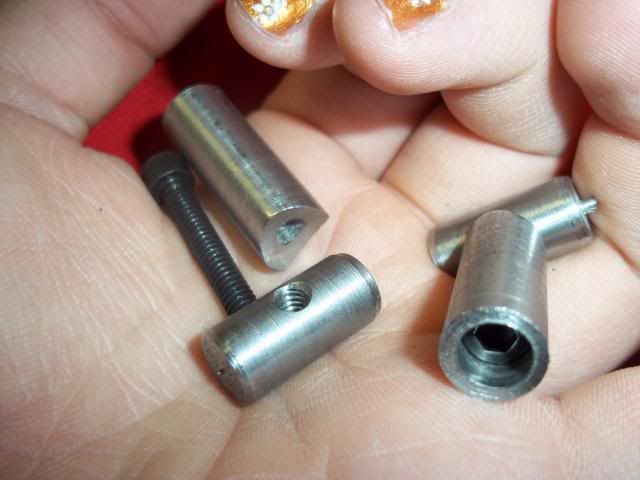
Some custom parts. 8) The pieces that are threaded have been turned-down to fit inside the sissy bar tubing. The other two parts are step-drilled . . . a small hole at one end, and a bigger hole at the other end. See how the socket-head screw fits inside. Also, these have been made to snuggle up against the outside of the sissy bar.
We removed the sissy bar and drilled holes ½" above the Sharpie marks for the socket-head screws. Here’s the parts bolted to the sissy bar.
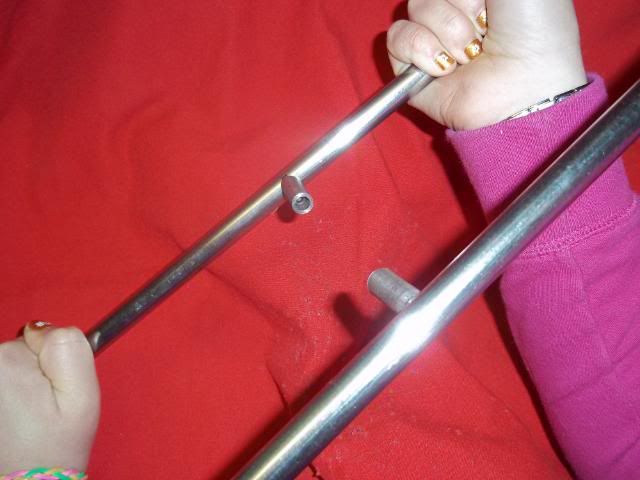
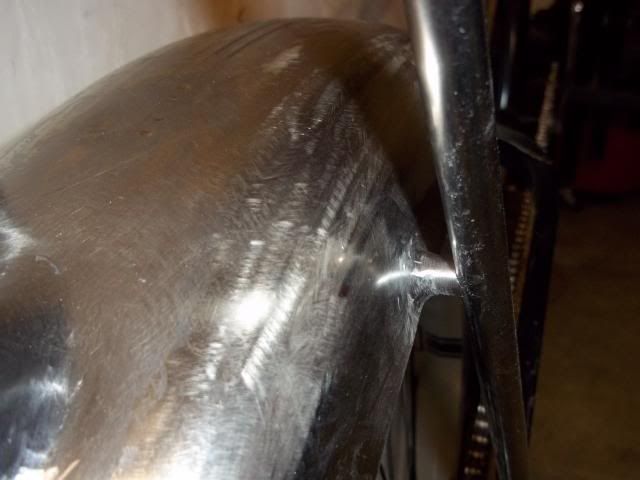
The fender and sissy bar were re-installed with the special tubes inserted into the holes in the fender and tack-welded. Next, the fender/sissy bar combination was carefully removed as a unit so the parts could be completely MIG welded.
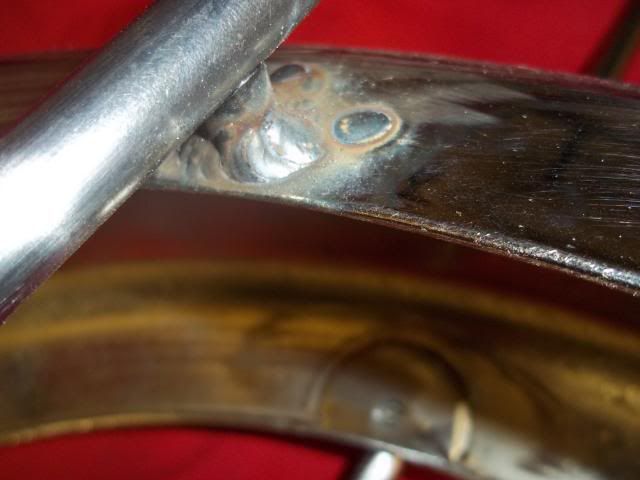
This is on the inside. In order to reinforce the mounting, we bought a couple large washers at Lowe’s, drilled the washers to fit over the mounting tubes, and trimmed the edge of the washers. This is how it looks after the washers were welded and ground. Note how the socket-head screws are recessed for tire clearance.
Back on the bike . . . a view from the outside. The fender still needs an additional attachment point towards the front . . . we’ll tackle that next in step 2. :wink:
Thanks to you all for the nice comments . . . we truly appreciate them!
Hope you won’t mind a bunch of photos.
This is how we started to get the fender mounting taken care of . . . We positioned the sissy bar at an angle that looked right, then bolted it to the drop-outs. A chain is installed and the wheel is adjusted so that the chain is tight. The fender is sitting on the tire with ½" spacers to hold it above the tire. With every thing in place, we marked the fender on either side of the sissy bar with a Sharpie. The sissy bar was also marked . . . right at the bottom edge of the fender.
Measured up ½" from the bottom edge of the fender and drilled a hole between the marks . . . on each side of the fender.
Some custom parts. 8) The pieces that are threaded have been turned-down to fit inside the sissy bar tubing. The other two parts are step-drilled . . . a small hole at one end, and a bigger hole at the other end. See how the socket-head screw fits inside. Also, these have been made to snuggle up against the outside of the sissy bar.
We removed the sissy bar and drilled holes ½" above the Sharpie marks for the socket-head screws. Here’s the parts bolted to the sissy bar.
The fender and sissy bar were re-installed with the special tubes inserted into the holes in the fender and tack-welded. Next, the fender/sissy bar combination was carefully removed as a unit so the parts could be completely MIG welded.
This is on the inside. In order to reinforce the mounting, we bought a couple large washers at Lowe’s, drilled the washers to fit over the mounting tubes, and trimmed the edge of the washers. This is how it looks after the washers were welded and ground. Note how the socket-head screws are recessed for tire clearance.
Back on the bike . . . a view from the outside. The fender still needs an additional attachment point towards the front . . . we’ll tackle that next in step 2. :wink:
- Joined
- Aug 3, 2010
- Messages
- 12,545
- Reaction score
- 2,885
This is going to be an epic build. :mrgreen: Eagerly awaiting more.
Latest posts
-
 Bike from the Dead's Freshly-Exhumed Finds (Everything I've dug up since 6/15/21)
- Latest: Bike from the Dead
-

-
-

-

-
-
-

-
