Sirocco - Soft Sand Trike

Rat Rod Bikes Bicycle Forum

Help Support Rat Rod Bikes Bicycle Forum:

This site may earn a commission from merchant affiliate links, including eBay, Amazon, and others.
Joined
Jan 14, 2012
Messages
296
Reaction score
3
Rating - 0%
0   0   0
The last box of parts I was waiting on before starting the assembly of this build arrived today. Sirocco is a dry wind that blows across the sands of Africa. I was inspired by the trikes and beach bikes on this site to try to build a trike that can be used as a prime mover to get elderly and handicapped people across the loose sand barrier between the pavement or boardwalk and the surf packed sand.

Stopped in to start working on the build at Colin's. "Haulin Colin" makes a lot of custom trailers and cargo bikes. Frankly he has a lot nicer shop than I do and a lot of it came in handy tonight.

Put the frame in the stand and did a rough fit of the trike frame and rear wheel/tire.
429192_3249258719180_1498326880_33194329_469997414_n.jpg


The rear tires are norco 21x12-8 slicks mounted on kite buggy wheels. We had to drill out the 15mm bearing adapters to fit the 5/8 axle and Colin will be fabricating a driving plate to weld on the axle flange tomorrow. They were pretty close to a perfect fit and are lightweight compared to some of the other options. The Wheeleez are probably lighter, but after calling them 4 times and not getting an answer I decided to go this route. The Norco's run at 4psi and this wheel configuration is very popular and sees a lot of abuse from the kite guys.

This is a little better picture showing how the wheel fits along with SA 5 sp transmission. The adapter is simply going to get welded to the driver and bolted to the wheel with one bolt for each of the 8 spokes.

397039_3249260479224_1498326880_33194335_610636024_n.jpg


Once both rears were mounted we started working on the front. The headset wasn't quite right so we had to press out the tube and turn down the race support, one of the bearing shells cracked so we replaced it and that meant the dust seal need to be trimmed. The front rim is a "Large Marge" and laced with heavy duty spokes to s surley hub with an endemporph 3.7 on it. Initially it just cleared after the build it just touches. We'll dimple the chopper forks a hair. I was really able to save a lot of money by recycling abandoned snow bike parts I found on CL.

422575_3249262079264_1498326880_33194336_294353730_n.jpg


At this point it seemed like it was time to see what happened when we put the roller on the ground. It was pretty obvious that the 30" forks were a bit too long so we adjusted them down a little to give it a flat rake with plenty of ground clearance.

431669_3249264079314_1498326880_33194337_181496299_n.jpg


From there we trimmed up the fork tubes and dropped in the stem and mounted the handle bars all pretty uneventfully.

423336_3249265199342_1498326880_33194338_646789949_n.jpg


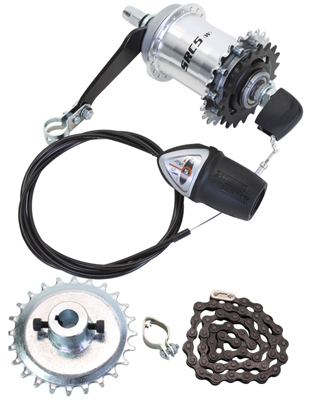
This last picture shows how the trike kit fits on. It's pretty simple really.

420273_3249266999387_1498326880_33194339_108208965_n.jpg


With that we called it a night. Colin is going to work on finishing up the rest of the human powered part of the driveline tomorrow. After work I'll stop by and we'll plan out the electric drive and rear carrier for the articulated trailer. I feel even more confident than when I started that this will have enough floatation to get across the sand and isn't going to be too heavy to pedal doing it.


I'm still at a loss related to seat and grips. I would like to put a suicide shifter on, but so far I have had no luck finding the SA 5 speed stick for it. BUT despite that, I should be able to ride it tomorrow and have it powered up not long after that.

FUN!
 
Was thinking about the seat this morning and think I've narrowed it down to a few choices.

The ever popular and inexpensive Velo kit about $40..
velo-seat-grips-kit-white.jpg


A stamped steel universal implement seat for about $25 that I could then paint, powdercoat or plate anyway I wanted.
UniversalAntiqueSteelPanSeat_232938.jpg


The Lehman's cast aluminum implement seat for $50 that I could paint, powdercoat or polish.
247_2.jpg


A stool with a plastic implement seat that I could purchase online or from Target for $65 there are colors but I think white.
AAAADBs3QF4AAAAAAS1dcQ.jpg


I think for any of these I'm going to mount them on a suspension seat post. The Lehman seat weighs 6 lb even though it is cast aluminum which I think makes it the heaviest.

I know there have to be other options. They have to survive being in the full sun without becoming so hot you get burned and I like them being a little bit "industrial".

FUN!
 
Wow! looks awesome. I just have one question. "I was really able to save a lot of money by recycling abandoned snow bike parts I found on CL.", really? where did you find 'abandoned' snow bike parts? and are there any more?
 
moleman said:
Wow! looks awesome. I just have one question. "I was really able to save a lot of money by recycling abandoned snow bike parts I found on CL.", really? where did you find 'abandoned' snow bike parts? and are there any more?

The front tire and rim were on the Seattle CL. I got them for about 1/3 of the cost of new before shipping. I also picked up a set of snowcat rims and 2.5" hookworms from the same guy. These parts show up pretty frequently as seasons come and go and riders upgrade, downgrade or simply get out of the sport. They're nice parts compared to the typical wide chopper bike rims, double walled etc... I do scan CL pretty regularly and will post when I spot stuff in the future. I may have just gotten lucky but when I started thinking of this build they were there along with some larger ones I couldn't have fit in these forks.

I just ordered the Lehmann's aluminum seat. I have never bought from them and been disappointed and even though it's probably heavier than the others it's really not going to matter that much after the electric drive goes in.
 
Had to work late last night. I heard from Colin that it's now a rider.

Today I have business travel so... So I guess I'll do a few sketches for myself of the electric drive and the articulated two seat/wheelchair/walker trailer.

If I get lucky I'll even have a chance to walk along the beach I imagine this bike being ridden on this weekend. :D
 
Went for a ride, well brief pedal is a better description. The aluminum tractor seat arrived and I can see how to mount it. I ordered a few more pieces. A "minoura besso mount" for the shifter, it's going to go on seat tube. A maxi suspension seat post to put under the tractor seat. We talked through the motor/controller mounting and I have to measure the batteries so I get the platform height right for 36V gel/LiPe/NiMh battery packs.

I wasn't able to get the hub to engage in reverse. Not sure what's going on there but I'm not going to worry about it until the shifter is installed.
 
This trike is so WICKED!!!!
I sooooooo want to ride Fugsley with it!!

MO FATTA
MO BETTA

I may check back with you on details on how you adapted your hub for the trike.
 
kingfish254 said:
This trike is so WICKED!!!!
I sooooooo want to ride Fugsley with it!!

MO FATTA
MO BETTA

I may check back with you on details on how you adapted your hub for the trike.

Fugsley was big inspiration to get me started! I got the moxi-spring seat post for this today. I'm hoping to have the trike out on sand here in Seattle next weekend. I will post more pictures of the mount, but ultimately it's just a plate welded to the standard hollow hub driver and some bolts through the plastic wheel.

Eventually will end up in Carpinteria CA moving mobility impaired people across the soft sand. I bet Fugsley could help with that too.

FUN!
 
RAT Motorsports said:
Awesome looking! On the seat, you mentioned using it at te beach, that tractor seat might get pretty toasty sitting in the sun all day.

Ok, you talked me out of it. I got a used one for now and ordered a brand new white plastic bmx seat. A few other parts arrived today.

426564_3353094835018_1498326880_33235898_617533513_n.jpg


Hoping for time today to work on her.
 
Shifter fitted. Needed to fabricate a drive sprocket flange for the freewheel. electric motor mount figured out, waiting for a little fabrication. New seat arrived will fit it to laid back post.

Trip to Ikea tomorrow to pick up the seats for the articulated trailer/wheel chair hauler.
 
How did you convert your hub to a trike hub with the extra sprocket?
 
kingfish254 said:
How did you convert your hub to a trike hub with the extra sprocket?

The axle drives hollow hub wheels. One on side there is a flange with three holes that bolts to the driven wheel. That leaves the other wheel freewheeling on it's bearings. To mount the sand buggy wheels a new flange (larger diameter) was fabricated and drilled for 4 bolts (the plastic buggy wheel has 8 "spokes") and then bolted on the same way. I promise more pictures.

The buggy wheels mount on their axle the same way a hollow hub wheel mounts. The only difference was the the axle diameter of the buggies is 15mm and the trike kit was 5/8. Chucked up the axle adapters and bored with a drill. You could probably do it with a vise and a hand drill they are soft metal.
 
I see two sprockets on the hub itself. How you you set this up.
Do you have a photo?
 
kingfish254 said:
I see two sprockets on the hub itself. How you you set this up.
Do you have a photo?

OH... different HUB.. That is the transmission! It comes that way.

3754.jpg


I got my best price on the 5 speed from Staton http://www.staton-inc.com/store/ind...in=all&search_str=sturmey+archer+5+sp&x=0&y=0

These transmissions come in coaster/3/5 speed configurations. They drive gear is attached by it being screwed to the hub with a little screw every other spoke hole on the hub. The trike kit I bought came with a coaster brake transmission and a driven gear. I stayed with the driven gear on the trike kit axle because it had the same number of teeth.
 
Guess,I might have to figure out a way to modify my SA 5 hub to work.
 
kingfish254 said:
Guess,I might have to figure out a way to modify my SA 5 hub to work.

There is no magic there! Just a big ole sprocket and a rotary table to drill the holes and open up the bore. The hub holes simply look tapped for the screws so I guess I'd find the right size "thread rolling" not cutting tap and have at it. This transmission is supposed to have a reverse, though I haven't gotten it to work yet, which seems like a pretty valuable thing in a trike.

I went with the 5 speed because of the goal of using this as a hauler across the soft sand barrier. I've also been gearing things down a lot. I don't expect that with the electric motor at 36V and someone pedaling their heart out it will get over 15mph. BUT I do imagine it might be able to climb the dunes and berms hauling three people, a load of firewood, a grill and a cooler with a couple surf and boogie boards and some collection of beach chairs, wet suits and towels... I won't be surprised if it becomes obvious using it that the three speed or even single speed would have been fine.

I smile every time I think of riding this to the beach... Just pile the stuff on and go instead of the trips dragging stuff back and forth through the sand...

FUN! Sirocco "the warm wind that carries across the sand to the water"
 
Spent a little time rounding up parts and mocking up this afternoon. Didn't have much time.

These are some photos of the drivetrain as it currently is configured. I do like the view from the back.
423844_3378327705824_1498326880_33244702_1235420192_n.jpg


This is a pretty clear picture of the SA transmission.
421178_3378326865803_1498326880_33244701_1651843404_n.jpg


The plate that drives the wheel, you can see where it was welded to the 3 hole one that was there from the start.
424329_3378325505769_1498326880_33244700_301360133_n.jpg


This is the first mock up of the electric motor mount.
431541_3378324585746_1498326880_33244699_424900360_n.jpg


The frame the motor is on is going to change quite a bit. You can see the plate between the stays, that is going to be the battery tray. Above the motor there is going to be another deck for accessories.
 

Latest posts

Back
Top