


DANGER! I do NOT recommend that you try this. Failure to follow proper safety precautions can cause injury, blindness, death and there is a hazard of explosion from the production of hydrogen gas during this process! If you try this and cause injury or death, it's YOUR FAULT!
Materials I Used
How I Did It
I set myself up outside (TO PREVENT THE BUILDUP OF HIGHLY EXPLOSIVE HYDROGEN GAS INSIDE MY HOUSE!)
I prepared my artwork with some old graphics software and made sure that I could print the artwork to the exact size of the finished headbadge. PhotoShop would be great or another good free one is Gimp http://www.gimp.org/
I cut my brass sheet to slightly larger than needed.
I de-burred the brass around the edges.
I roughed up the brass with steel wool and then cleaned it with dish soap and water to remove any oils.
I transferred my artwork to the brass using the instructions here: http://www.techniks.com/how_to.htm
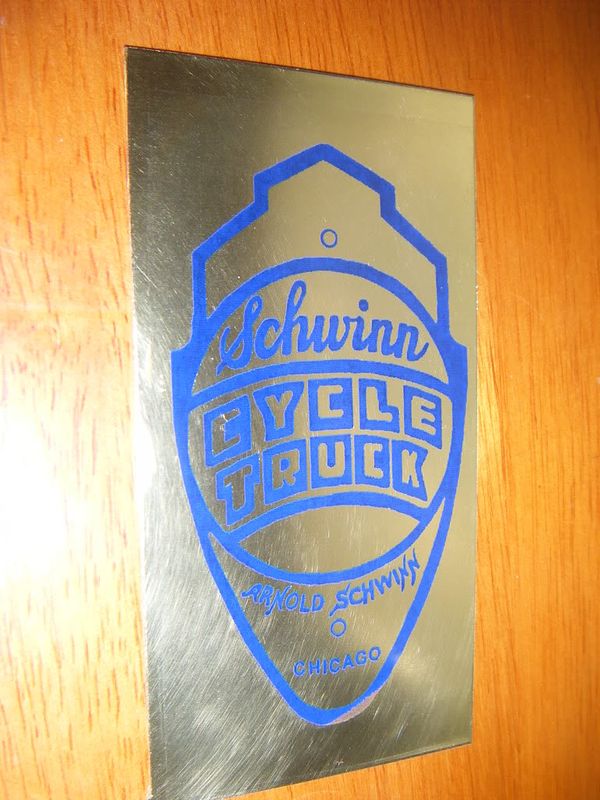
I let the brass sheet cool for 10 minutes before peeling the blue transfer sheet off.
I drilled a hole in the corner where there would be no artwork.
I spray painted the back side of the brass to prevent etching on that side and then let it dry.
I secured the zip tie through the hole in the brass so that I could pull it out of the etching solution without reaching into the solution.
I mixed my etching solution; 1 cup of hydrogen peroxide into the plastic container FIRST! and then GENTLY/SLOWLY! added 1/2 cup of muriadic acid to the plastic container.
HAD I ADDED THE HYDROGEN PEROXIDE TO THE ACID, I COULD HAVE BEEN SERIOUSLY INJURED!
I filled the 2nd plastic container with plain water.
I GENTLY! lowered the brass into the etching solution with the artwork face up.
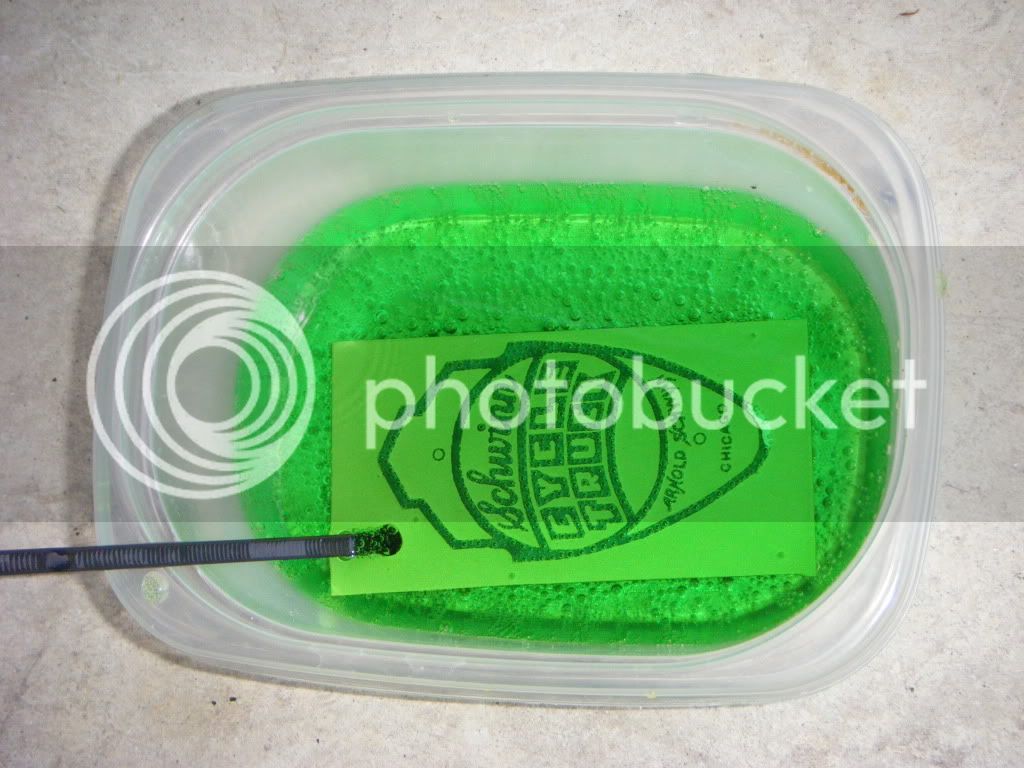
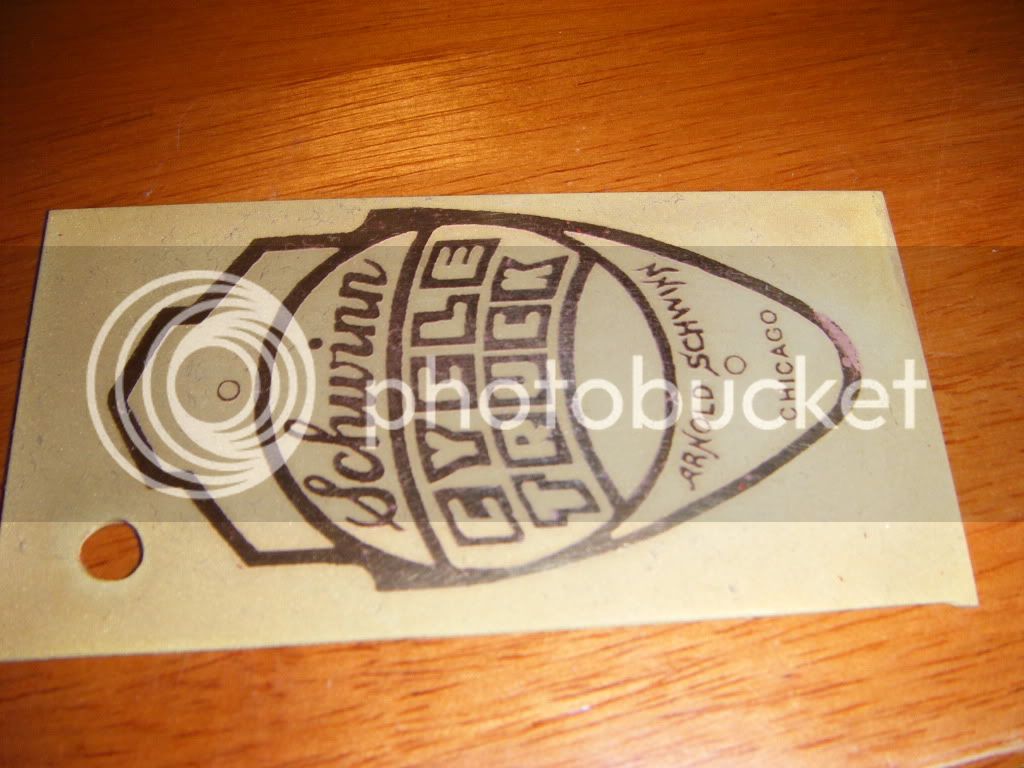
After roughly 20 minutes, I removed the brass from the etching solution and rinsed it in the other plastic container with water.
I removed the blue film and paint from the brass with brake cleaner.
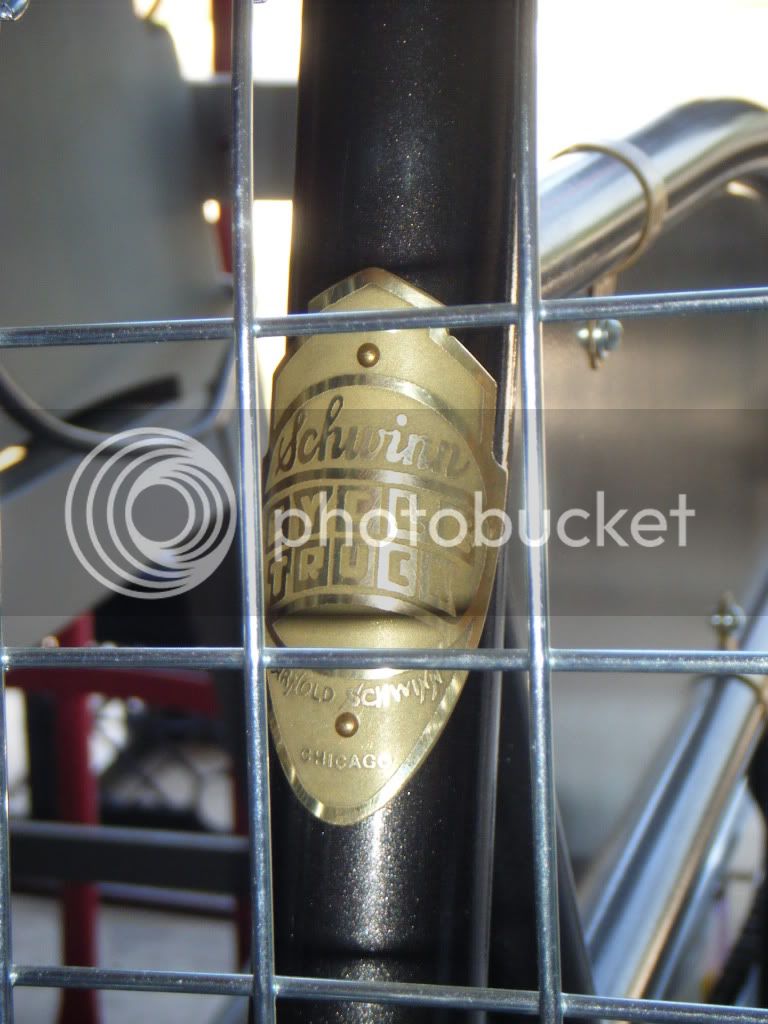
I cut the shape of the headbadge out with a Dremel and various bits. I also polished the badge using a Dremel polishing kit.
Materials I Used
- Artwork for a headbadge
Hydrogen Peroxide, 3% from my local pharmacy
Muriadic Acid, 31.5%, from my local hardware store
2 Plastic Containers, one for etching, the other for rinsing
A plastic zip tie
Press-n-Peel Blue Transfer Film, from http://www.techniks.com/
Brass Sheet, 0.015" thick, from any hobby shop, like HobbyLobby.
A laser printer or copy machine.
An iron
Brake Cleaner
5/16" drill bit & drill
Steel wool
Spray paint, any color
Long Nitrile Gloves (TO PREVENT THE ACID FROM TAKING MY SKIN OFF!)
Chemical Bib (TO PREVENT THE ACID FROM BURNING THROUGH MY CLOTHES AND INTO MY BODY!)
Face Shield (TO PREVENT THE ACID FROM DESTROYING MY EYES!)
How I Did It
I set myself up outside (TO PREVENT THE BUILDUP OF HIGHLY EXPLOSIVE HYDROGEN GAS INSIDE MY HOUSE!)
I prepared my artwork with some old graphics software and made sure that I could print the artwork to the exact size of the finished headbadge. PhotoShop would be great or another good free one is Gimp http://www.gimp.org/
I cut my brass sheet to slightly larger than needed.
I de-burred the brass around the edges.
I roughed up the brass with steel wool and then cleaned it with dish soap and water to remove any oils.
I transferred my artwork to the brass using the instructions here: http://www.techniks.com/how_to.htm
I let the brass sheet cool for 10 minutes before peeling the blue transfer sheet off.
I drilled a hole in the corner where there would be no artwork.
I spray painted the back side of the brass to prevent etching on that side and then let it dry.
I secured the zip tie through the hole in the brass so that I could pull it out of the etching solution without reaching into the solution.
I mixed my etching solution; 1 cup of hydrogen peroxide into the plastic container FIRST! and then GENTLY/SLOWLY! added 1/2 cup of muriadic acid to the plastic container.
HAD I ADDED THE HYDROGEN PEROXIDE TO THE ACID, I COULD HAVE BEEN SERIOUSLY INJURED!
I filled the 2nd plastic container with plain water.
I GENTLY! lowered the brass into the etching solution with the artwork face up.
After roughly 20 minutes, I removed the brass from the etching solution and rinsed it in the other plastic container with water.
I removed the blue film and paint from the brass with brake cleaner.
I cut the shape of the headbadge out with a Dremel and various bits. I also polished the badge using a Dremel polishing kit.
