Nicely Done, Im a sucker for English Roadsters, and I like this one
- COMPETITIONS
- THE COMPETITION ARCHIVES
- RRBBO OFFICIAL COMPETITIONS
- BUILD OFF 15 (2020)
- BUILD OFF 15 - CLASS 1 - BUILD JOURNALS
You are using an out of date browser. It may not display this or other websites correctly.
You should upgrade or use an alternative browser.
You should upgrade or use an alternative browser.
BO15 Emsbroek & Poesse Ratracer (pg6 ride video!)
- Thread starter BartRidesEternal
- Start date


Help Support Rat Rod Bikes Bicycle Forum:
This site may earn a commission from merchant affiliate
links, including eBay, Amazon, and others.
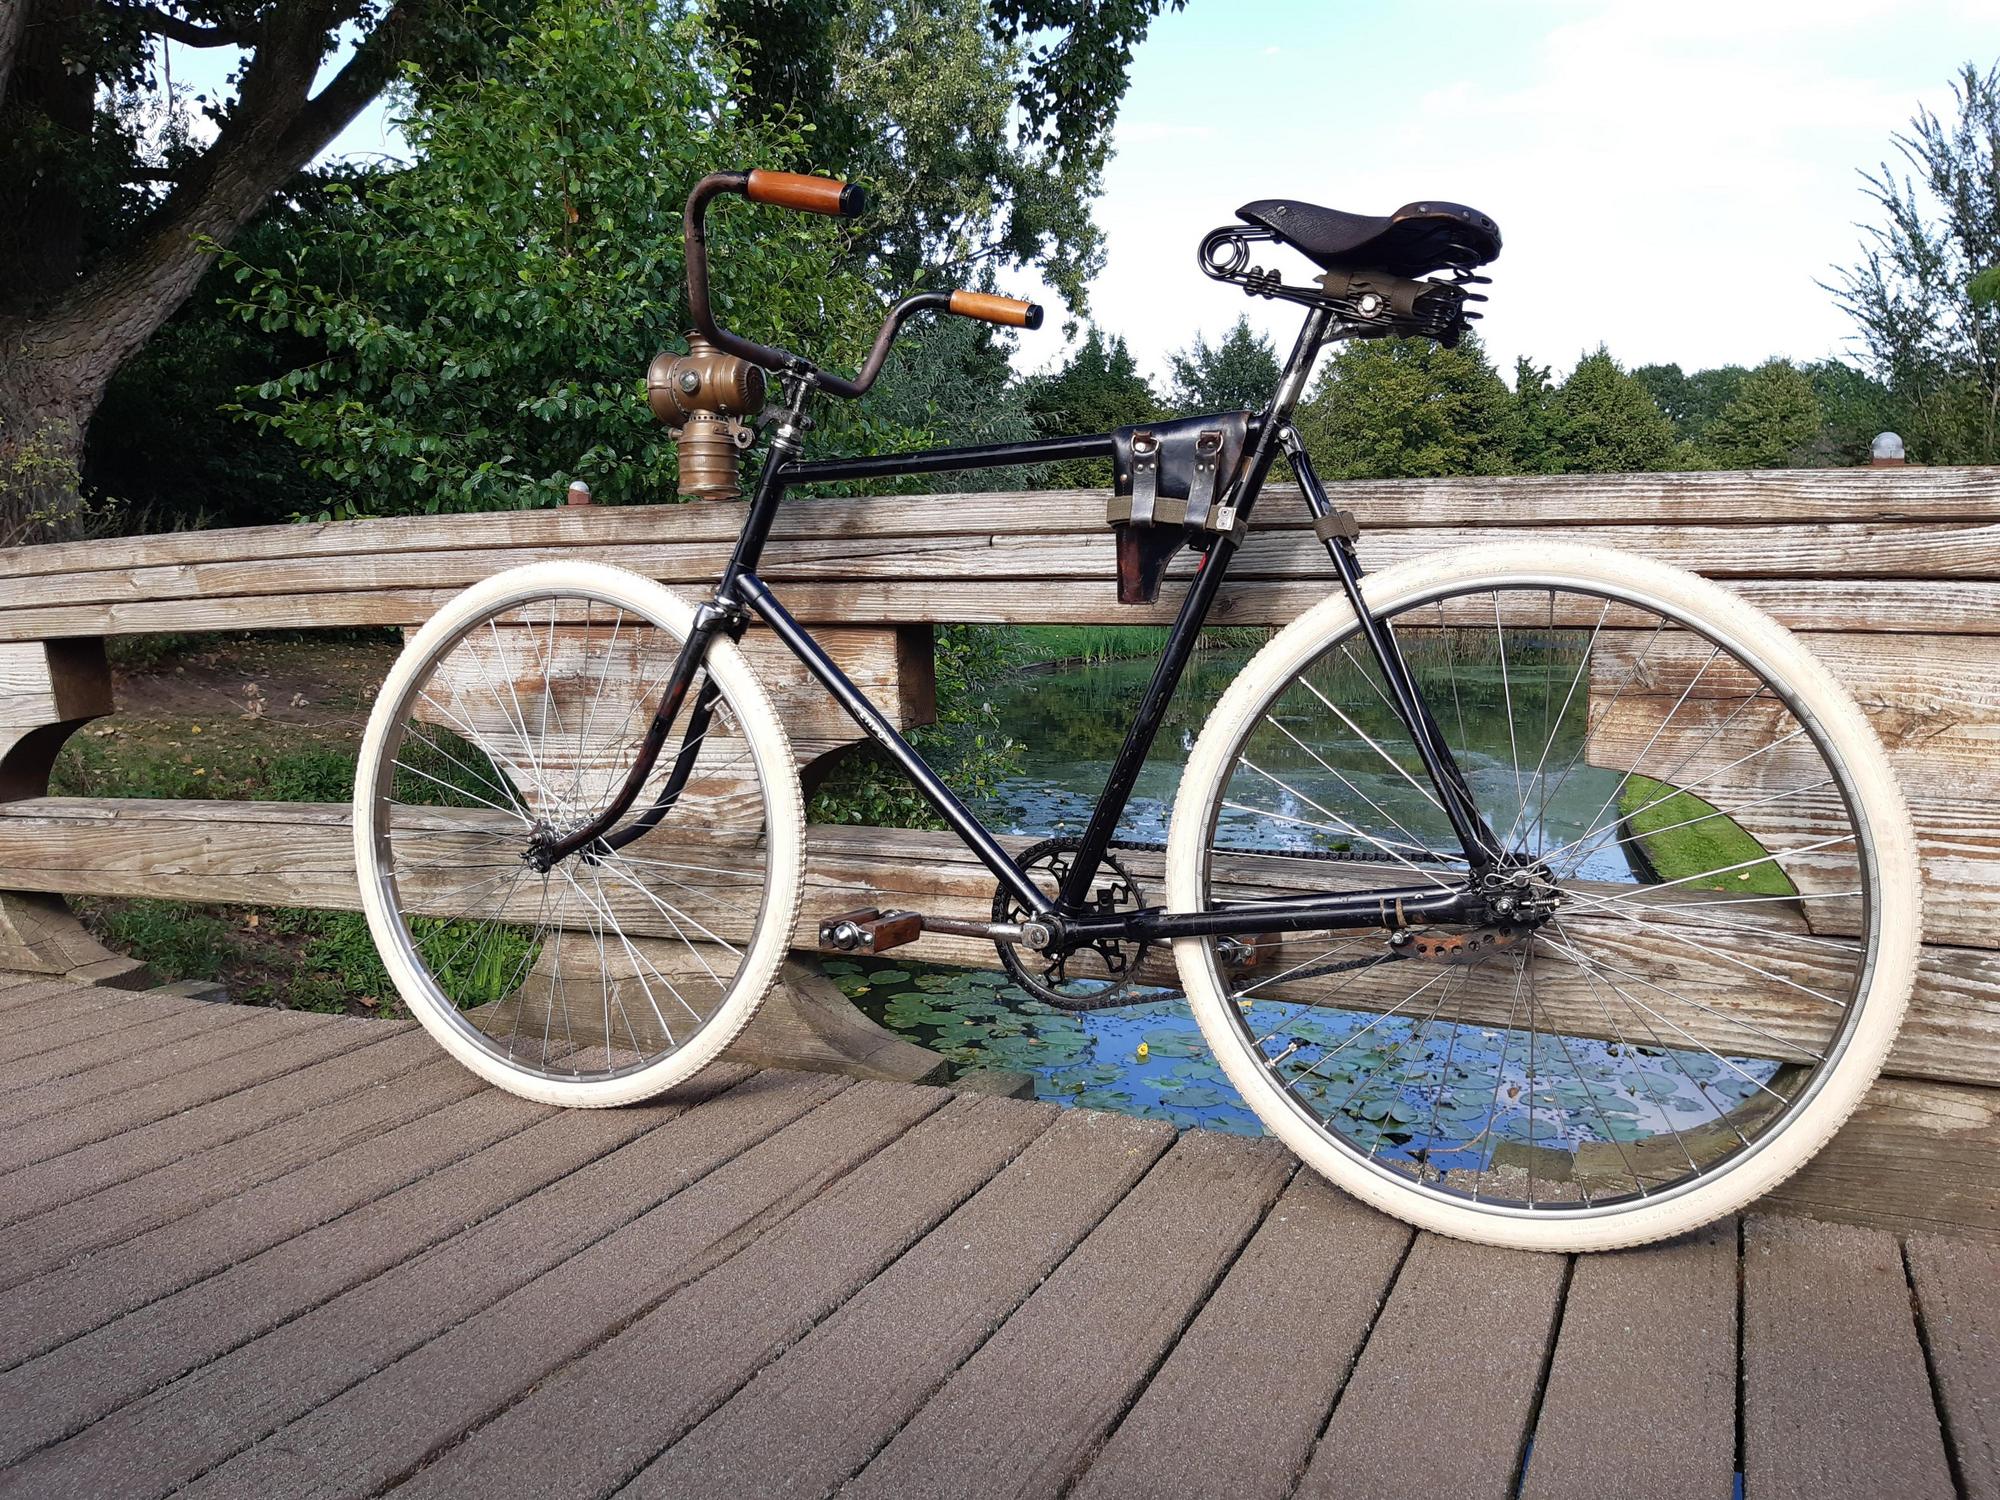
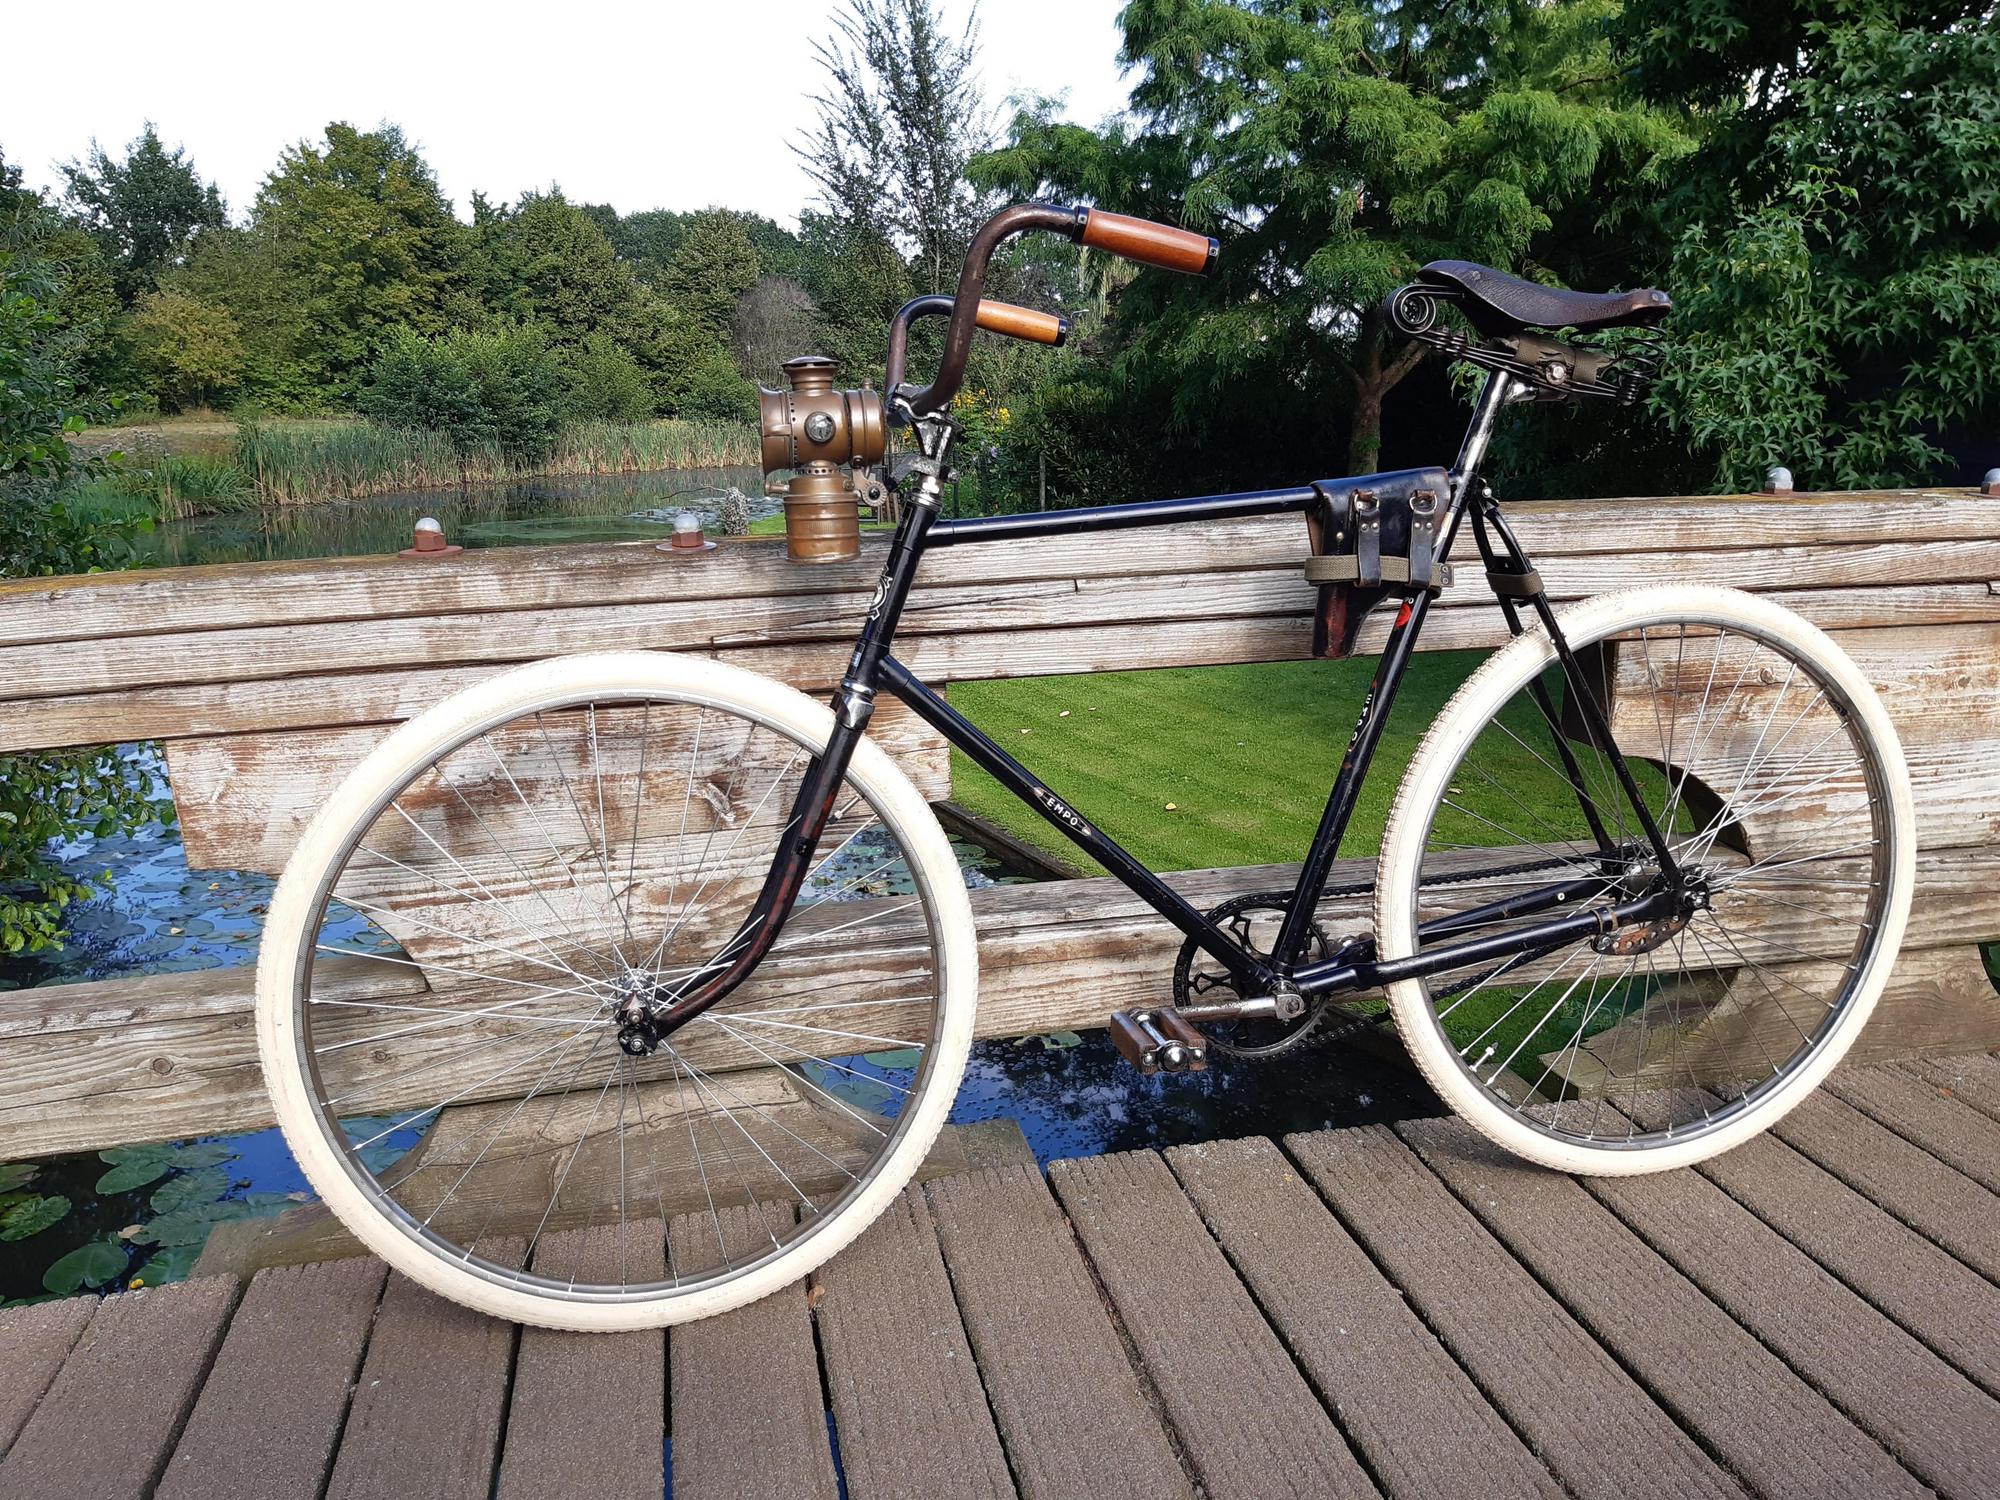
using wood on a roadster, nice touch ( wooden pedals, grips, wheels, saddle insert) very 1918
.jpg")
Good idea to look for examples from that era Toro, thanks!You could get away with it, I think the key is in the letter size. It has to be just right. Dunlop is classic, of course. I have two rear modern Dunlop taillights and I like that it says DUNLOP on them and not some modern brand or some chinese brand or whatever.
Lettering looks really nice on Schwalbe or Thick Brick cream tires for example.
Look at tires from that period and if you like something just copy it. Or come with your own, but I'd try on a computer first. So you can try ideas and decide whether to do it or not.
But as it is now the bike is great.
I agree with you Dr, I like the clean looks of a Pathracer aswell.I’d leave the black lettering off the tires, if it were me.
Simple bike, keep it simple
Sent from my iPhone using Tapatalk
The tires are already getting a bit dirty.... which look pretty good with the patina'd bike.
Thanks John, appreciate that!Nicely Done, Im a sucker for English Roadsters, and I like this one
That thing looks good! Love the handlebars and the curved tube!using wood on a roadster, nice touch ( wooden pedals, grips, wheels, saddle insert) very 1918View attachment 131591
Update
Pictures below the text.
You can skip the text, but what I am implying: I really dislike cotterpin cranks... how did they cycle with this for over 100 years? How many bicycle repair shops lost people because of these cotterpins? Even I am starting to doubt myself... am I a bad mechanic?

I prepared the bike for the 80+ kilometer / 50+ mile ride... and again the cranks came loose without putting stress on the pedals.
It is pretty weird, I cleaned the shaft and arms locally from surface treatment and de-greased it, then welded the cranks...
Still the arms loosened up and started wobbling....
There is another shaft I had lying about and mounted that one with another older chainring and crankarm. The chainring was in better condition than the "UNION" cranks and chainring.
I tried mounting it with the "Simson" cotter pin again, did some research on how to mount them properly:
I no longer wonder why there are only "removal" videos on youtube about these cotterpins.
Probably the "Simson" cotterpin is too soft, or the old cranks are worn out somehow?
The 2nd crankset that I bought did have nice round holes of 9.5mm and a decent fit without too much play on the shaft...
As much as I hate to say this... I bought another 2nd hand (almost new condition) steel crankset with the JIS square taper holes. Offcourse I will keep the antique cranksets with the bicycle until I figure out the problem with the cotterpins loosening up/damaging.
At this point I just want to enjoy my bicycle and shoot some neat pictures for the competition!
Pictures with comments below.
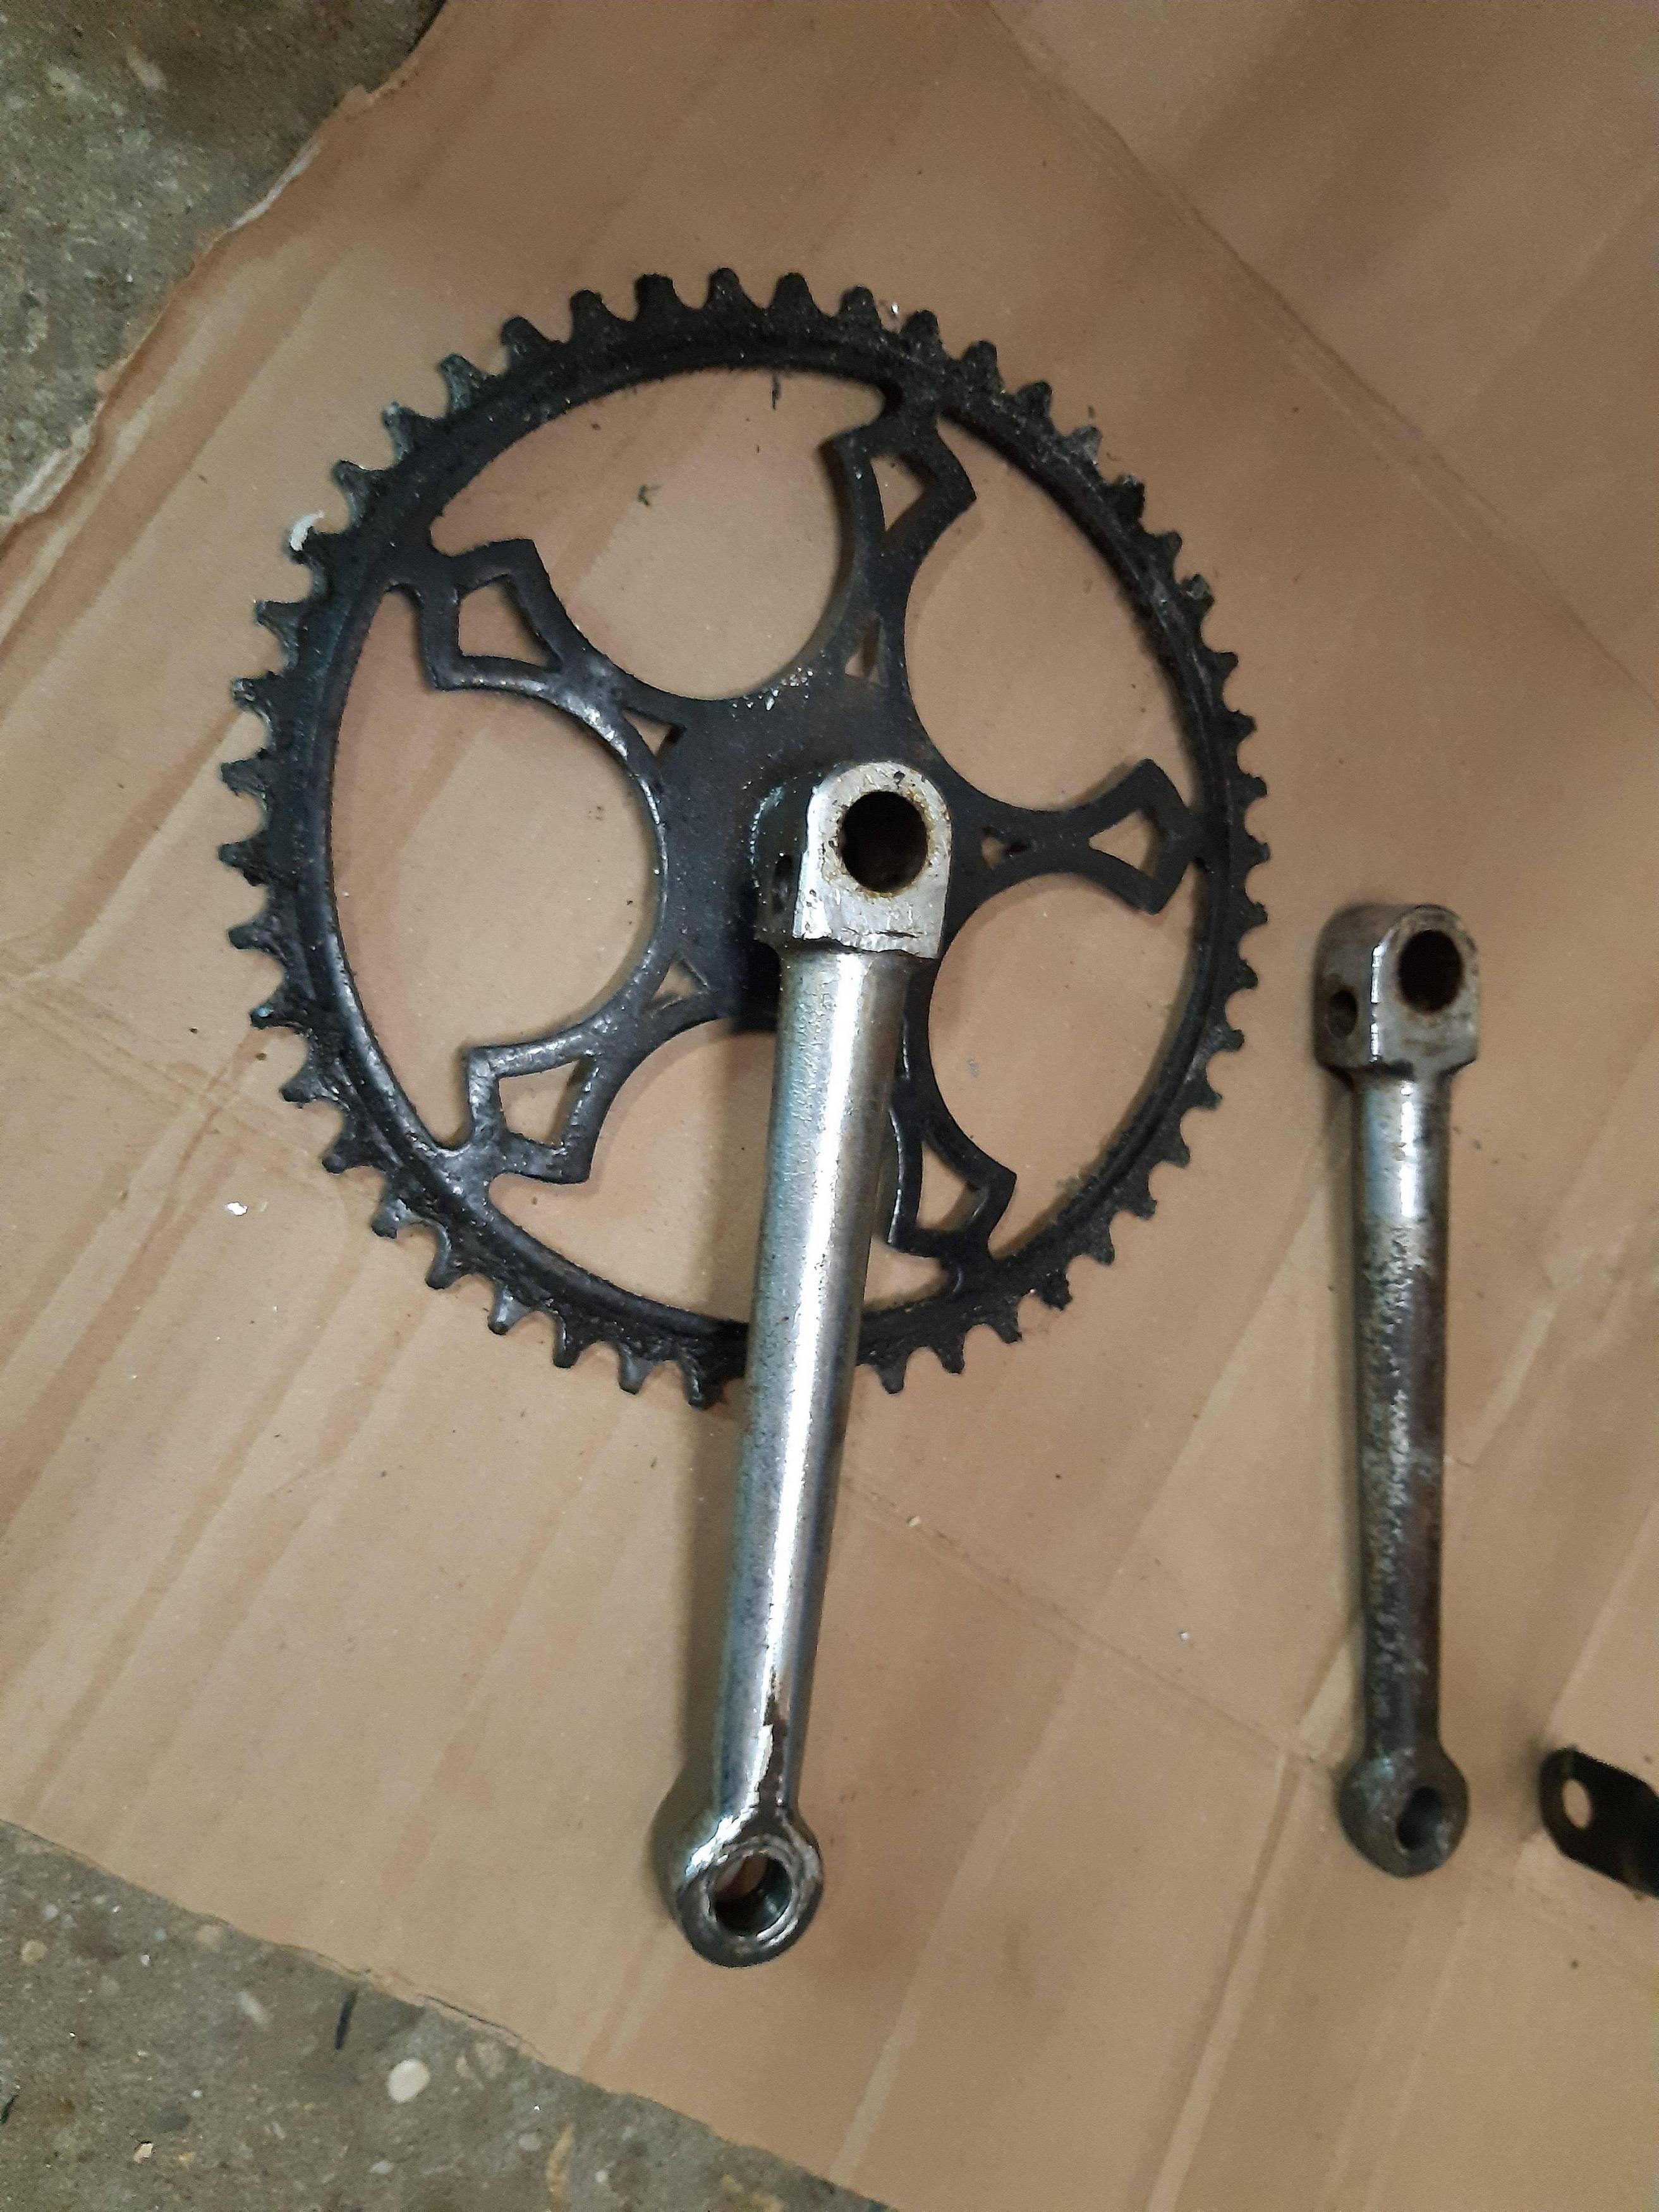
The 100+ years old good crankset with cotterpin holes. Looks really good!
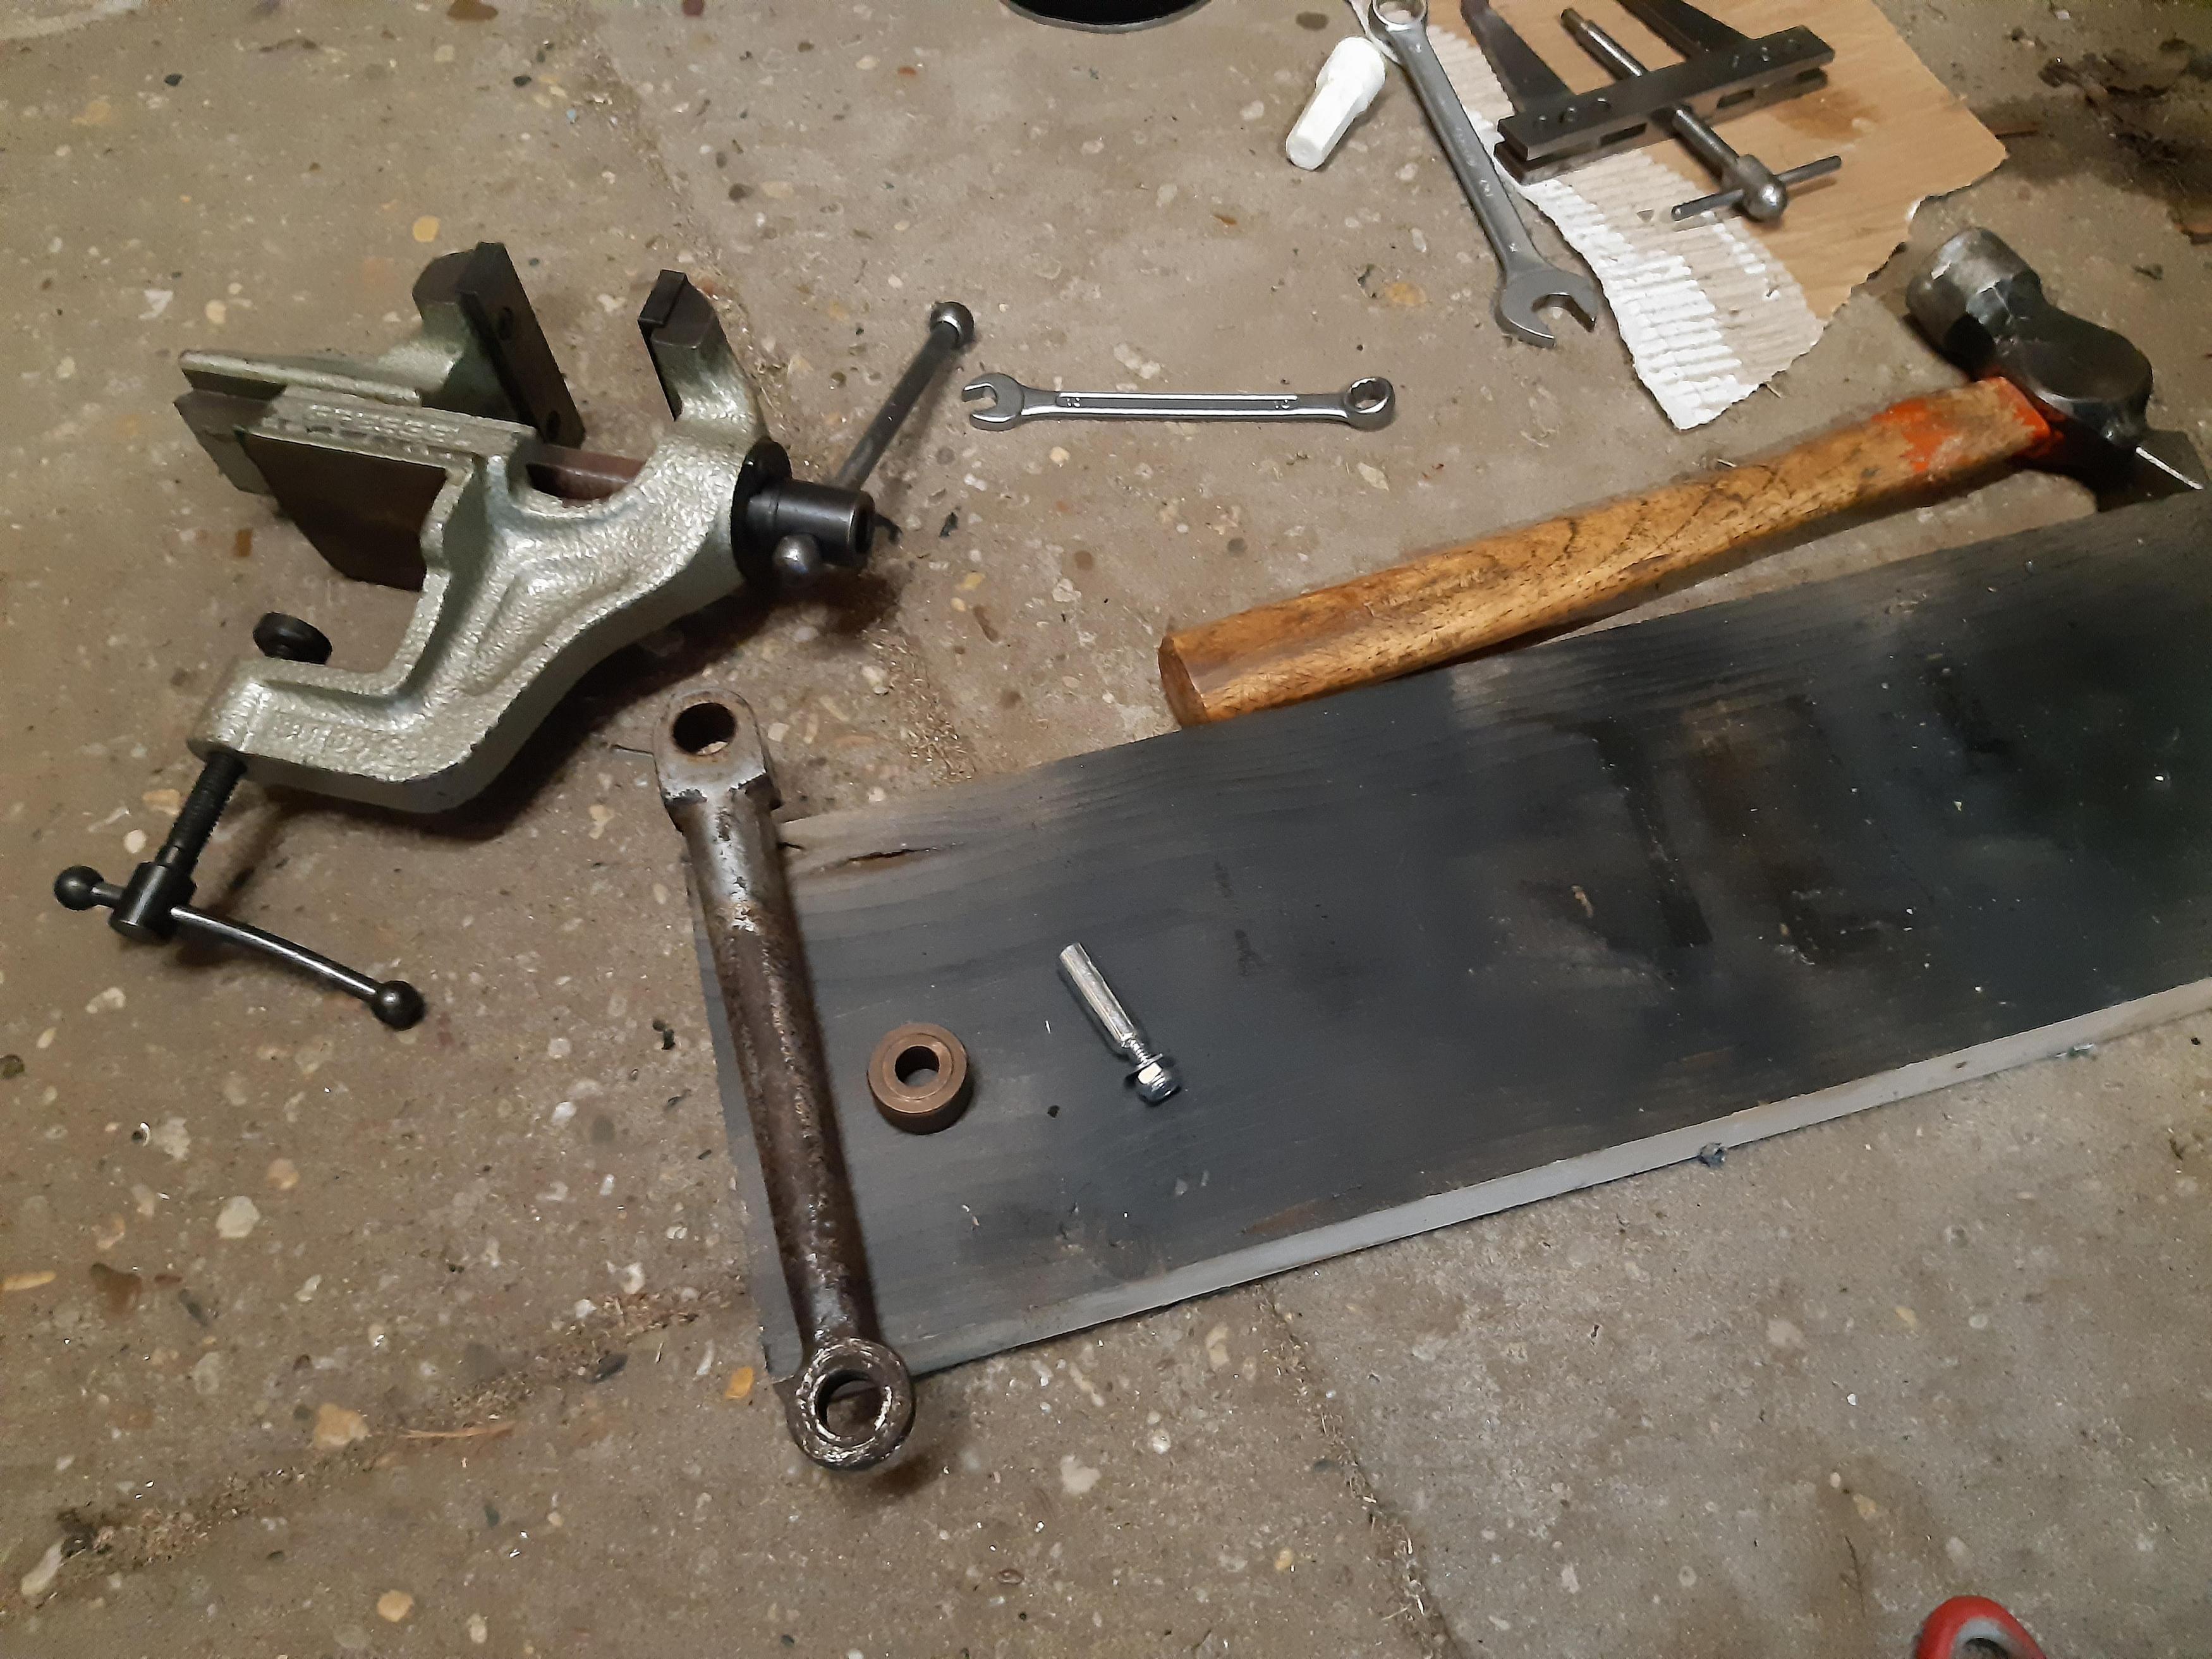
Tools for the job!
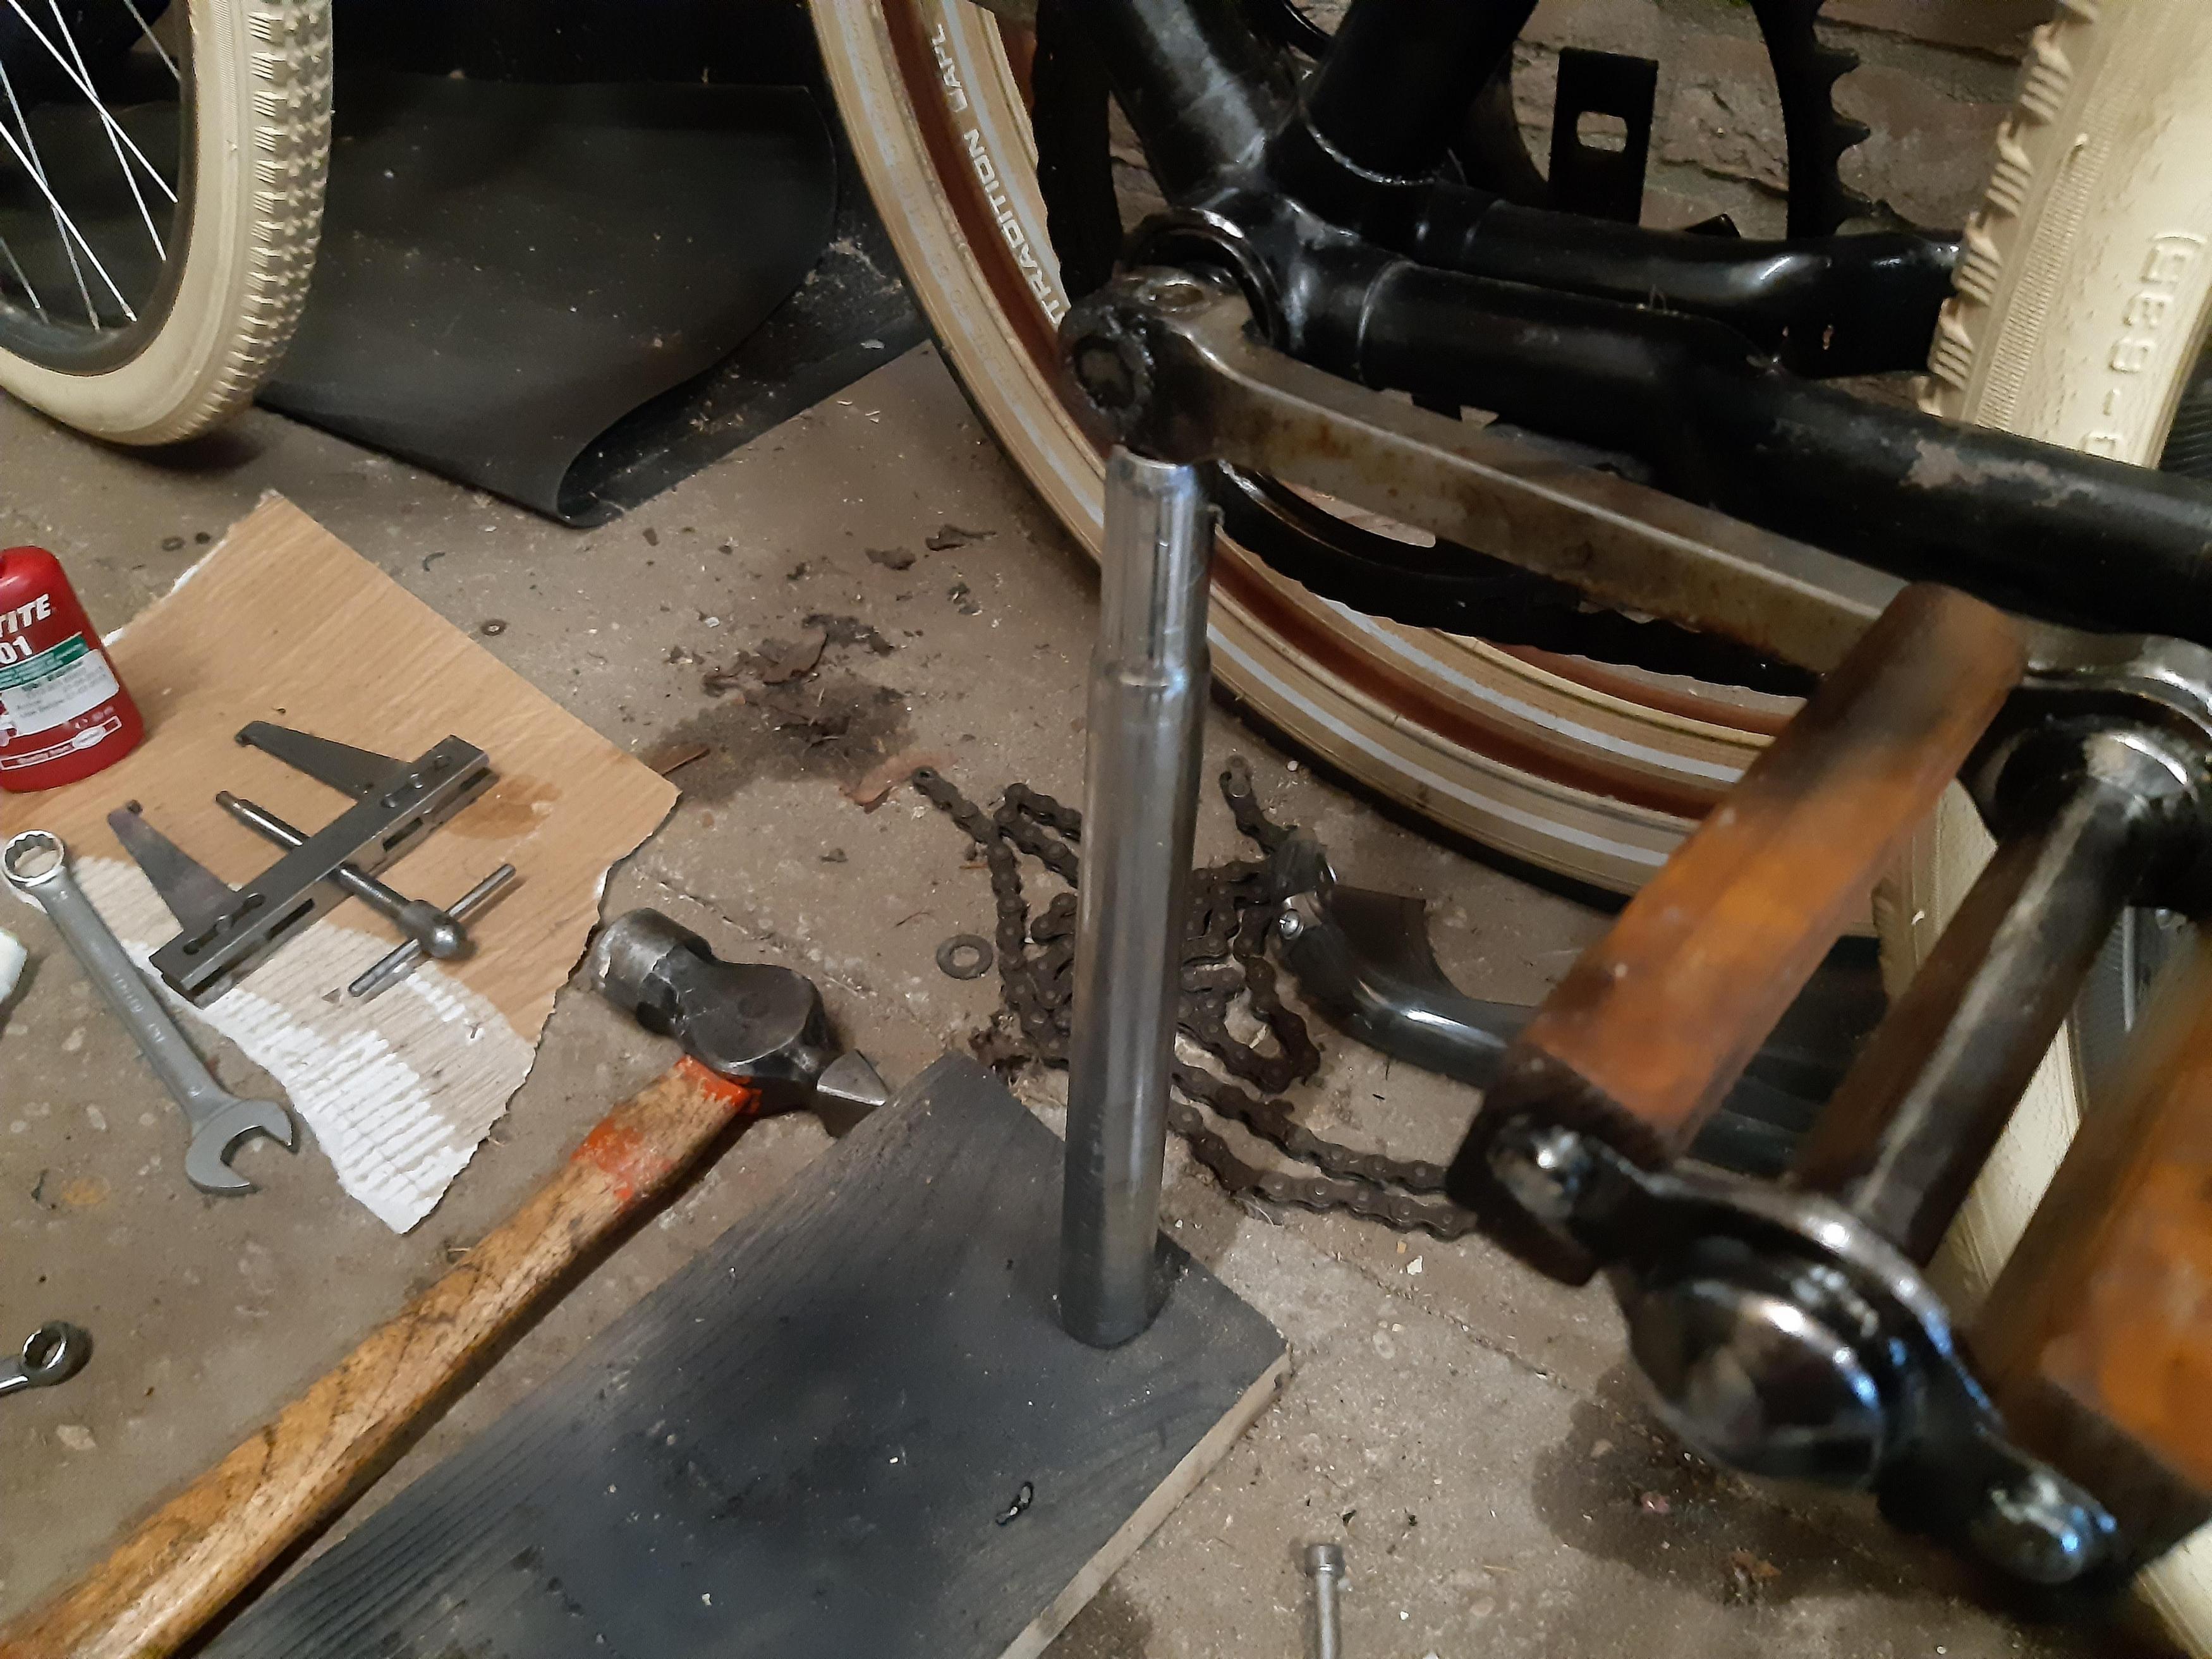
Removing the old cotterpin. I used a piece of wood and a sturdy old seatpost to support the crank. If I hit the cotterpins with a hammer without support, I might damage the bottom bracket bearings.
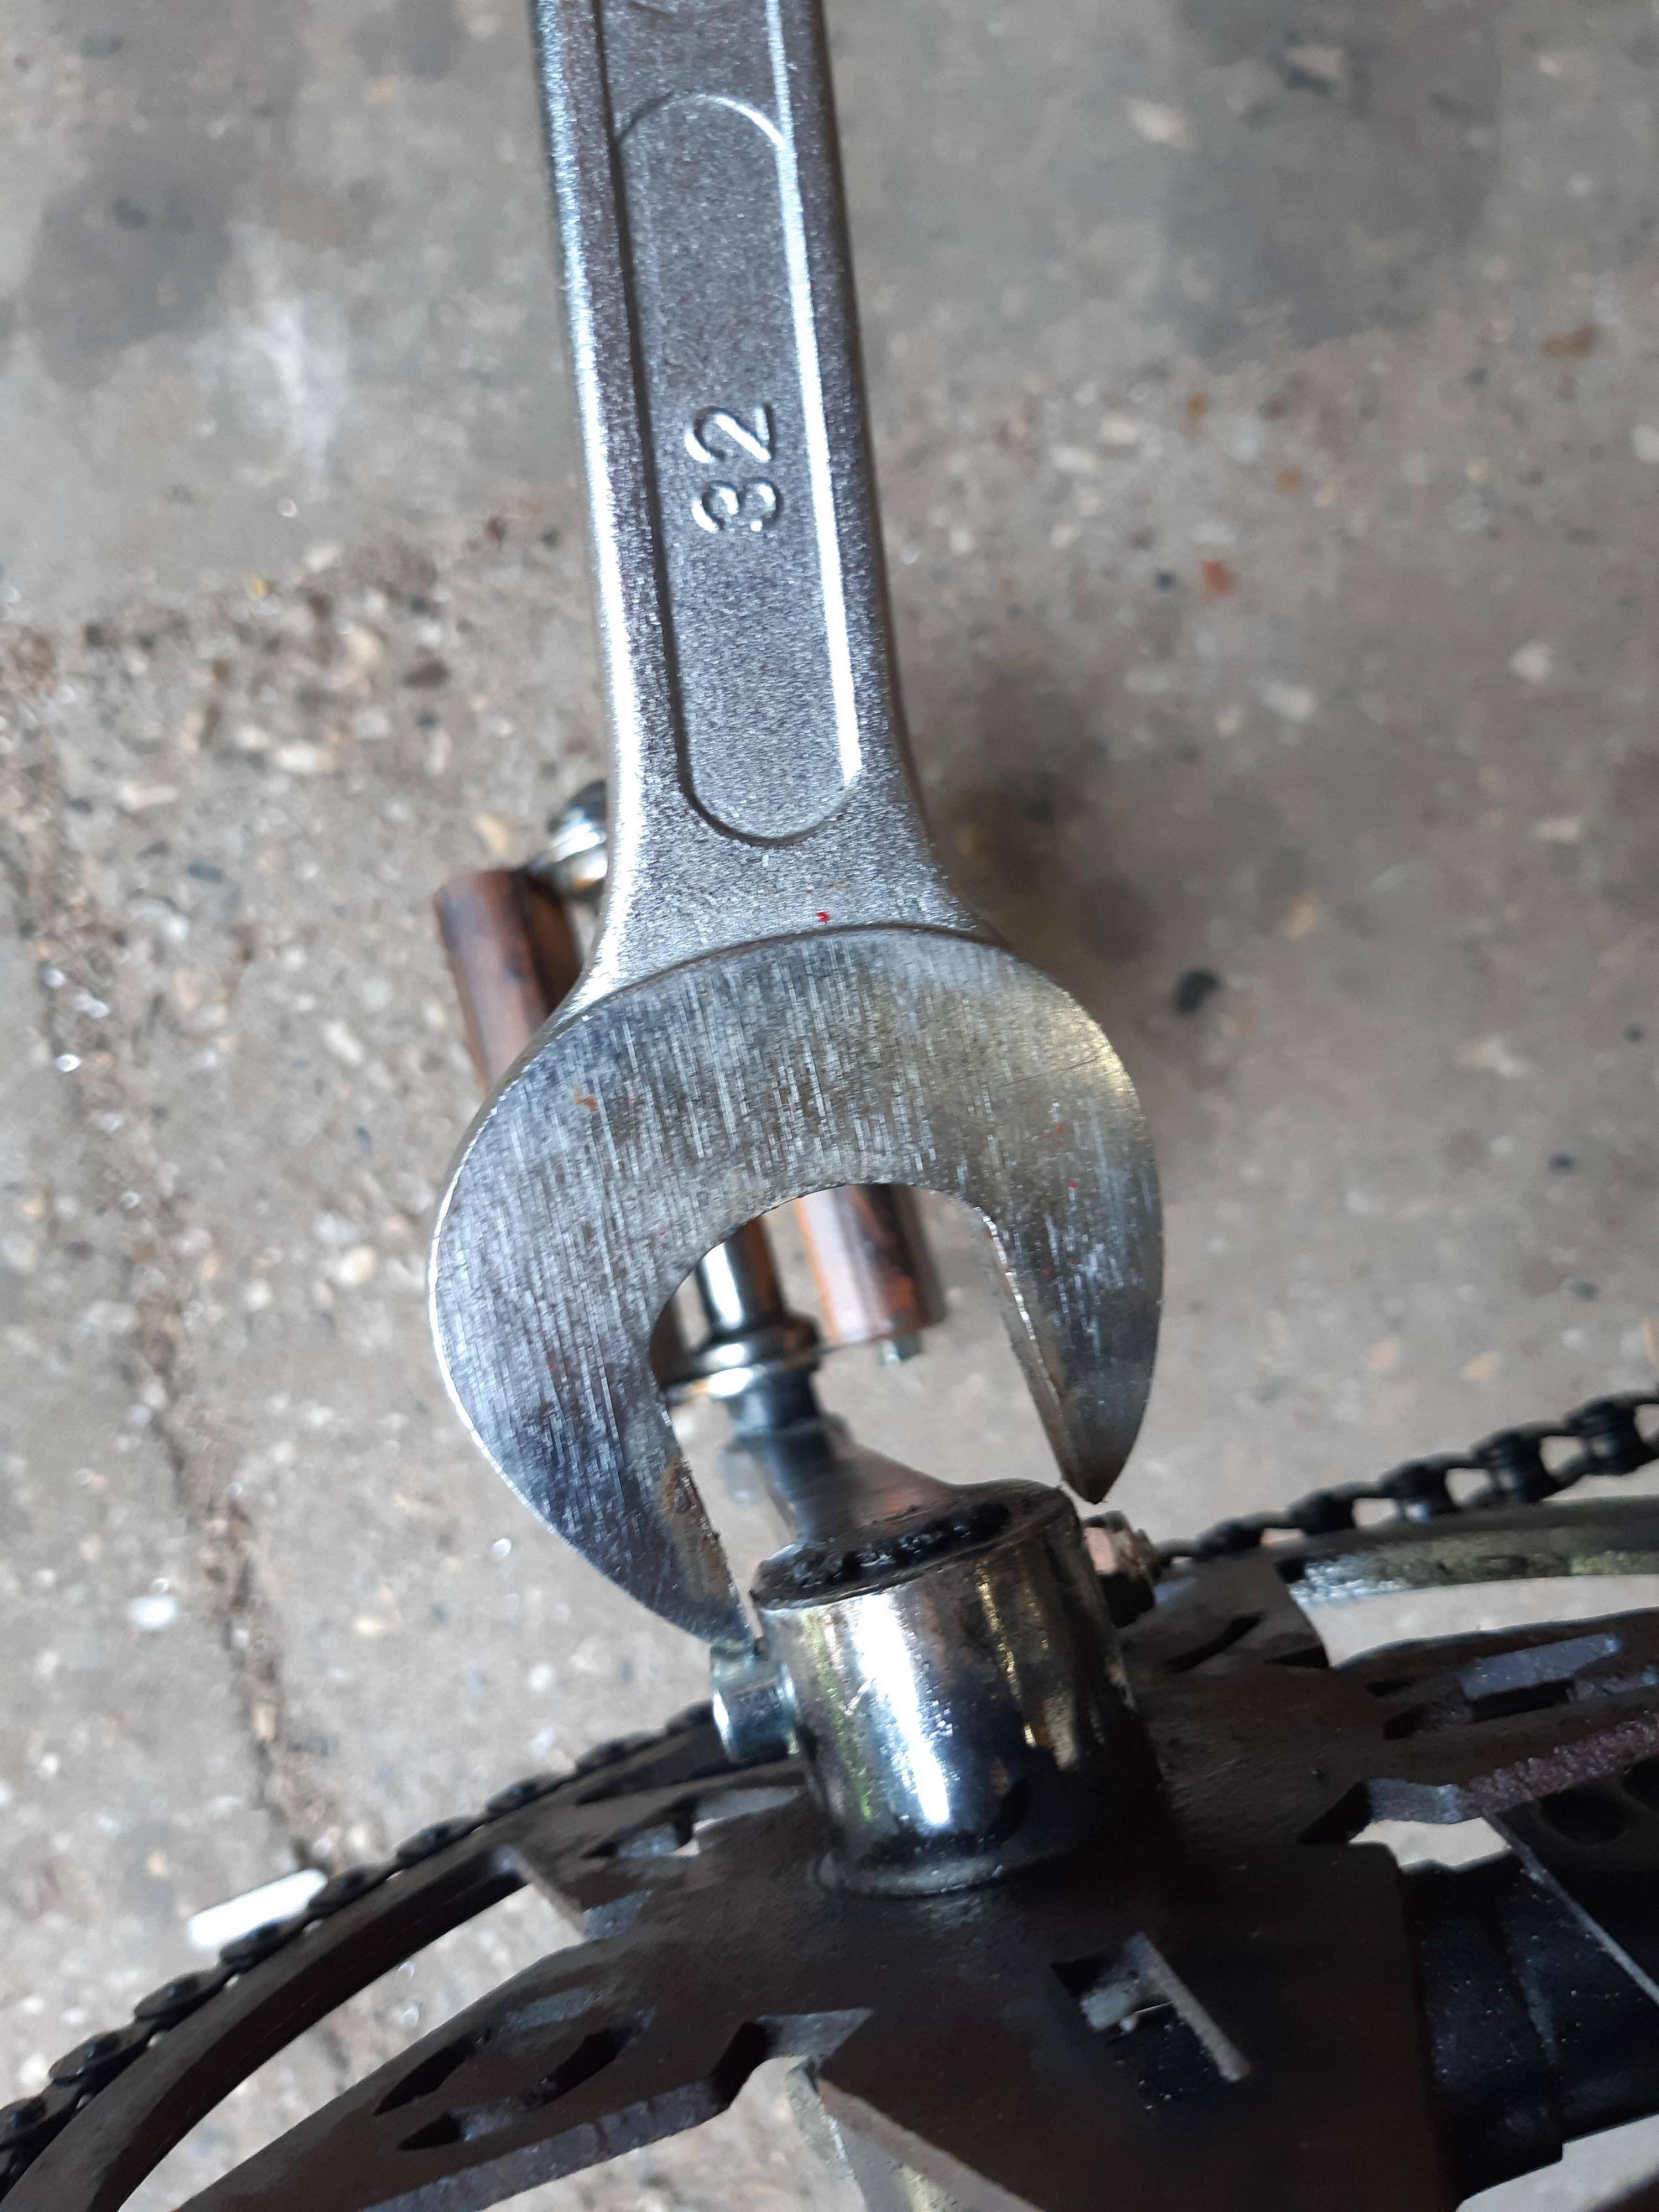
Don't mind this picture, I needed a quick way to
Pictures below the text.
You can skip the text, but what I am implying: I really dislike cotterpin cranks... how did they cycle with this for over 100 years? How many bicycle repair shops lost people because of these
cotterpins? Even I am starting to doubt myself... am I a bad mechanic? I prepared the bike for the 80+ kilometer / 50+ mile ride... and again the cranks came loose without putting stress on the pedals.
It is pretty weird, I cleaned the shaft and arms locally from surface treatment and de-greased it, then welded the cranks...
Still the arms loosened up and started wobbling....
There is another shaft I had lying about and mounted that one with another older chainring and crankarm. The chainring was in better condition than the "UNION" cranks and chainring.
I tried mounting it with the "Simson" cotter pin again, did some research on how to mount them properly:
- Crankarm in forward position on the side you are working on.
- Put some grease on the cotterpin and insert it from top to bottom. Flat side of the pin to the flat side of the shaft.
- Wobble the crankarm while inserting the cotterpin with your hands.
- When you can't push it any further, slight (not hard hitting!!) taps with a hammer so that the pin is firm in position.
- I used a small sturdy vice with a large bush (bush is for clearance of the cotterpins thread).
- Press the cotterpin in and still wobble the cranks a bit (my neighbour helped me out).
- Mount the nut and tighten it.
- Cycle for a couple of minutes without putting stress on the pedals.
- Again press the cotterpins and re-tighten the nuts.
I no longer wonder why there are only "removal" videos on youtube about these cotterpins.
Probably the "Simson" cotterpin is too soft, or the old cranks are worn out somehow?
The 2nd crankset that I bought did have nice round holes of 9.5mm and a decent fit without too much play on the shaft...
As much as I hate to say this... I bought another 2nd hand (almost new condition) steel crankset with the JIS square taper holes. Offcourse I will keep the antique cranksets with the bicycle until I figure out the problem with the cotterpins loosening up/damaging.
At this point I just want to enjoy my bicycle and shoot some neat pictures for the competition!
Pictures with comments below.
The 100+ years old good crankset with cotterpin holes. Looks really good!
Tools for the job!
Removing the old cotterpin. I used a piece of wood and a sturdy old seatpost to support the crank. If I hit the cotterpins with a hammer without support, I might damage the bottom bracket bearings.
Don't mind this picture, I needed a quick way to
Last edited:
"I no longer wonder why there are only "removal" videos on youtube about these cotterpins."
I have an old diamond frame with such cranks type and they are a pain. Do they come with the same bb and are the frames always BSA compatible?
It is a shame because old cranks usually have a nice chainring, while modern ones (BSA) are fugly.
I have an old diamond frame with such cranks type and they are a pain. Do they come with the same bb and are the frames always BSA compatible?
It is a shame because old cranks usually have a nice chainring, while modern ones (BSA) are fugly.
Well, thats the thing with bicycles...."I no longer wonder why there are only "removal" videos on youtube about these cotterpins."
I have an old diamond frame with such cranks type and they are a pain. Do they come with the same bb and are the frames always BSA compatible?
It is a shame because old cranks usually have a nice chainring, while modern ones (BSA) are fugly.
I have a threadless round 40mm bottom bracket. But: there is a bush inside with 68mm BSA 1.37x24TPI thread (standard BSA thread).
So thats why I have a square taper shaft lying about when I am completely sick of the cotterpins.
Yesterday something funny happened. I filed the cotterpins again, put them in the other way round and soon they started getting loose again.....
Then, after a couple of times cycling and re-tightening they started to lock up. And kept being locked up even when I started to accelerate very hard...
Now as a last resort I gave it a hard hit with the hammer (with bottom bracket bearing support, no worries) and the 100+ year old cranks seem to hold up.
So a couple of testrides more to get the trust back in the cotterpins and I can start planning the road trip.
I have a bottom bracket, rear cog and bottom bracket bearing lying ready in my workshop if stuff do not work out for the testrides.
In the meanwhile, my klunker is ready again! Already went for a mountainbiking trip for about 50 kilometers.

- New 13g big spokes. Stainless steel.
- 110 and 130 BCD 1980's powerdisc (I really dig the looks aswell).


Last picture: A quick break when cycling in the heat.
My nephew digs the klunker so much, that he wants to create a klunker video for me and our buddies. So thats nice.
Klunker is kool with a kapital K !
As far as the tires on the build, I'd keep them white. As mentioned, they will gather dirt / dust with riding. You could also rub some on for a more 'faded' vintage look if you like. I added some acrylic paint to the sidewalls of my Desert Rat-ified Columbia. Two purposes, get rid of the reflective stripe on the tire, and try to blend in with the real and 'surreal' rust I had already achieved. Just a thought.

That's a clay colored tire underneath the premature aging.
As far as the tires on the build, I'd keep them white. As mentioned, they will gather dirt / dust with riding. You could also rub some on for a more 'faded' vintage look if you like. I added some acrylic paint to the sidewalls of my Desert Rat-ified Columbia. Two purposes, get rid of the reflective stripe on the tire, and try to blend in with the real and 'surreal' rust I had already achieved. Just a thought.
That's a clay colored tire underneath the premature aging.
MattiThundrrr
Rattus All Terrainus
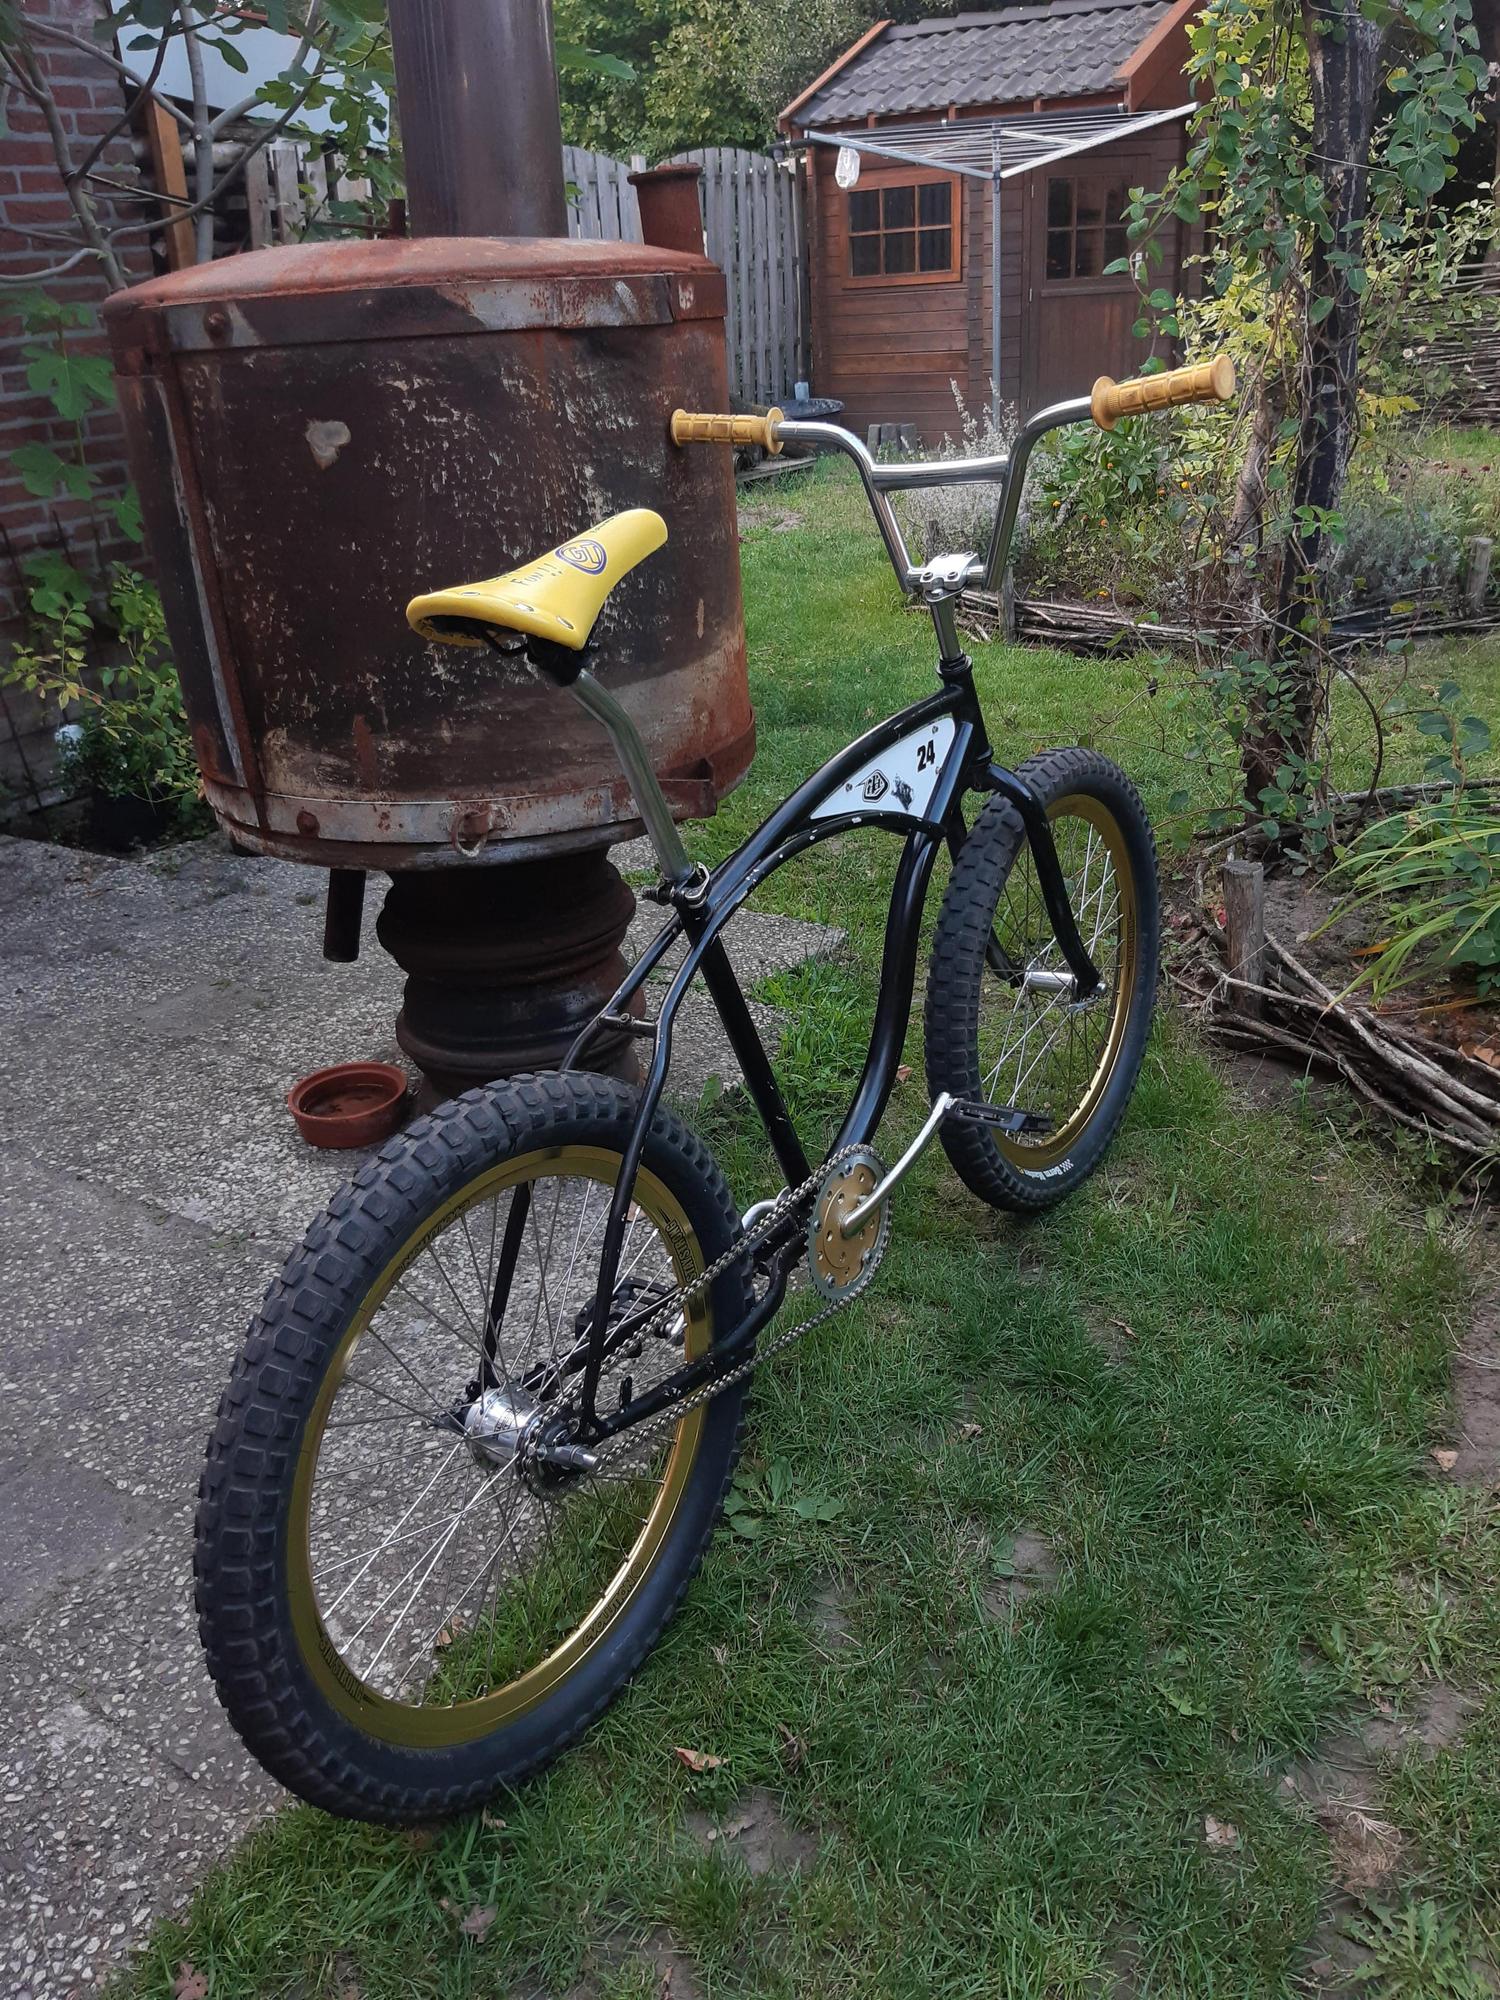
Nice klunker, Bart. Nice choices, especially like the knee saver bars. The Berm Masters look sooo faaaaaaaat! Did you fab the chain tensioners (rear axle locator or whatever they call them)?
Nice bike!Klunker is kool with a kapital K !
As far as the tires on the build, I'd keep them white. As mentioned, they will gather dirt / dust with riding. You could also rub some on for a more 'faded' vintage look if you like. I added some acrylic paint to the sidewalls of my Desert Rat-ified Columbia. Two purposes, get rid of the reflective stripe on the tire, and try to blend in with the real and 'surreal' rust I had already achieved. Just a thought.
View attachment 133276
That's a clay colored tire underneath the premature aging.
At first I tried to keep the tires clean, washing hands every time I tried to remove a wheel
 But now I like the dirty/oily/little bit dry look of the tires.
I bought them, only added a springs as a locking agent. I lost a screw before or the trails. They are from a manufacturer called "Simson".Nice klunker, Bart. Nice choices, especially like the knee saver bars. The Berm Masters look sooo faaaaaaaat! Did you fab the chain tensioners (rear axle locator or whatever they call them)?
Little update: Aaaalmoost done!
Alright, the bike is 99% done!
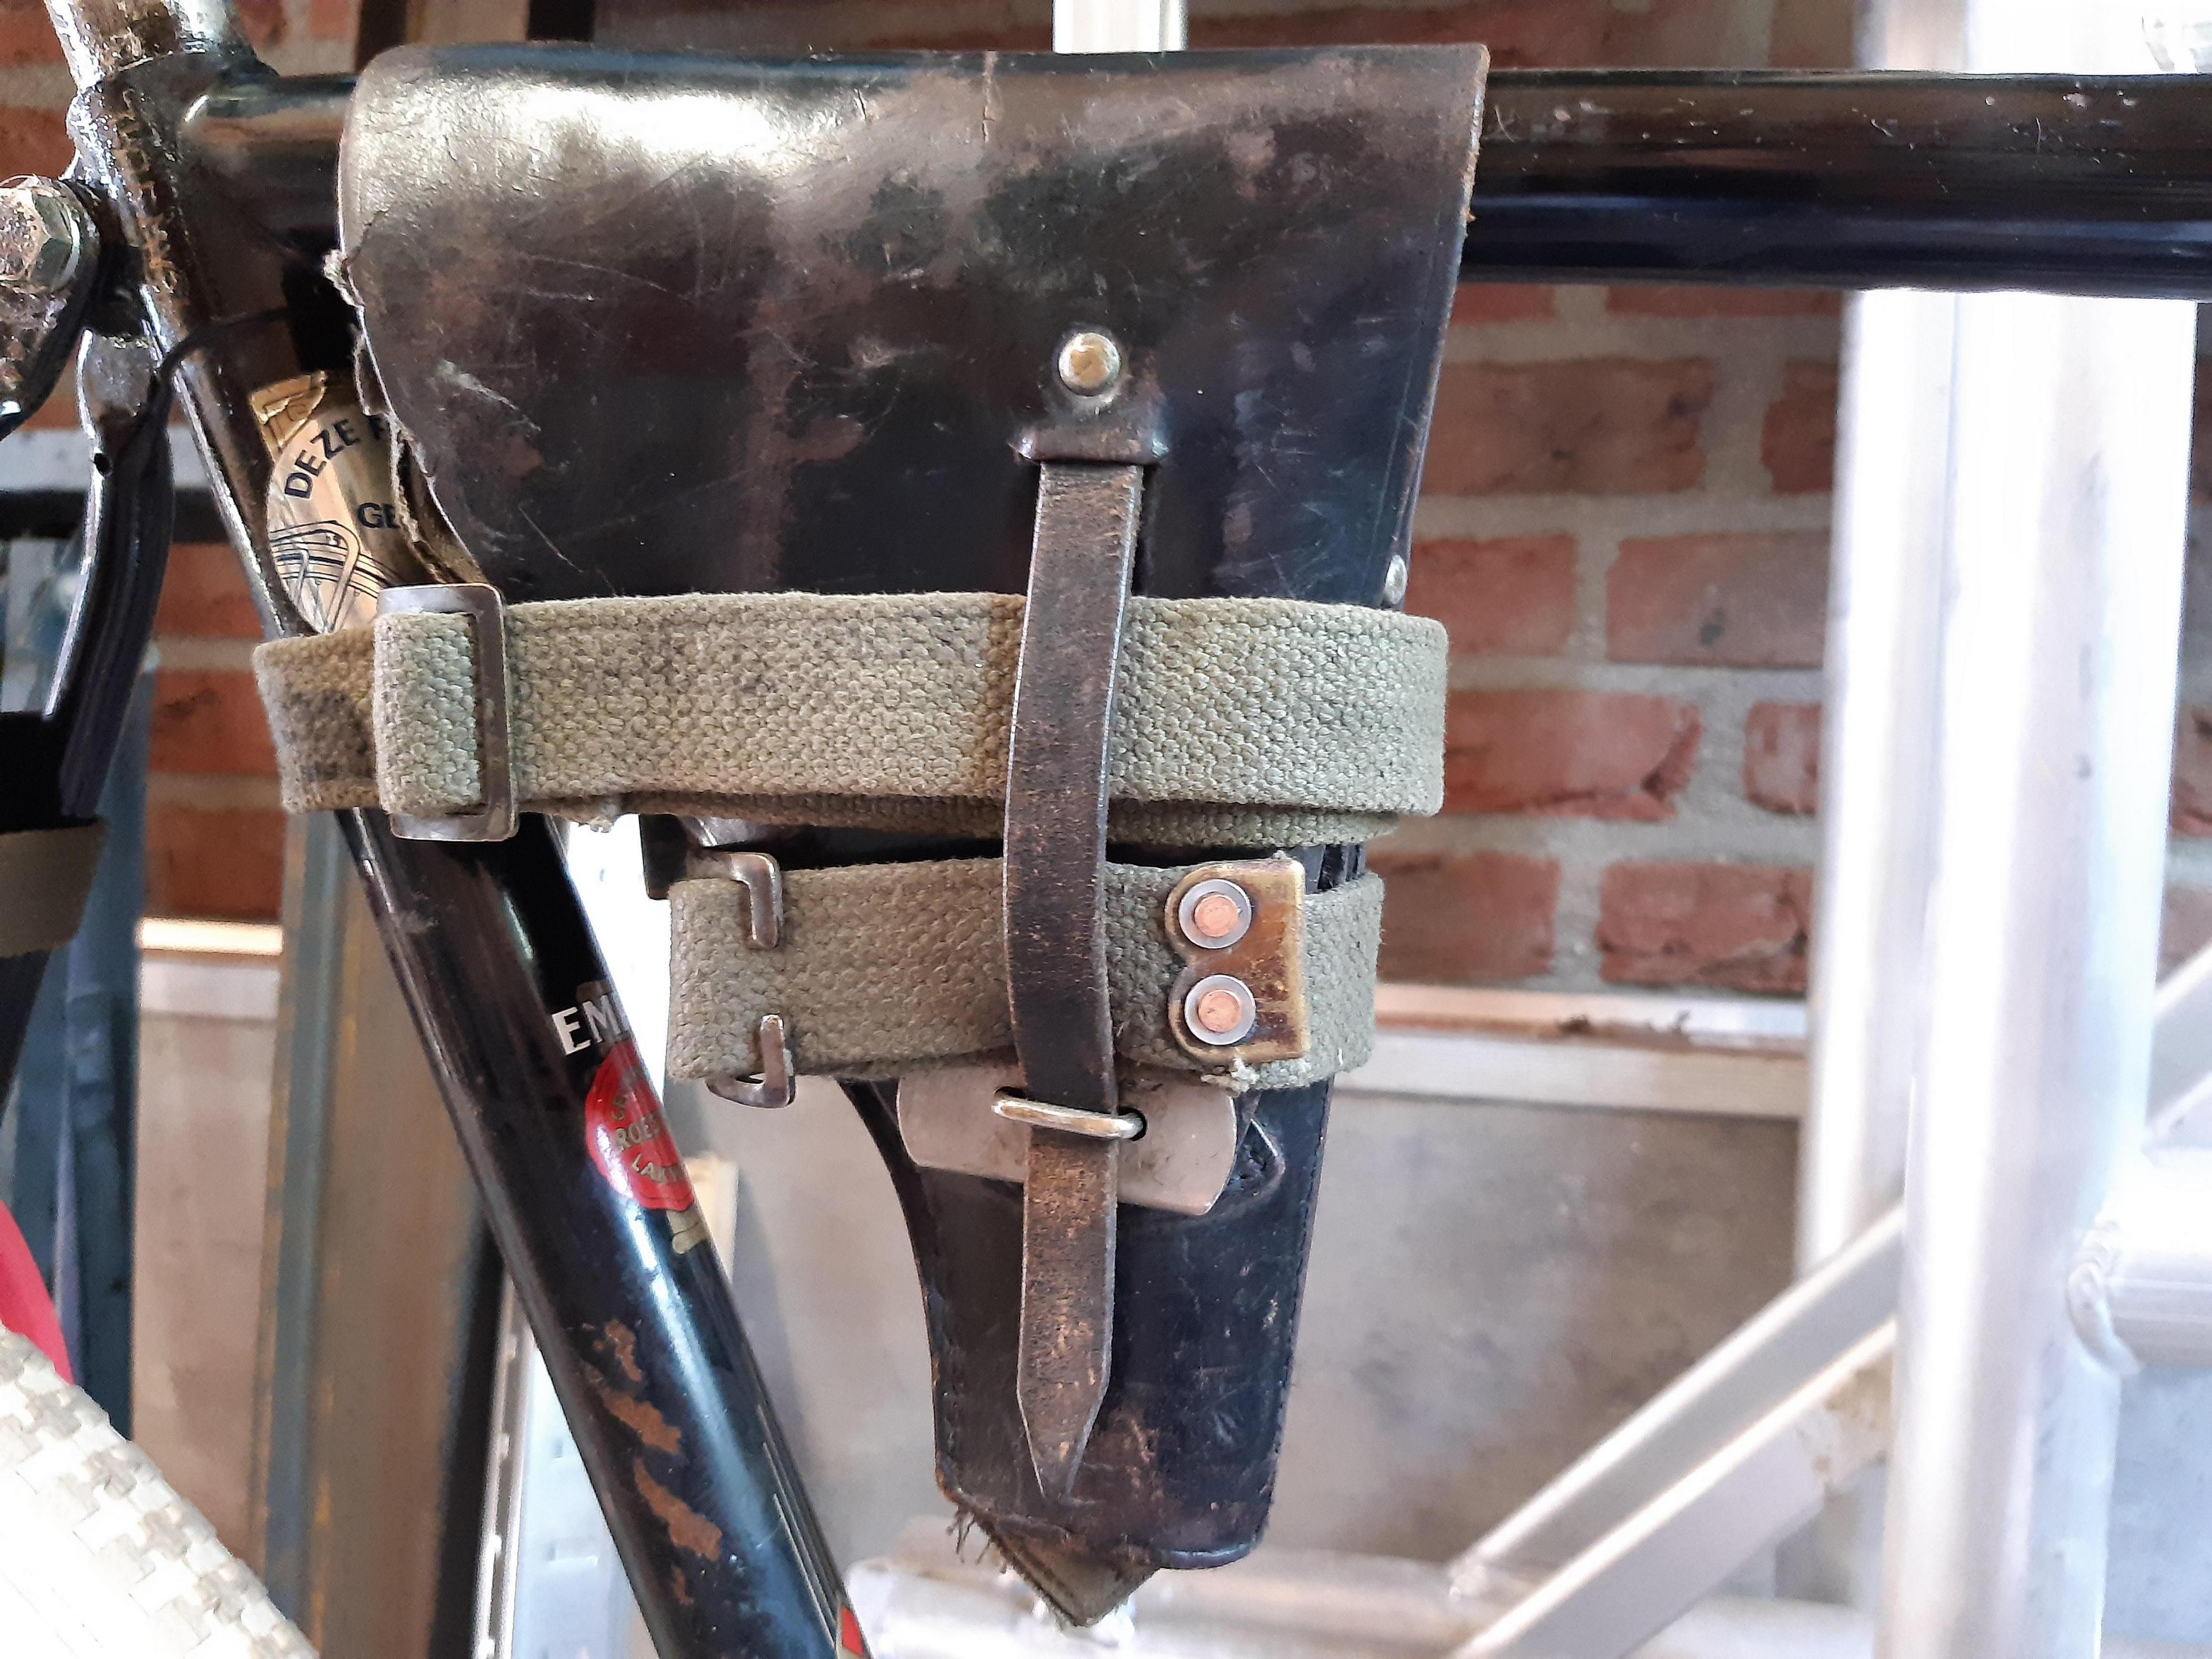
I cut some old stinky army pants in bits and used the pockets for tools. I placed it with some army straps underneath the saddle. The tools inside are to fix flat tires.
Front hub: I painted a broad stripe with the "UNION NL" letters on it. I made it a bit rough on purpose. I chose the green to create a bit of balance, because of the army straps underneath the saddle, and on the rear fork.
I added the red stripes by using a brush and spray paint. I did this because I wanted that weathered look, so you could see the black underneath a bit.
I weathered the "wing nuts" simply by spraying some black paint on it and then wiping it slightly with a cloth.
I also added a army strap around the rear hub, I think it looks great!
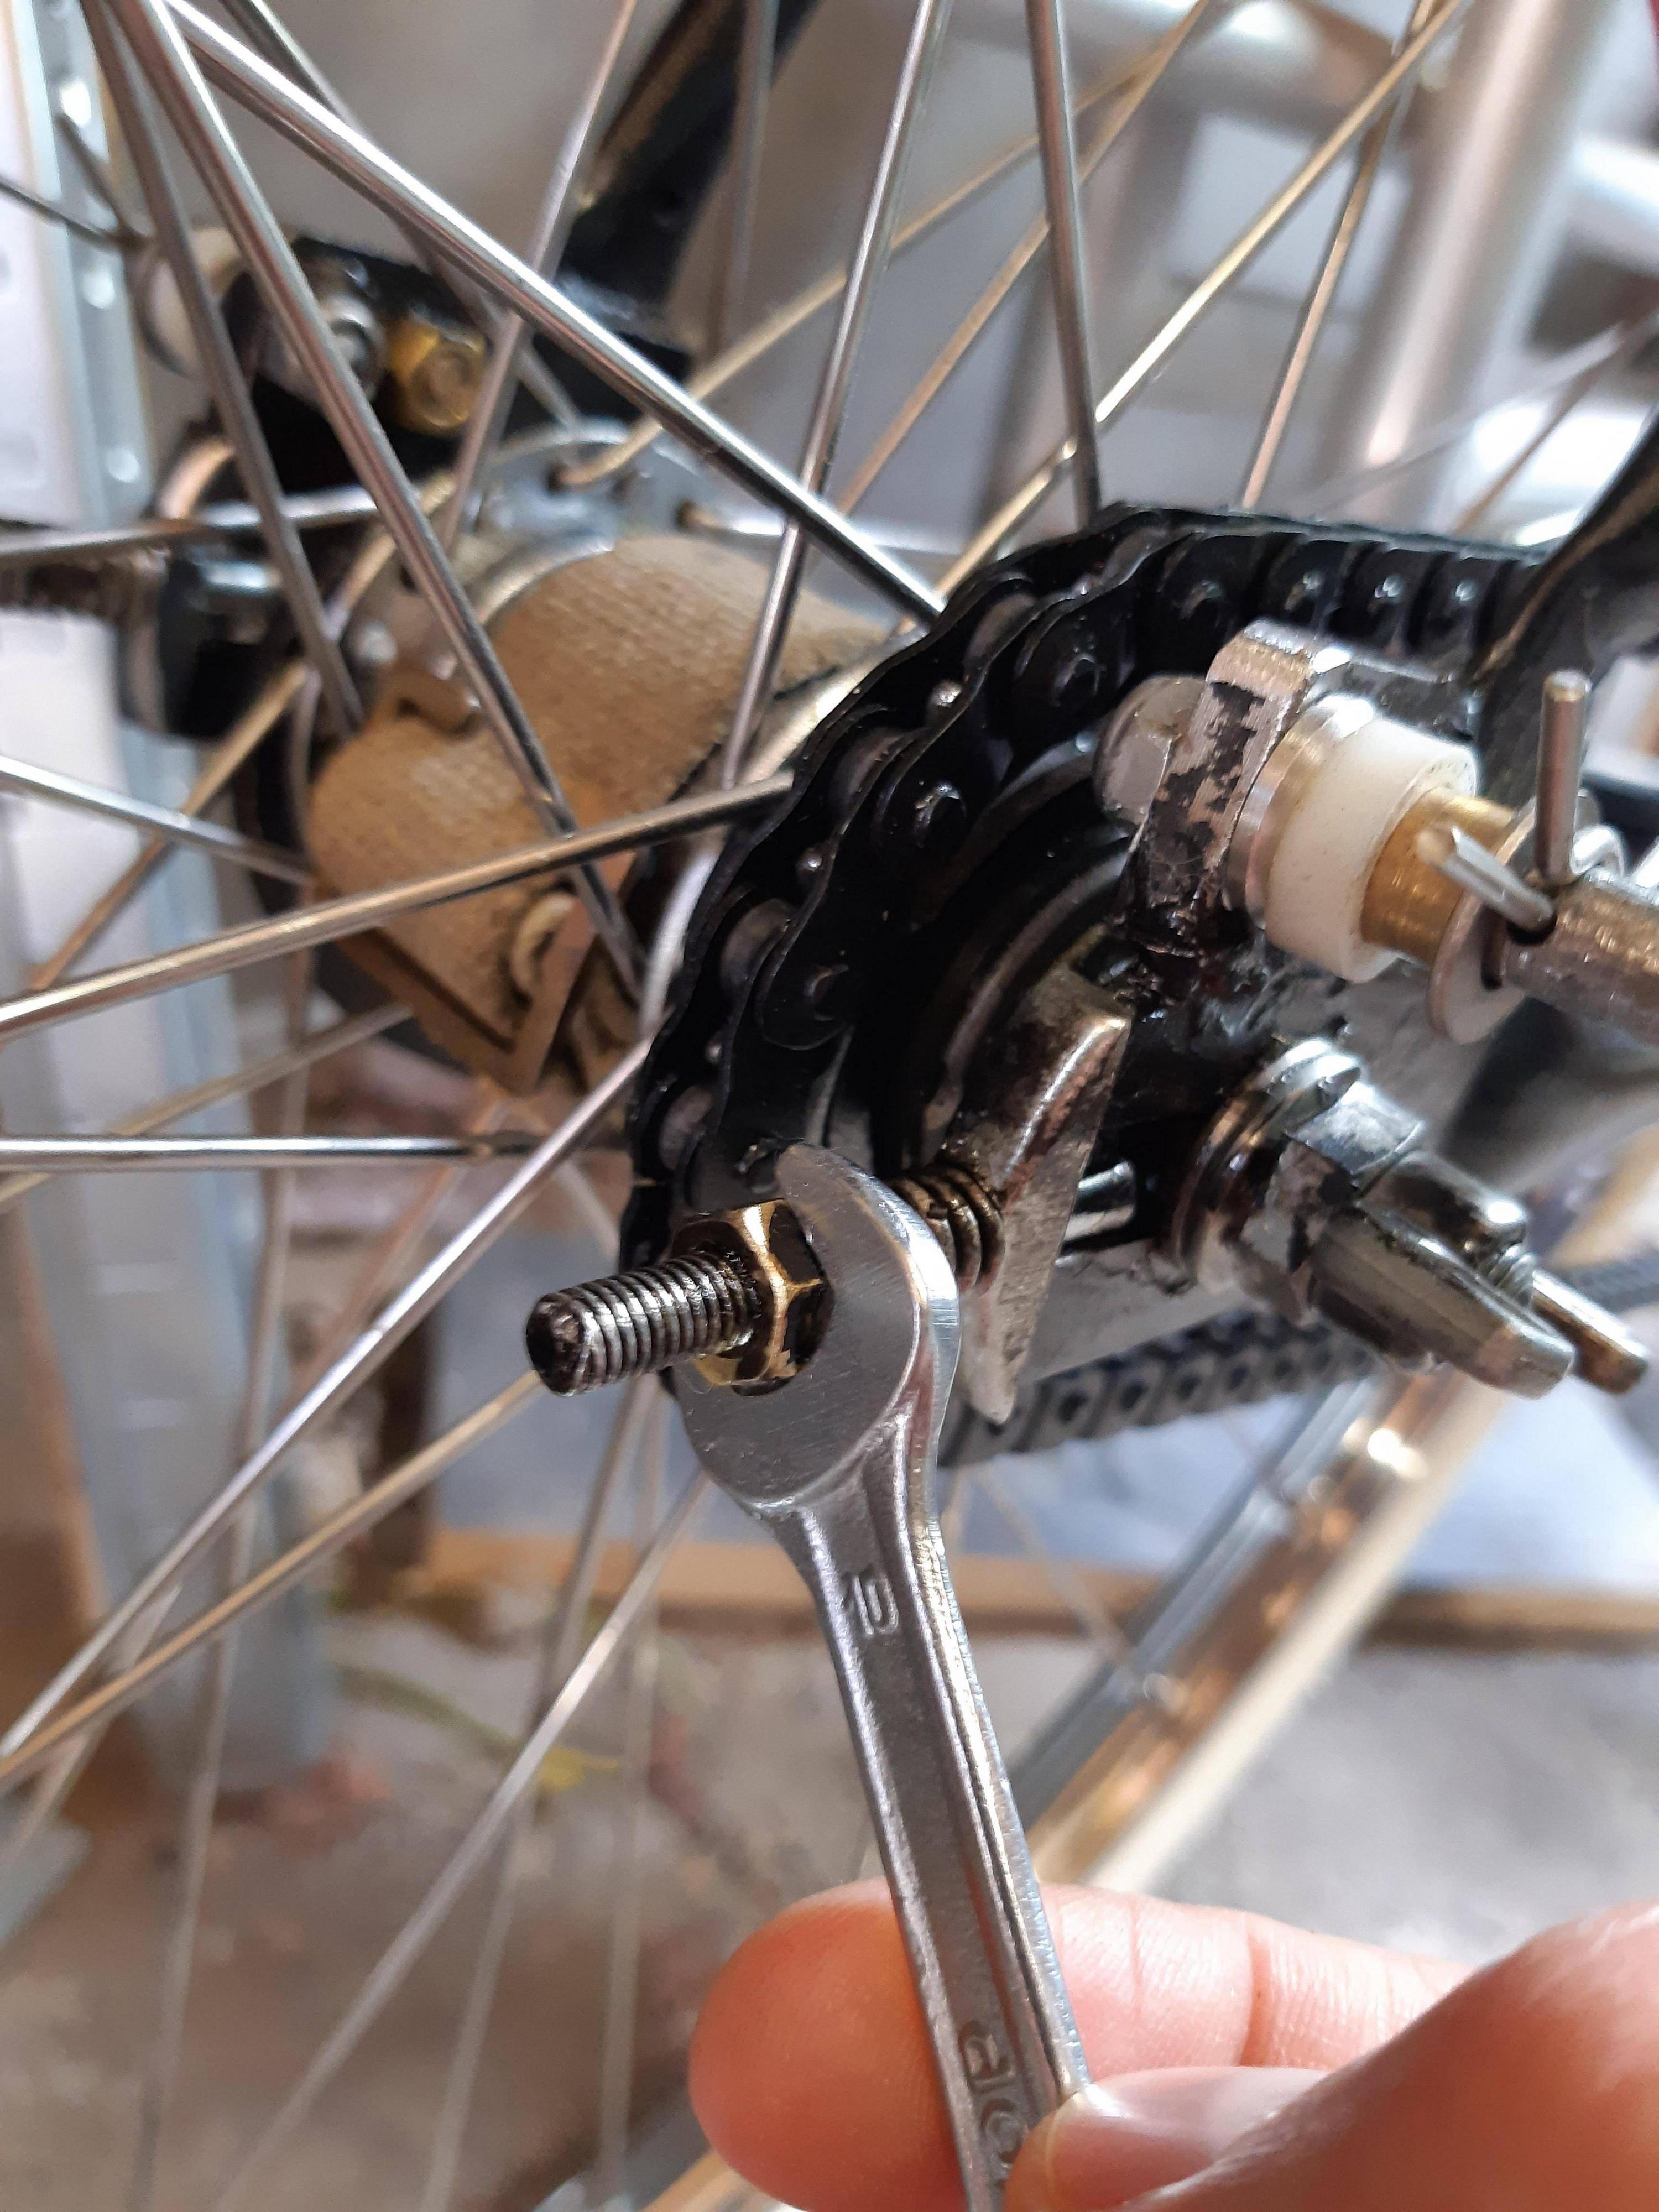
The cotterpins hold up! I did hit them with a hammer one last time (with bearing support). I added some disc springs underneath the nut for tension purposes.
Almost done!
Left to do: Tools in the 1910-1922 framebag/holster. (9mm tools? )
Alright, the bike is 99% done!
I cut some old stinky army pants in bits and used the pockets for tools. I placed it with some army straps underneath the saddle. The tools inside are to fix flat tires.
Front hub: I painted a broad stripe with the "UNION NL" letters on it. I made it a bit rough on purpose. I chose the green to create a bit of balance, because of the army straps underneath the saddle, and on the rear fork.
I added the red stripes by using a brush and spray paint. I did this because I wanted that weathered look, so you could see the black underneath a bit.
I weathered the "wing nuts" simply by spraying some black paint on it and then wiping it slightly with a cloth.
I also added a army strap around the rear hub, I think it looks great!
The cotterpins hold up! I did hit them with a hammer one last time (with bearing support). I added some disc springs underneath the nut for tension purposes.
Almost done!
Left to do: Tools in the 1910-1922 framebag/holster. (9mm tools?
)Probably final update
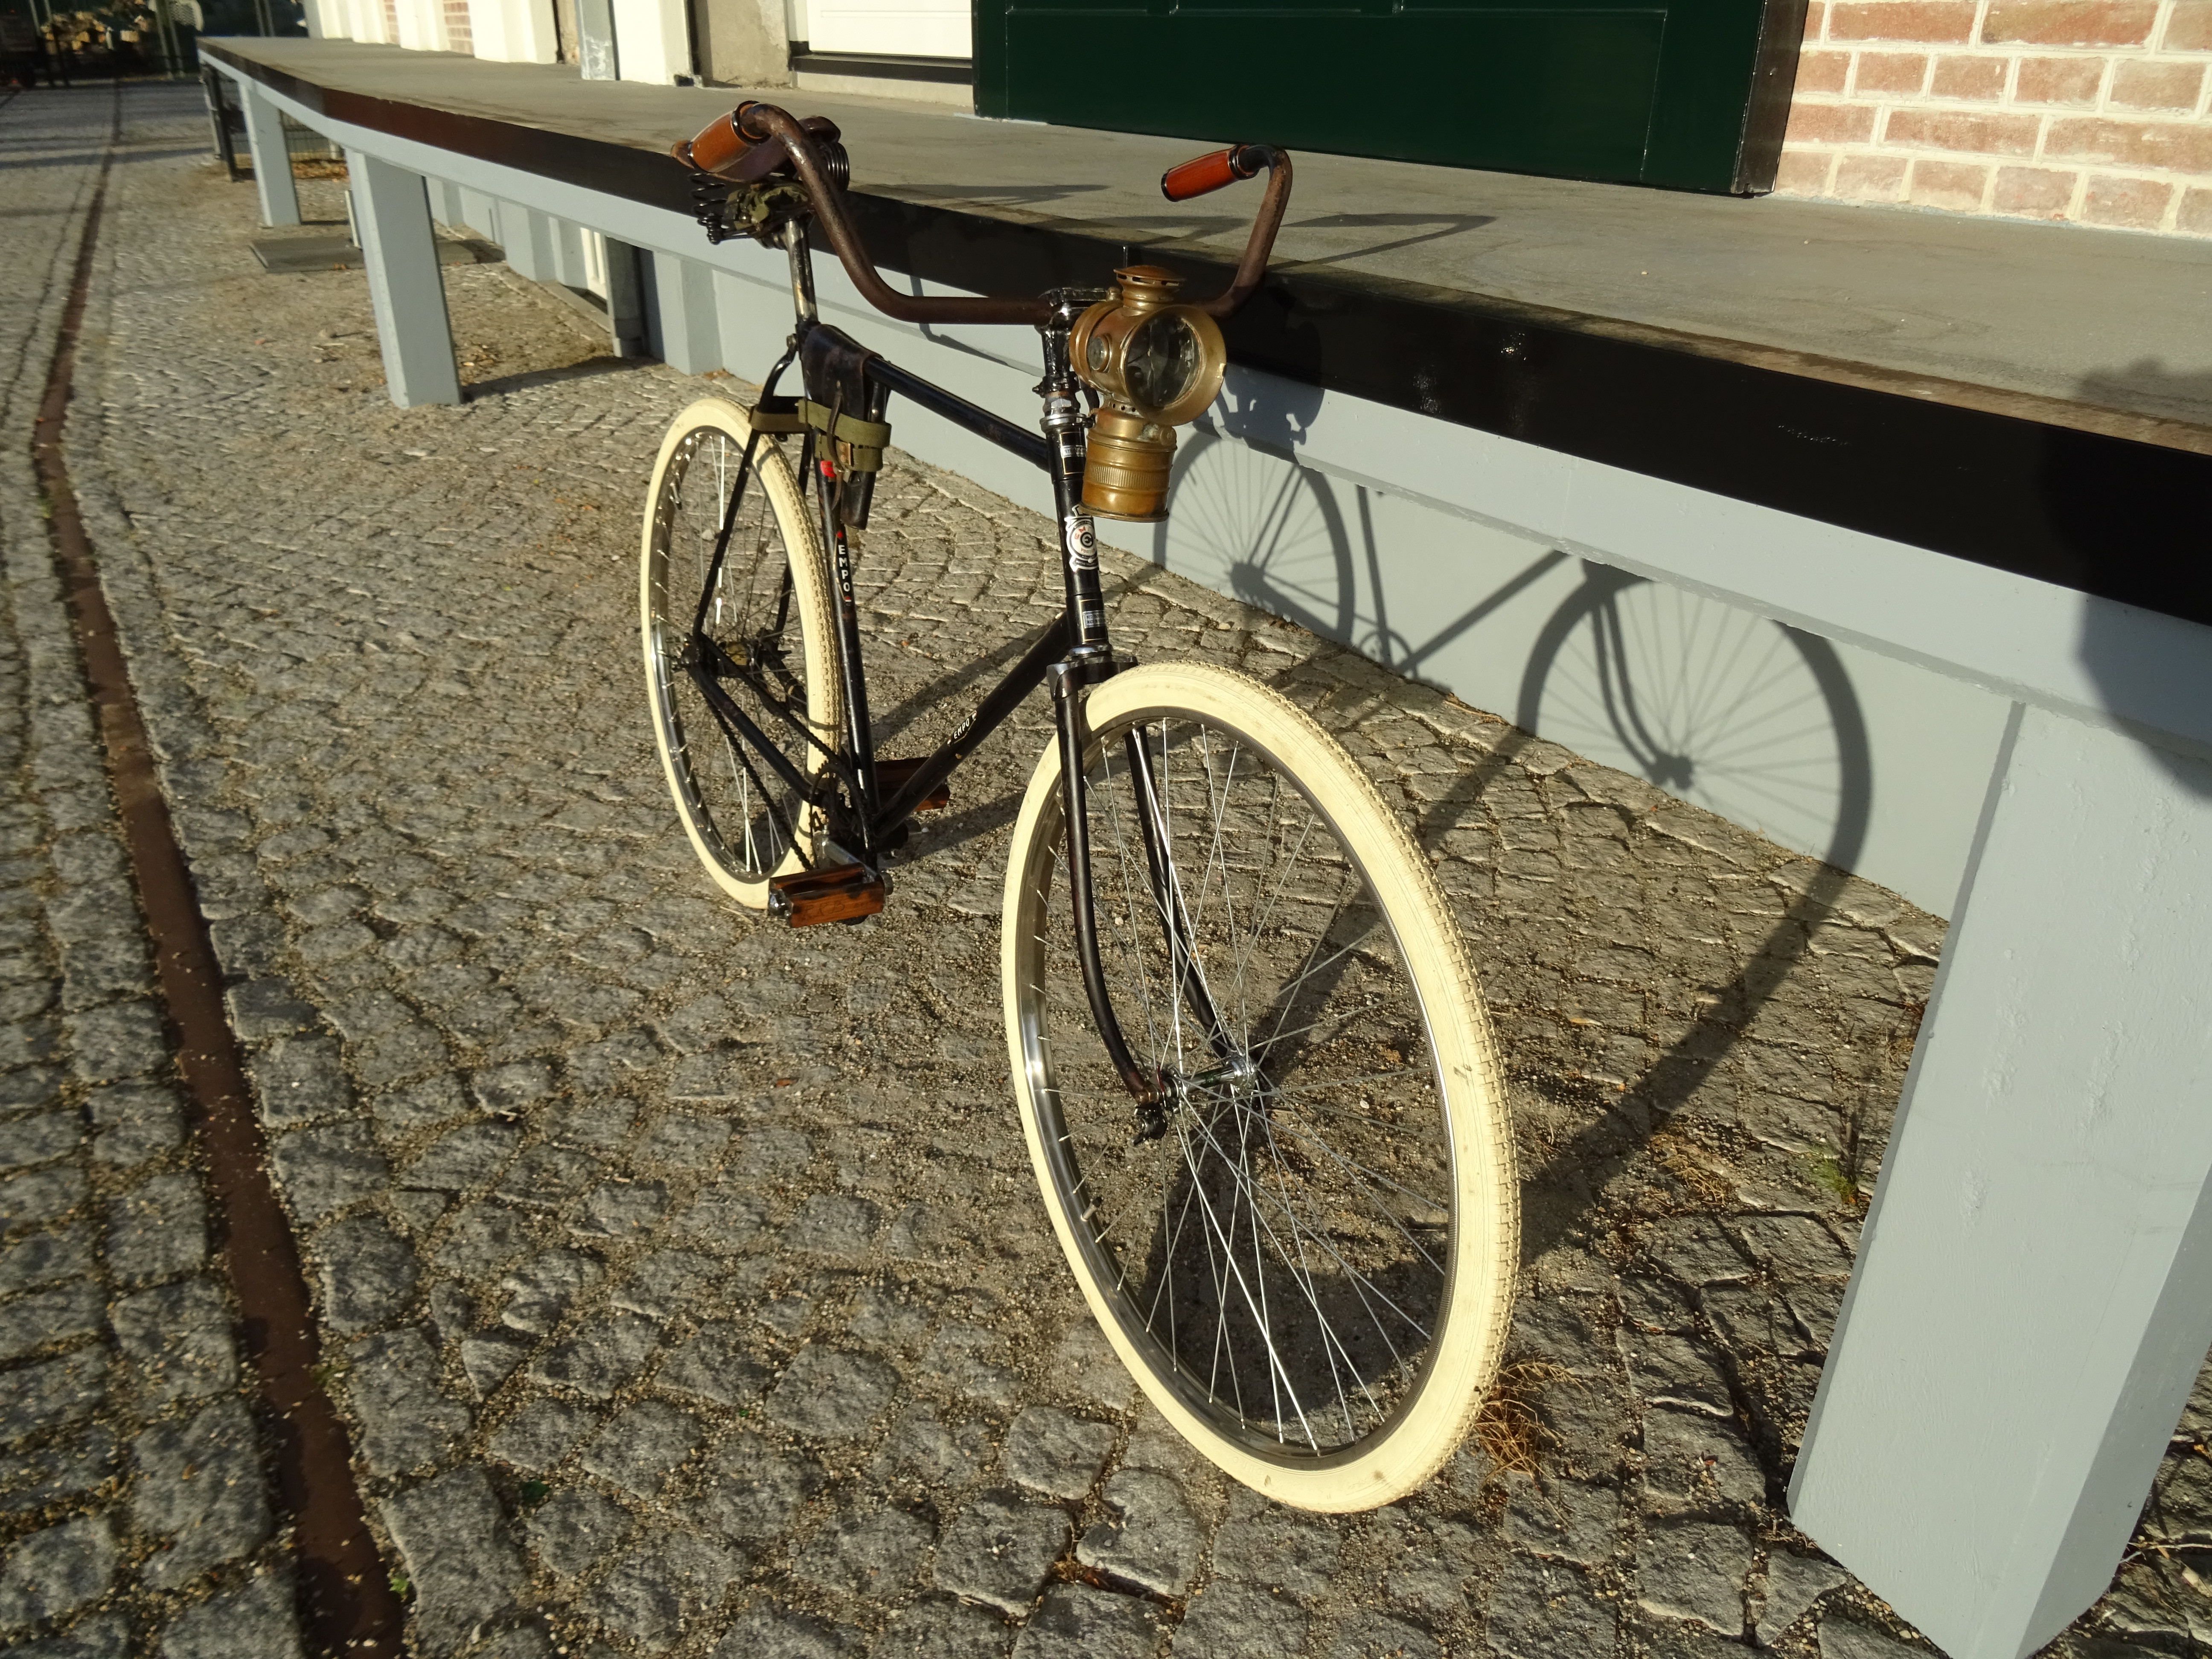
Alright, I completely checked the bicycle for the ride this week, everything is in order.
I love how the bike came out! It looks old, but it's technically perfect:
New bearings.
New tires (the little draught cracks fit the looks, even though I did not expect new tires to have these cracks).
New cotterpins
The last things I hope to do:
》Is a little modest pinstriping, but I don't know if I am able to make it timewise. And I don't have pinstriping tools at hand.
》Put a little lamp in the carbide lamp housing. I need parts to really fix the carbide lamp, but can't get them right now. In Oktober there's an old bicycle stock market where I aim to find stuff. For now, I can put a small battery lamp in there.
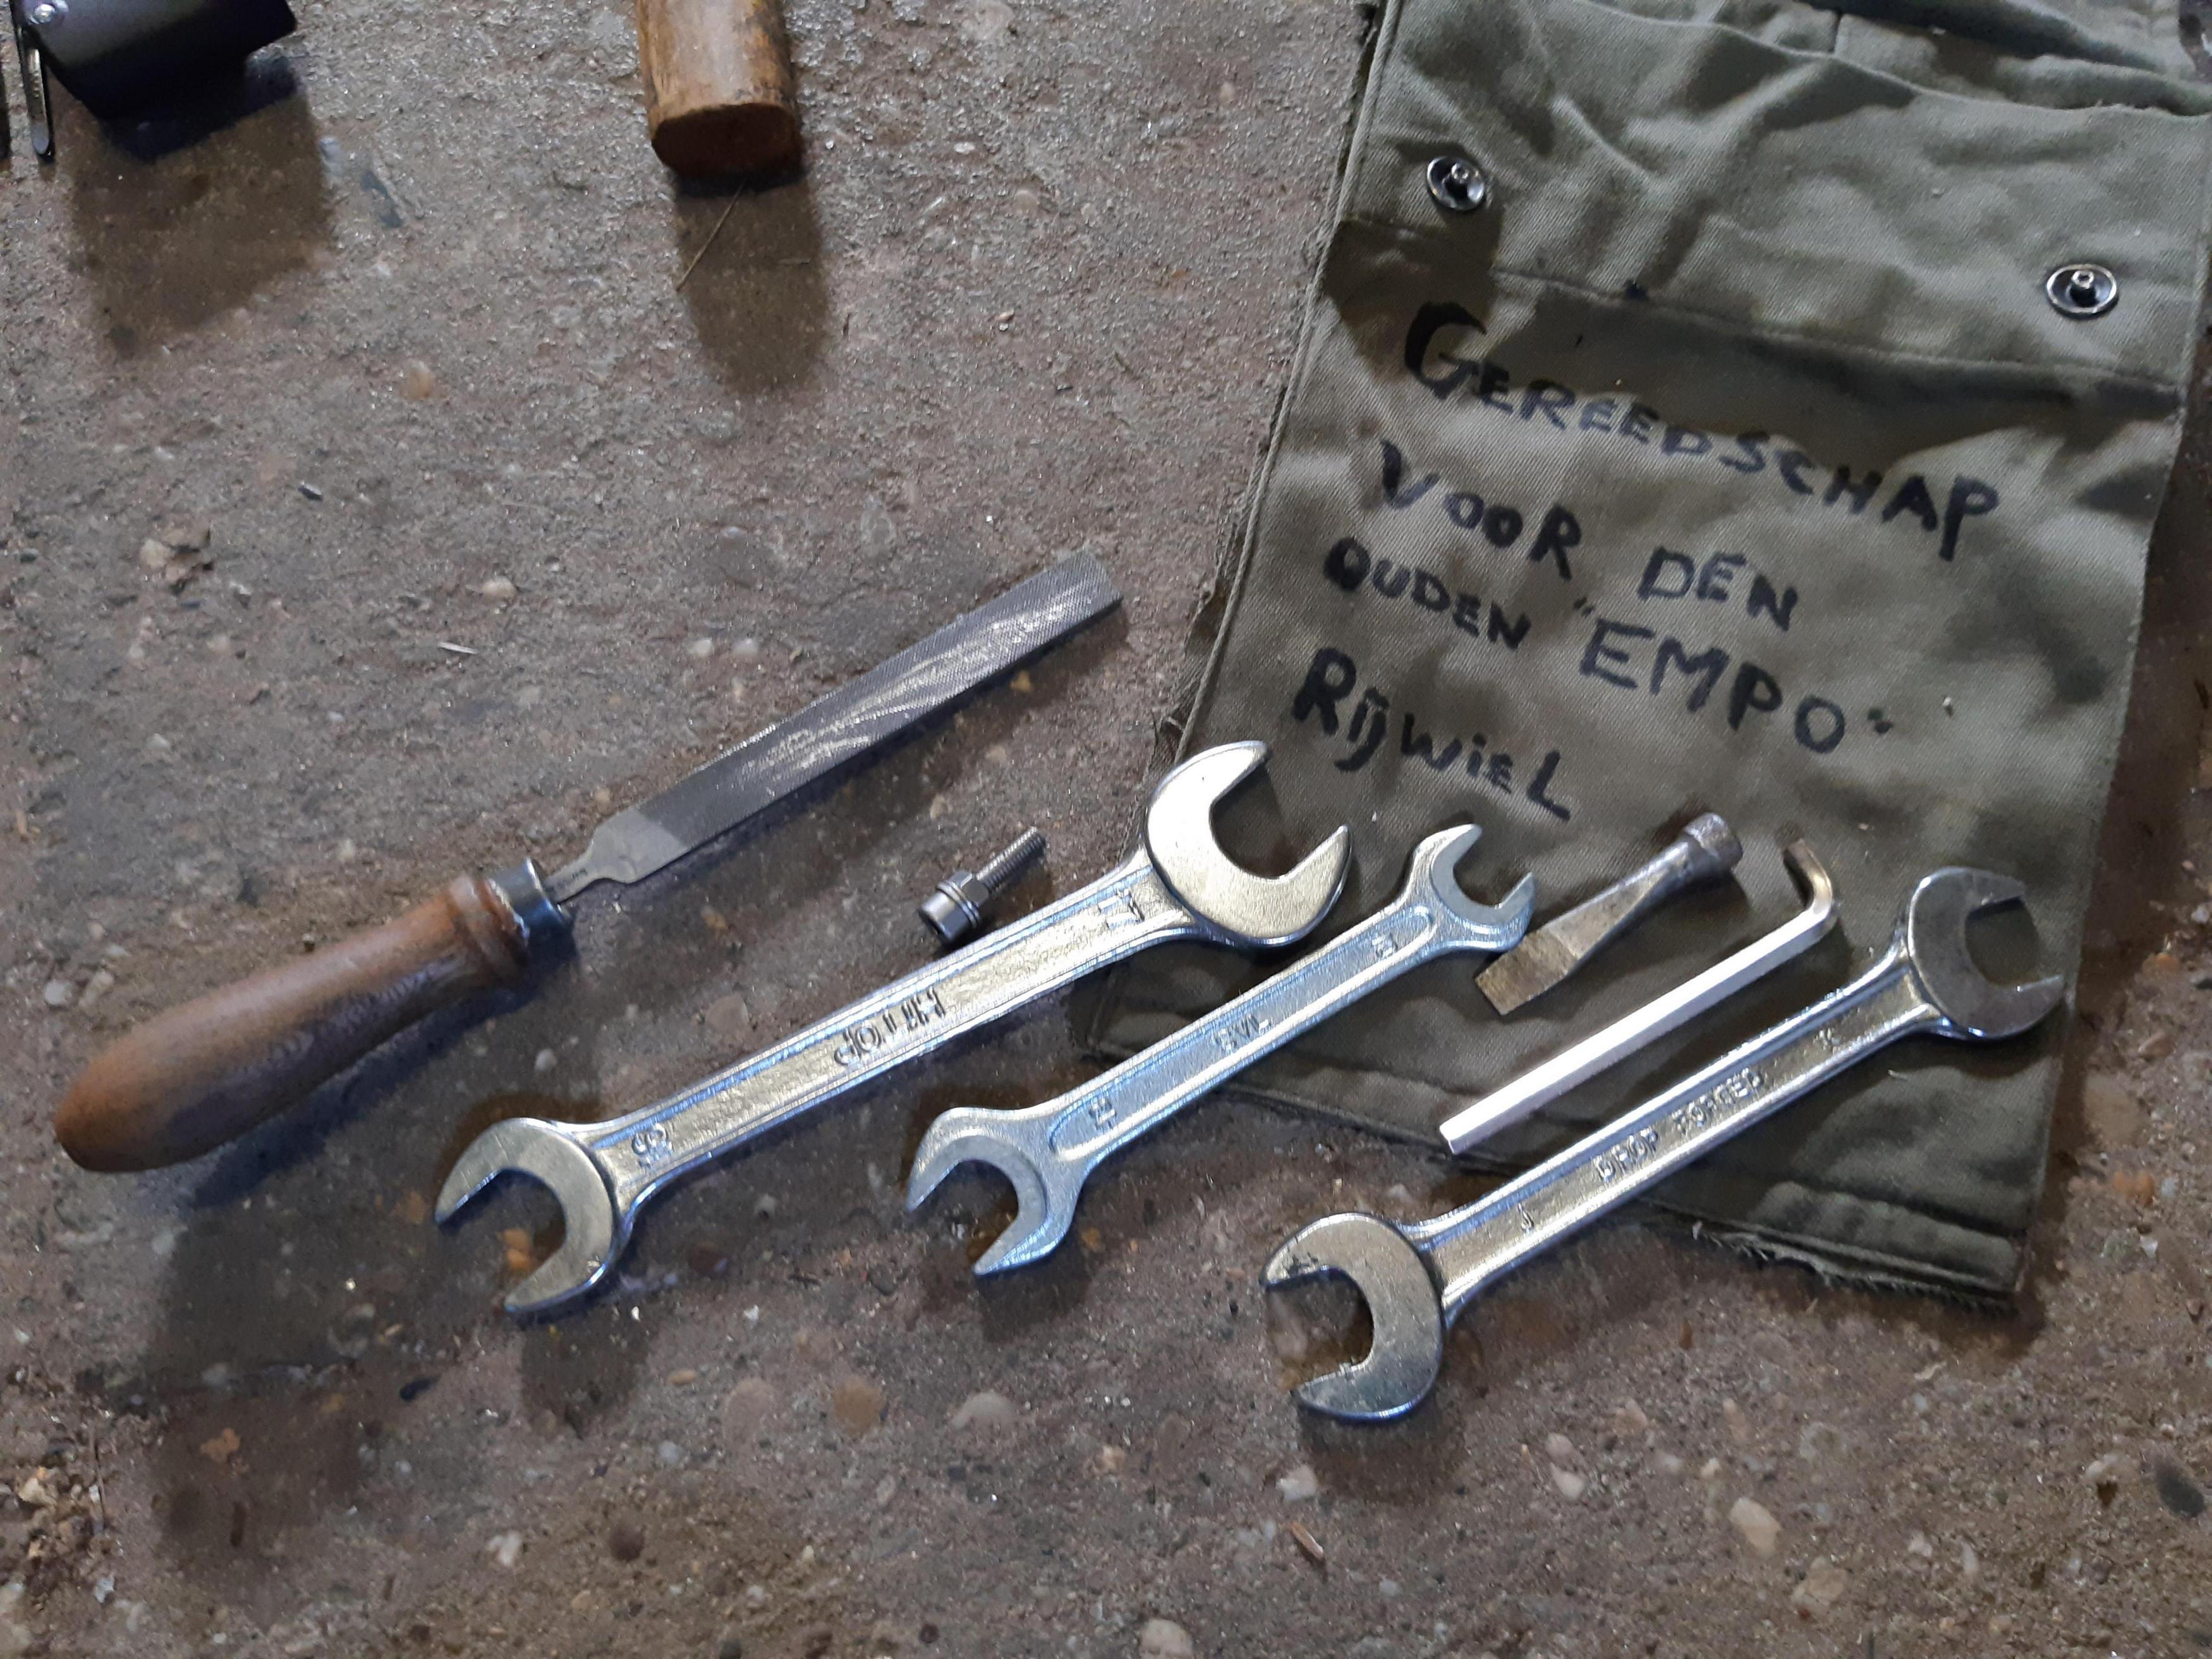
The last update I wanted to share is the tools in my holster framebag.
The aim was to take as few tools as possible, with maximum effect! At first to adjust things like, saddle, handlebars and tension the chain. But taking a bit more with me allowed me to remove the wheels (for flat tire repair). And even to adjust the rear hub!
Pictures with the tools and its use:
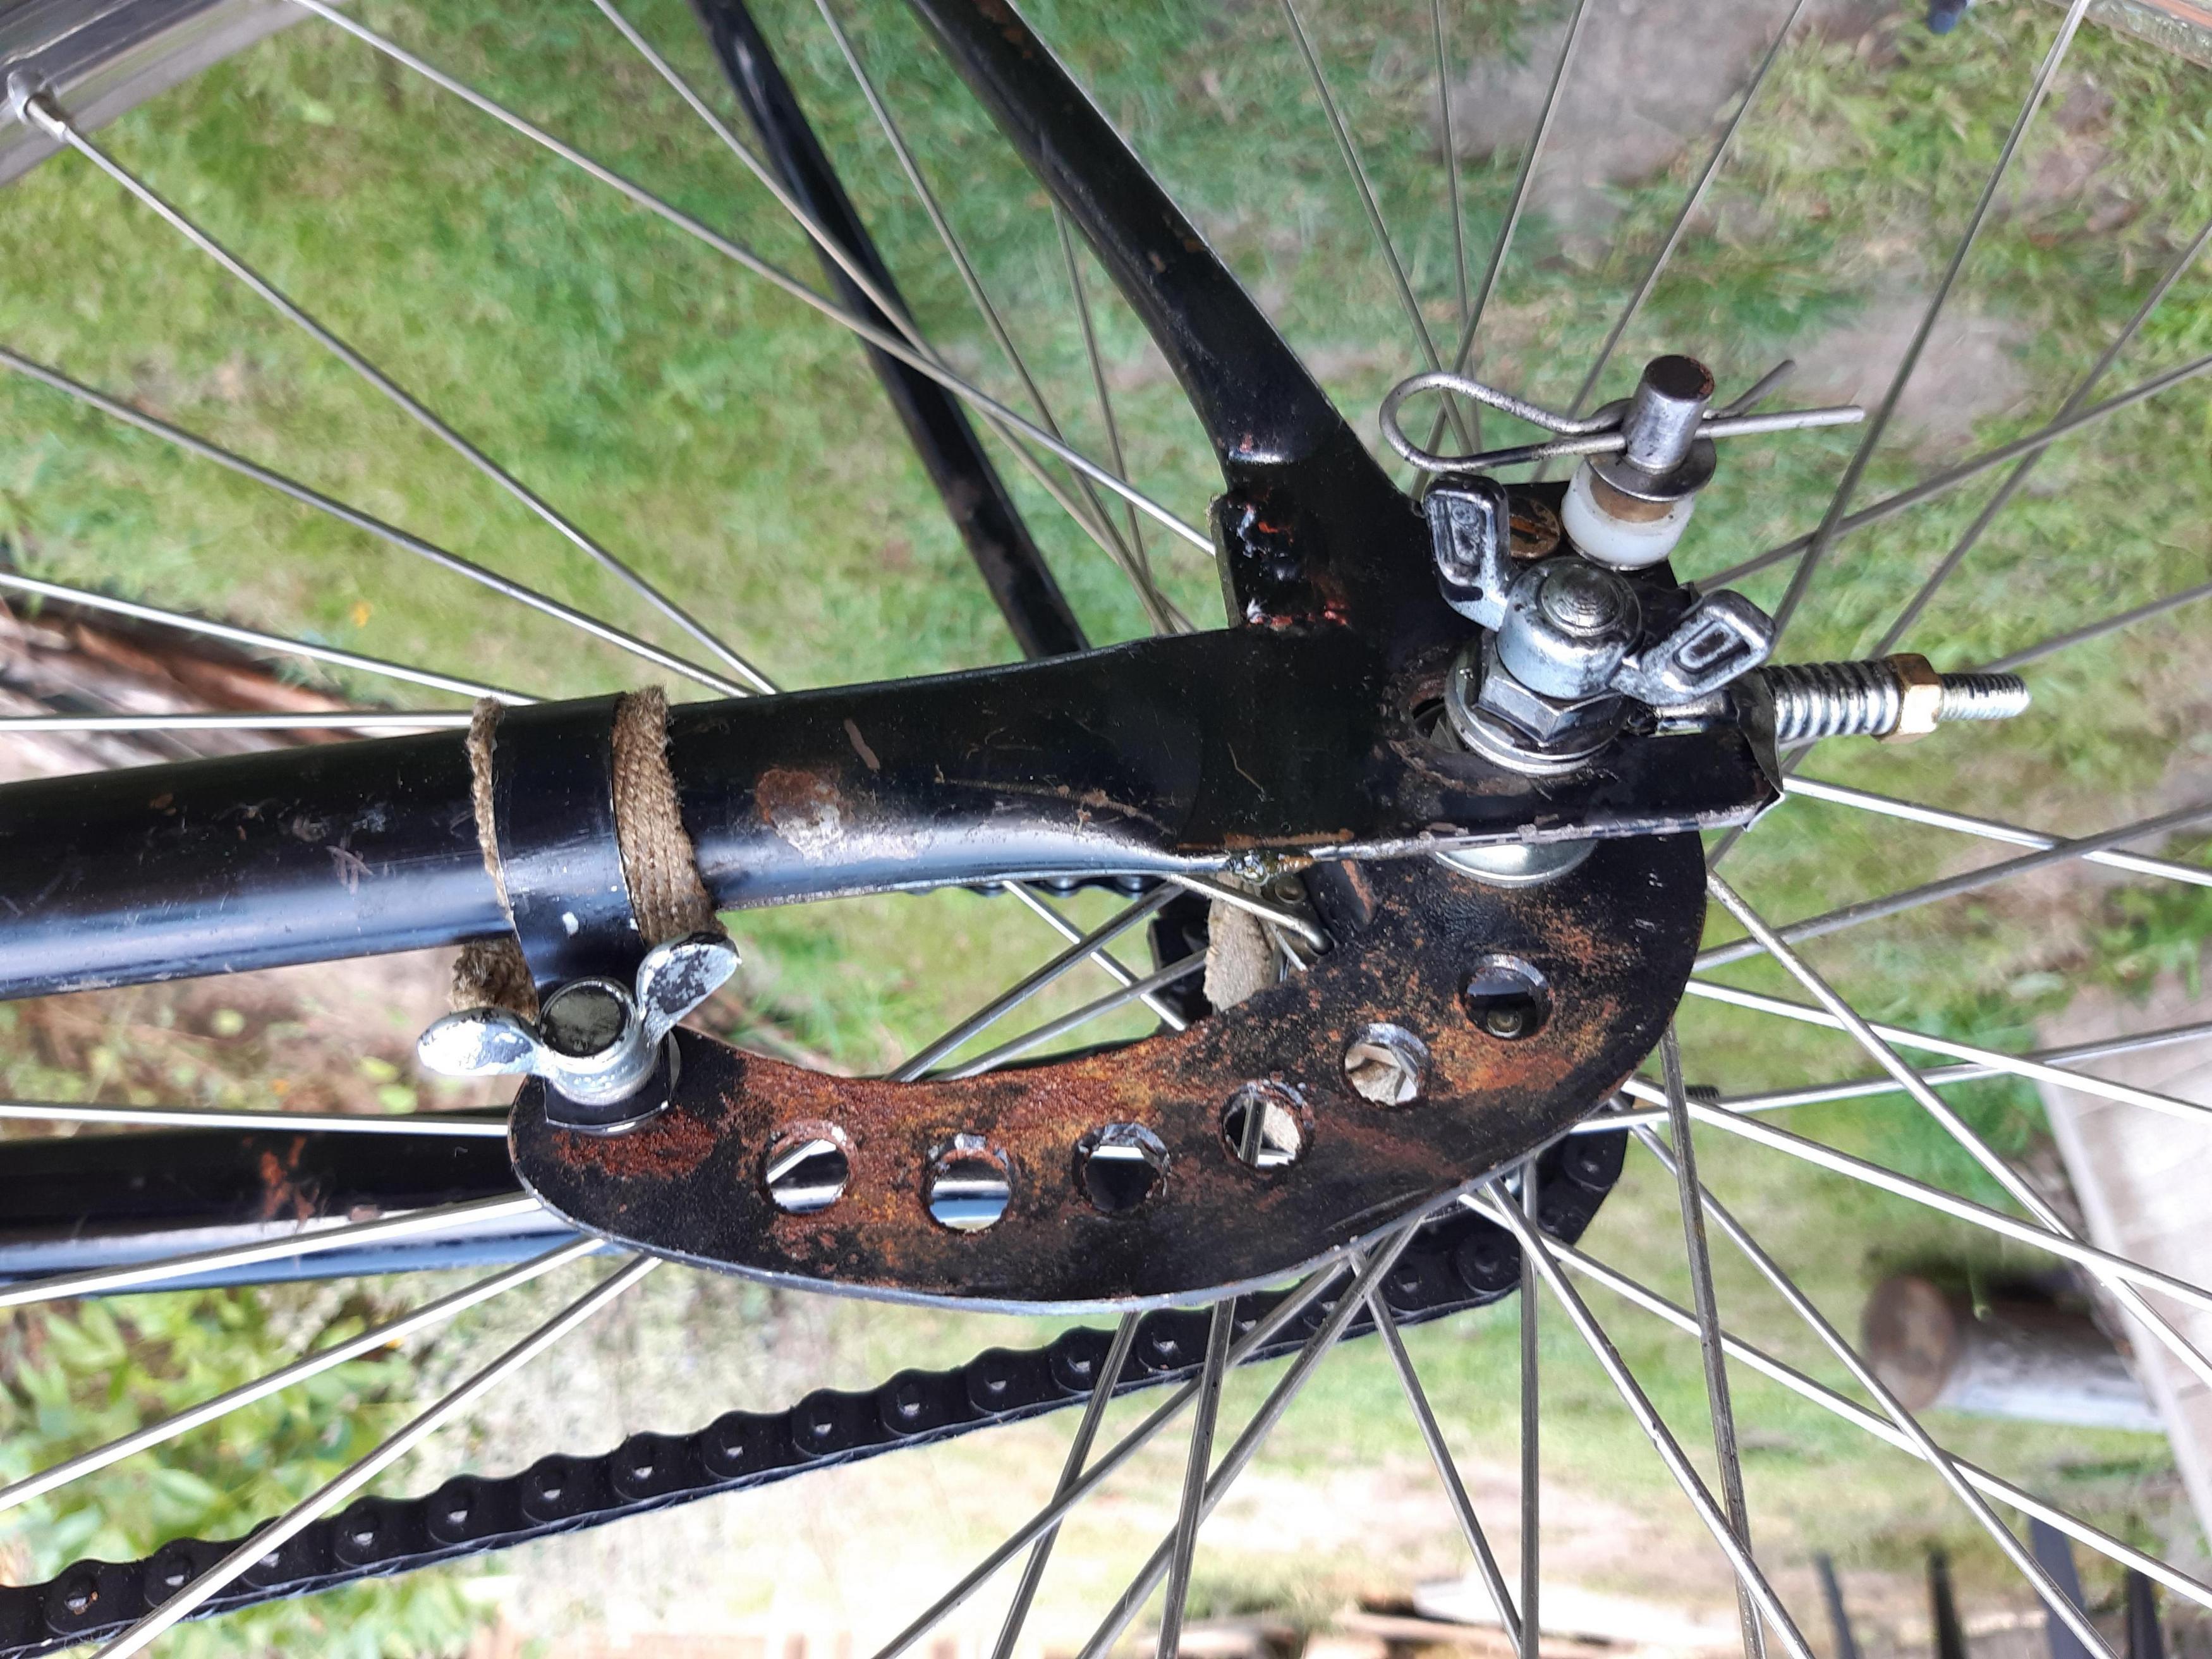
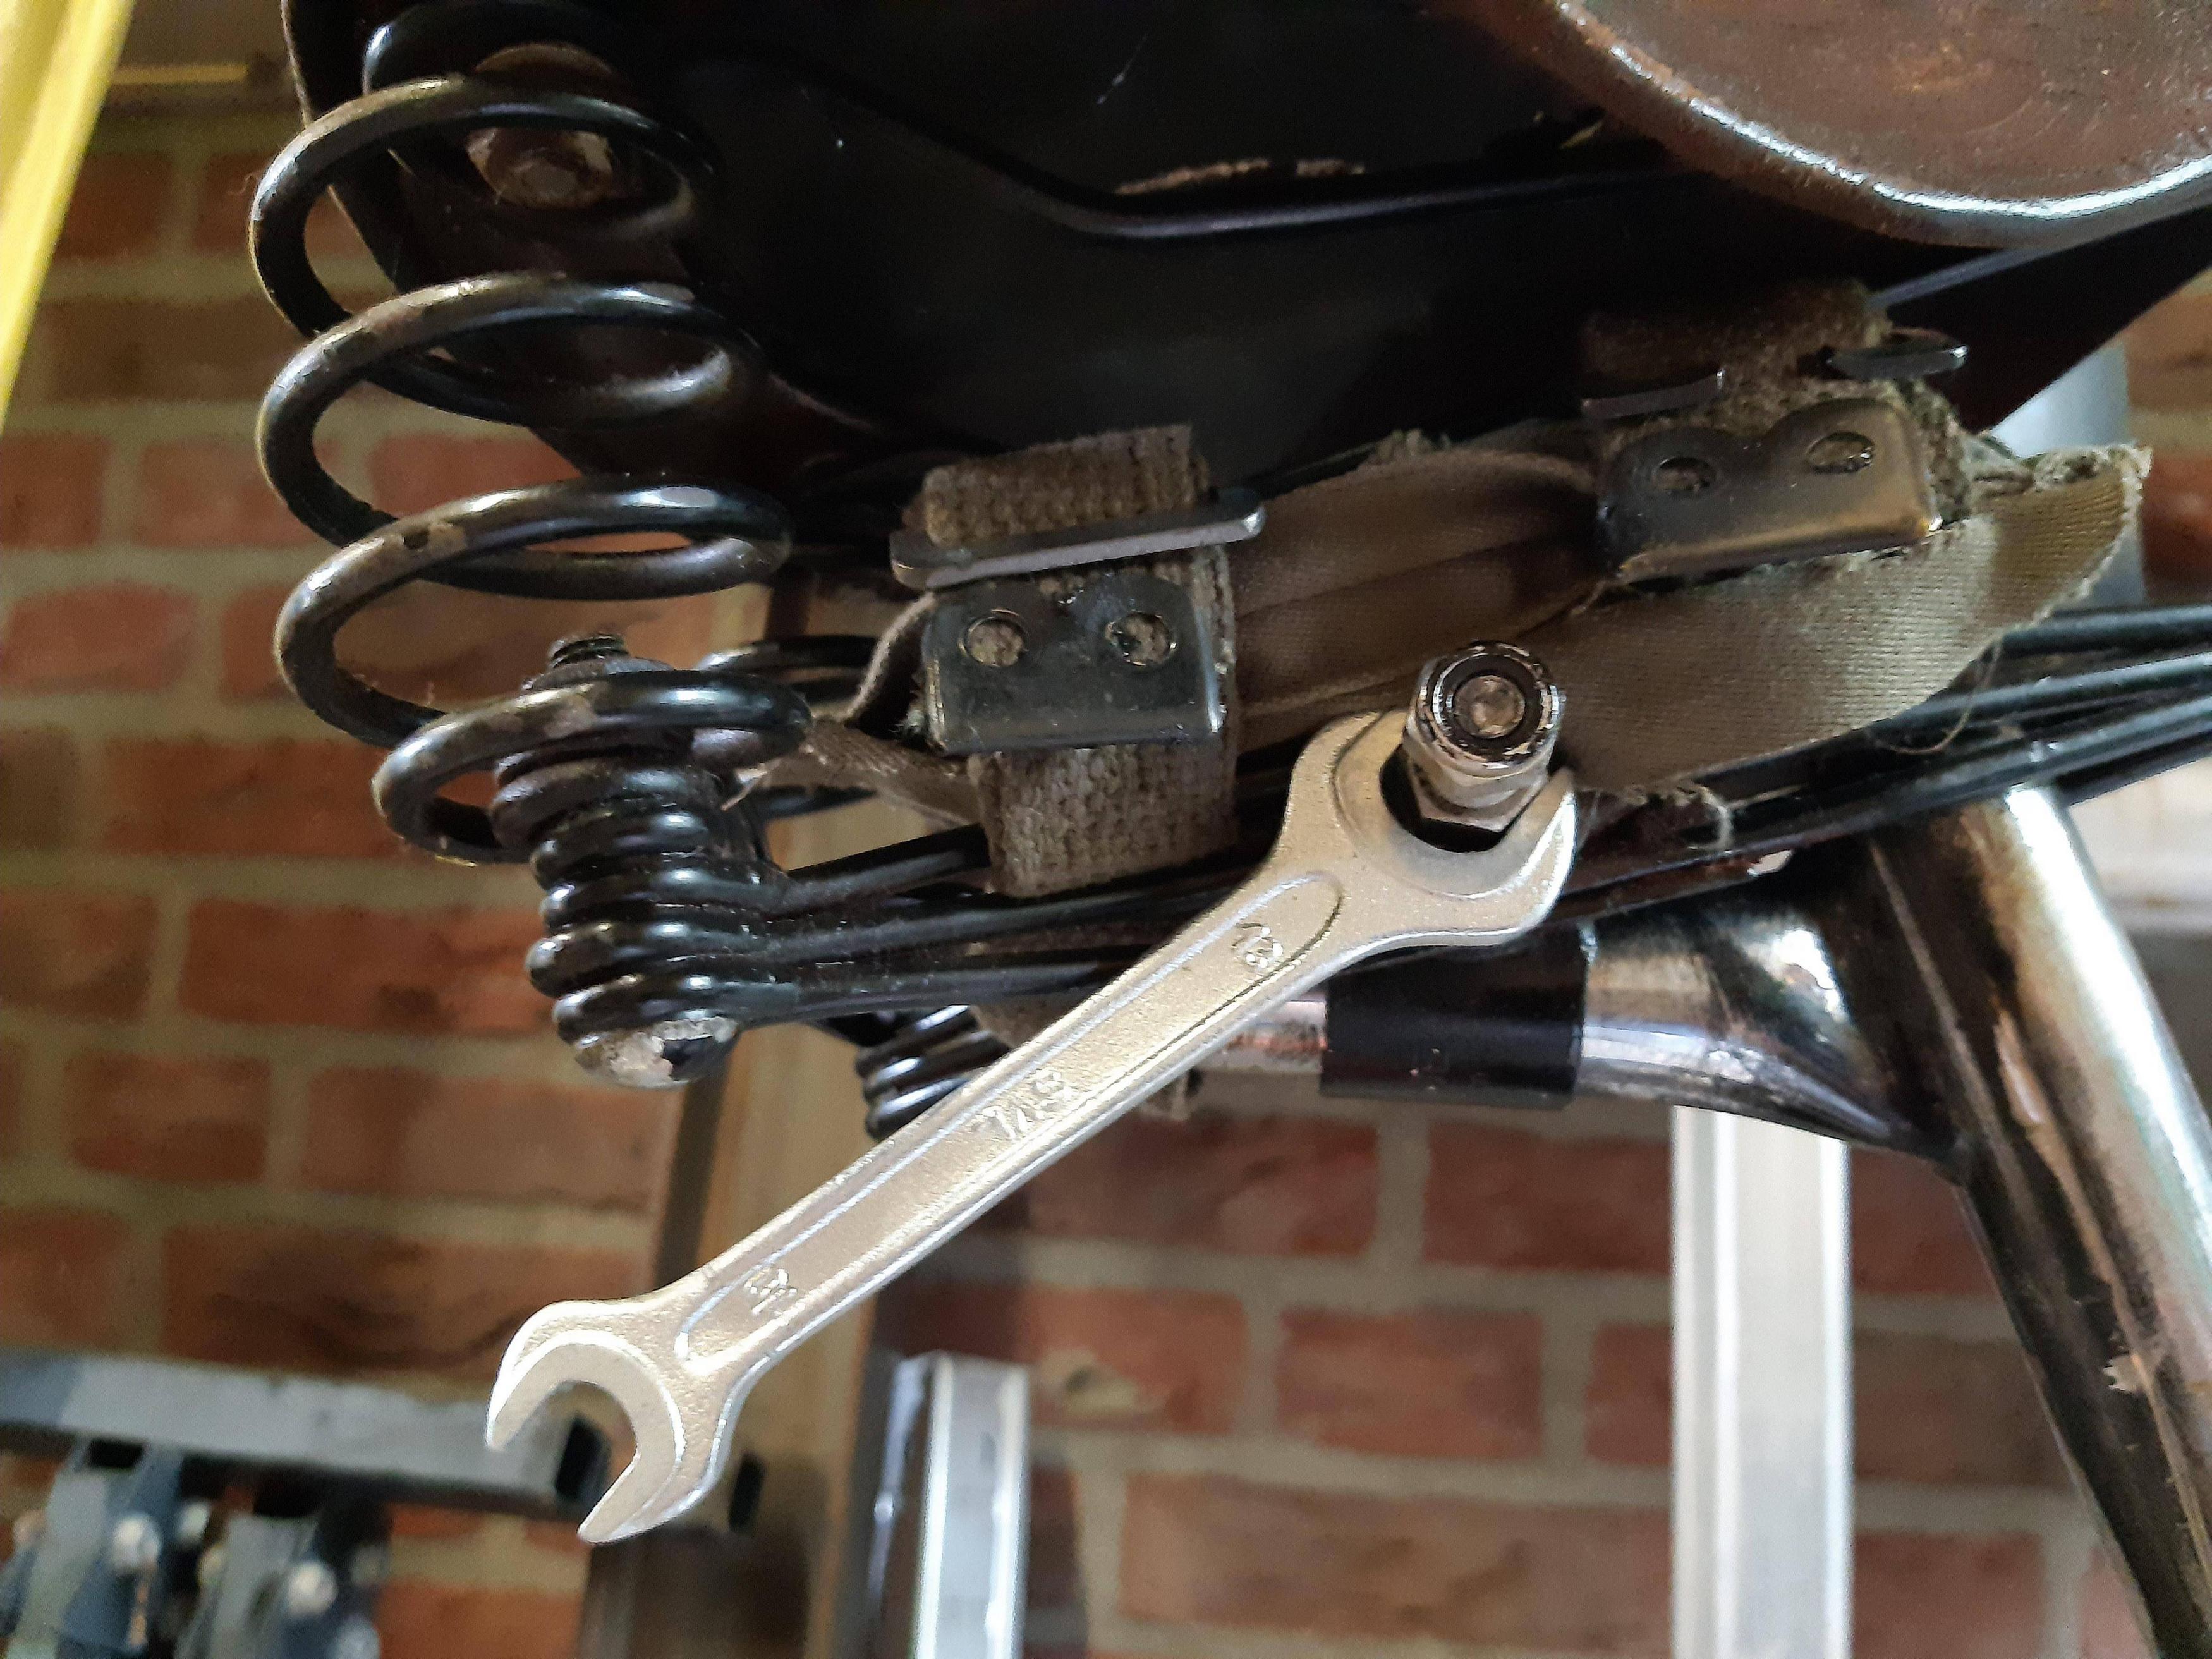
Wrench, 10mm, chain tensioner.
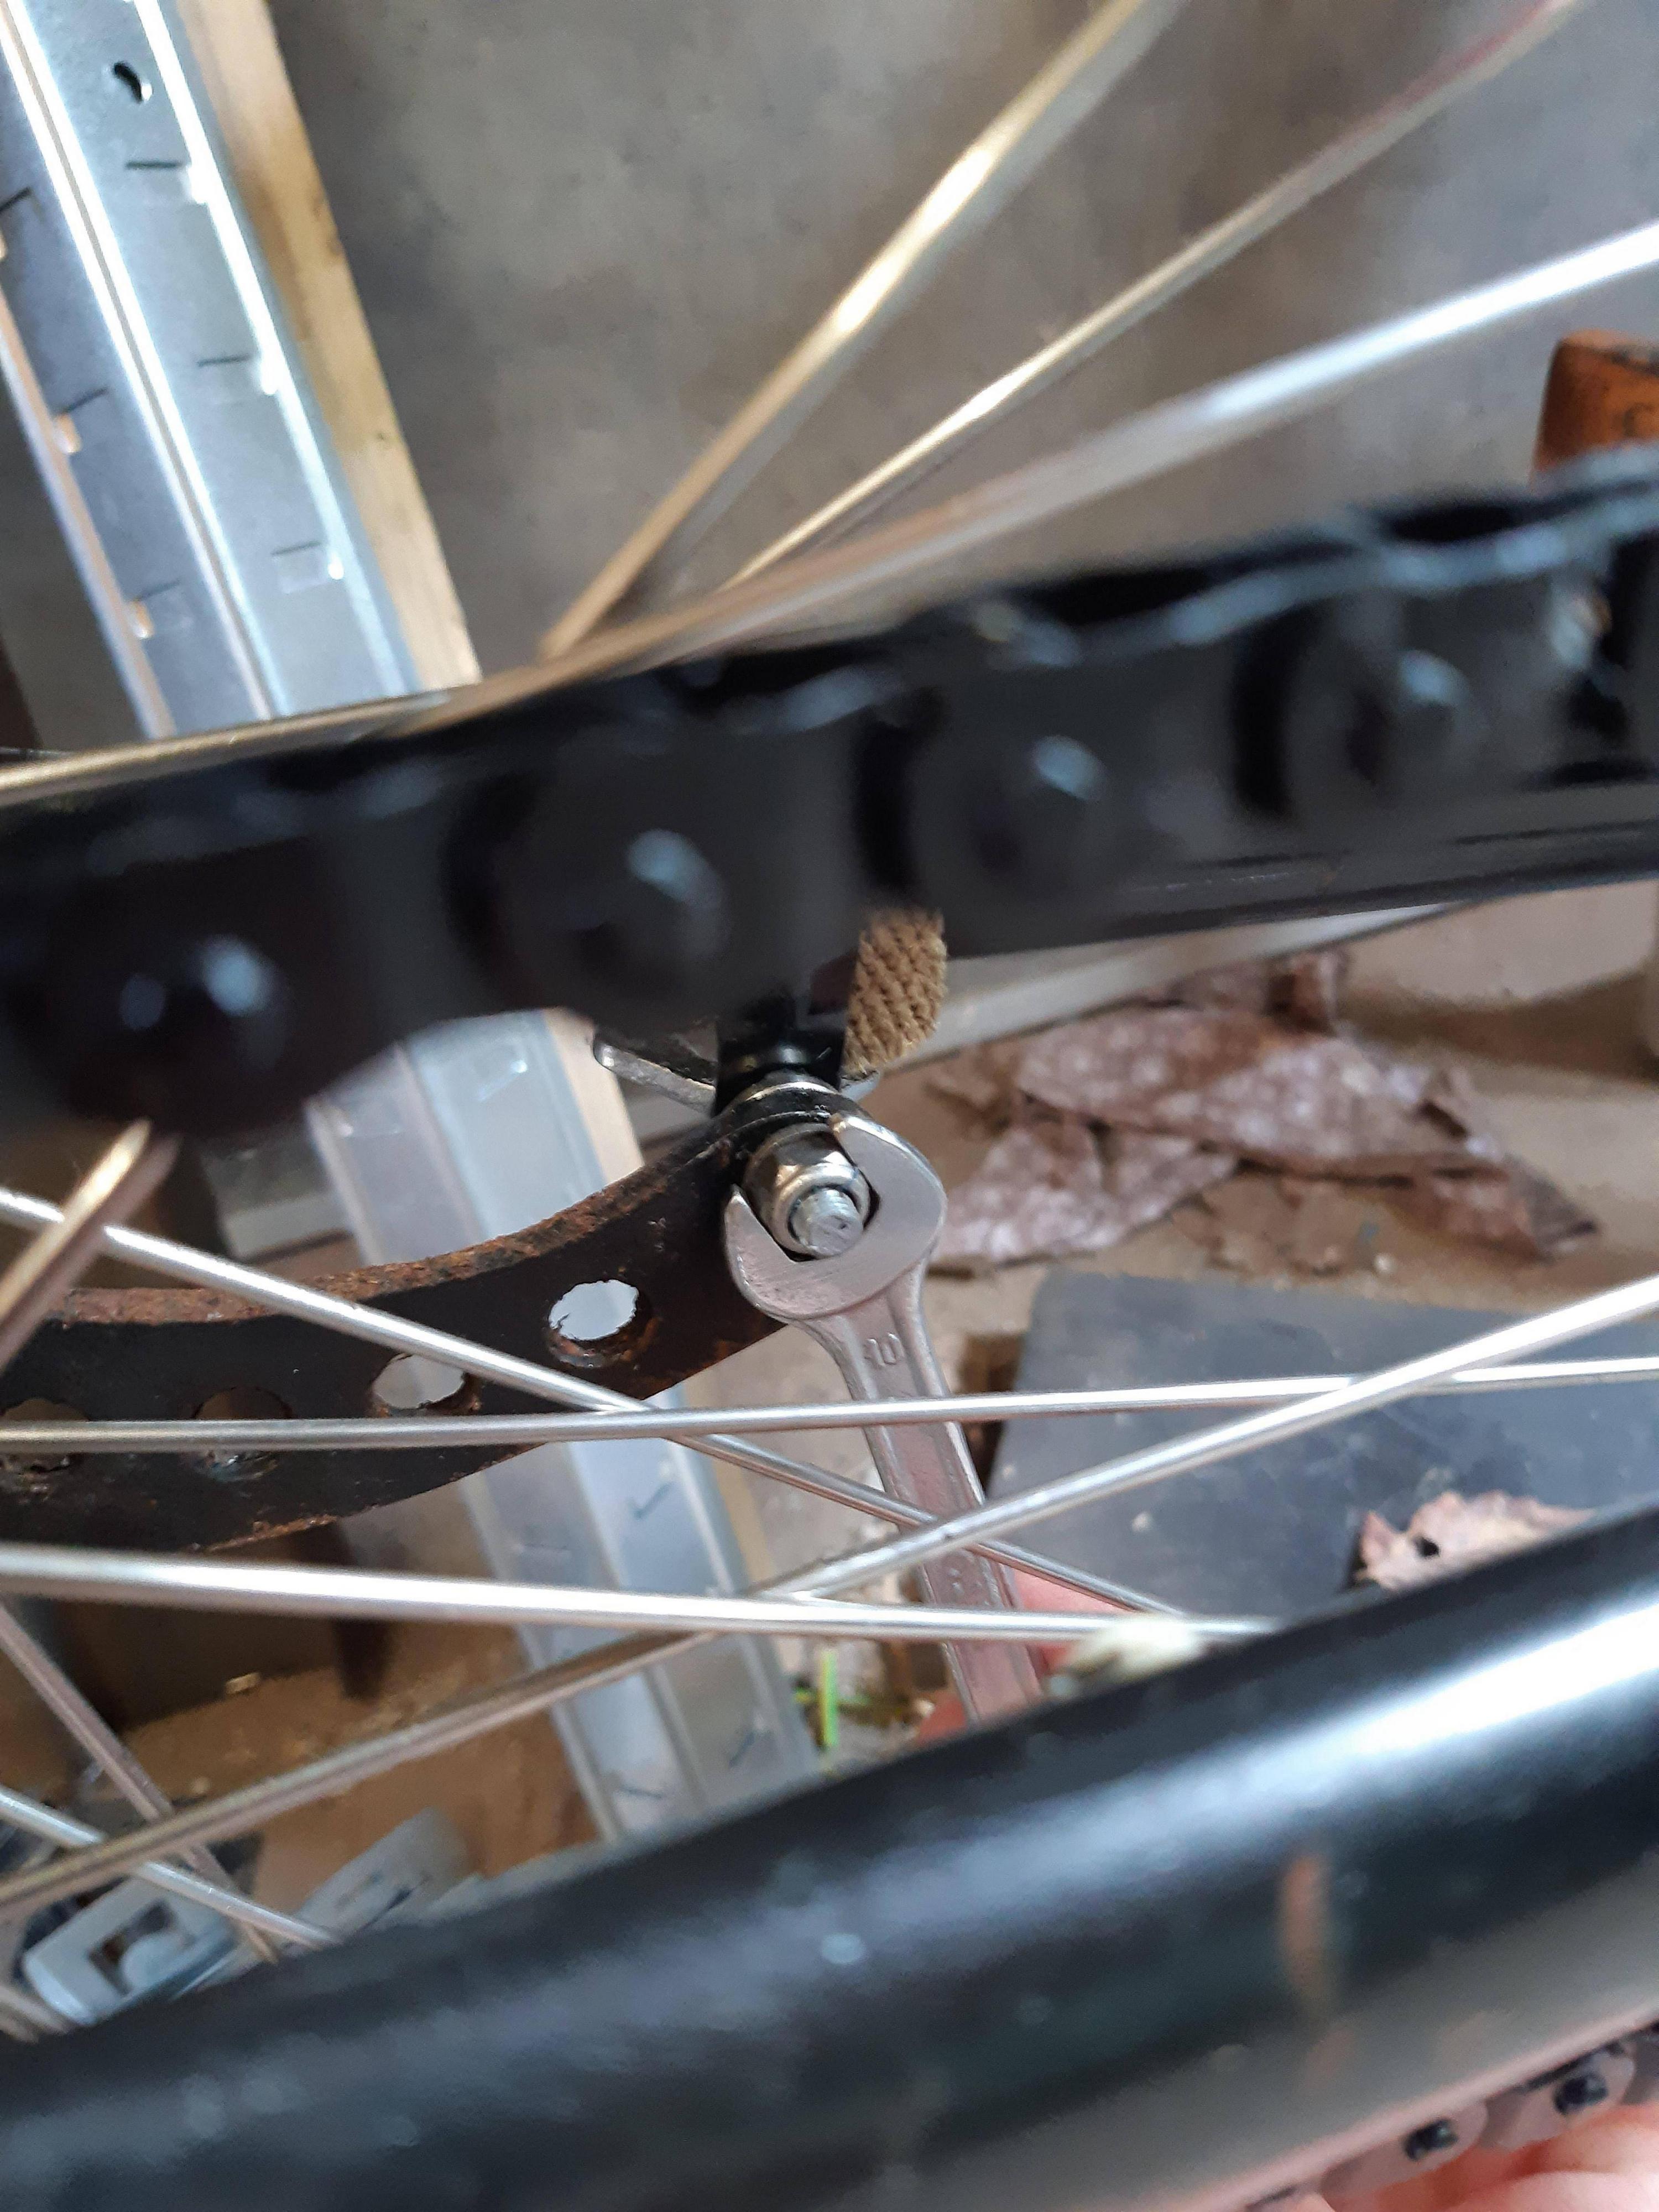 Wrench, 10mm again, for the coaster arm. This also needs to be loosened when adjusting the rear wheel and tensioning the chain.
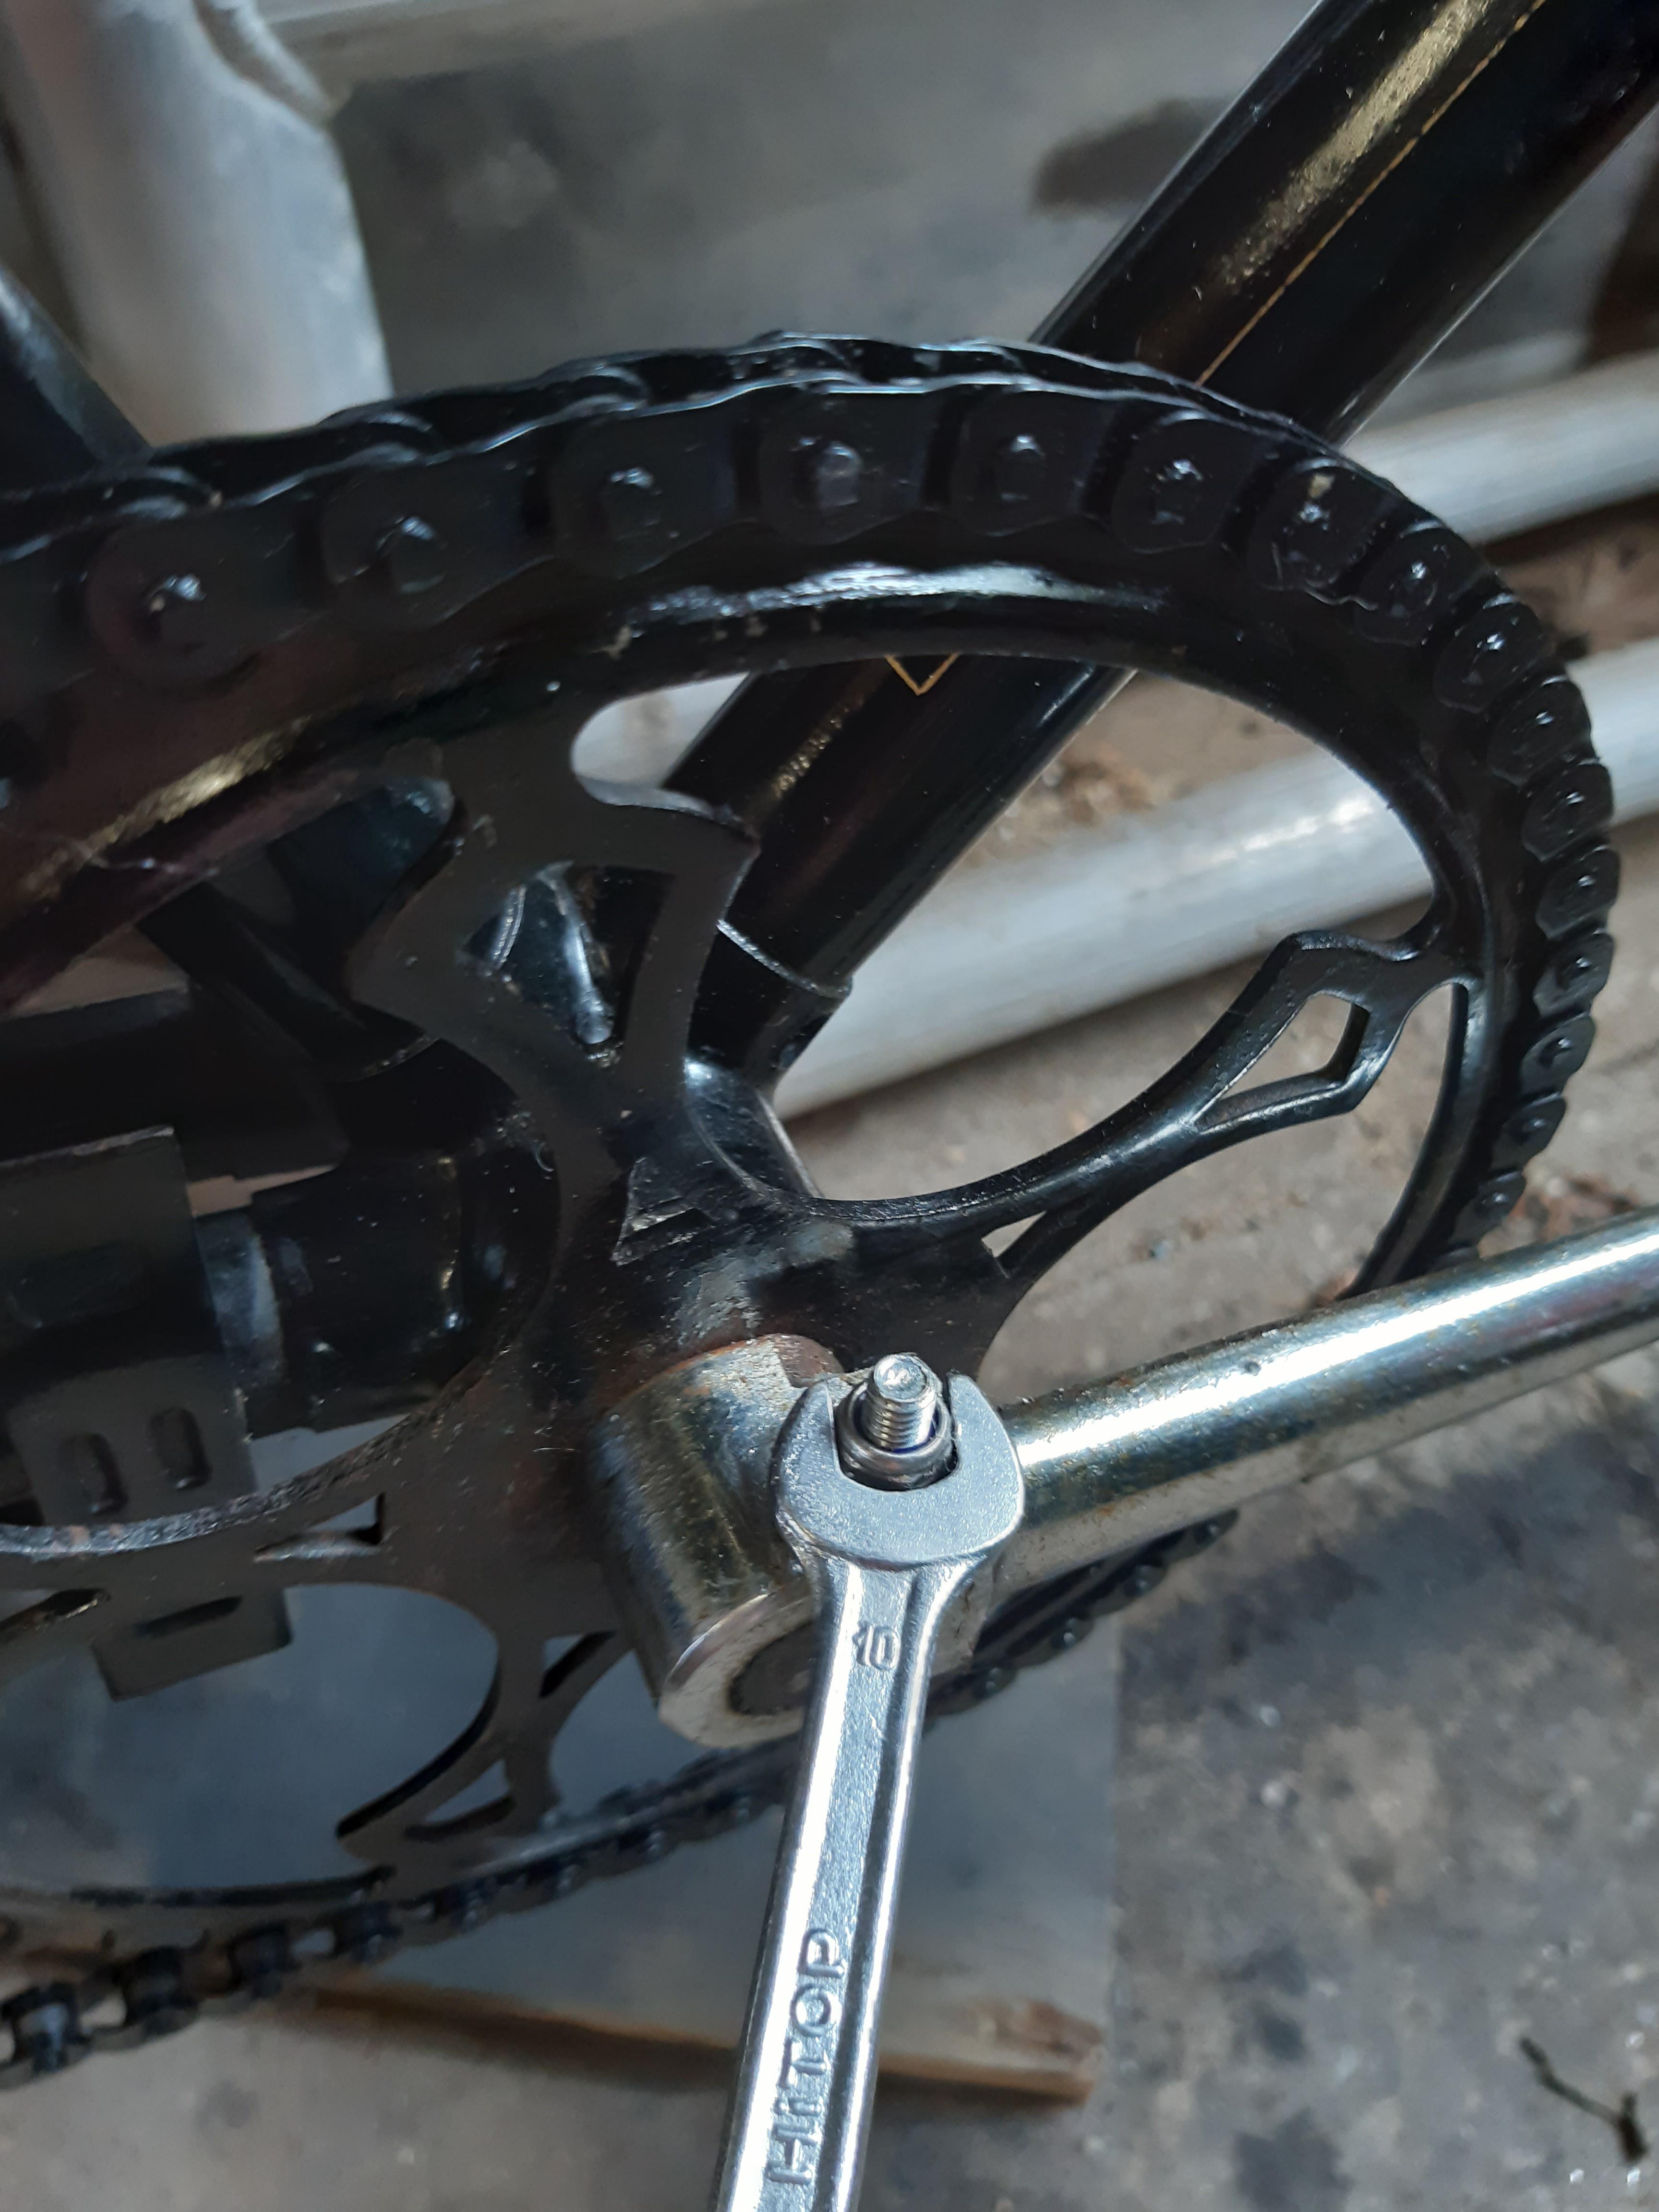
Wrench, 10mm again! For tensioning/tightening the cotterpin nuts.
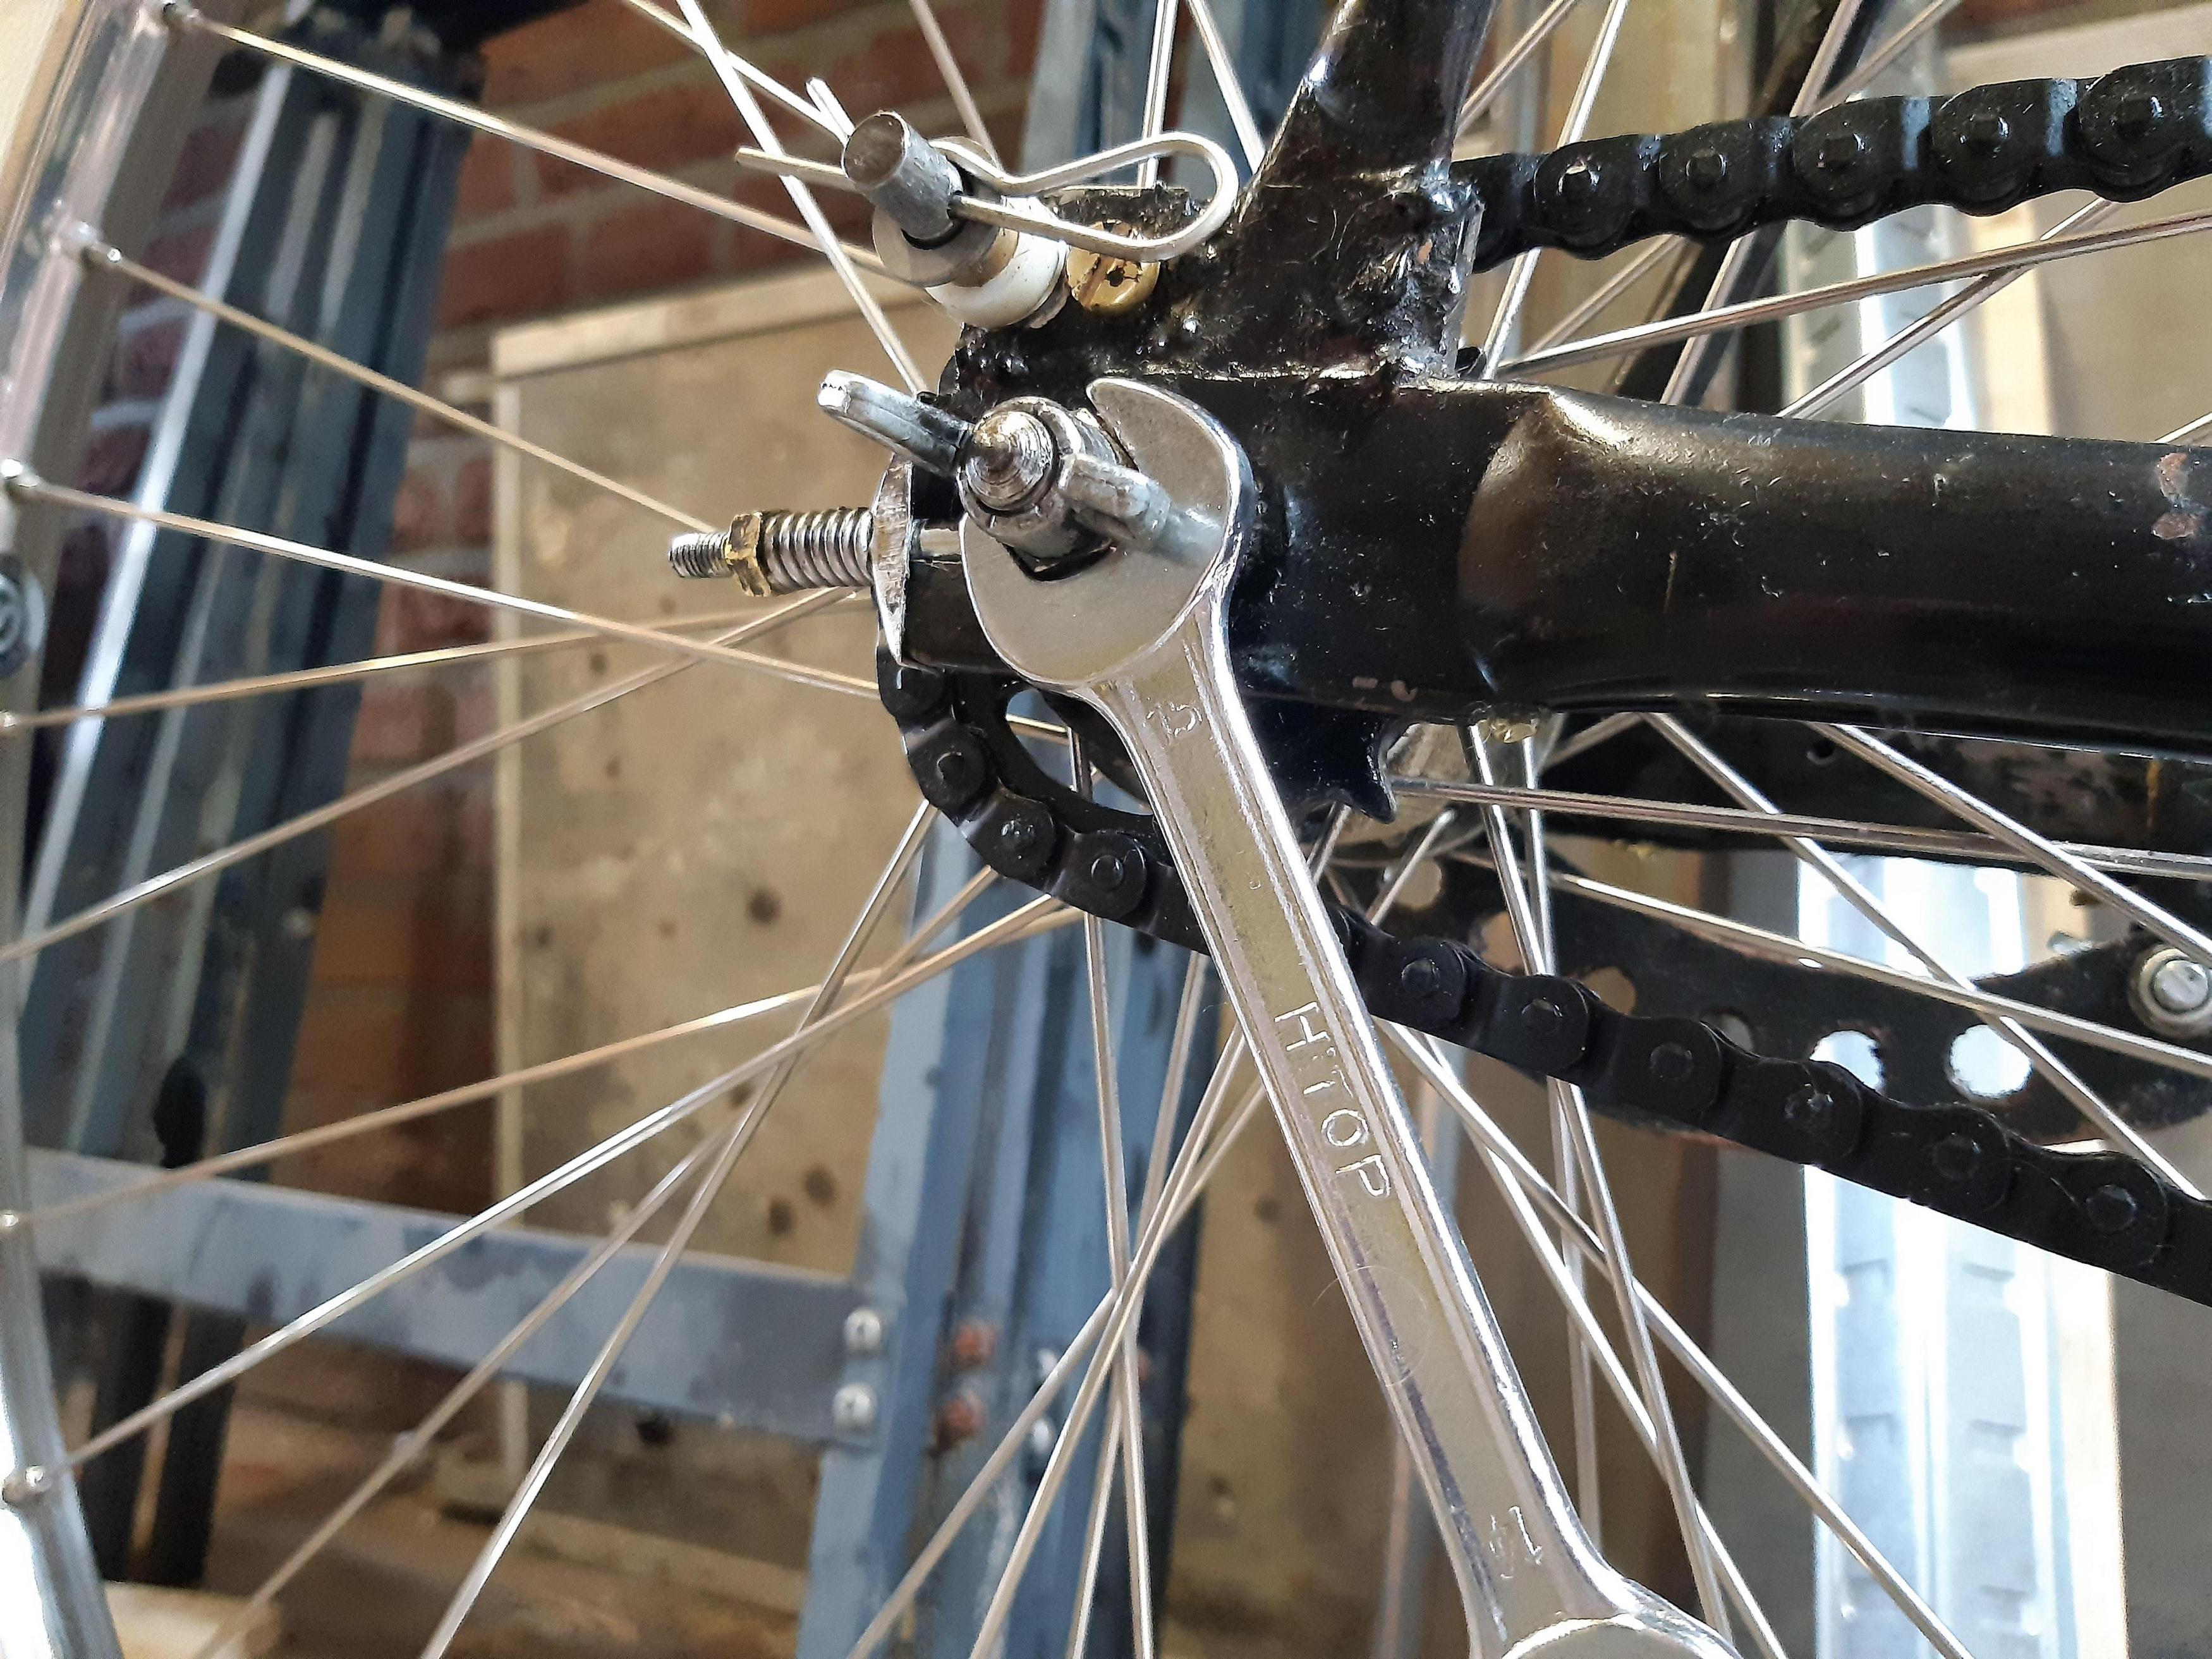
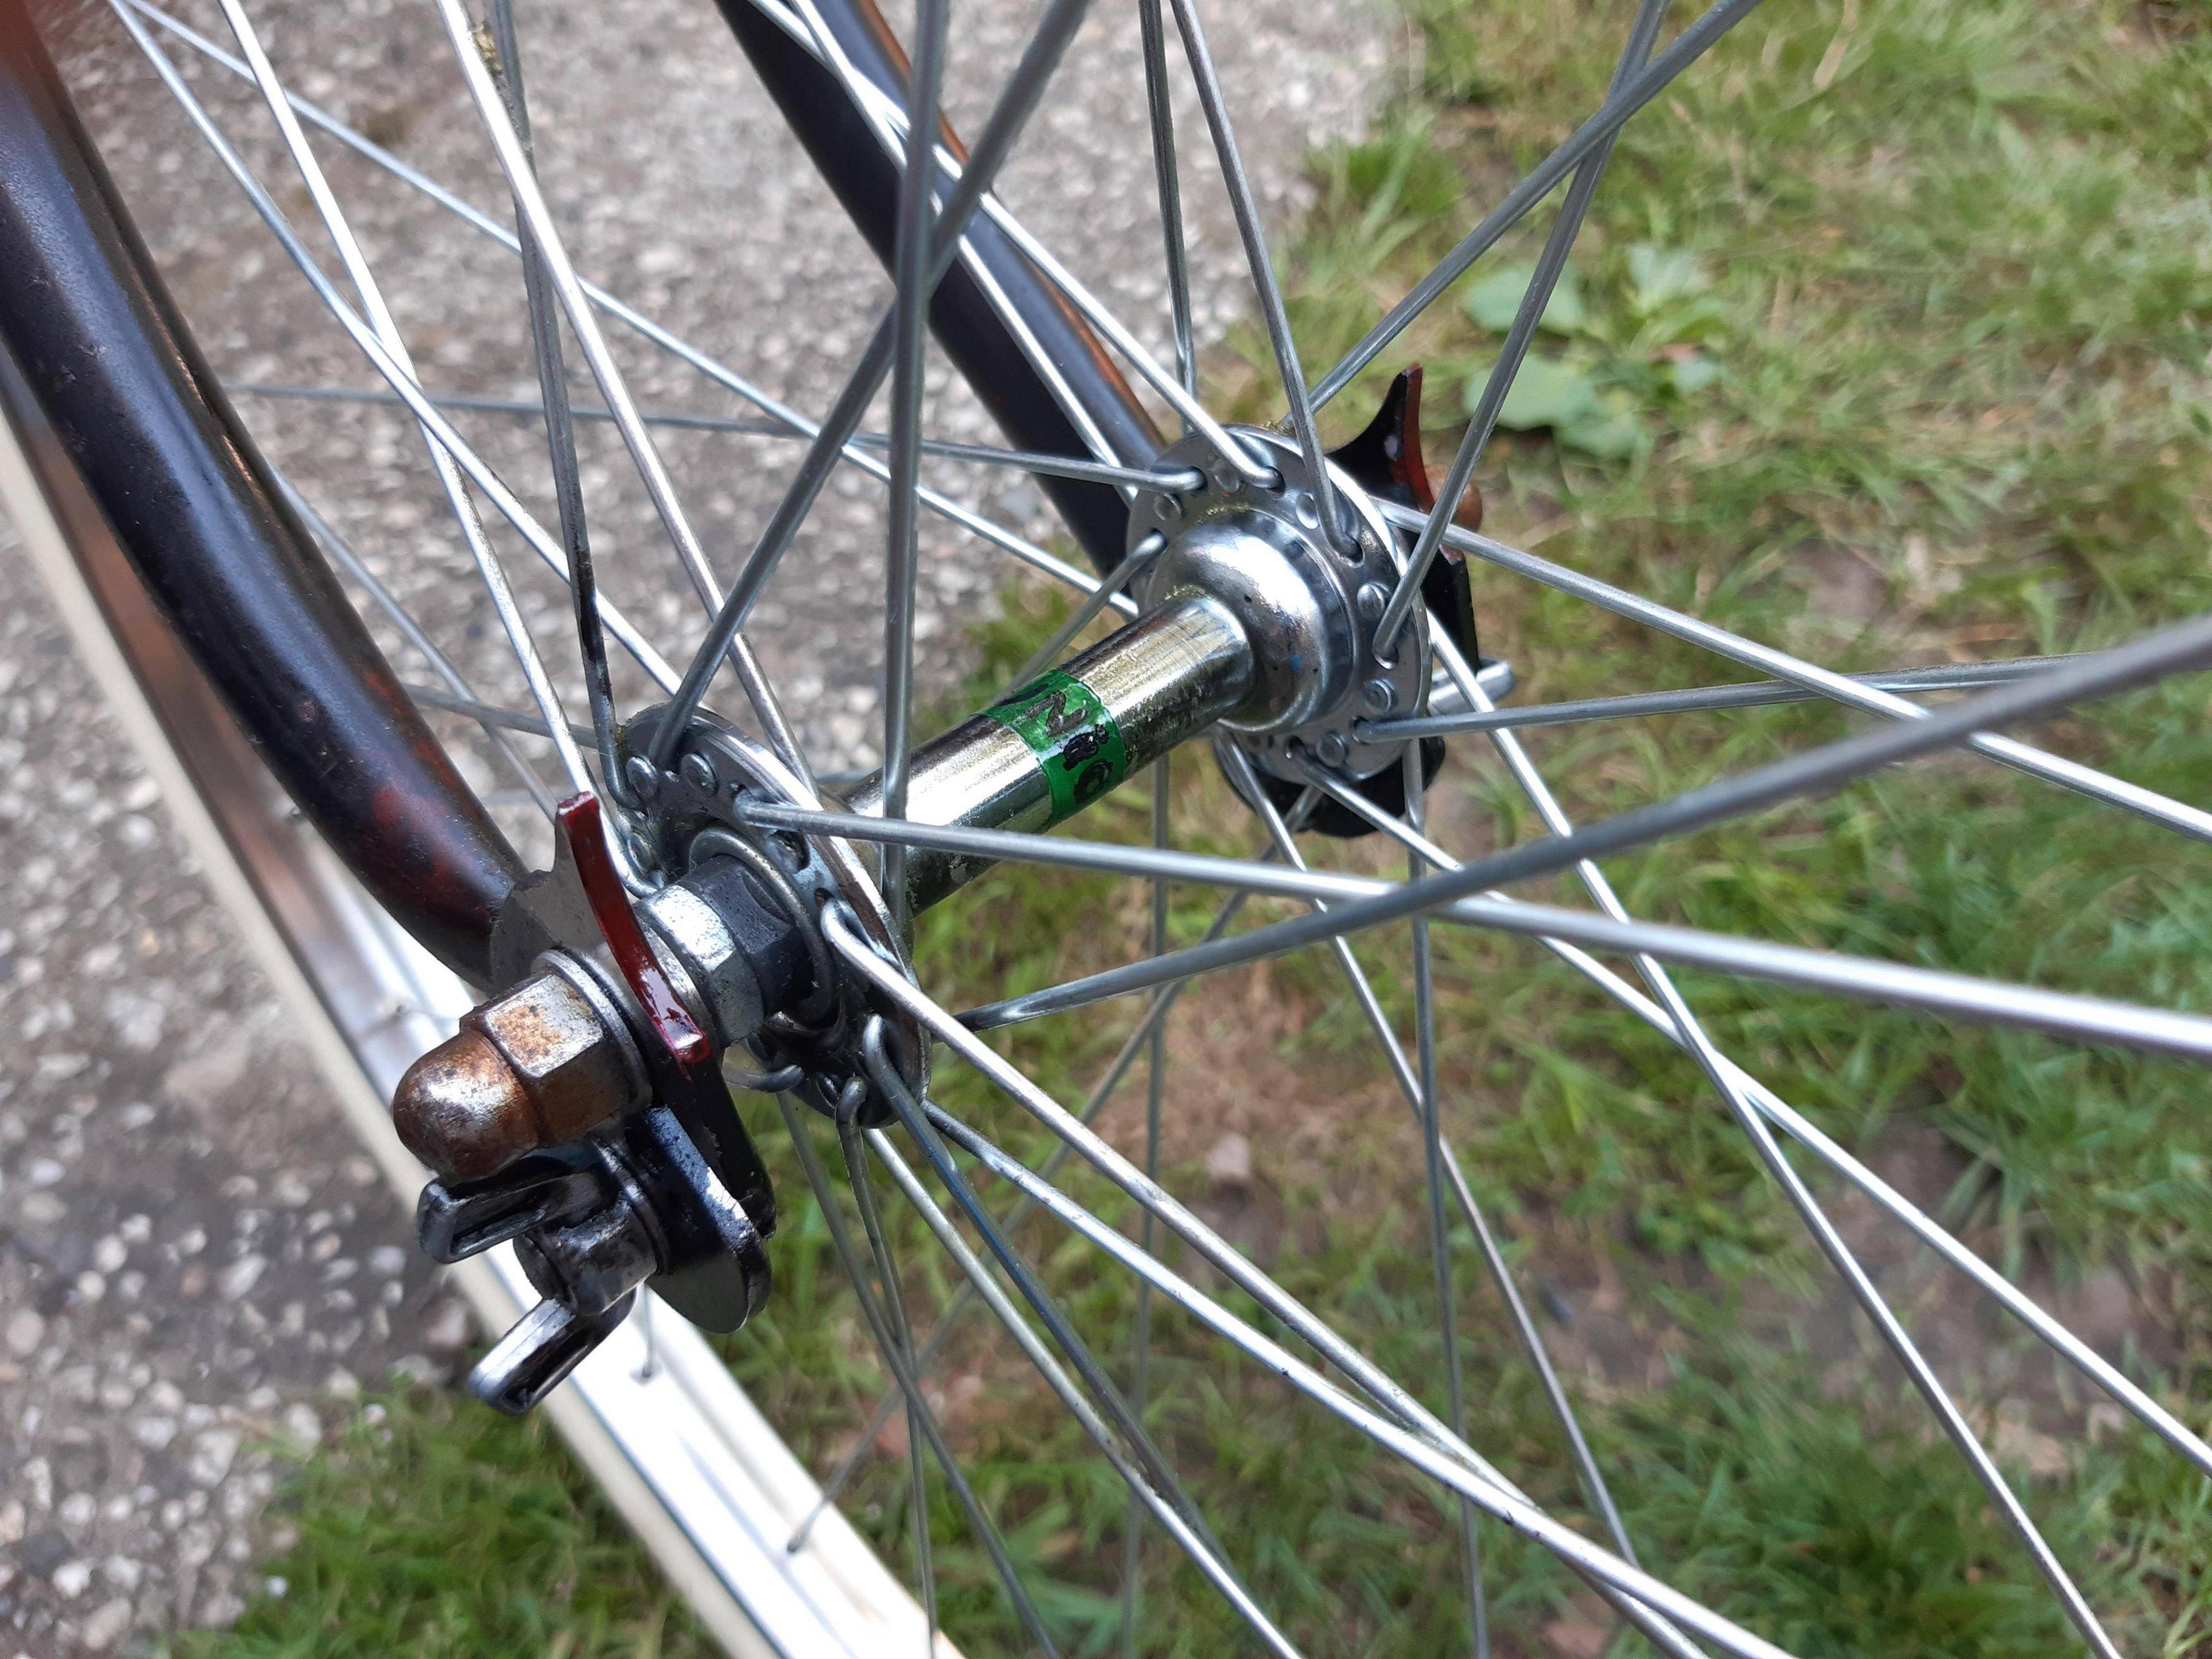
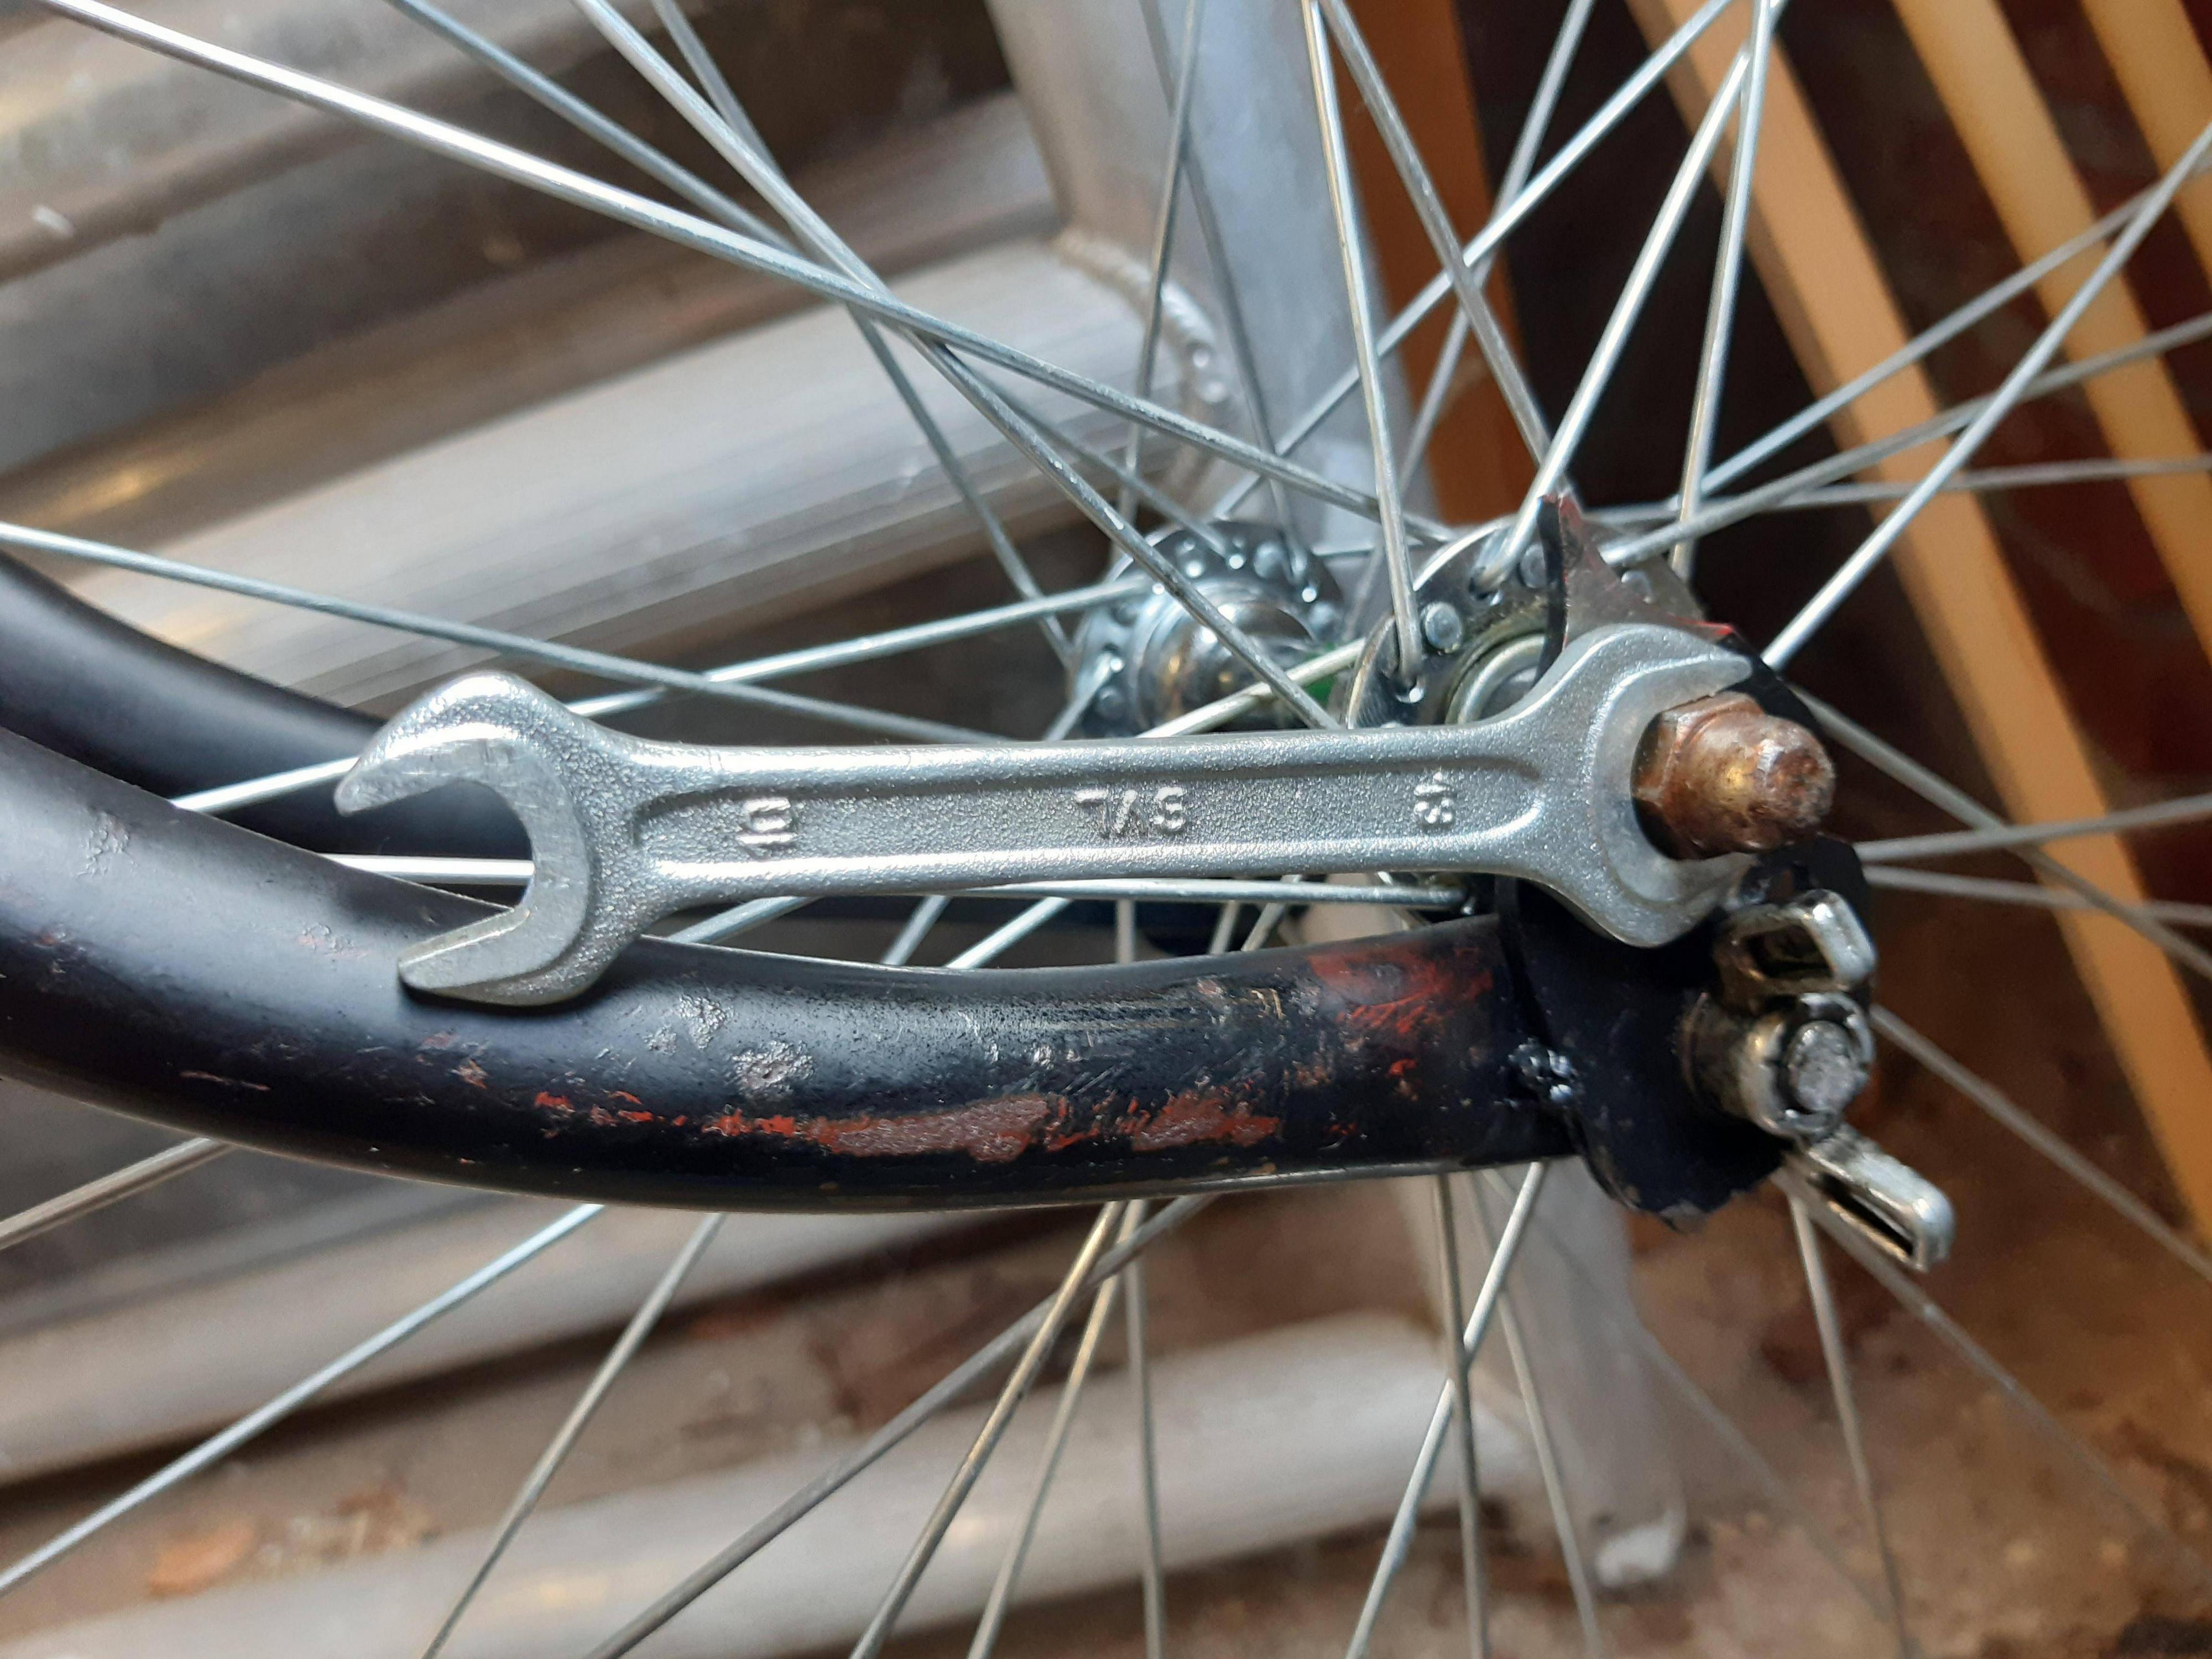
Wrench, 15mm, for the rear axle nuts.
 Wrench, 15mm, for tightening the pedals.
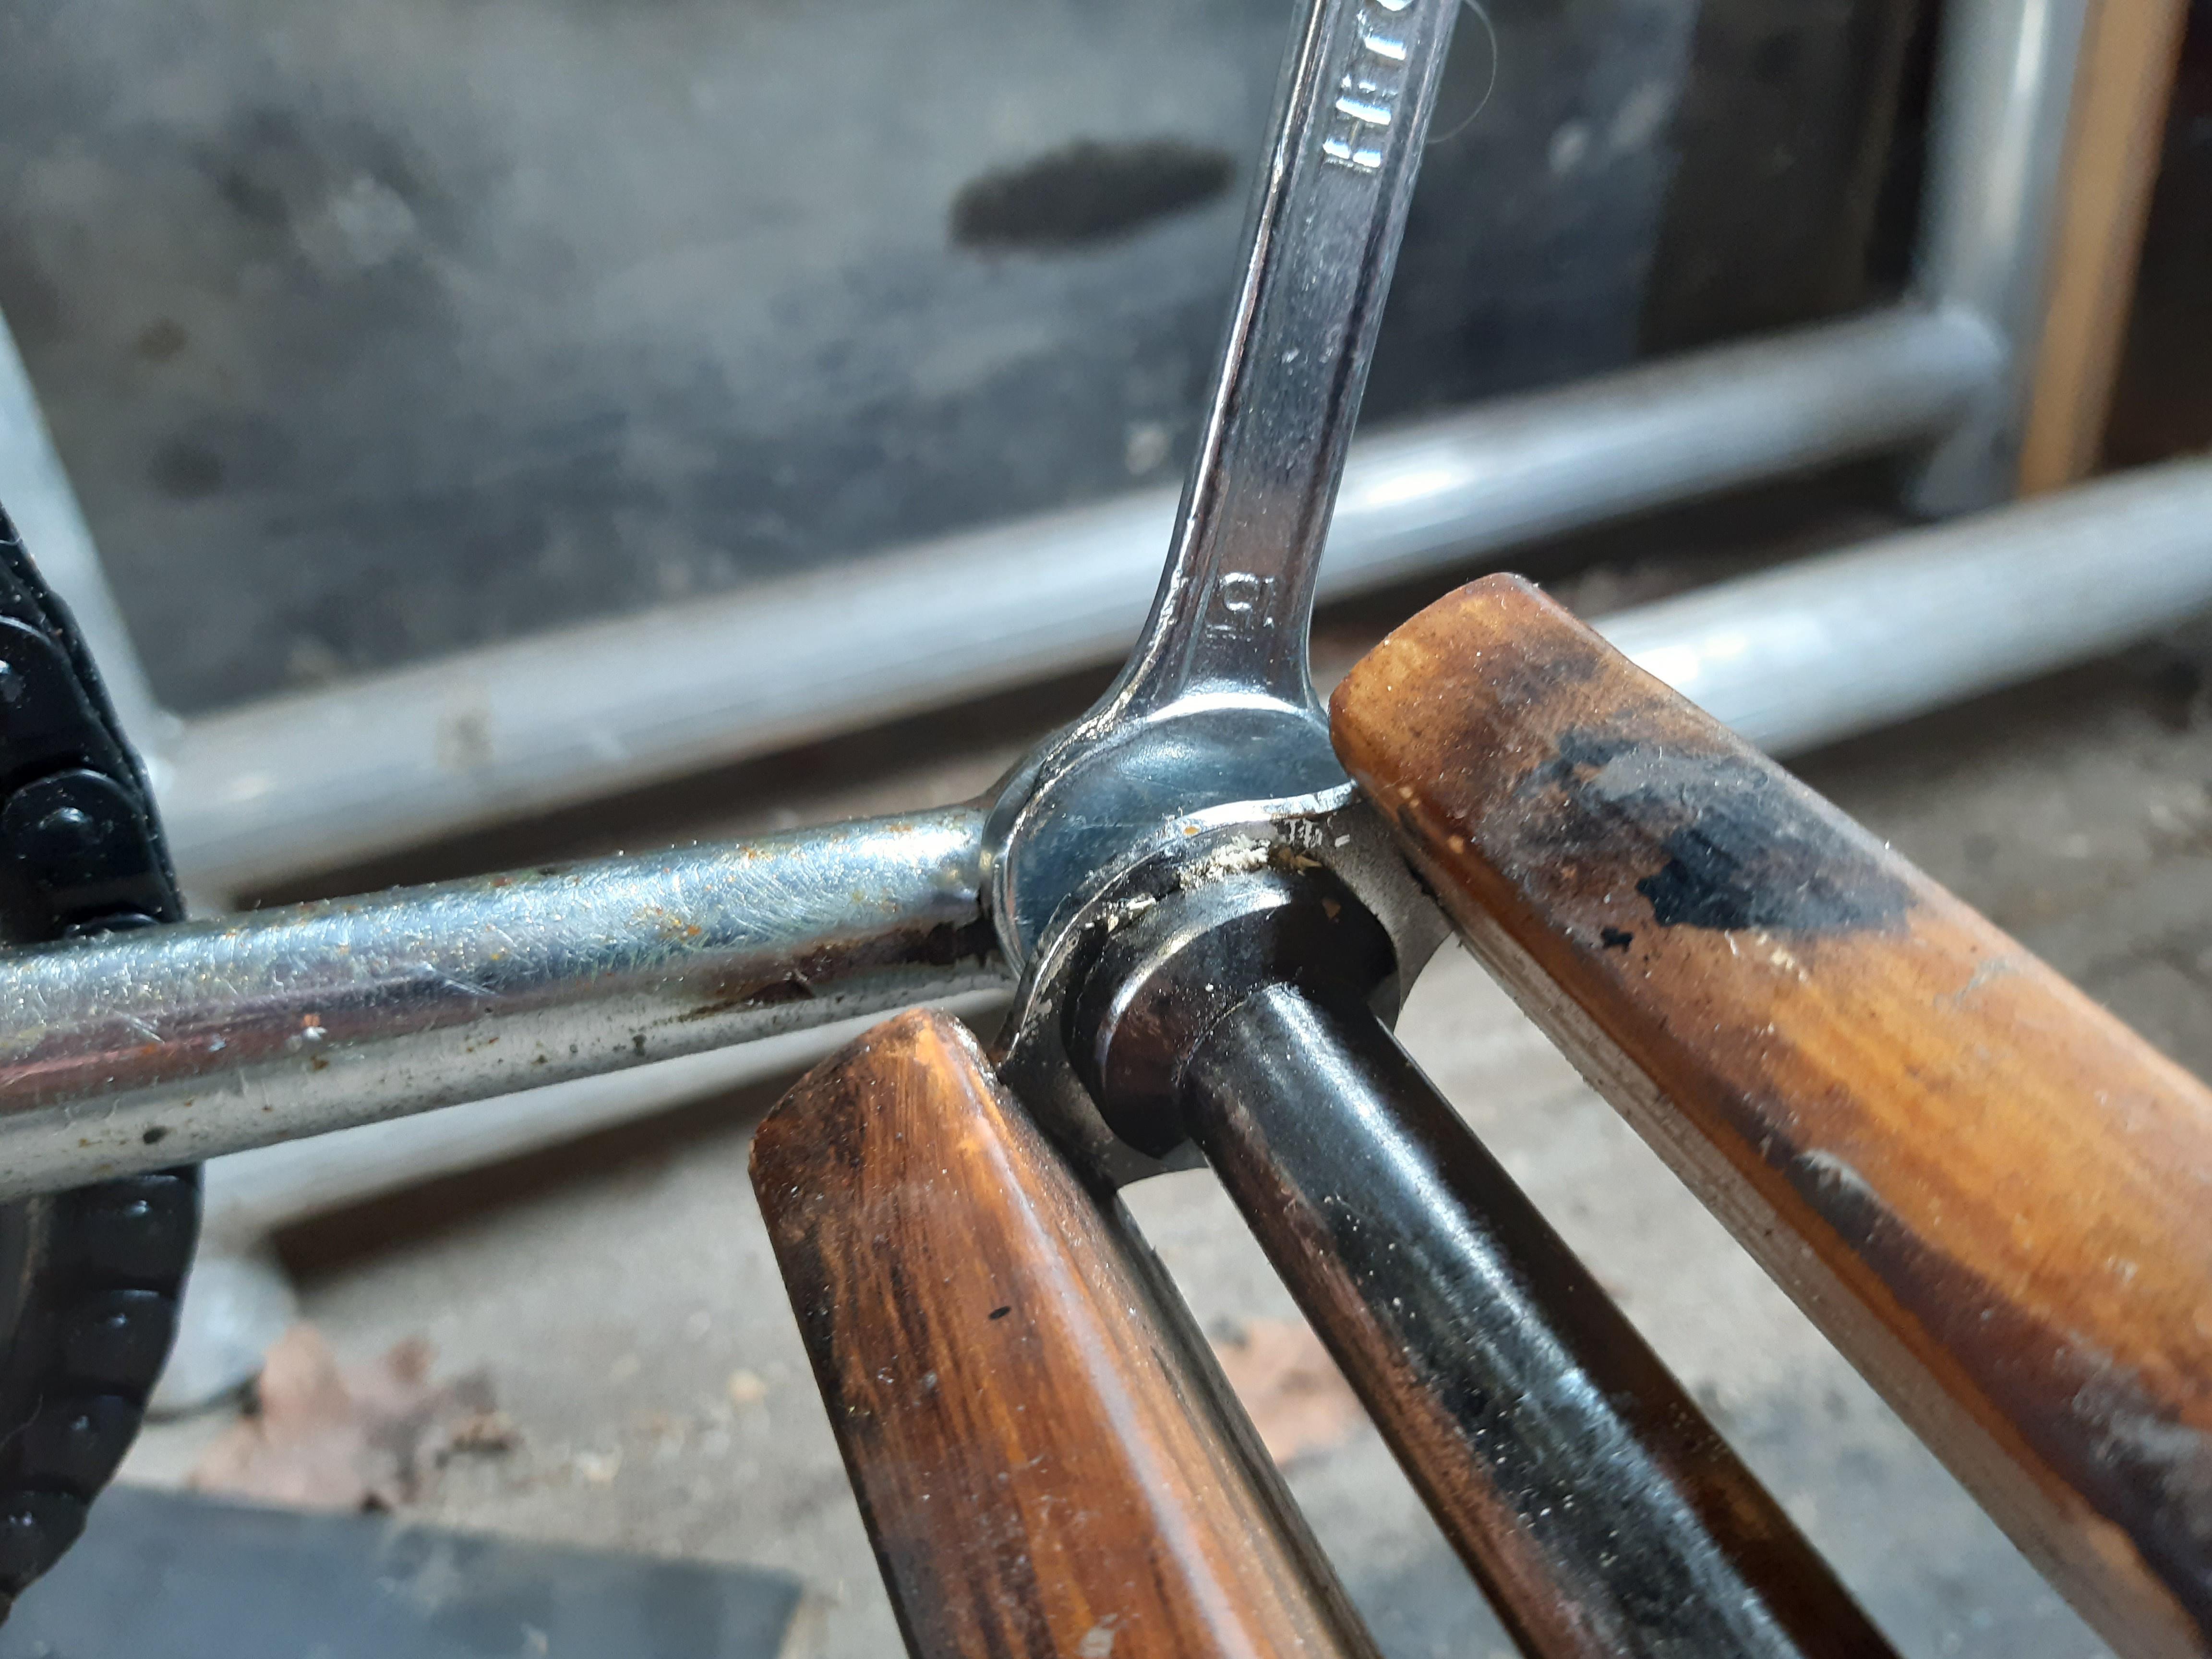
Wrench, 13mm, for saddle height adjustment.
Wrench, 13mm, for saddle angle adjustment.
Wrench, 13mm, for the front axle nuts. (butterfly nuts can also be loosened).
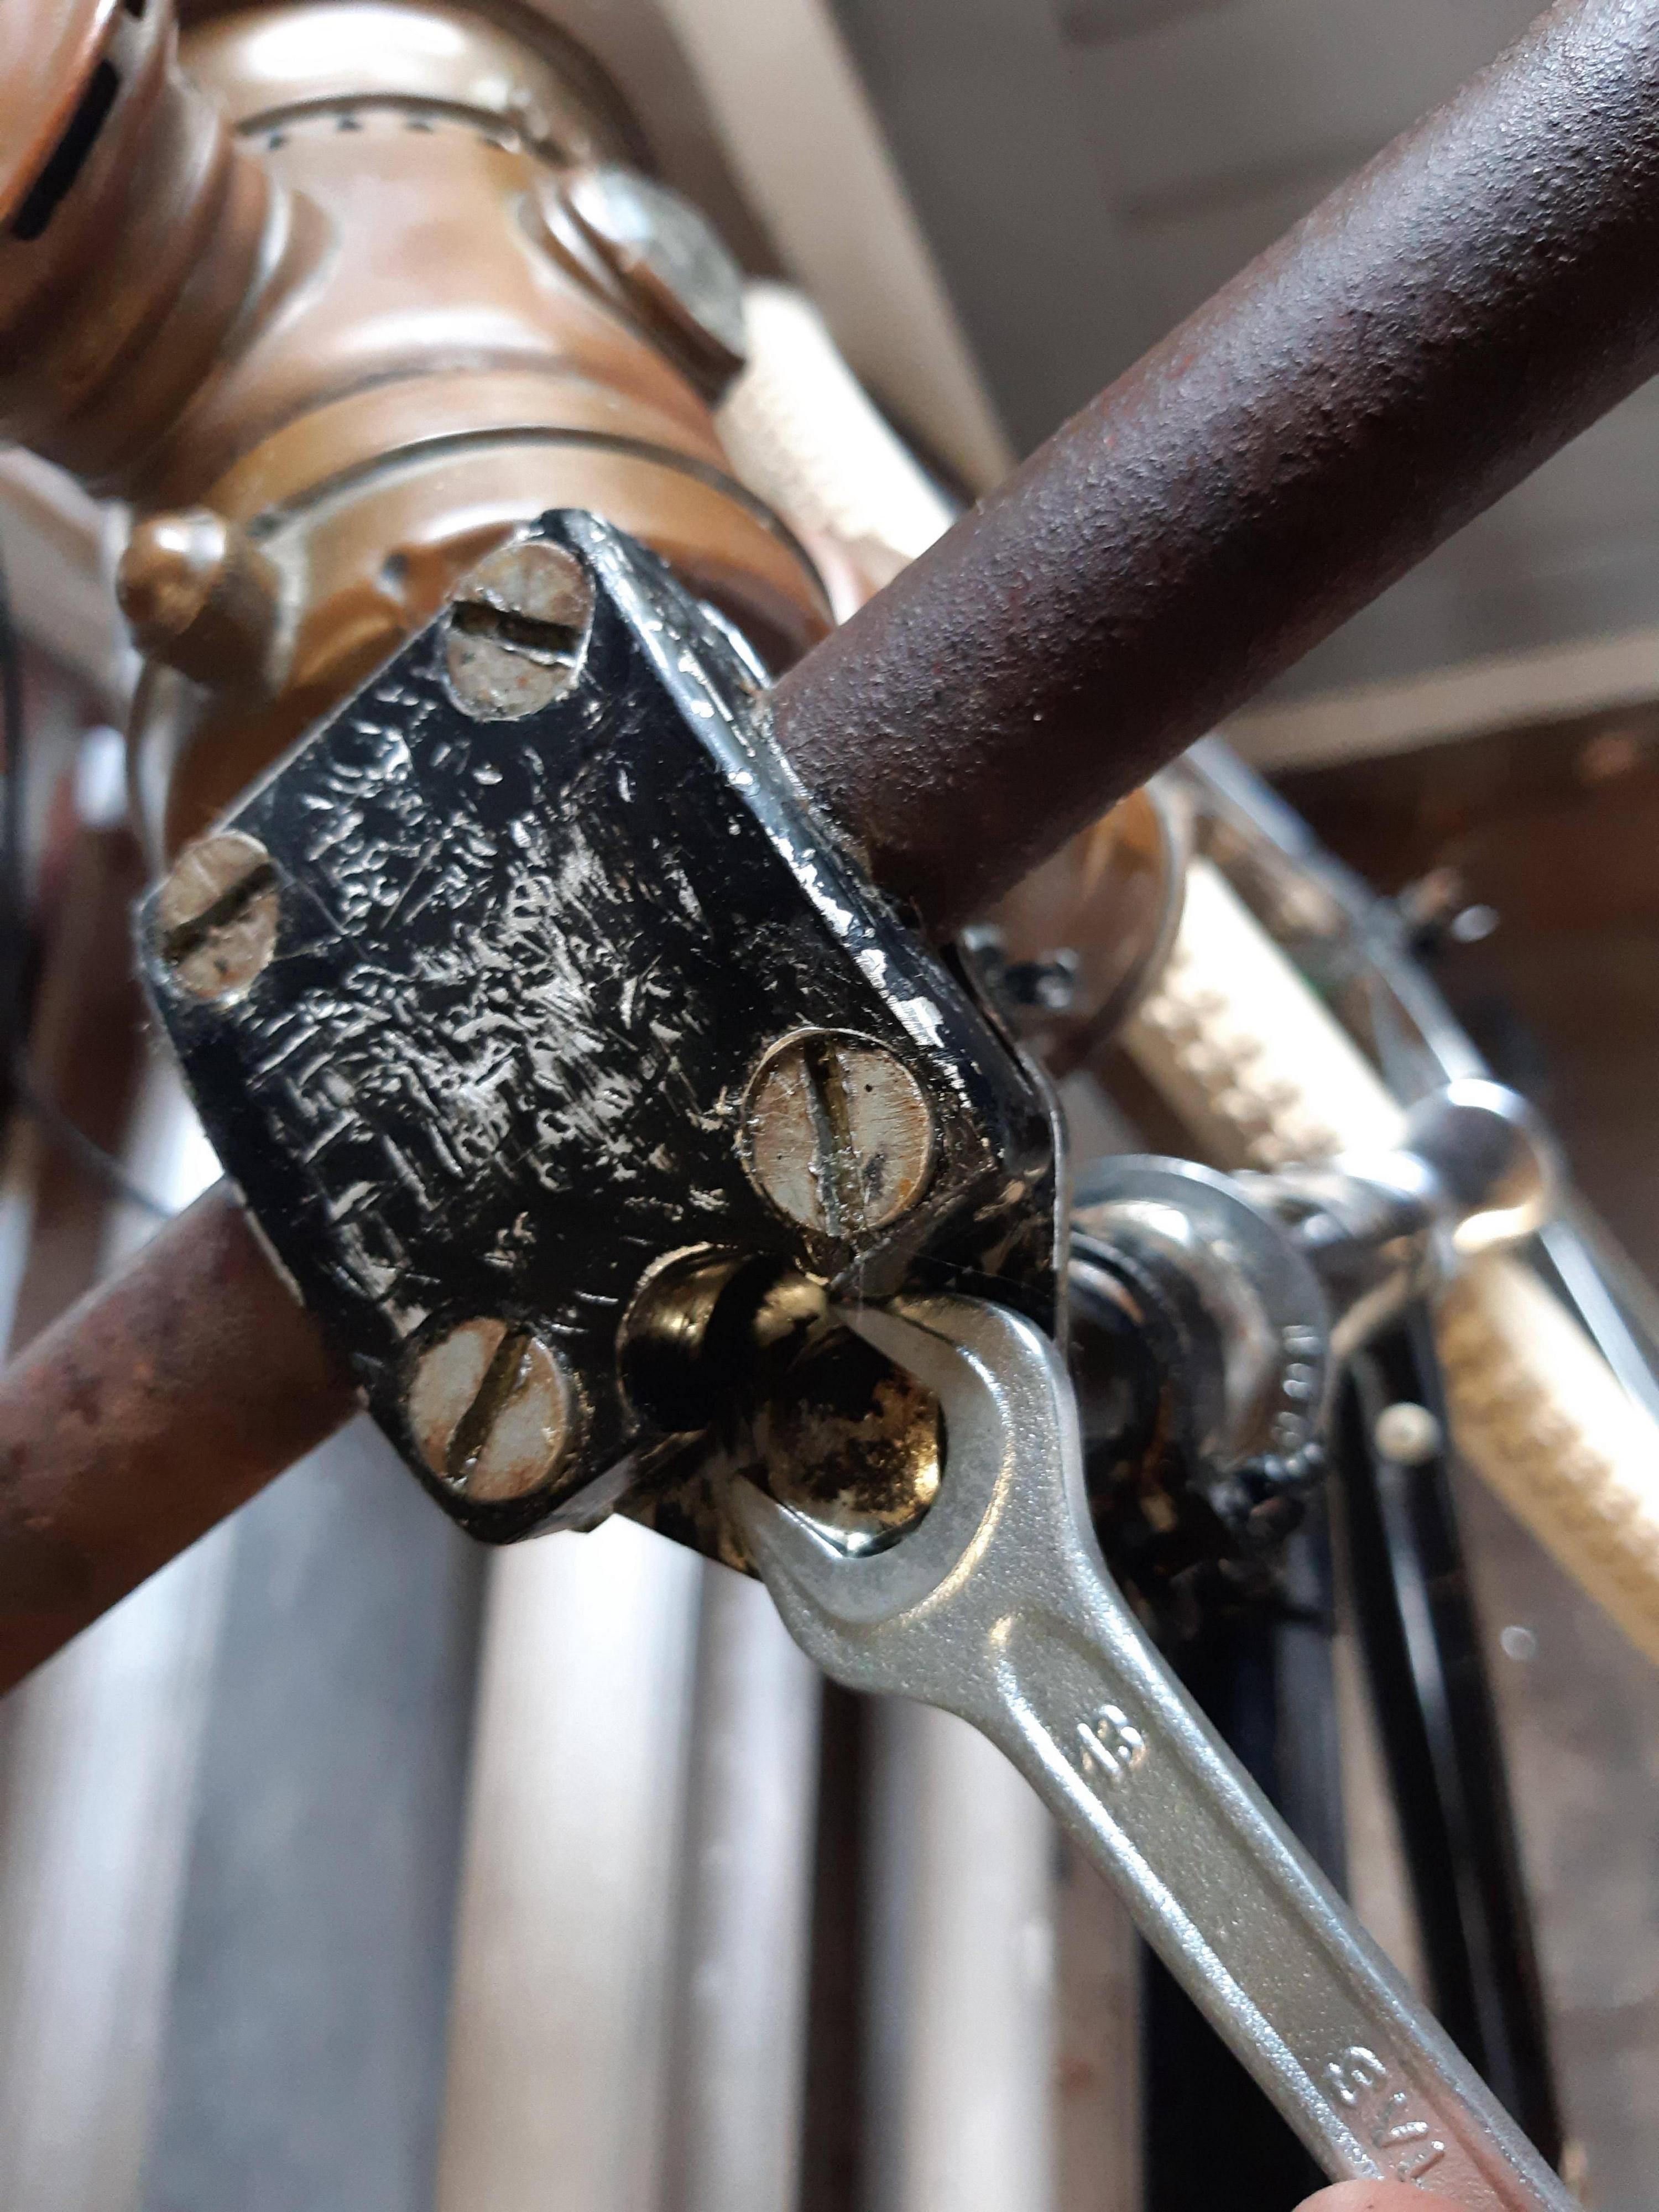
Wrench, 13mm, again! for the stem adjustment.
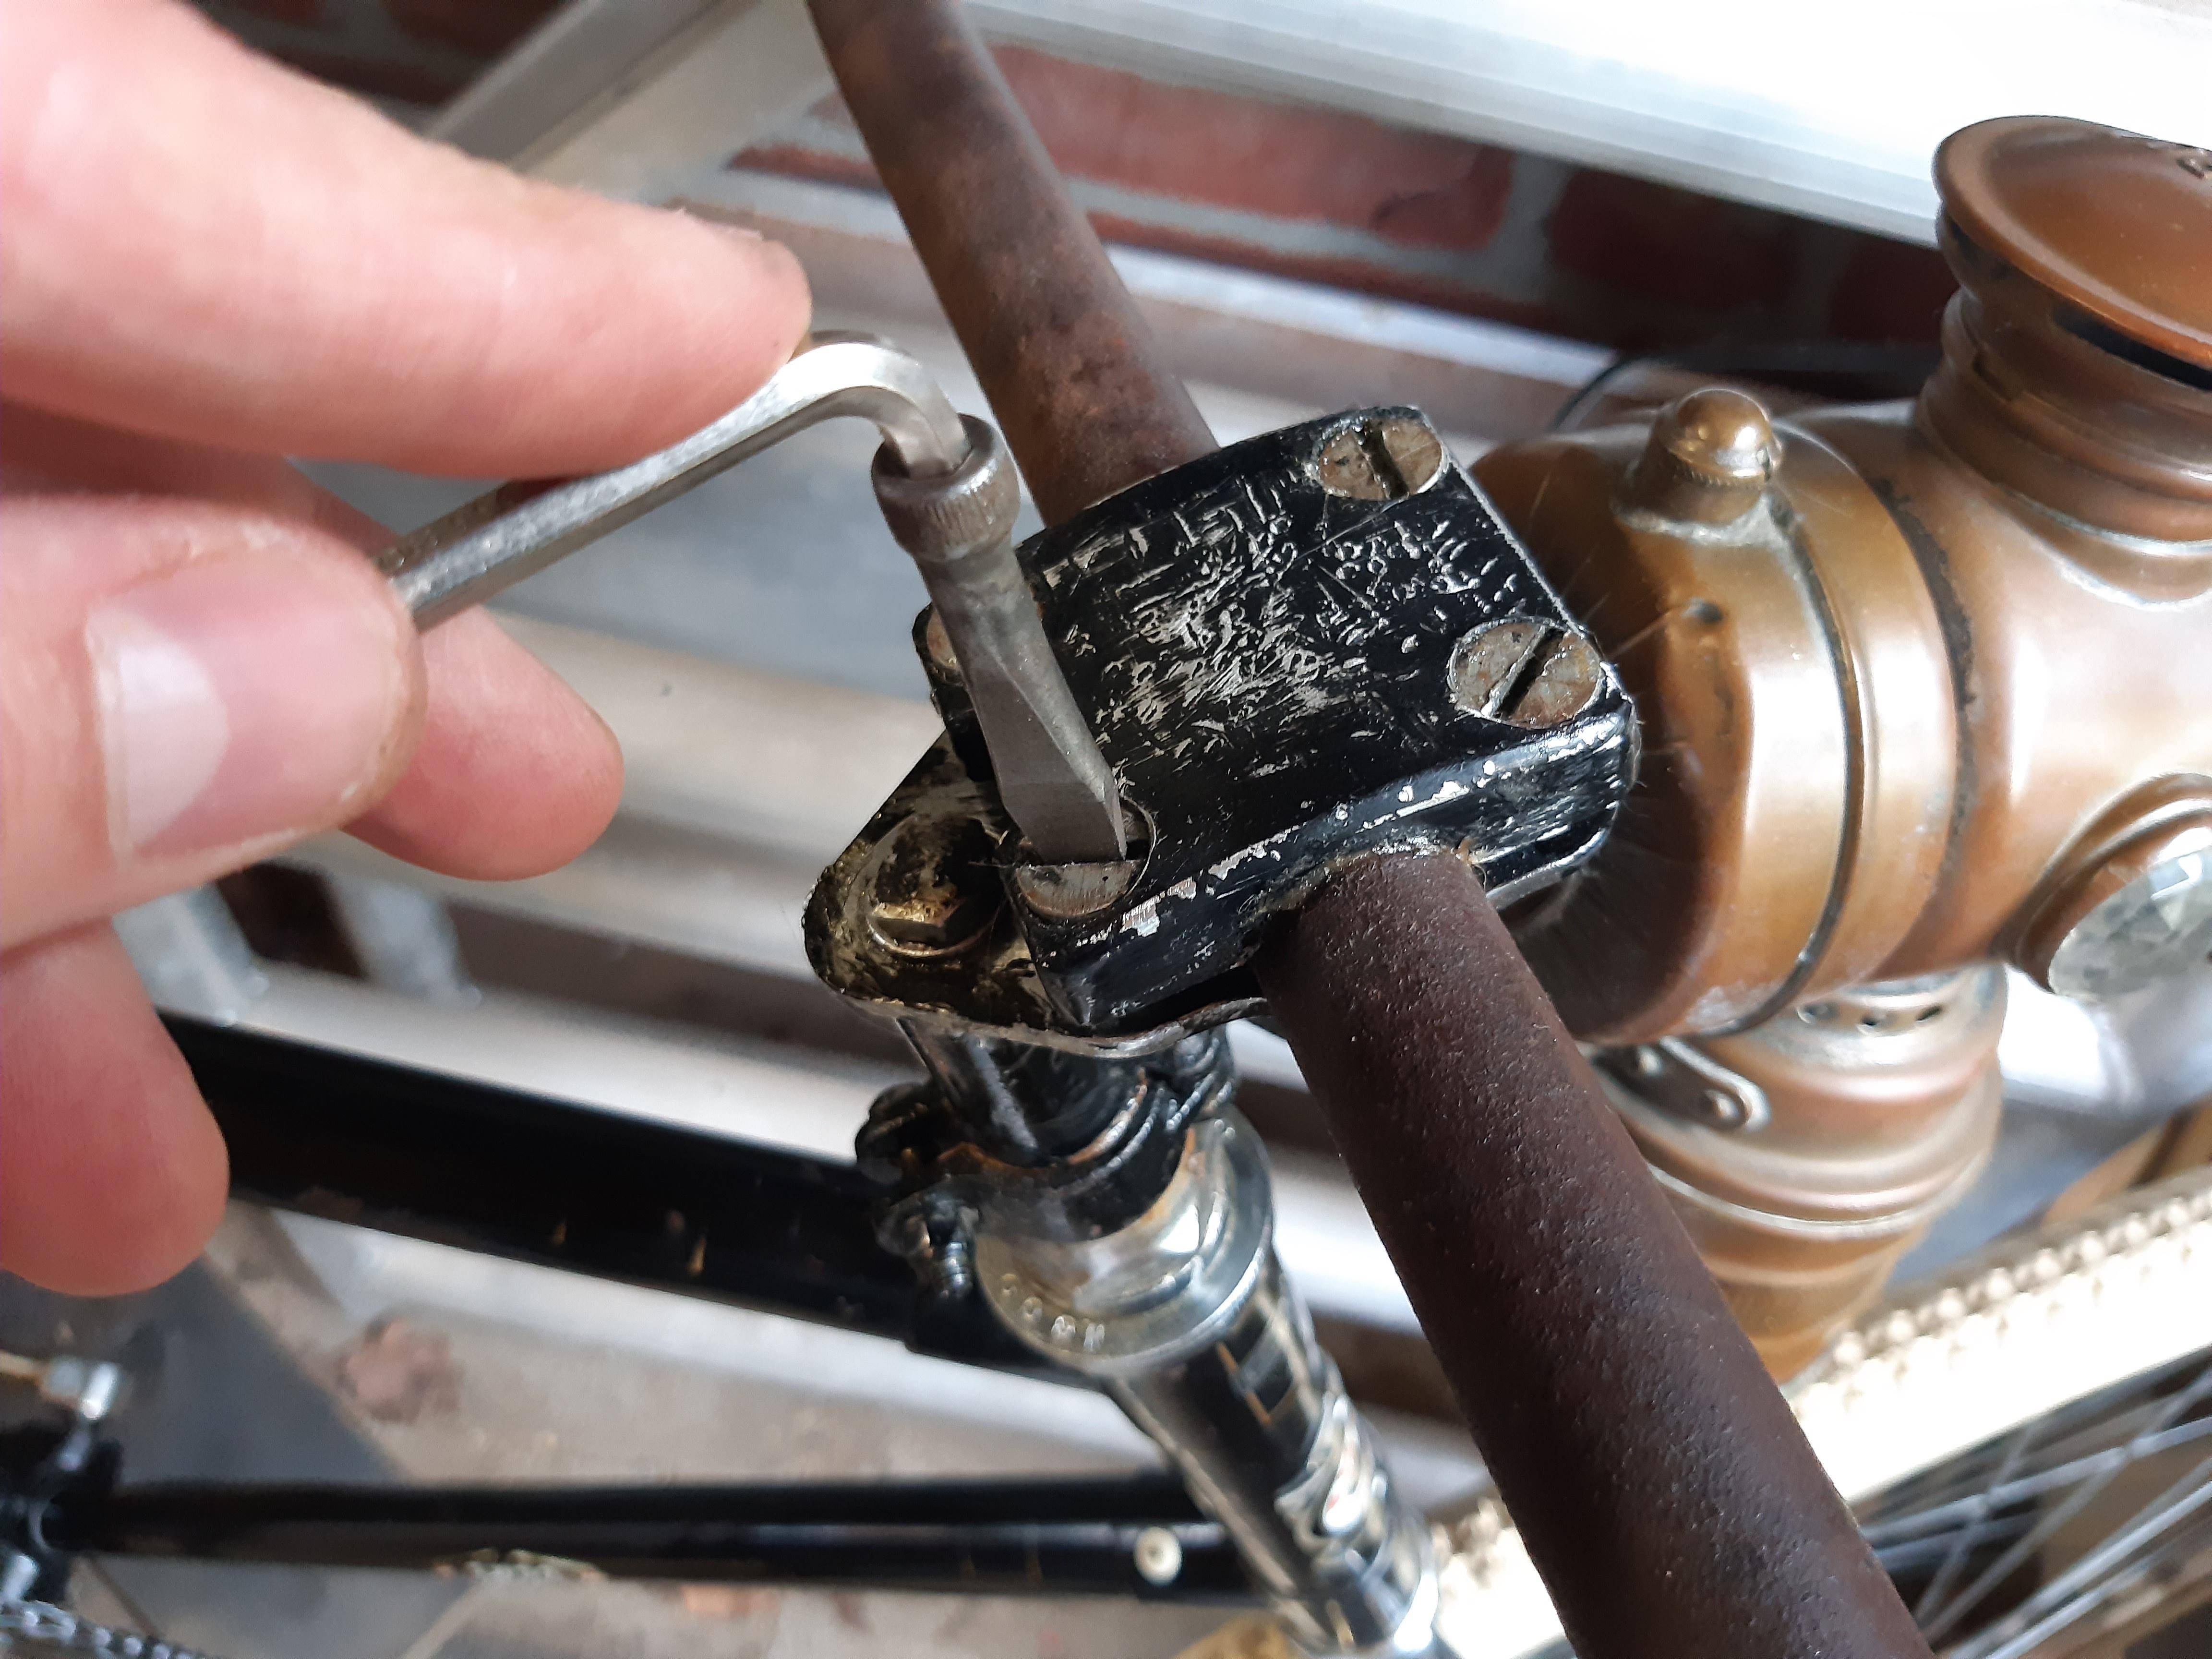
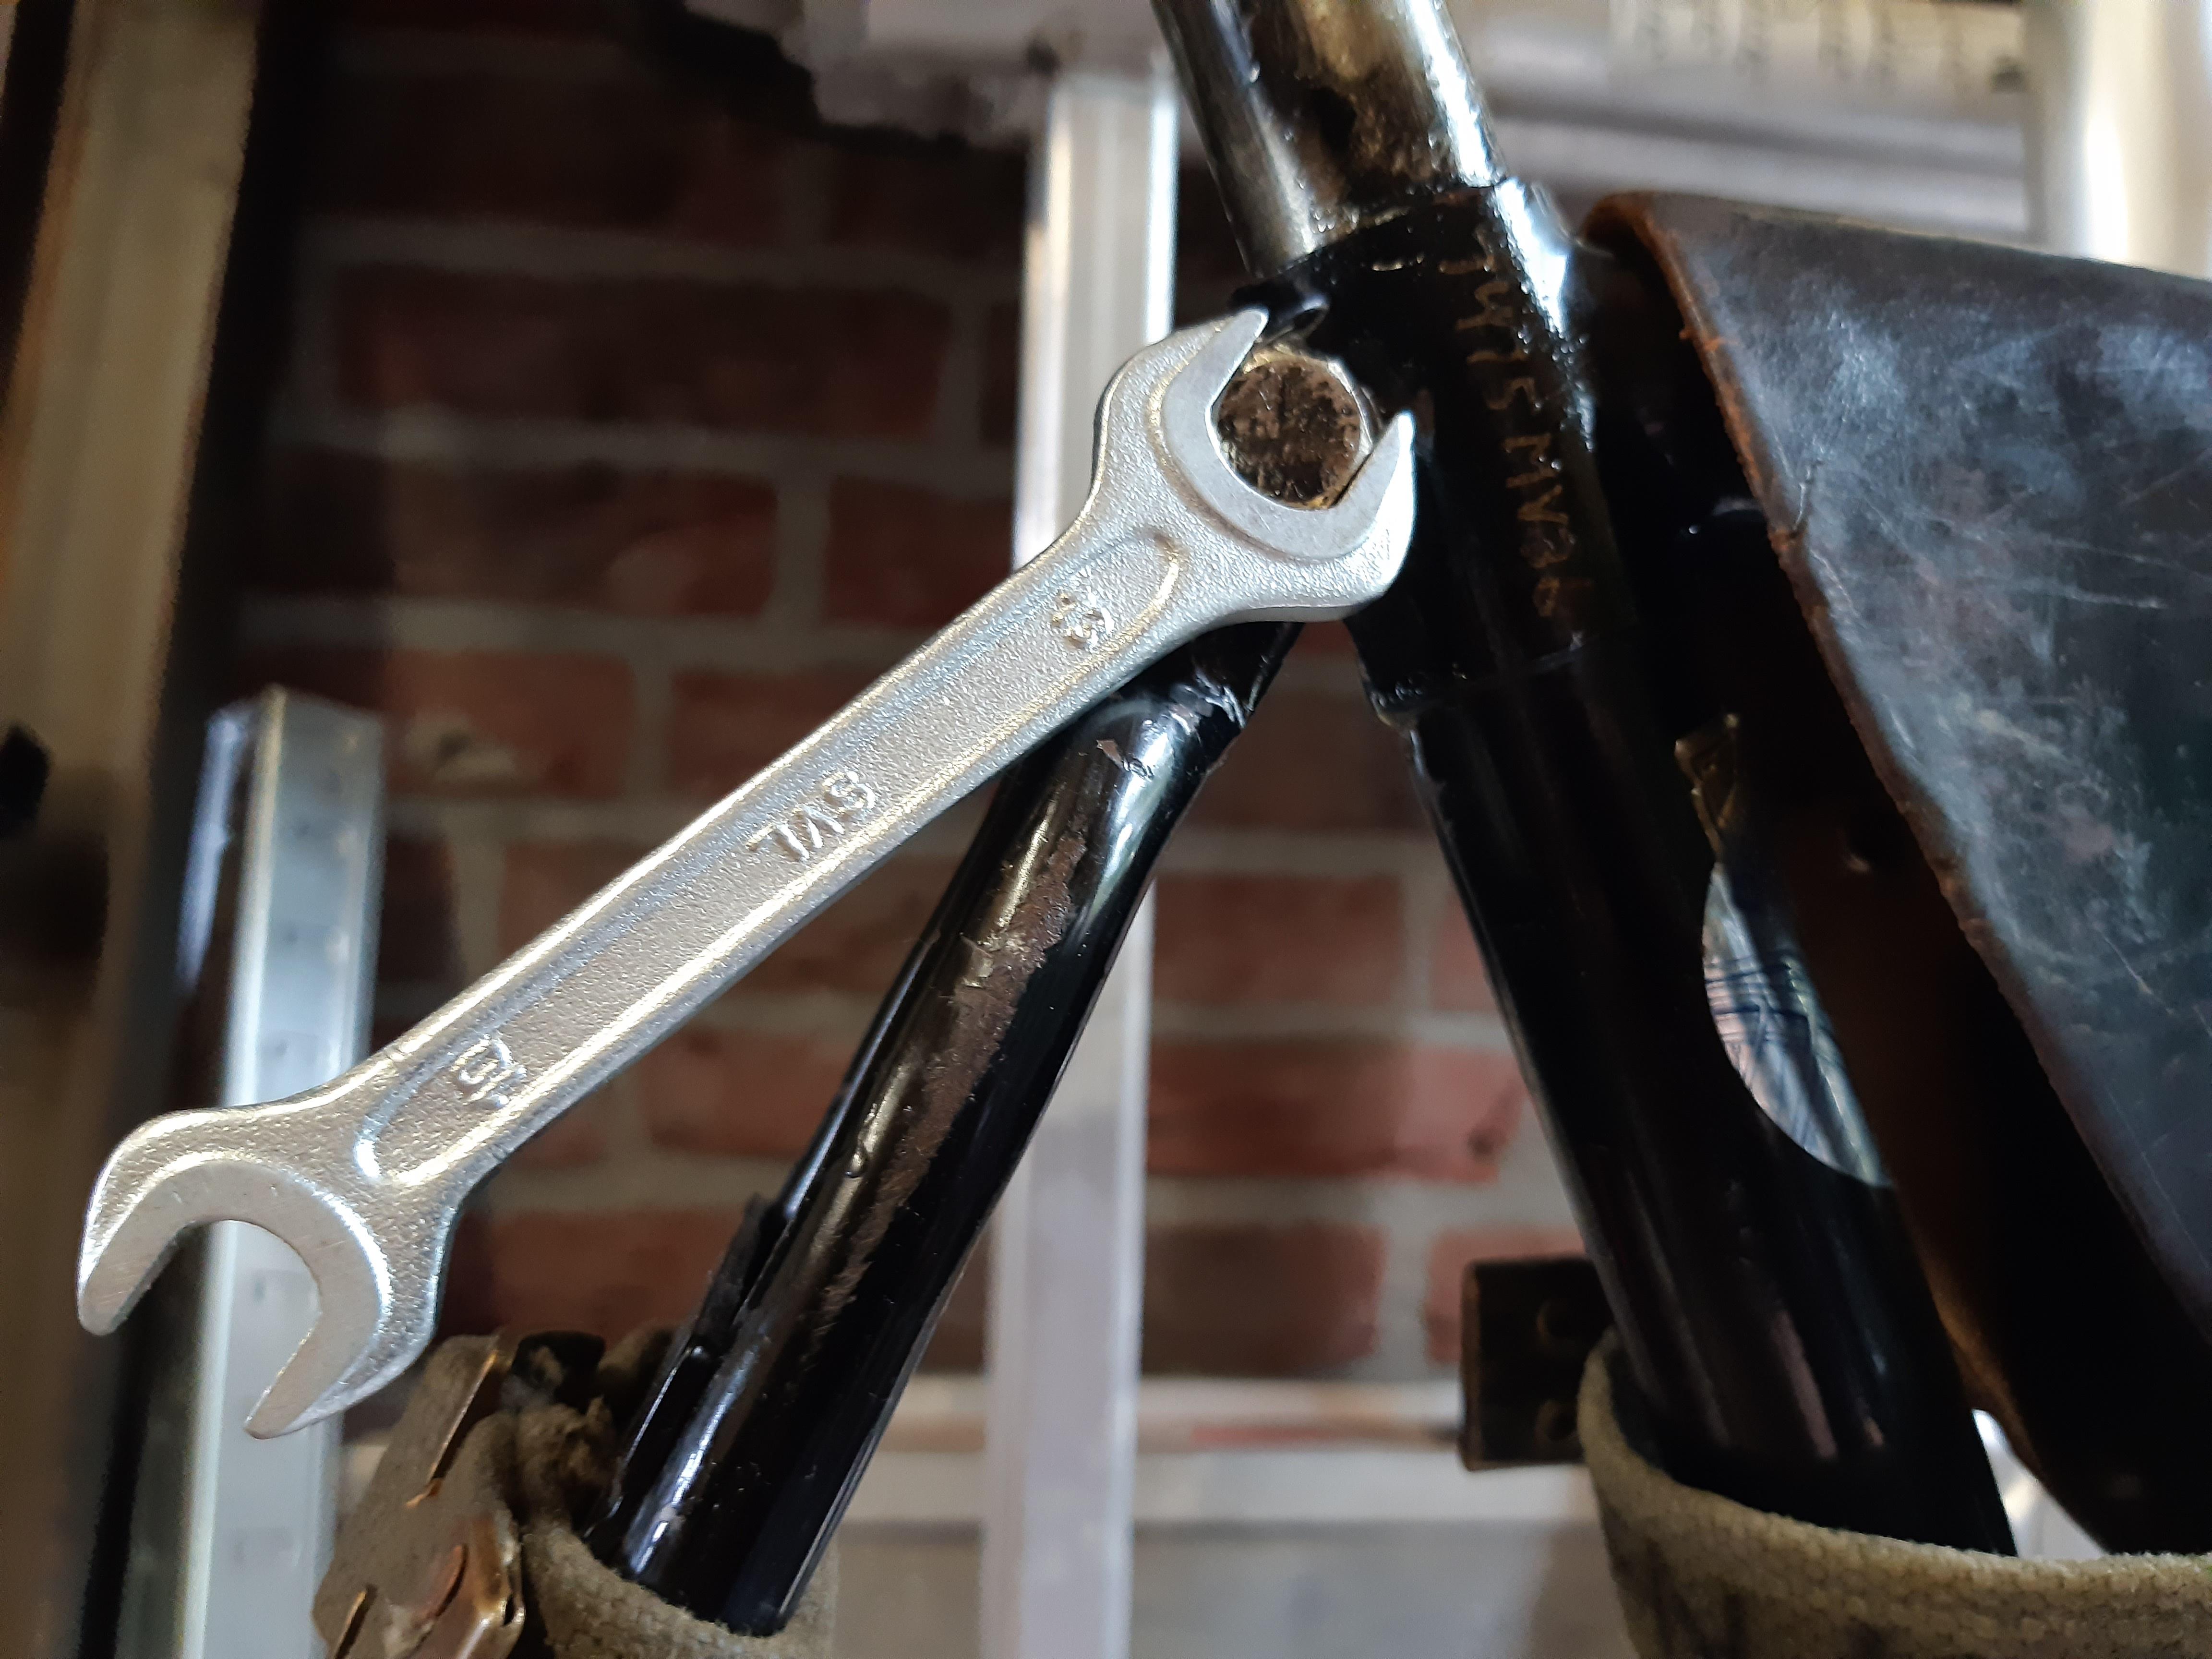
Flat head to allen key, for handlebar clamping.
https://i.imgur.com/97gp9SG.jpg[/imgWrench, 17mm, for rear hub bearing adjustment.
[img]https://i.imgur.com/uPKPYgX.jpg
Toolset!
The text on the army-cloth toolbag says:
"tools for the ol' EMPO bicycle" in a old Dutch way of writing.
It contains relatively old tools:
》Wrench: 10mm, 13mm, 15mm and 17mm.
》A file for filing spare cotterpins.
》And the flat head to allen key.
 Everything just fits!
Extra stuff I will be taking in my backpack for the trip:

Small hammer for spare-cotterpins, tywraps, a small pump, spare 28" inner tubes and new spare cotterpins.
More important stuff: Water, food and more sustenance
Alright, I completely checked the bicycle for the ride this week, everything is in order.
I love how the bike came out! It looks old, but it's technically perfect:
New bearings.
New tires (the little draught cracks fit the looks, even though I did not expect new tires to have these cracks).
New cotterpins
The last things I hope to do:
》Is a little modest pinstriping, but I don't know if I am able to make it timewise. And I don't have pinstriping tools at hand.
》Put a little lamp in the carbide lamp housing. I need parts to really fix the carbide lamp, but can't get them right now. In Oktober there's an old bicycle stock market where I aim to find stuff. For now, I can put a small battery lamp in there.
The last update I wanted to share is the tools in my holster framebag.
The aim was to take as few tools as possible, with maximum effect! At first to adjust things like, saddle, handlebars and tension the chain. But taking a bit more with me allowed me to remove the wheels (for flat tire repair). And even to adjust the rear hub!
Pictures with the tools and its use:
Wrench, 10mm, chain tensioner.
Wrench, 10mm again!
For tensioning/tightening the cotterpin nuts.
Wrench, 15mm, for the rear axle nuts.
Wrench, 13mm, for saddle height adjustment.
Wrench, 13mm, for saddle angle adjustment.
Wrench, 13mm, for the front axle nuts. (butterfly nuts can also be loosened).
Wrench, 13mm, again!
for the stem adjustment.
Flat head to allen key, for handlebar clamping.
https://i.imgur.com/97gp9SG.jpg[/imgWrench, 17mm, for rear hub bearing adjustment.
[img]https://i.imgur.com/uPKPYgX.jpg
Toolset!
The text on the army-cloth toolbag says:
"tools for the ol' EMPO bicycle" in a old Dutch way of writing.
It contains relatively old tools:
》Wrench: 10mm, 13mm, 15mm and 17mm.
》A file for filing spare cotterpins.
》And the flat head to allen key.
Extra stuff I will be taking in my backpack for the trip:
Small hammer for spare-cotterpins, tywraps, a small pump, spare 28" inner tubes and new spare cotterpins.
More important stuff: Water, food and more sustenance
Last edited:
I tried to fix and edit that last post, but the browser won't allow it
Looking great! What a cool way to show all of the tools by using them as opposed to just laid out or in the bag. Killer build with so many cool details.
Thanks!!Looking great! What a cool way to show all of the tools by using them as opposed to just laid out or in the bag. Killer build with so many cool details.
The toolset picture that did not work in the previous post:
Text on the army bag says:
"TOOLS FOR YE OLDE EMPO BICYCLE"
I tried to litorally translate the old dutch words to American, I think you get the idea!
Alright guys, I present:
My trip with the ol' EmPo bicycle!
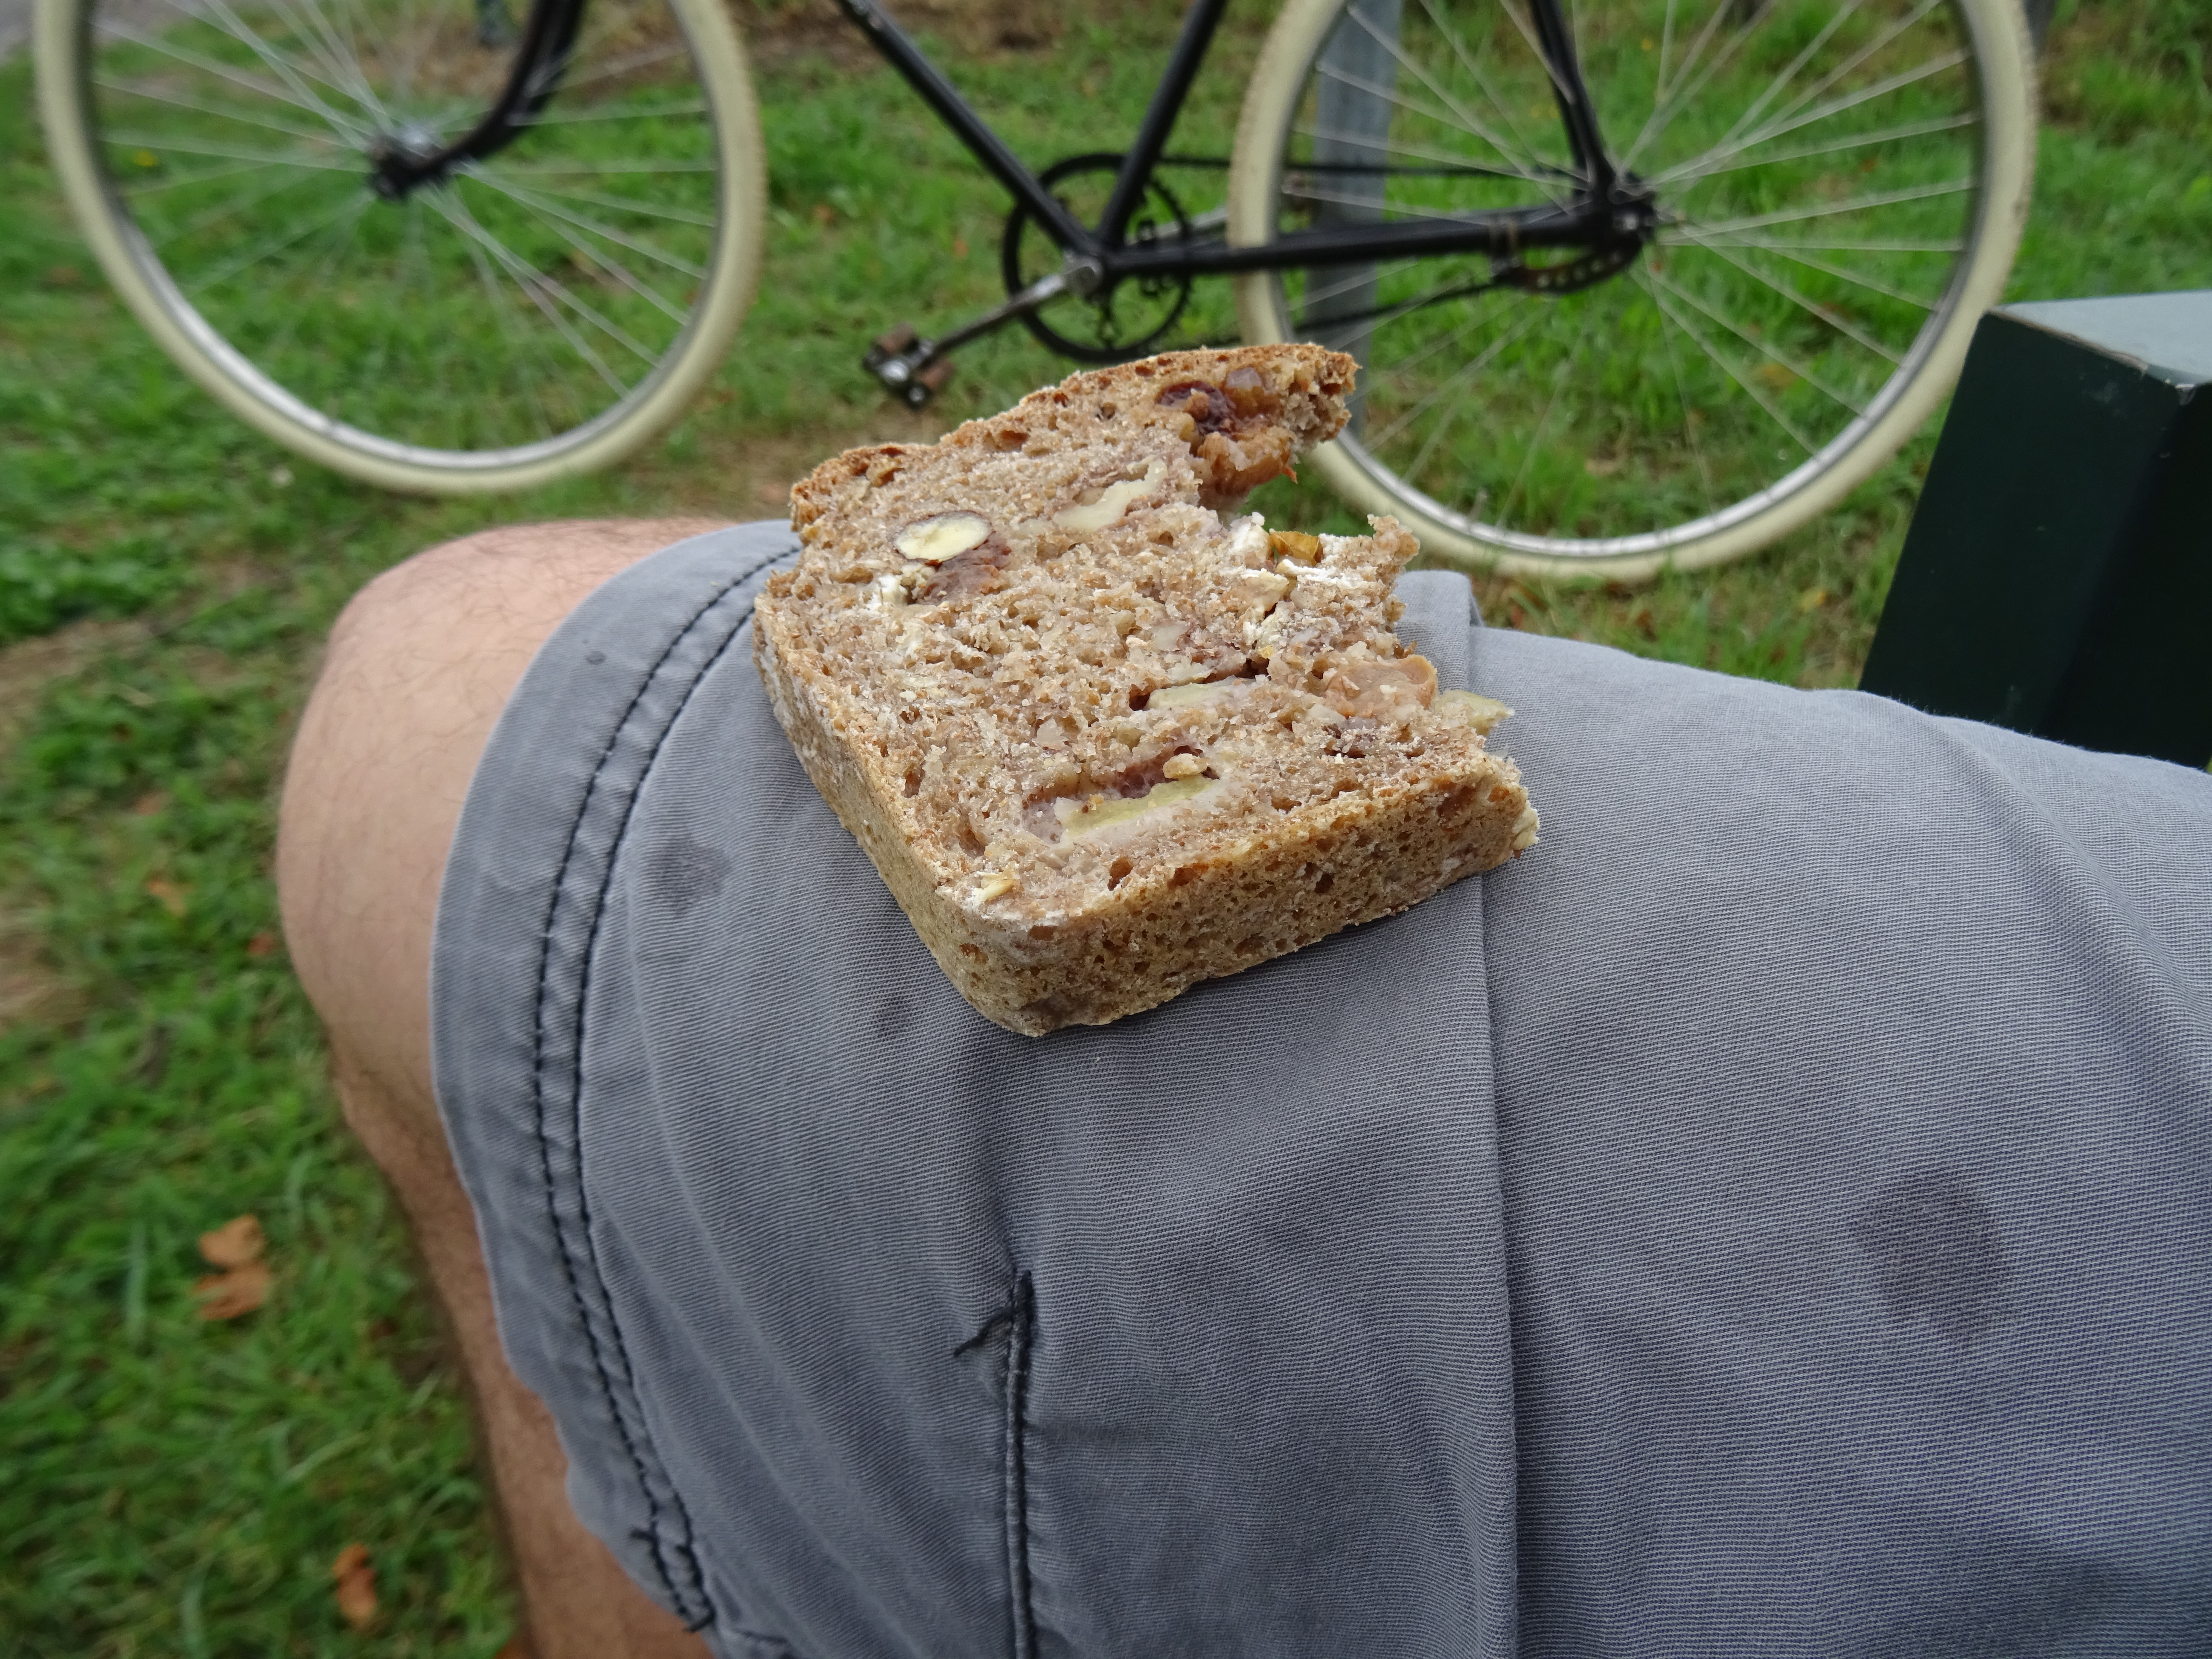
I took my tools, checked the bicycle, took some loafs of heavy whole wheat bread, a "junction route description" and some old looking clothes and started cycling.
The weather was great, around 20 degrees celcius.
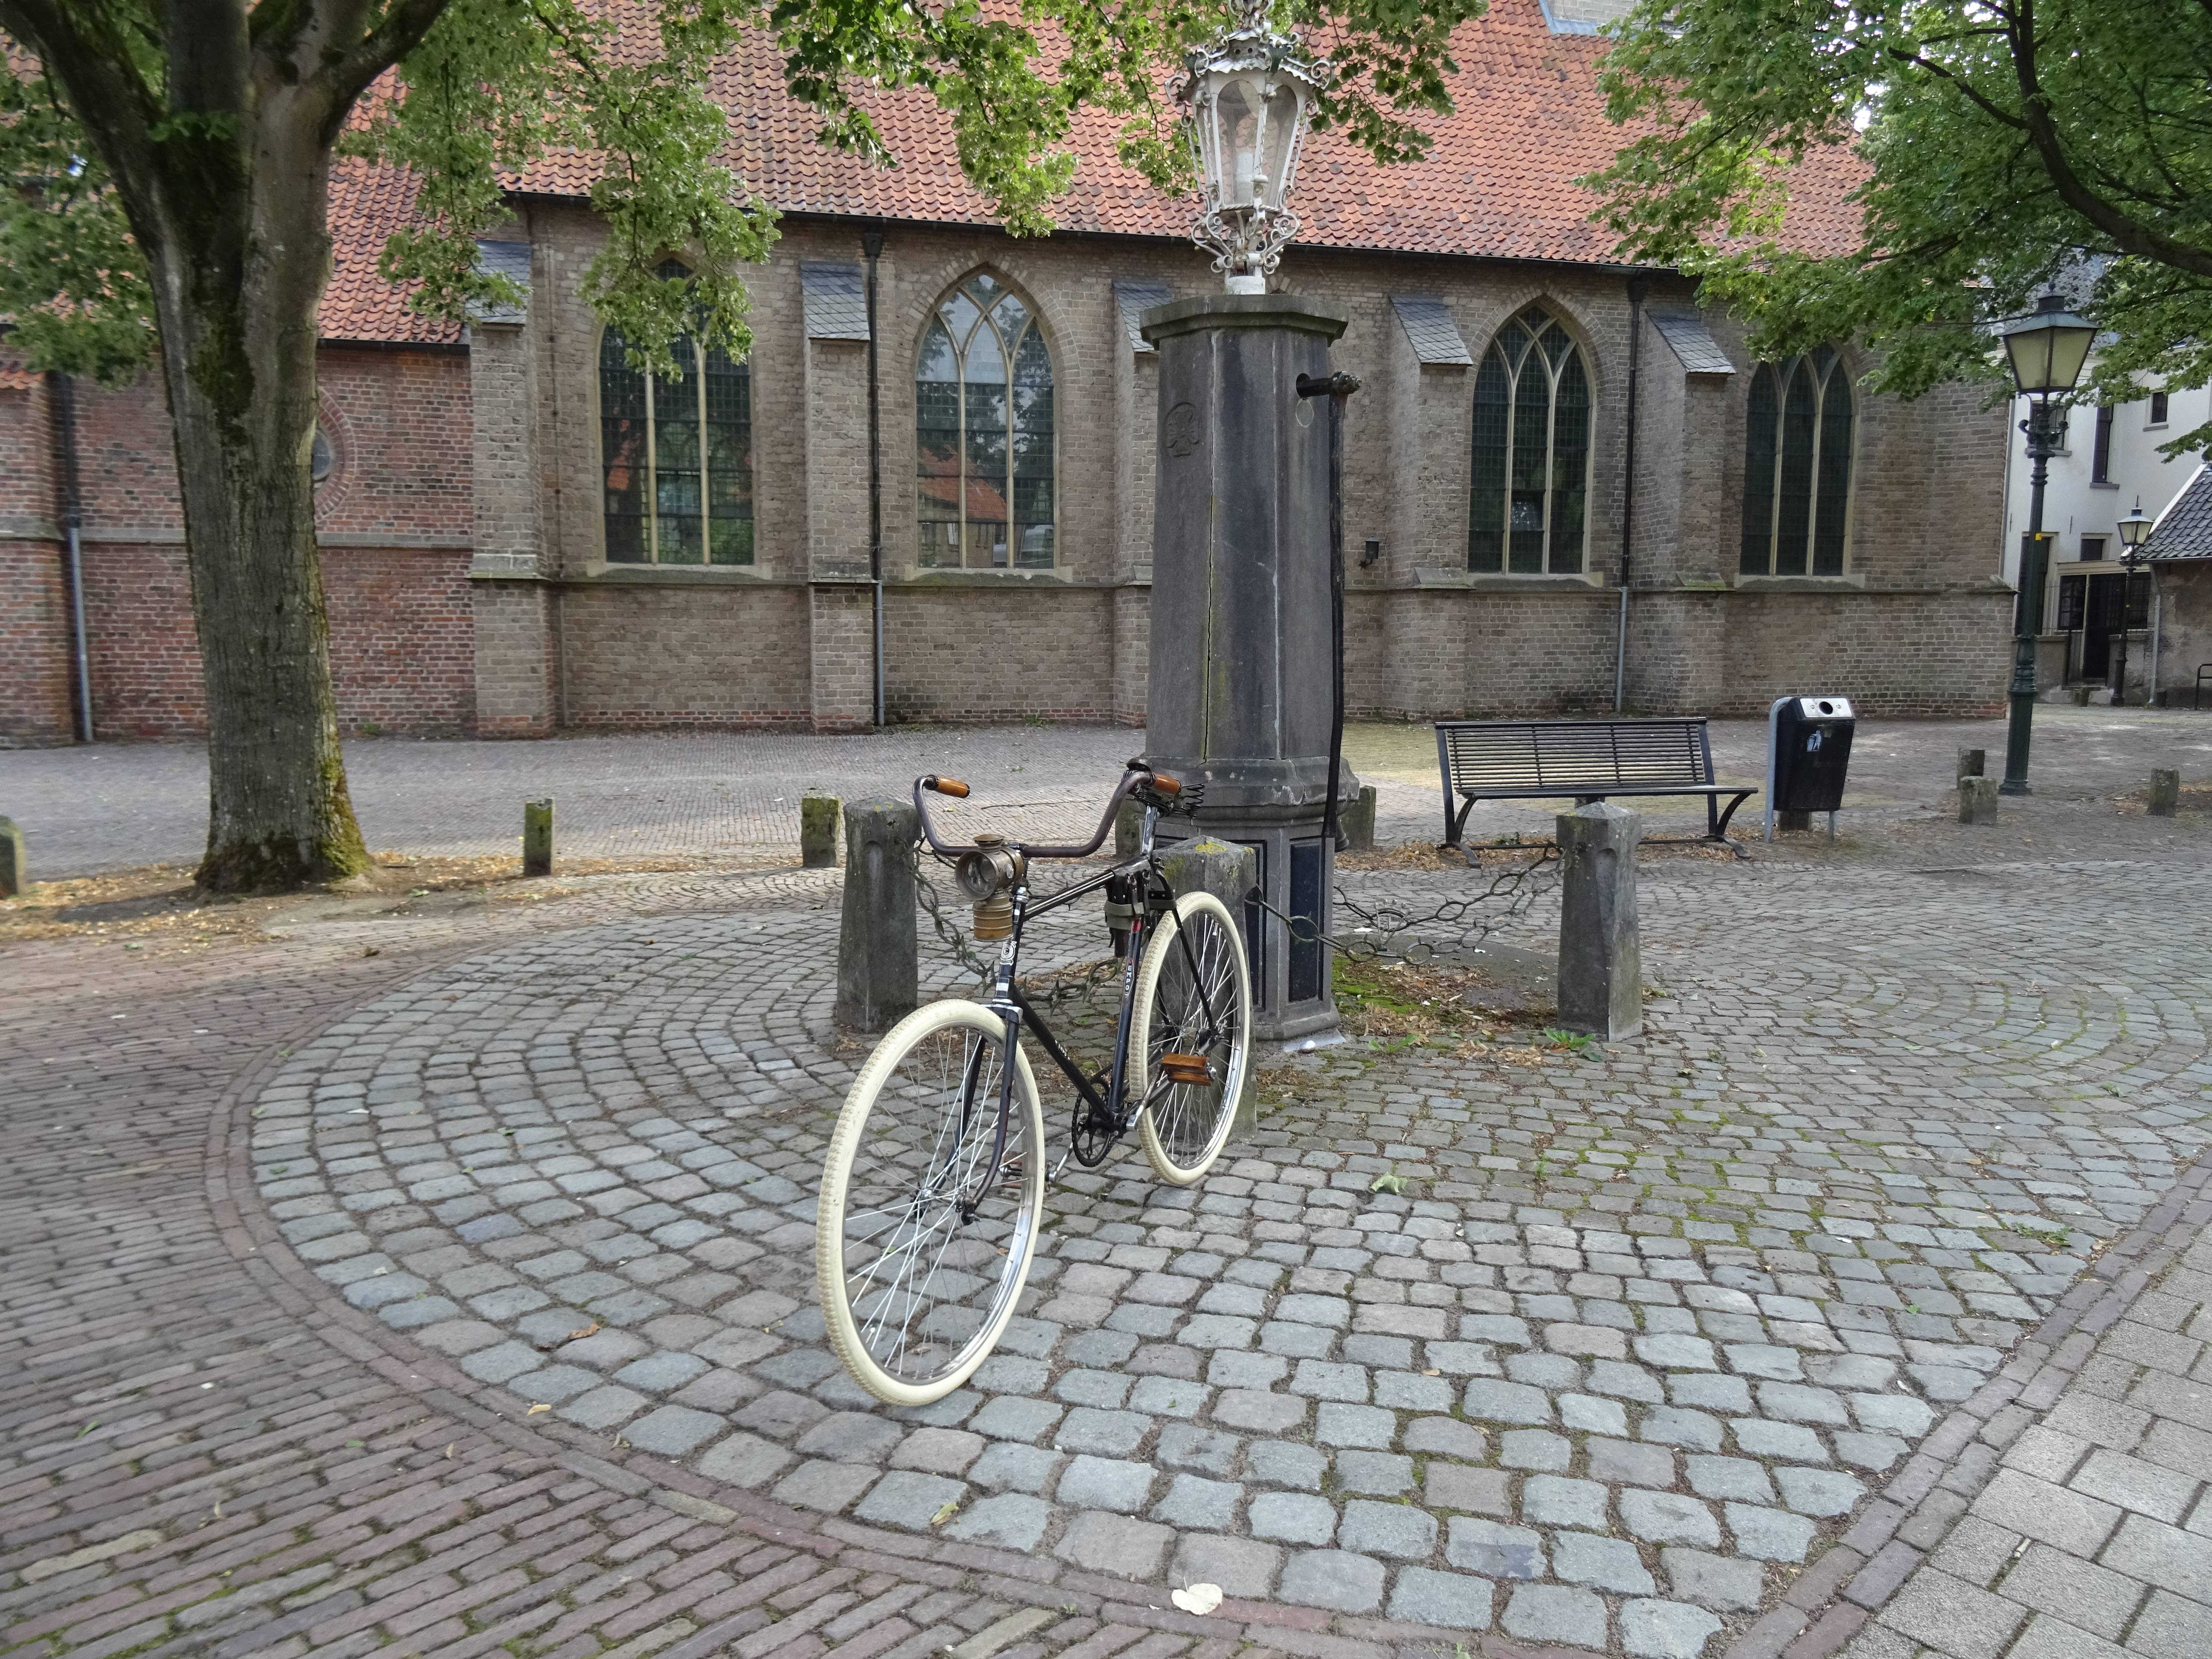
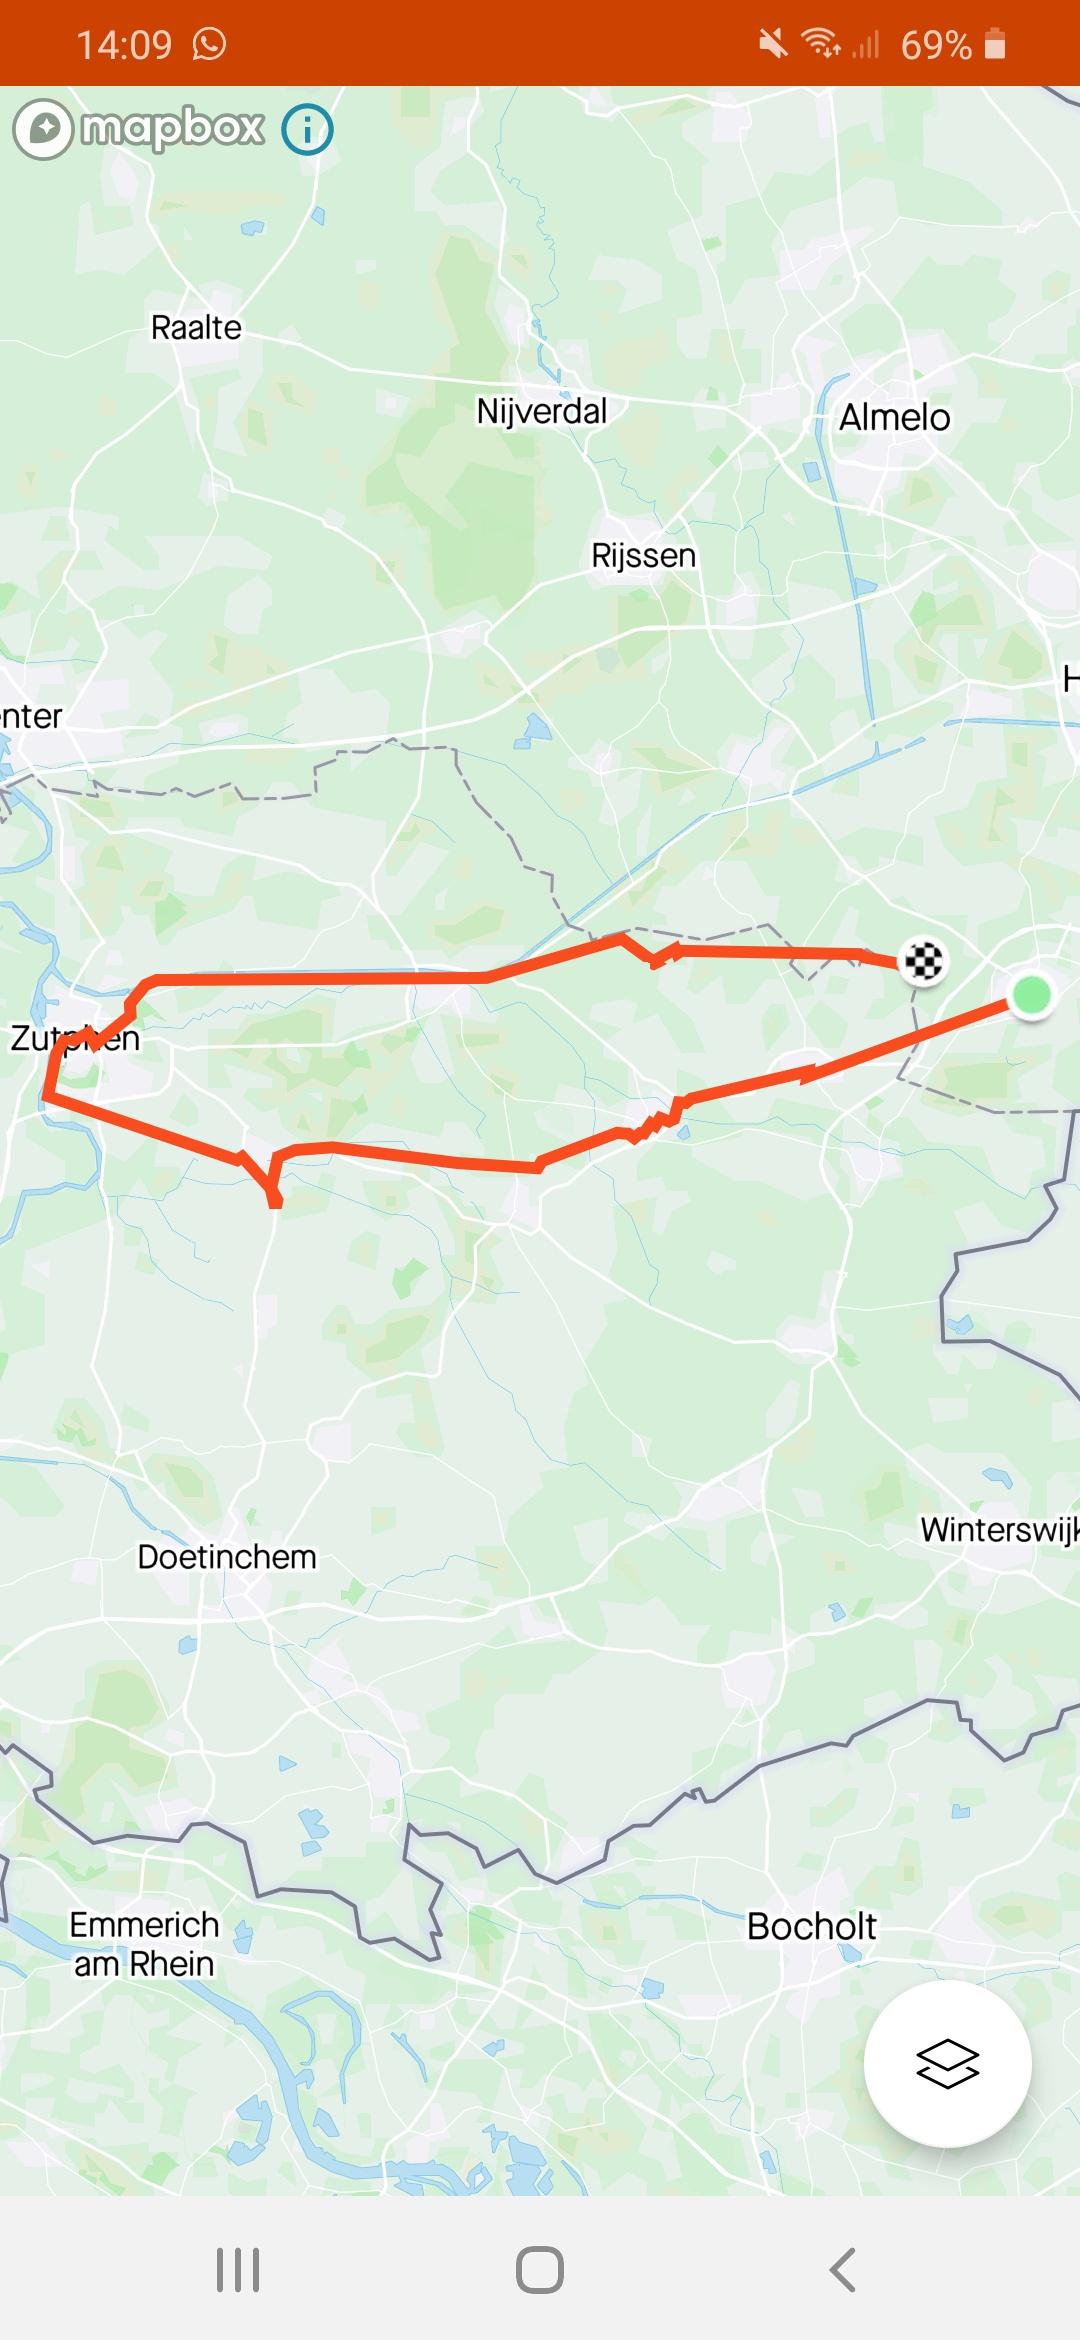
My goal was to reach "Vorden", the village where the bicycle is originally built. And continue to "Zutphen", which is one of the old hanseatic cities of the Netherlands and in my opinion, together with "Deventer" one of the most beautiful cities in the Netherlands.
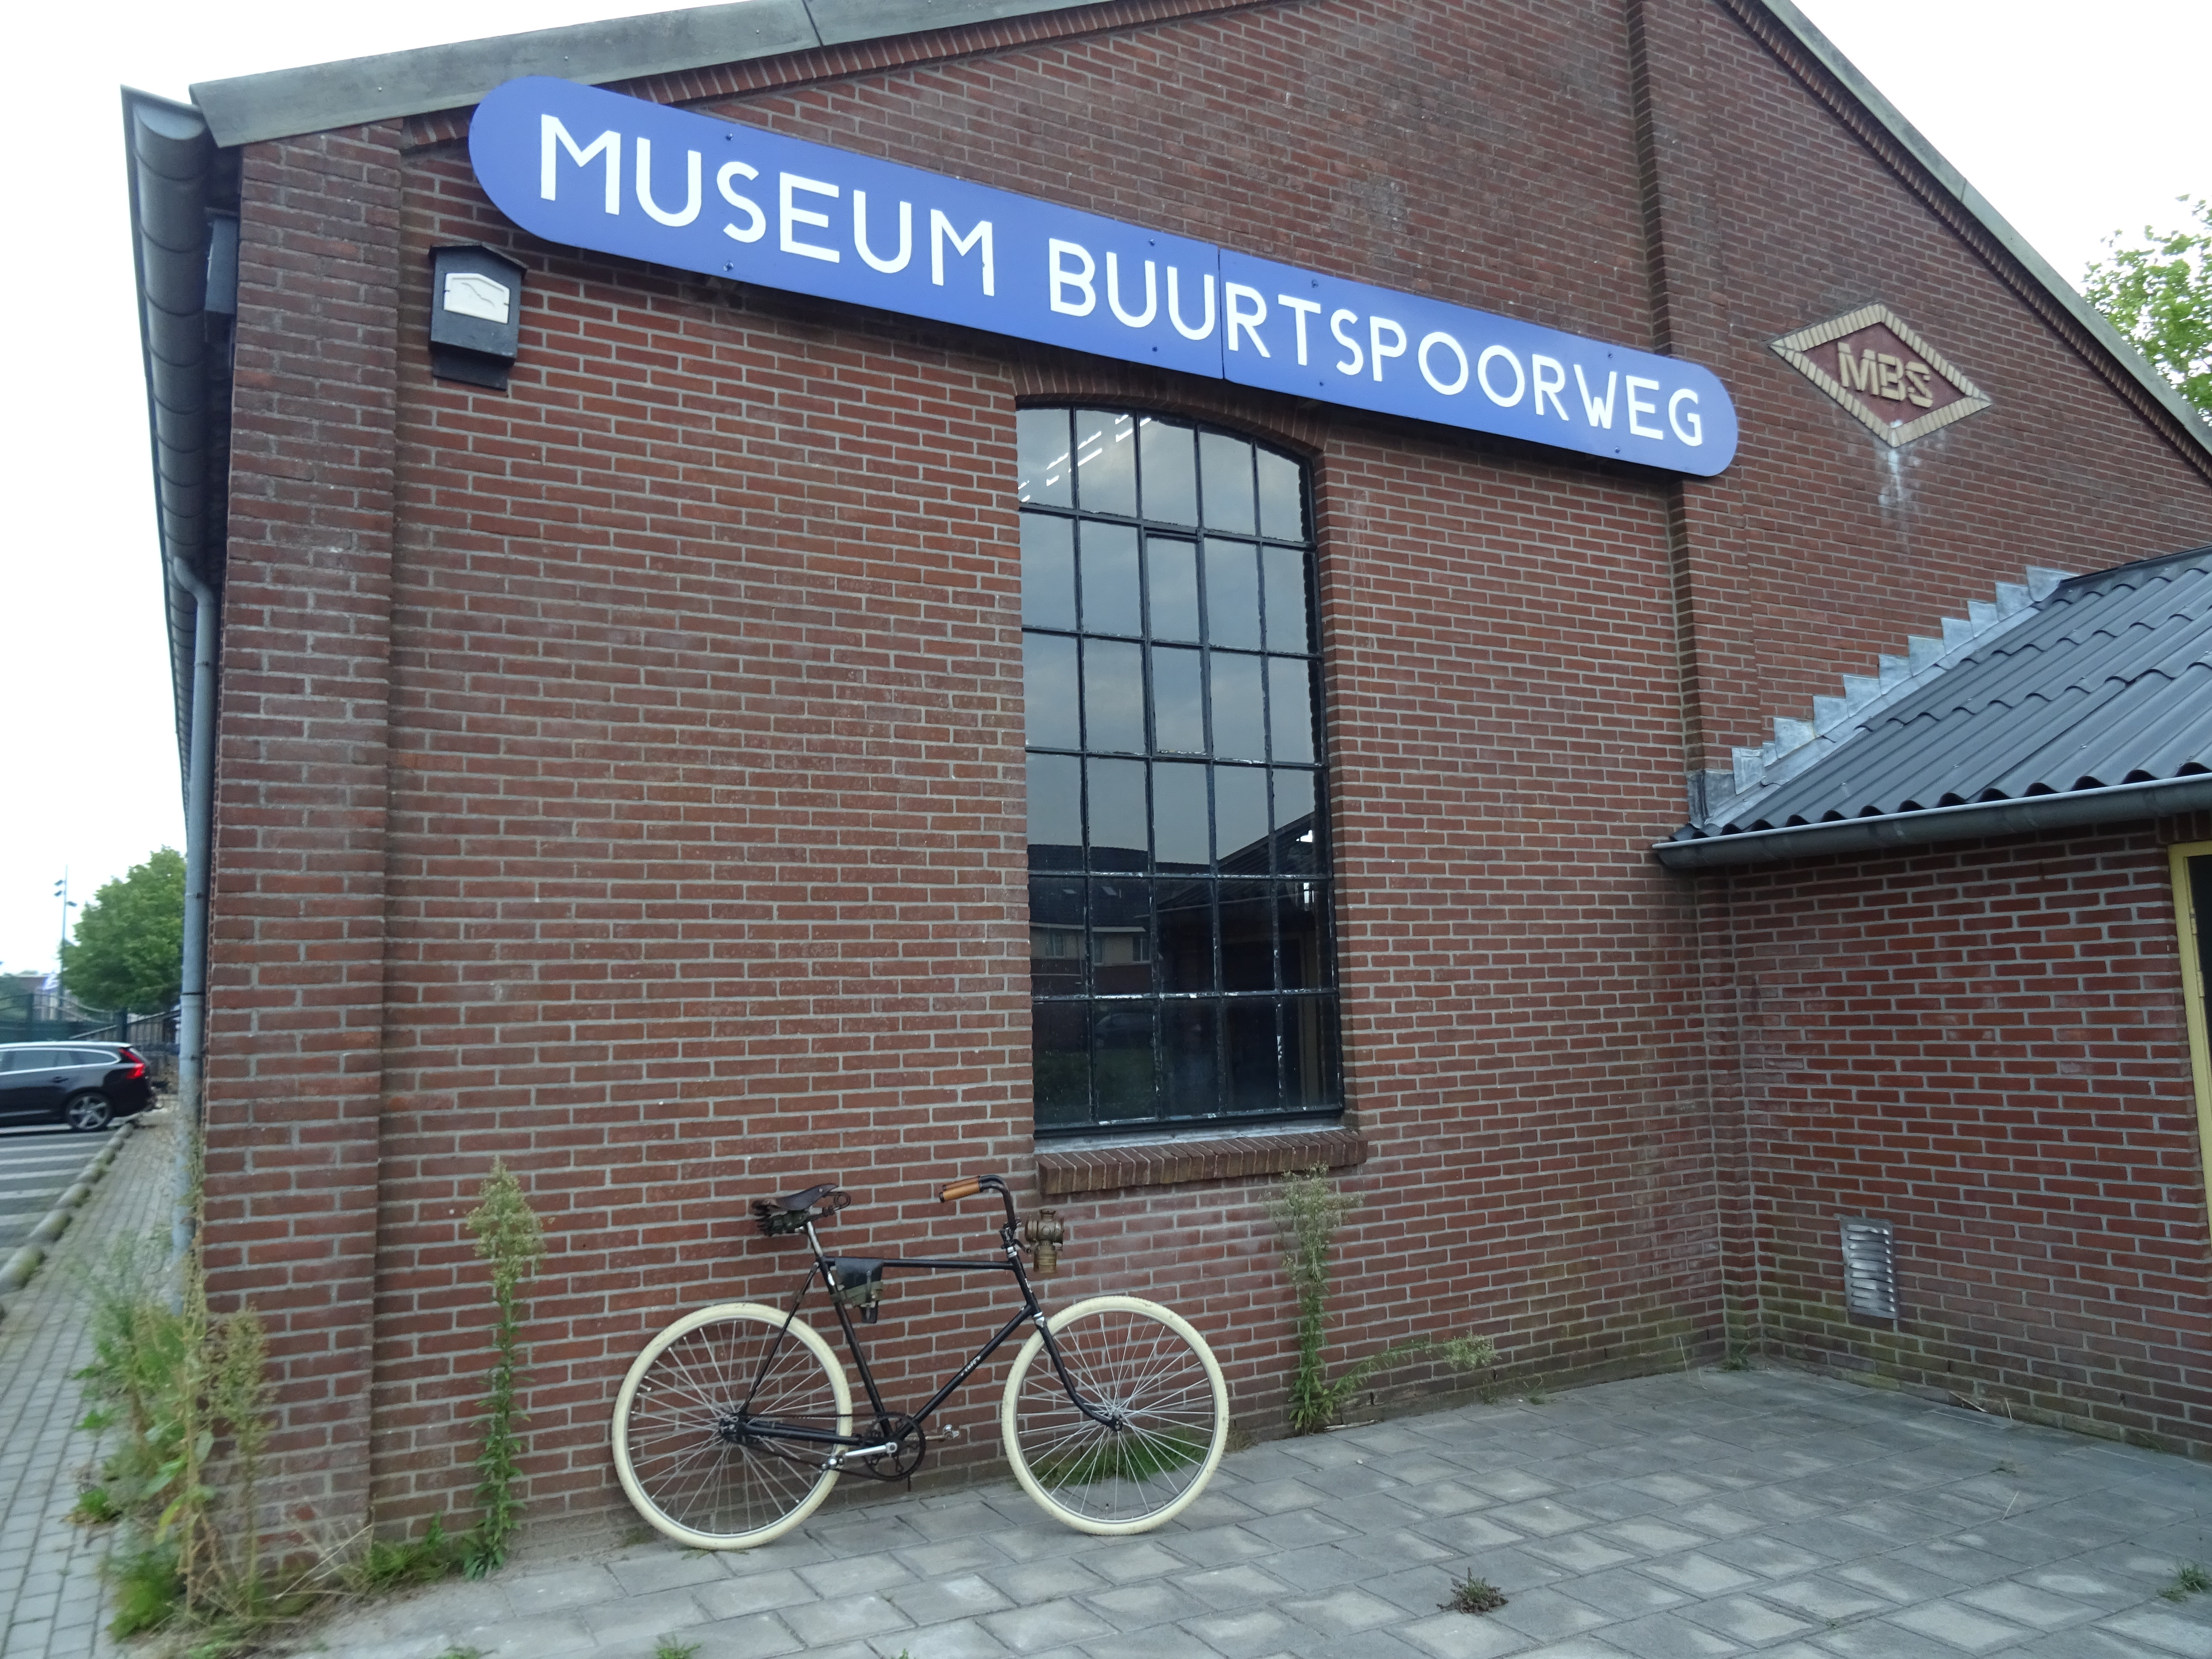
I started at "Museum Buurt Spoorweg" in Haaksbergen, my boring home town. Took some pictures and started cycling.
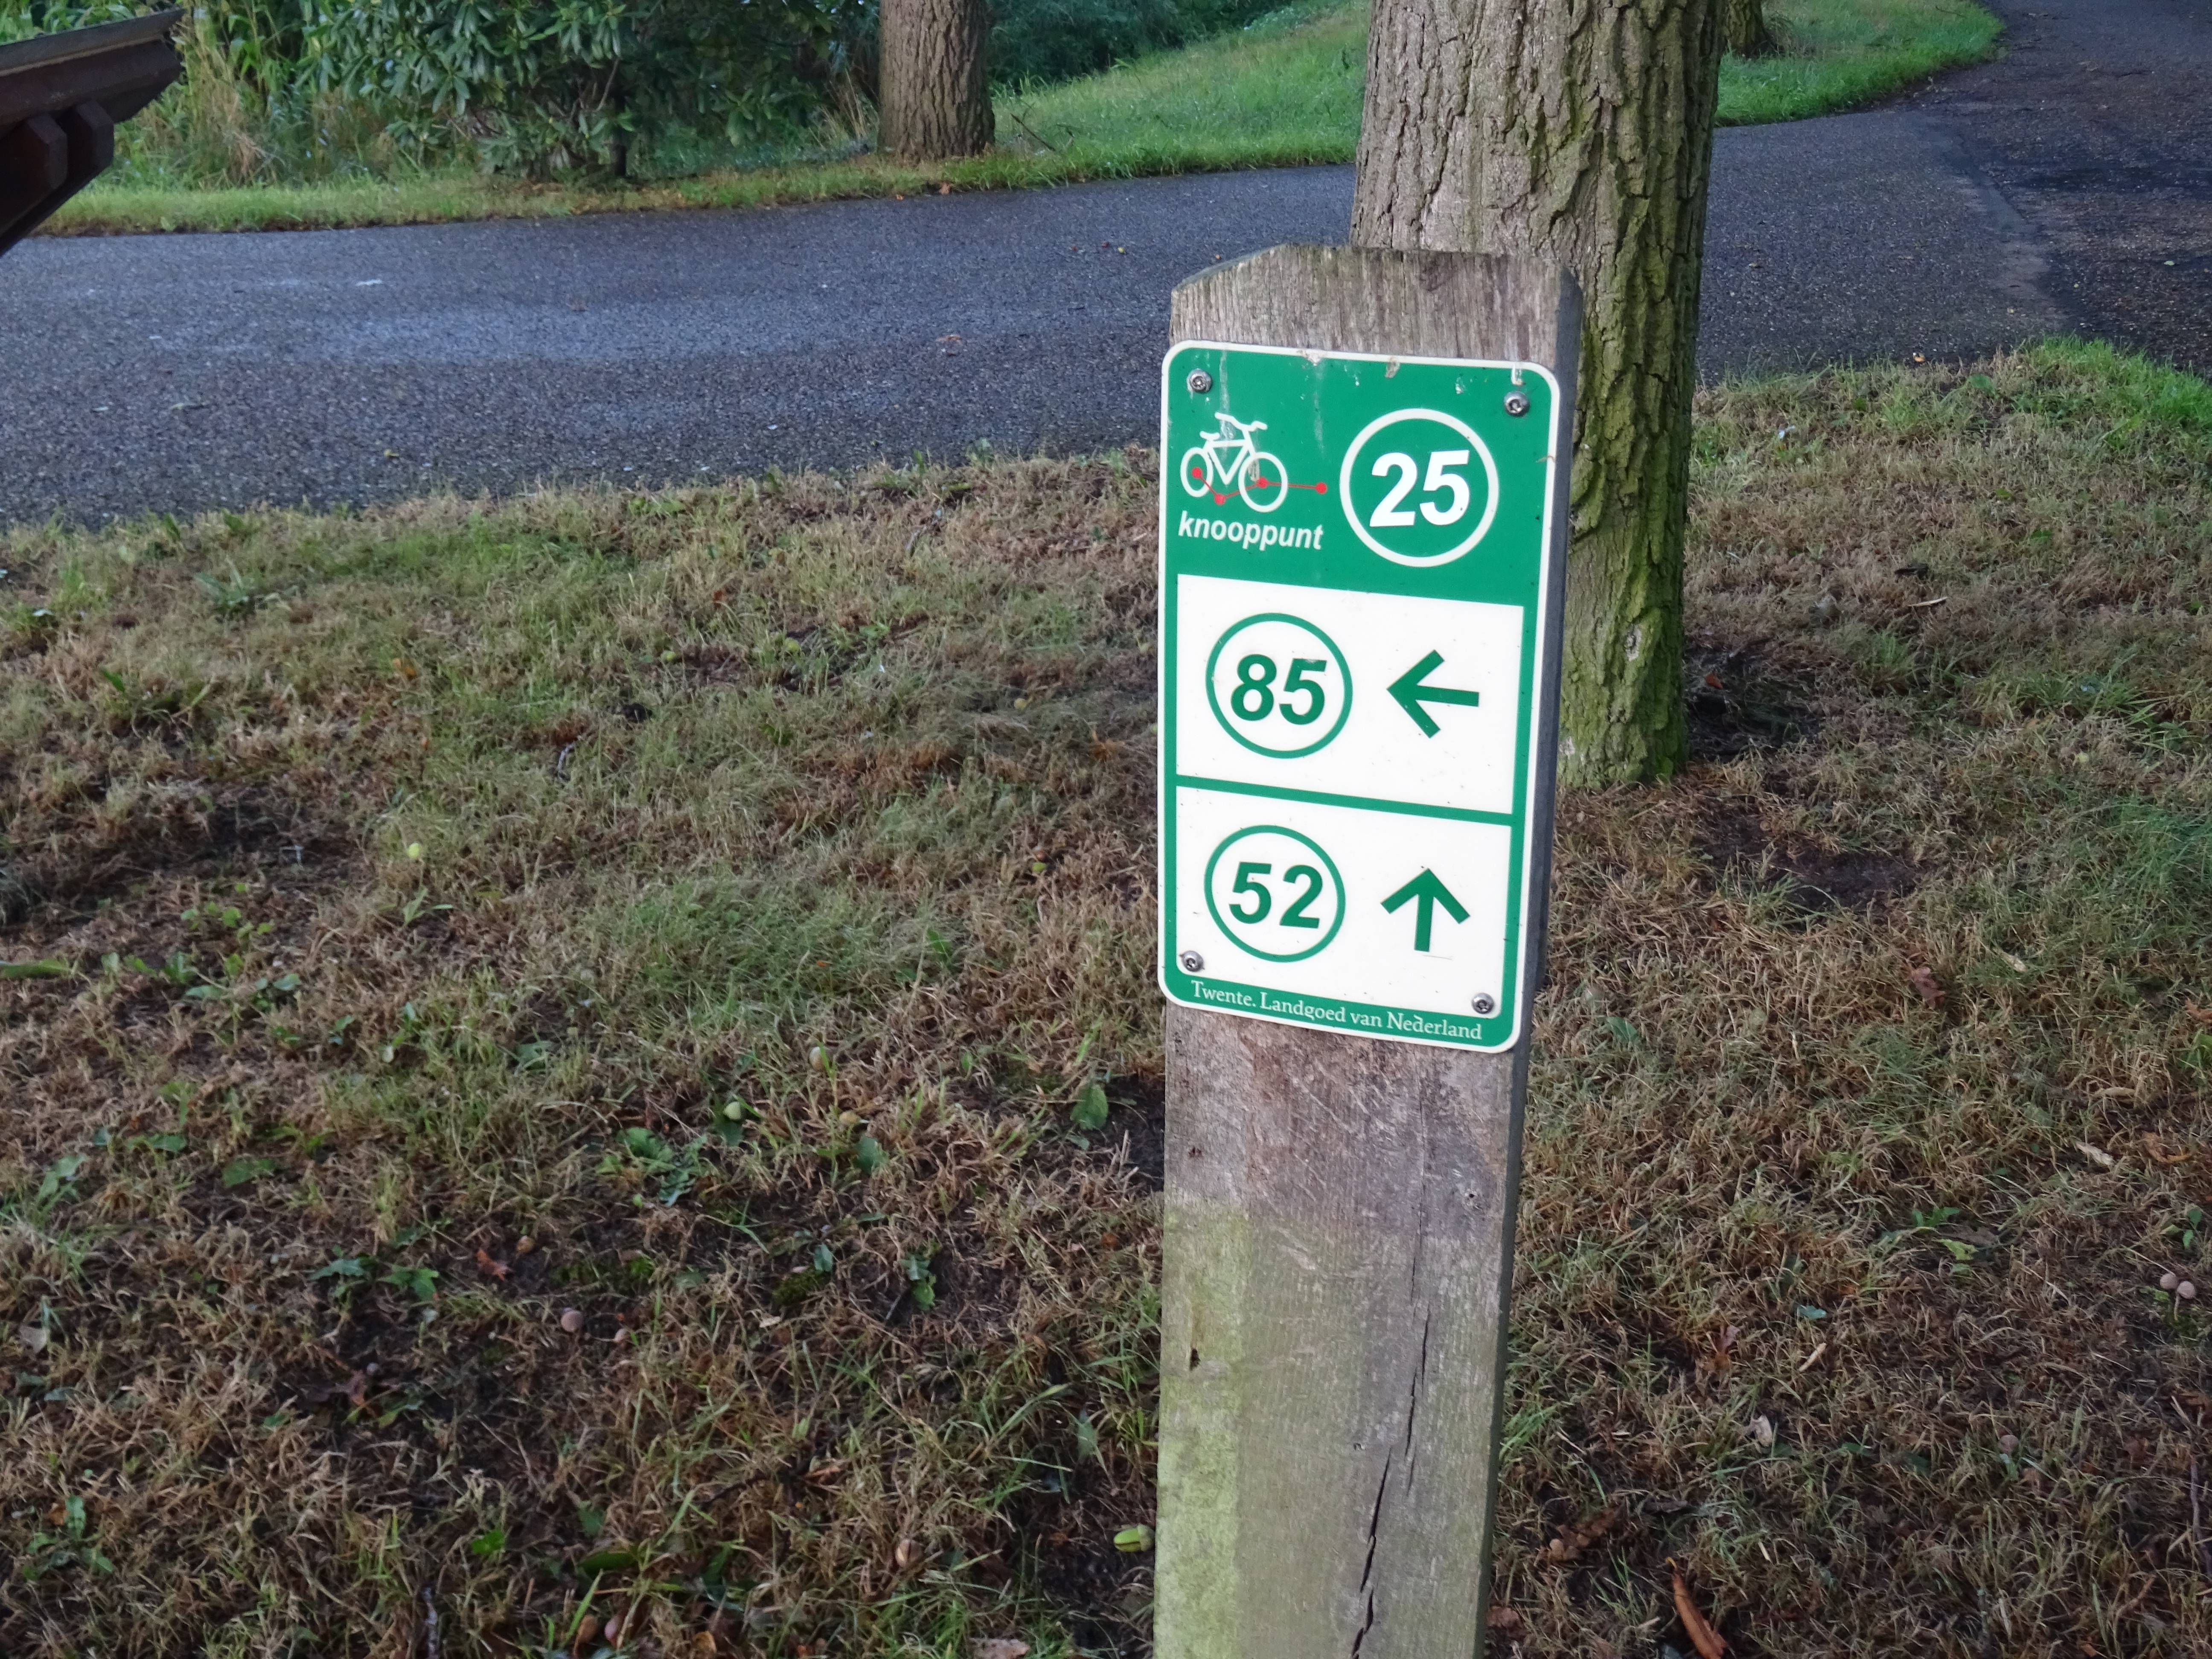
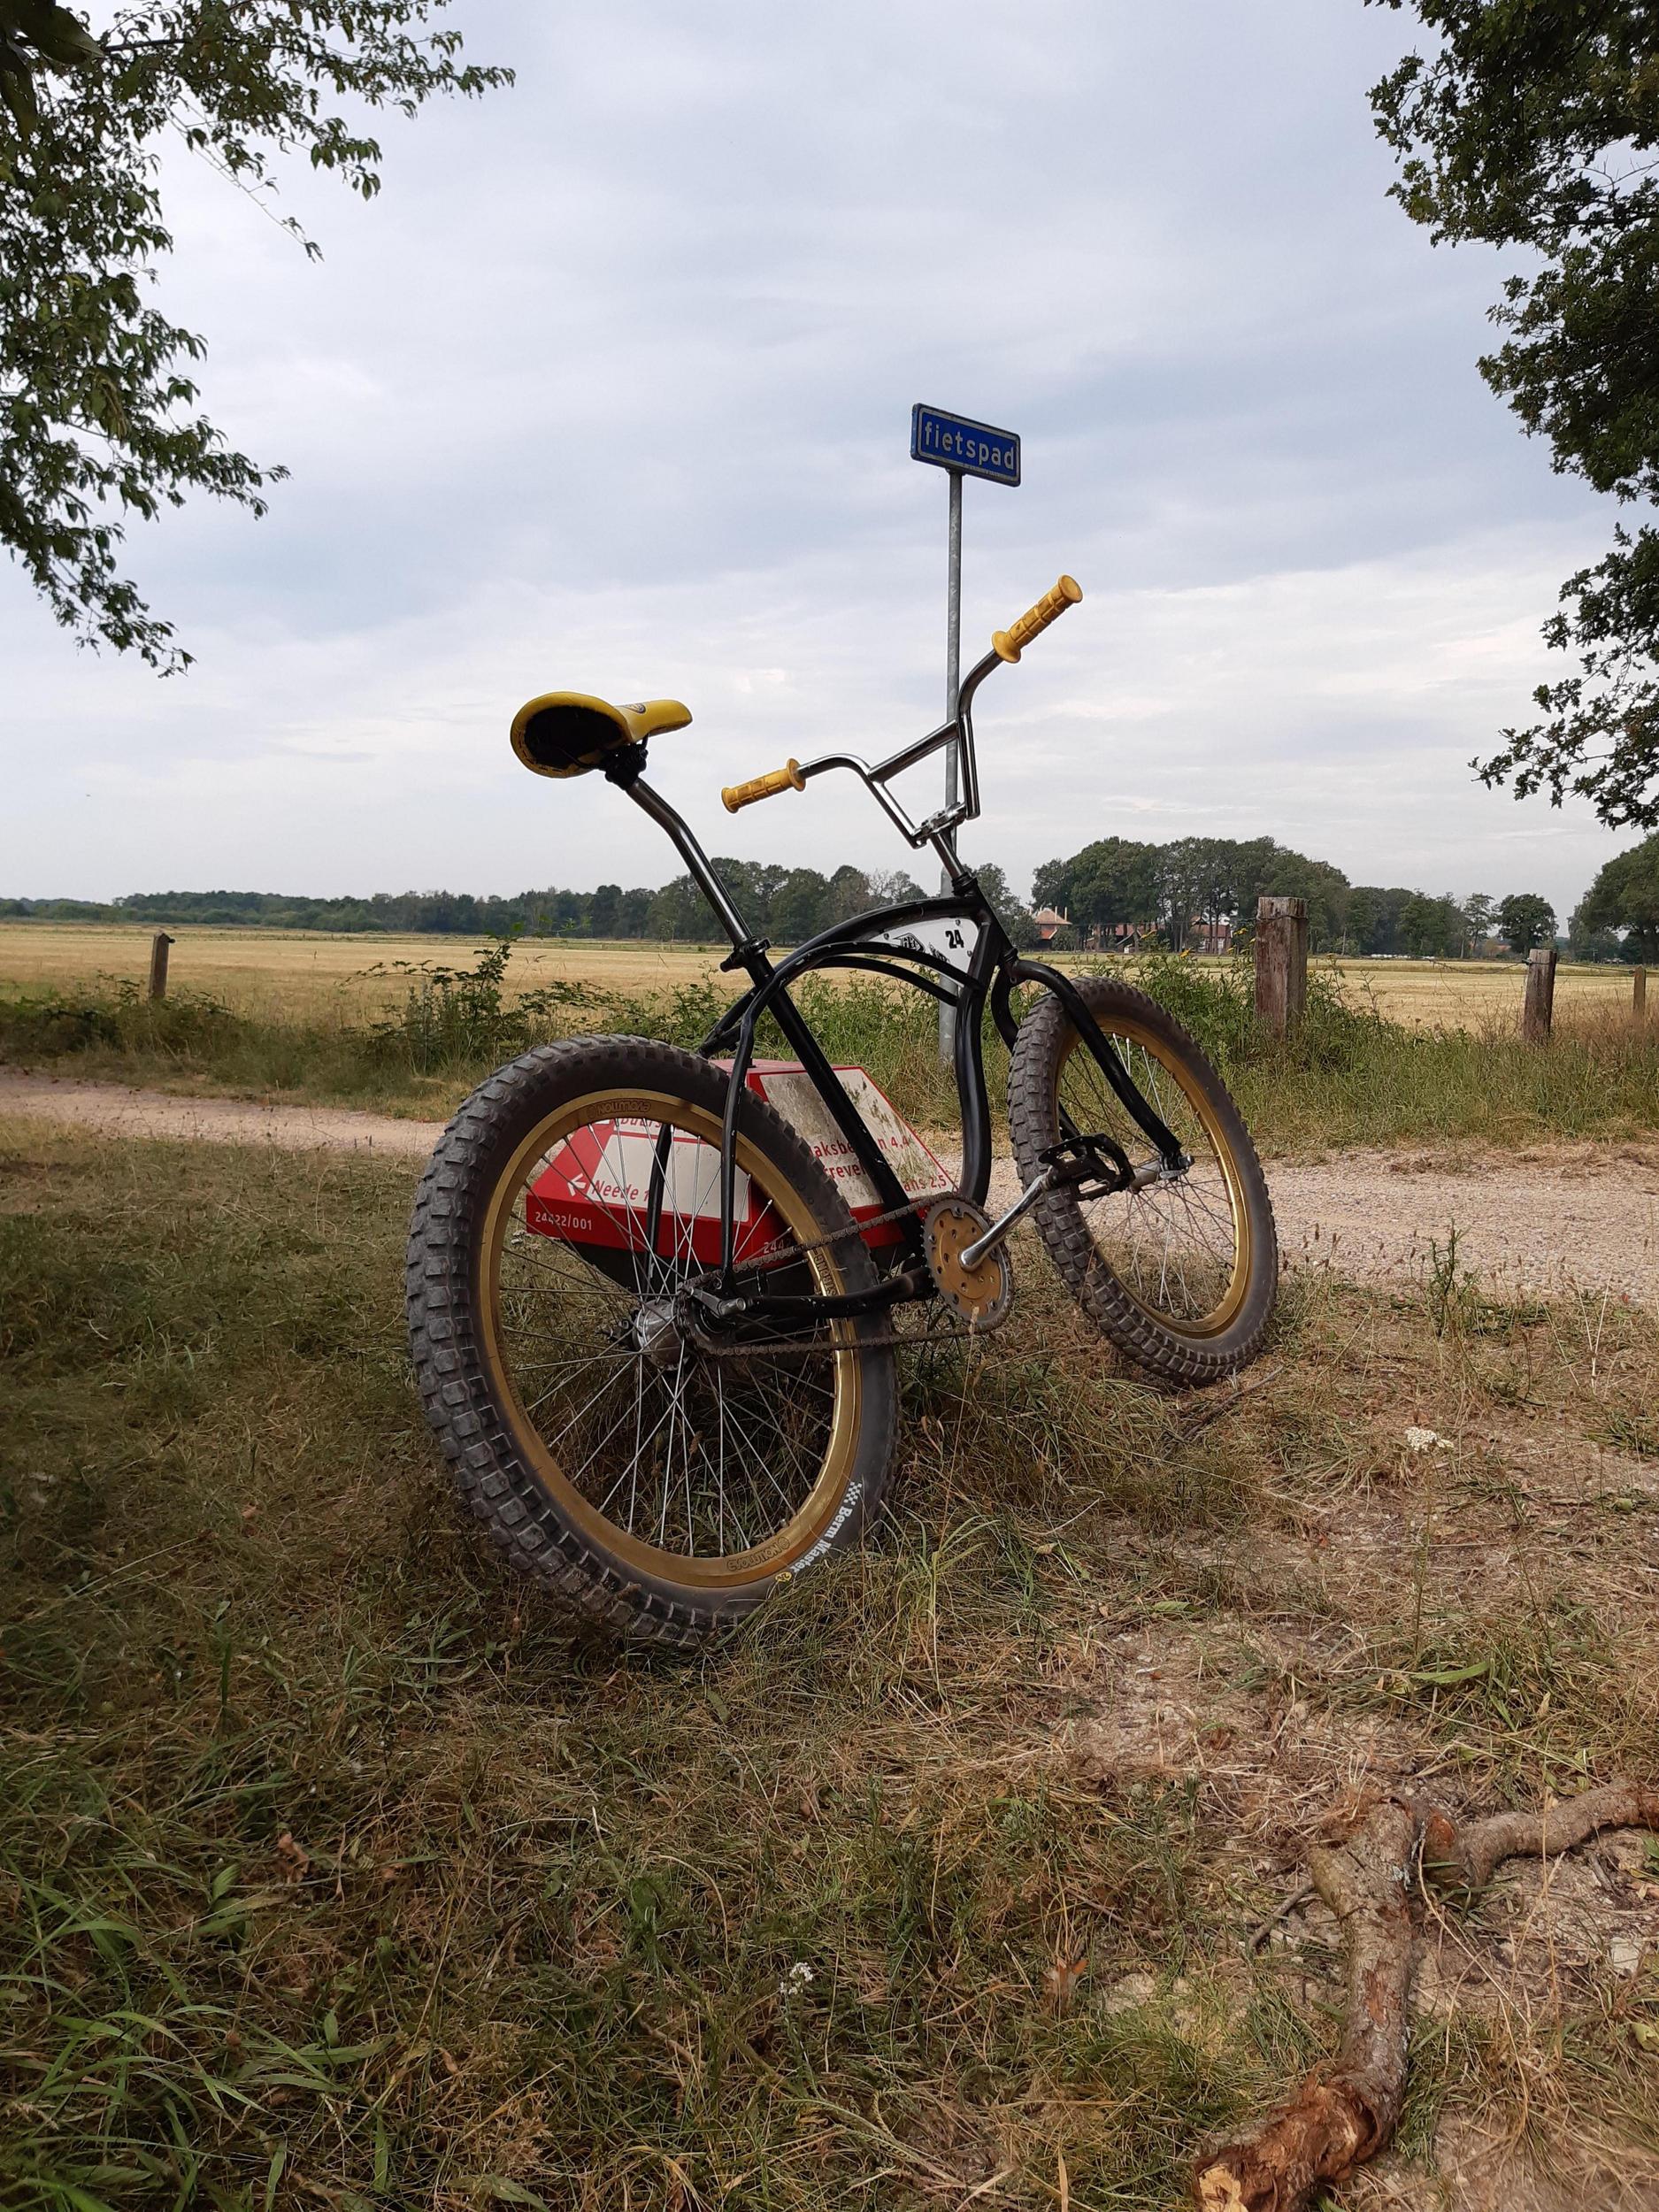
A sign of the "junction cycling route" in the Netherlands. They are mostly easy to follow. When in doubt: straight ahead! This one, number 25, was the first one I had to follow.
A short stop in the village of "Borculo".
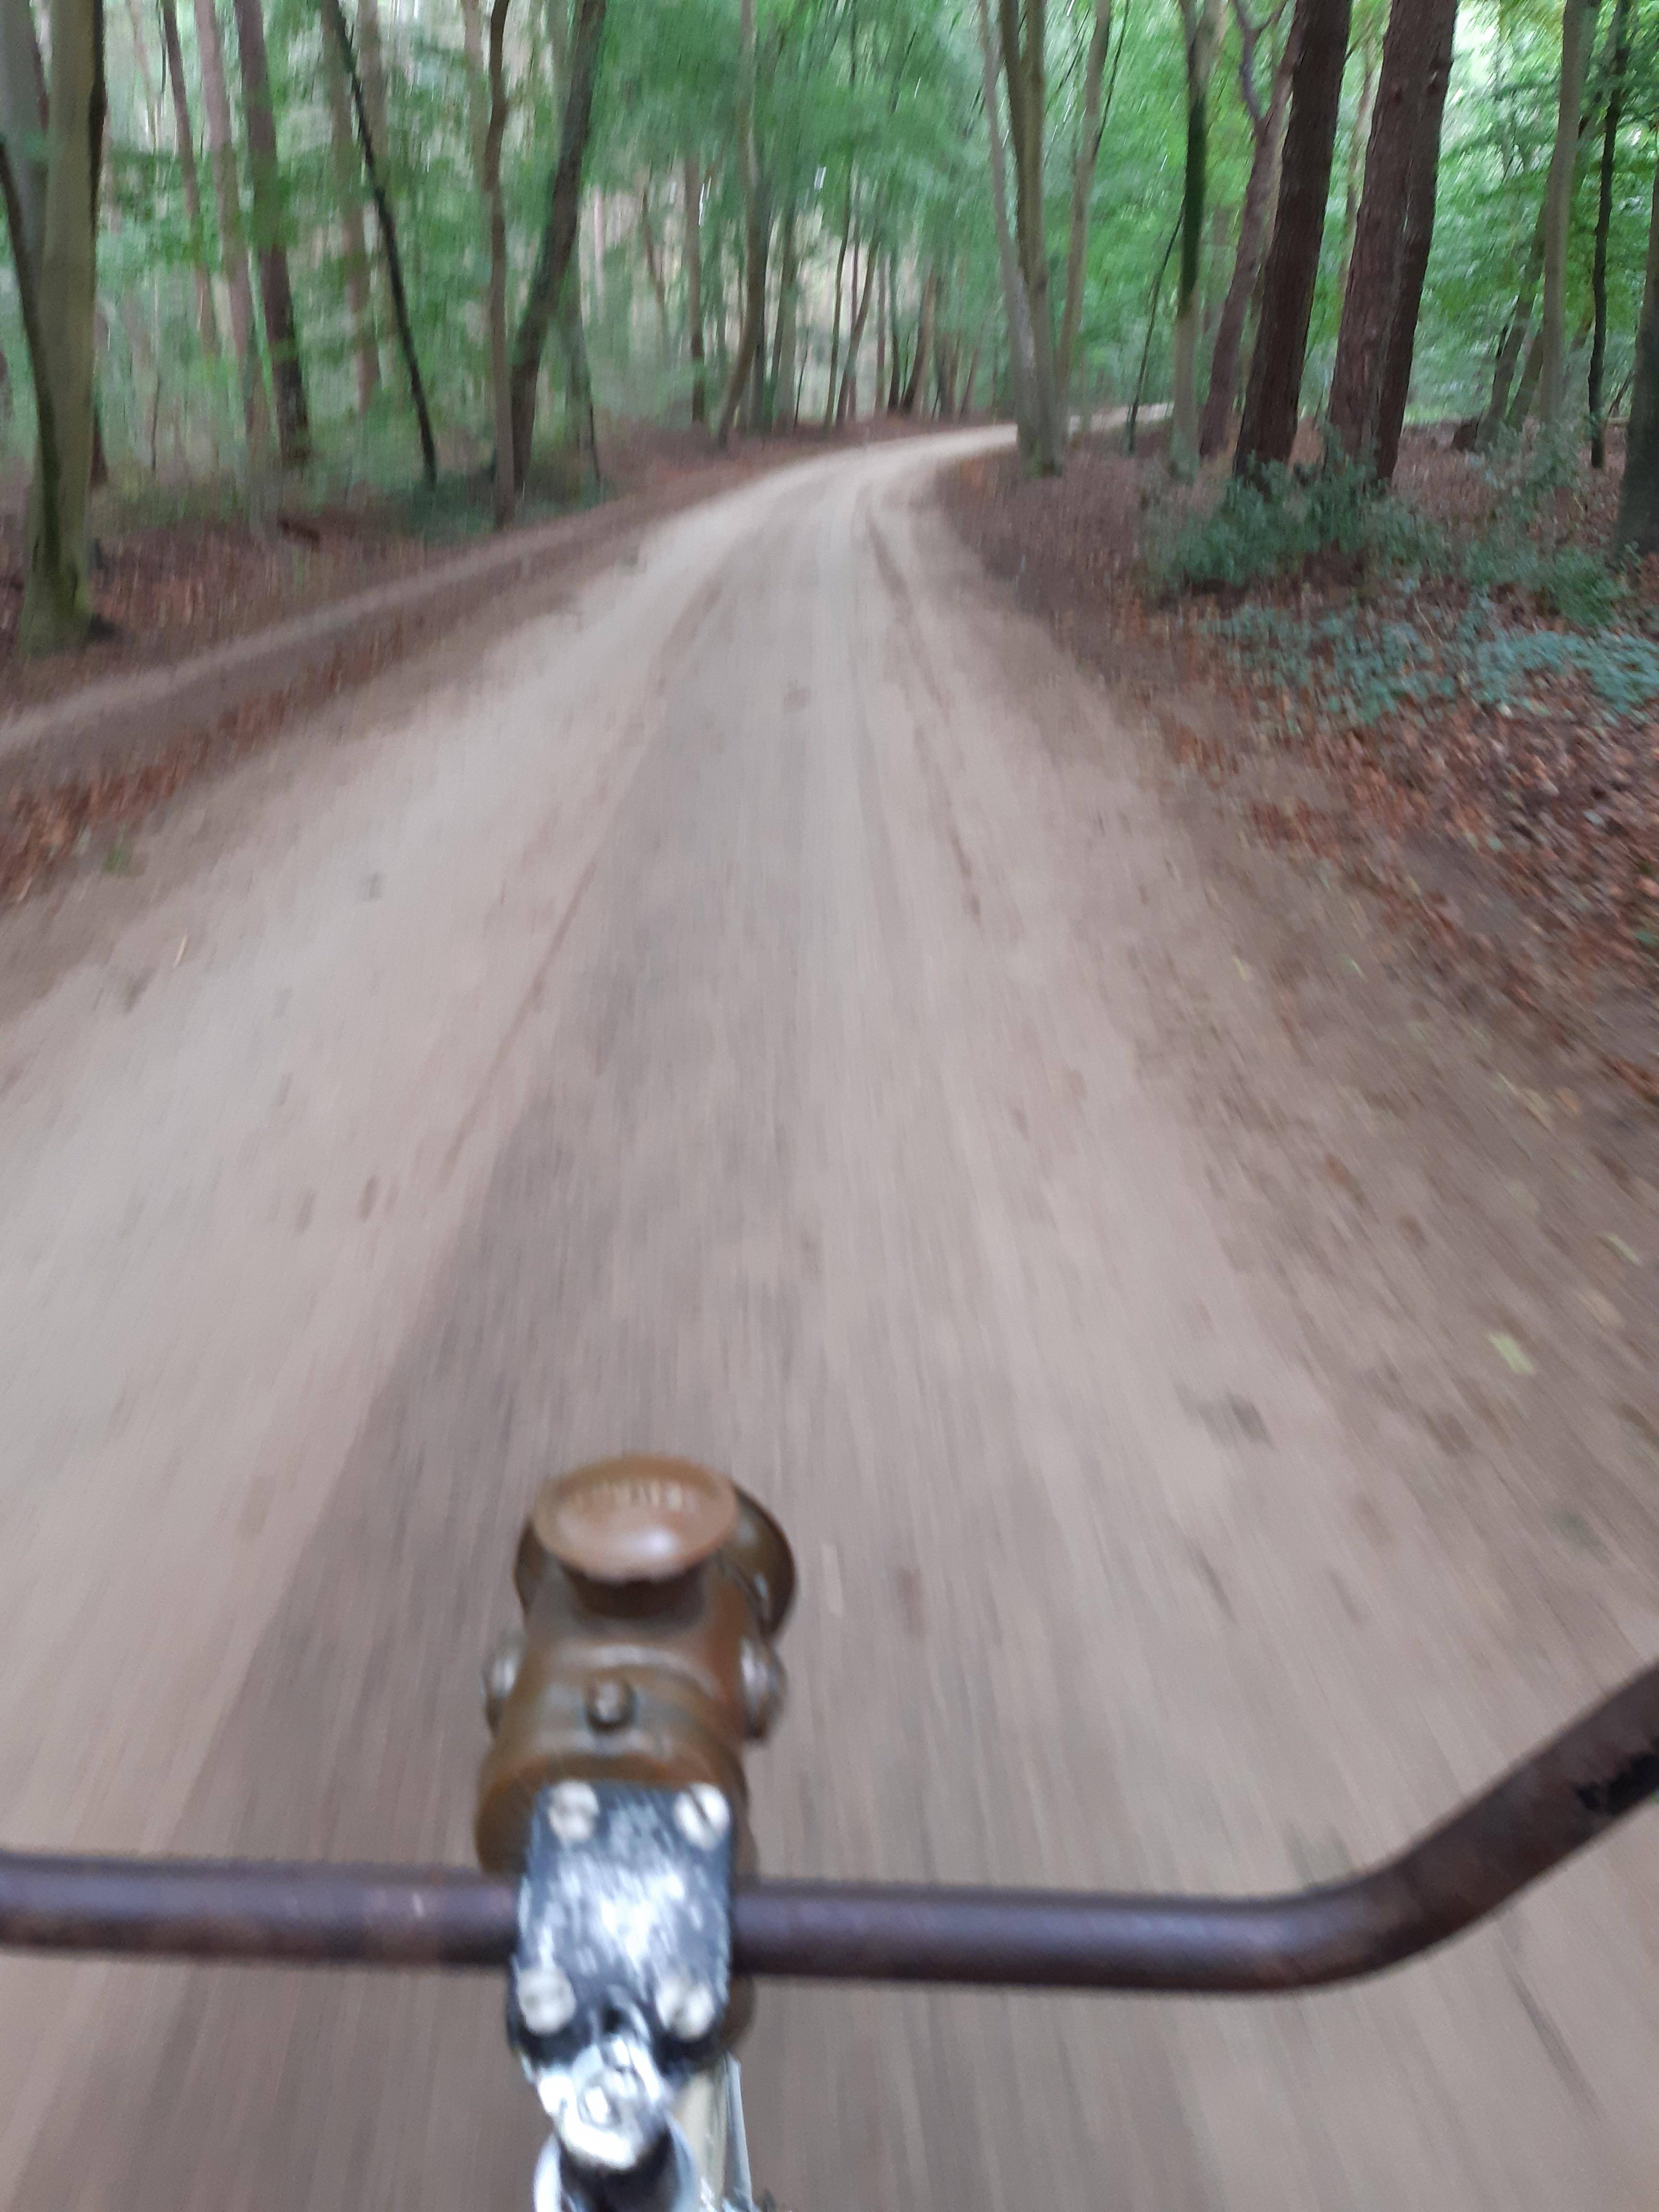
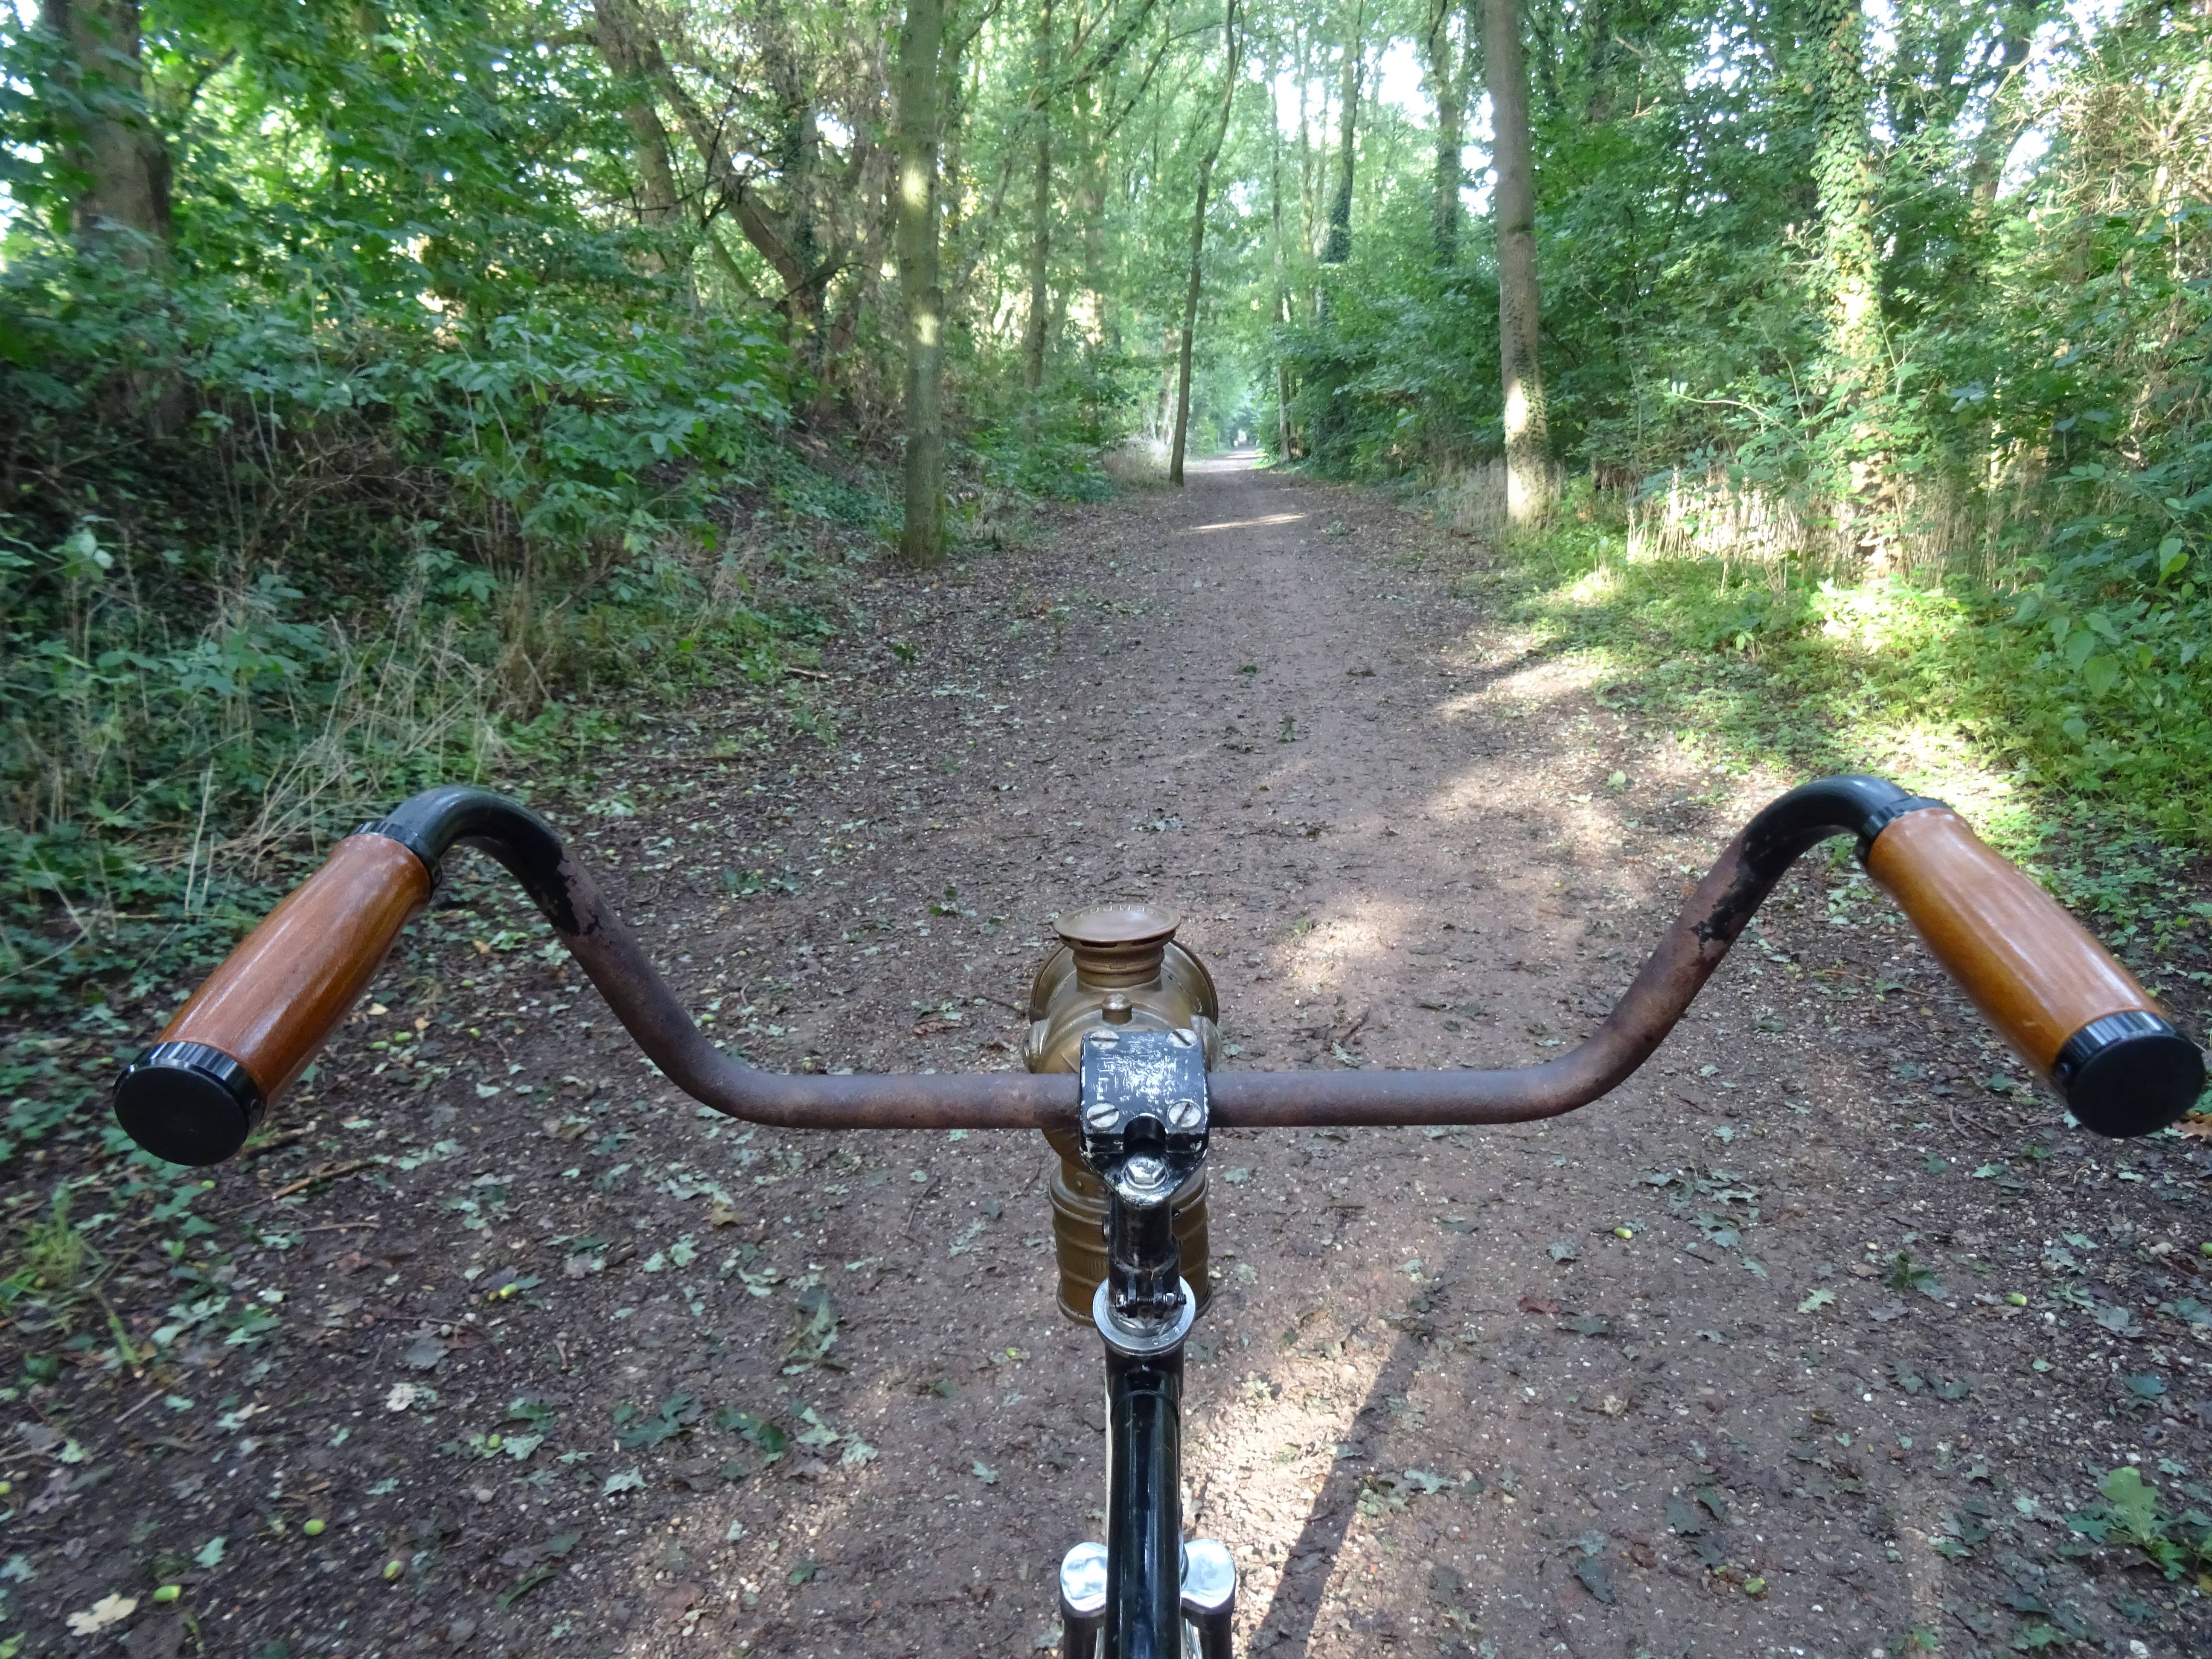
A lot of dirt and forest roads!
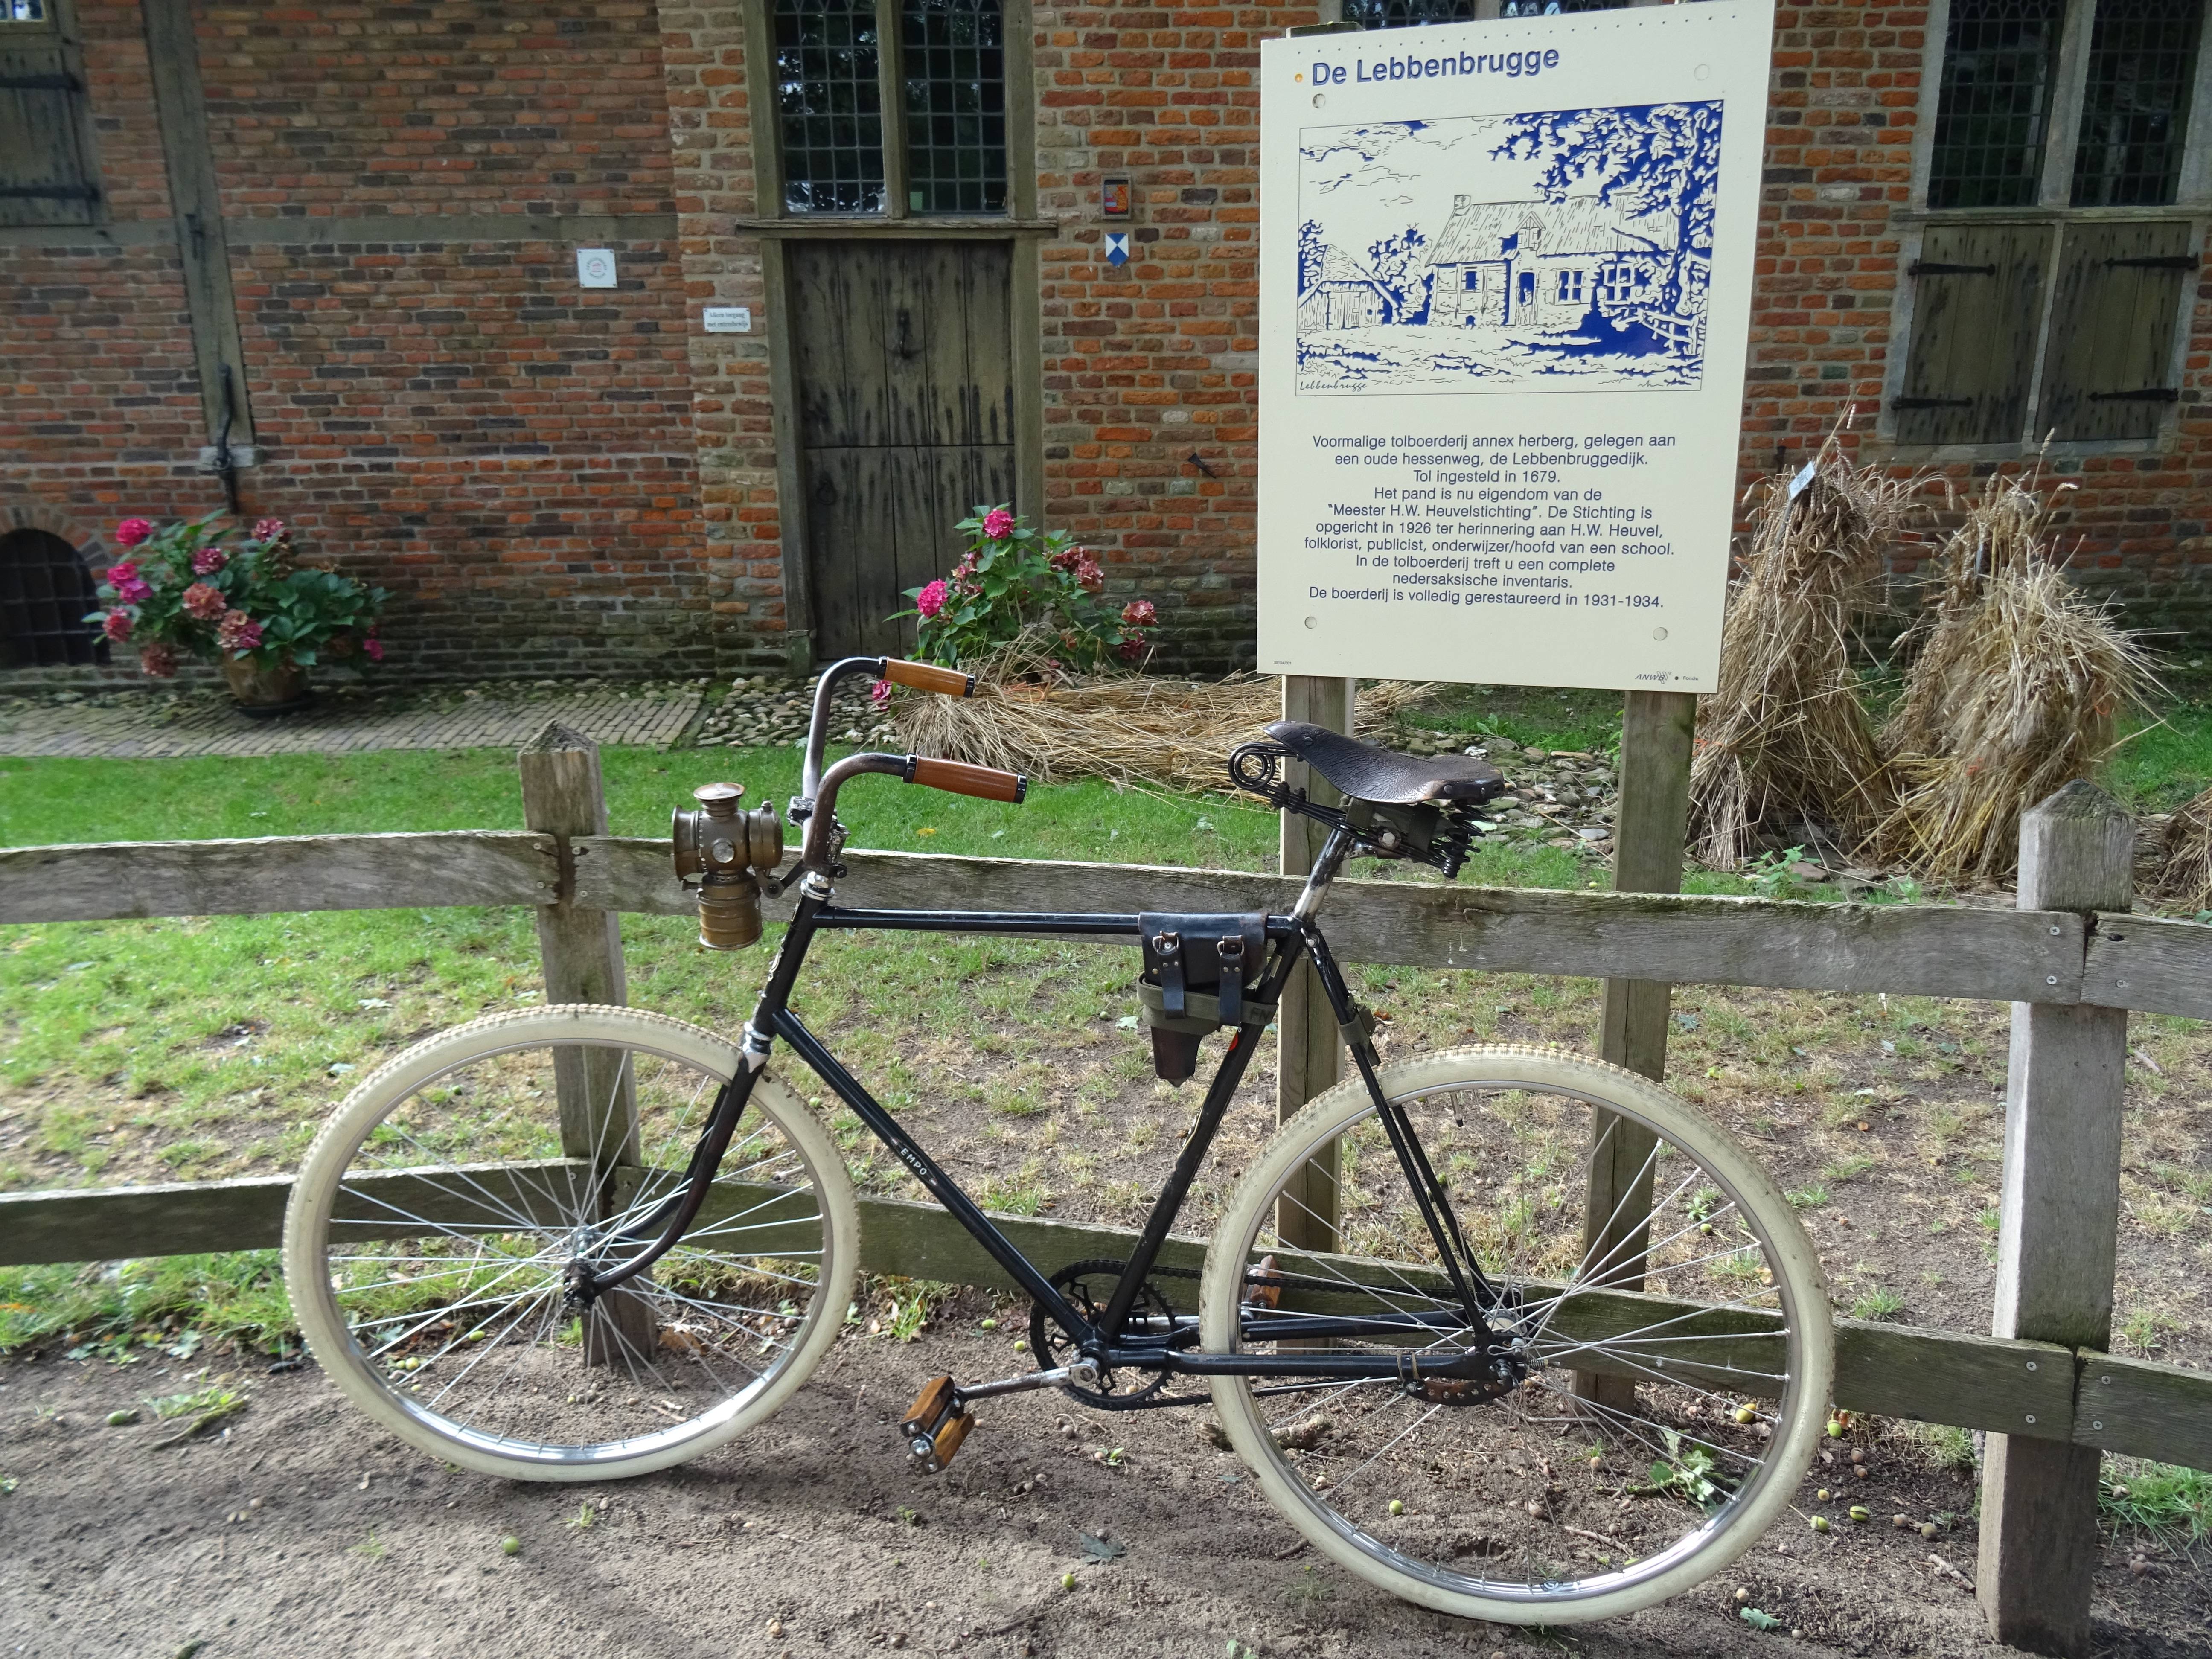
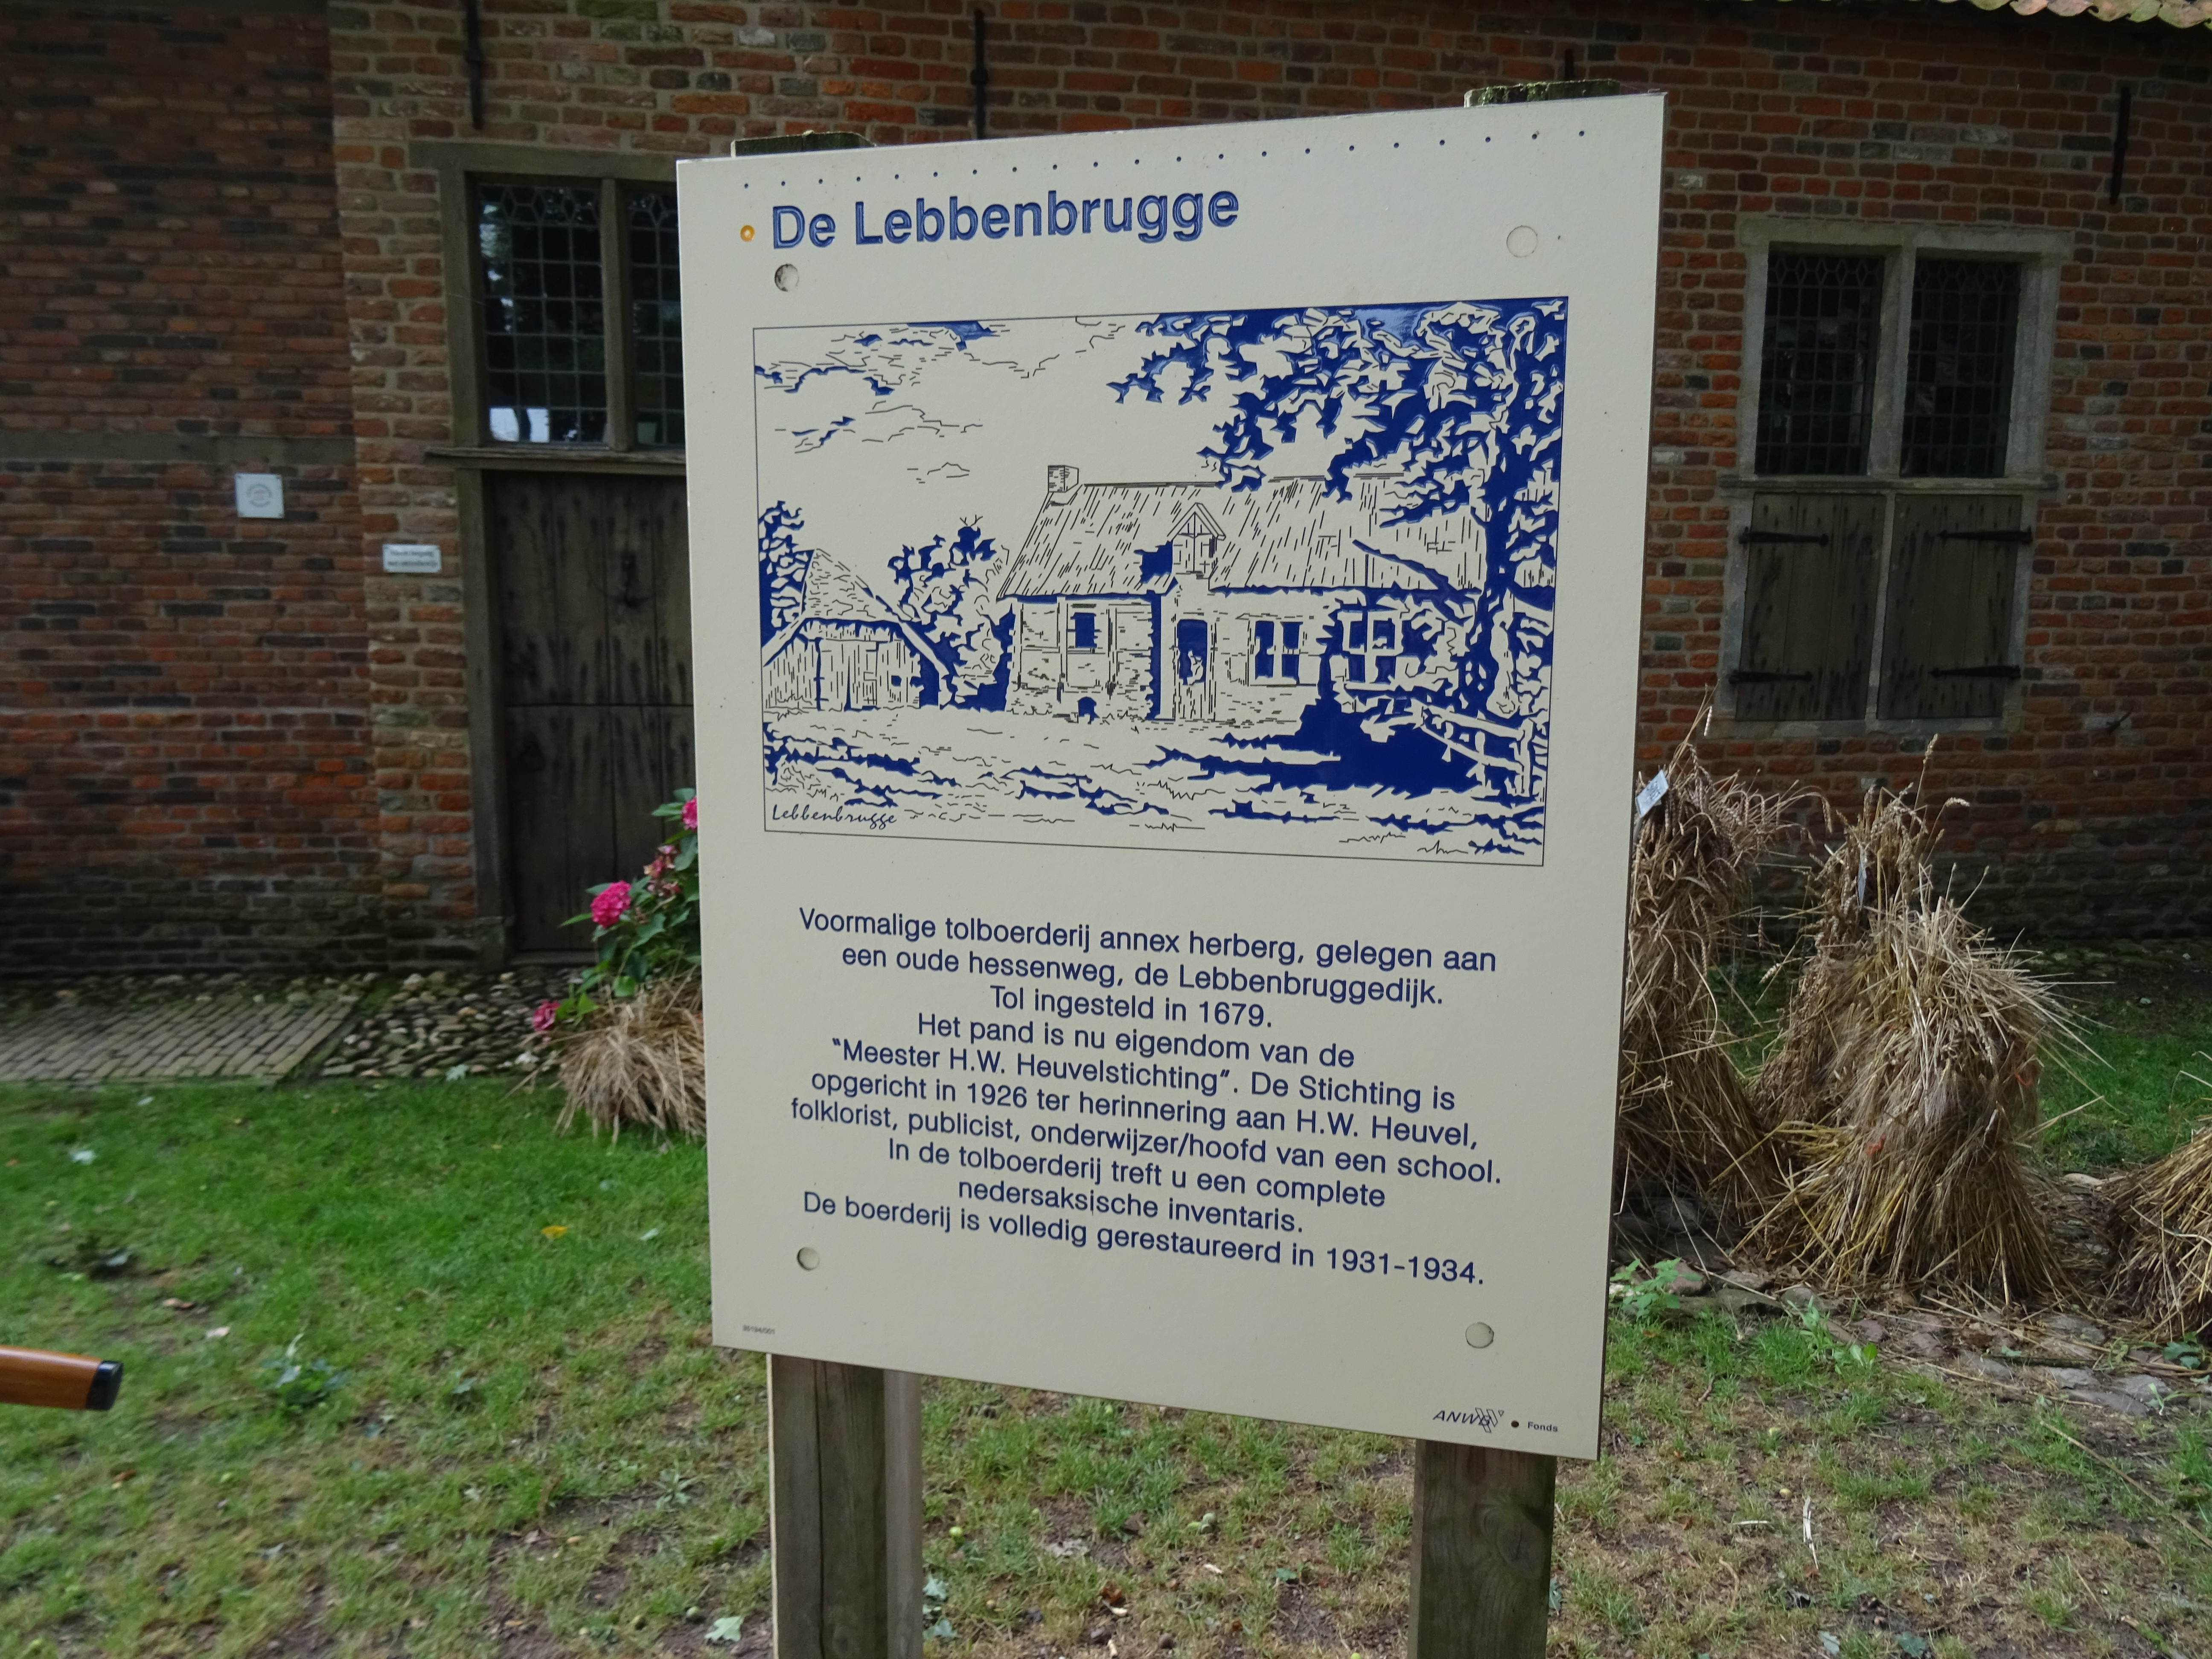
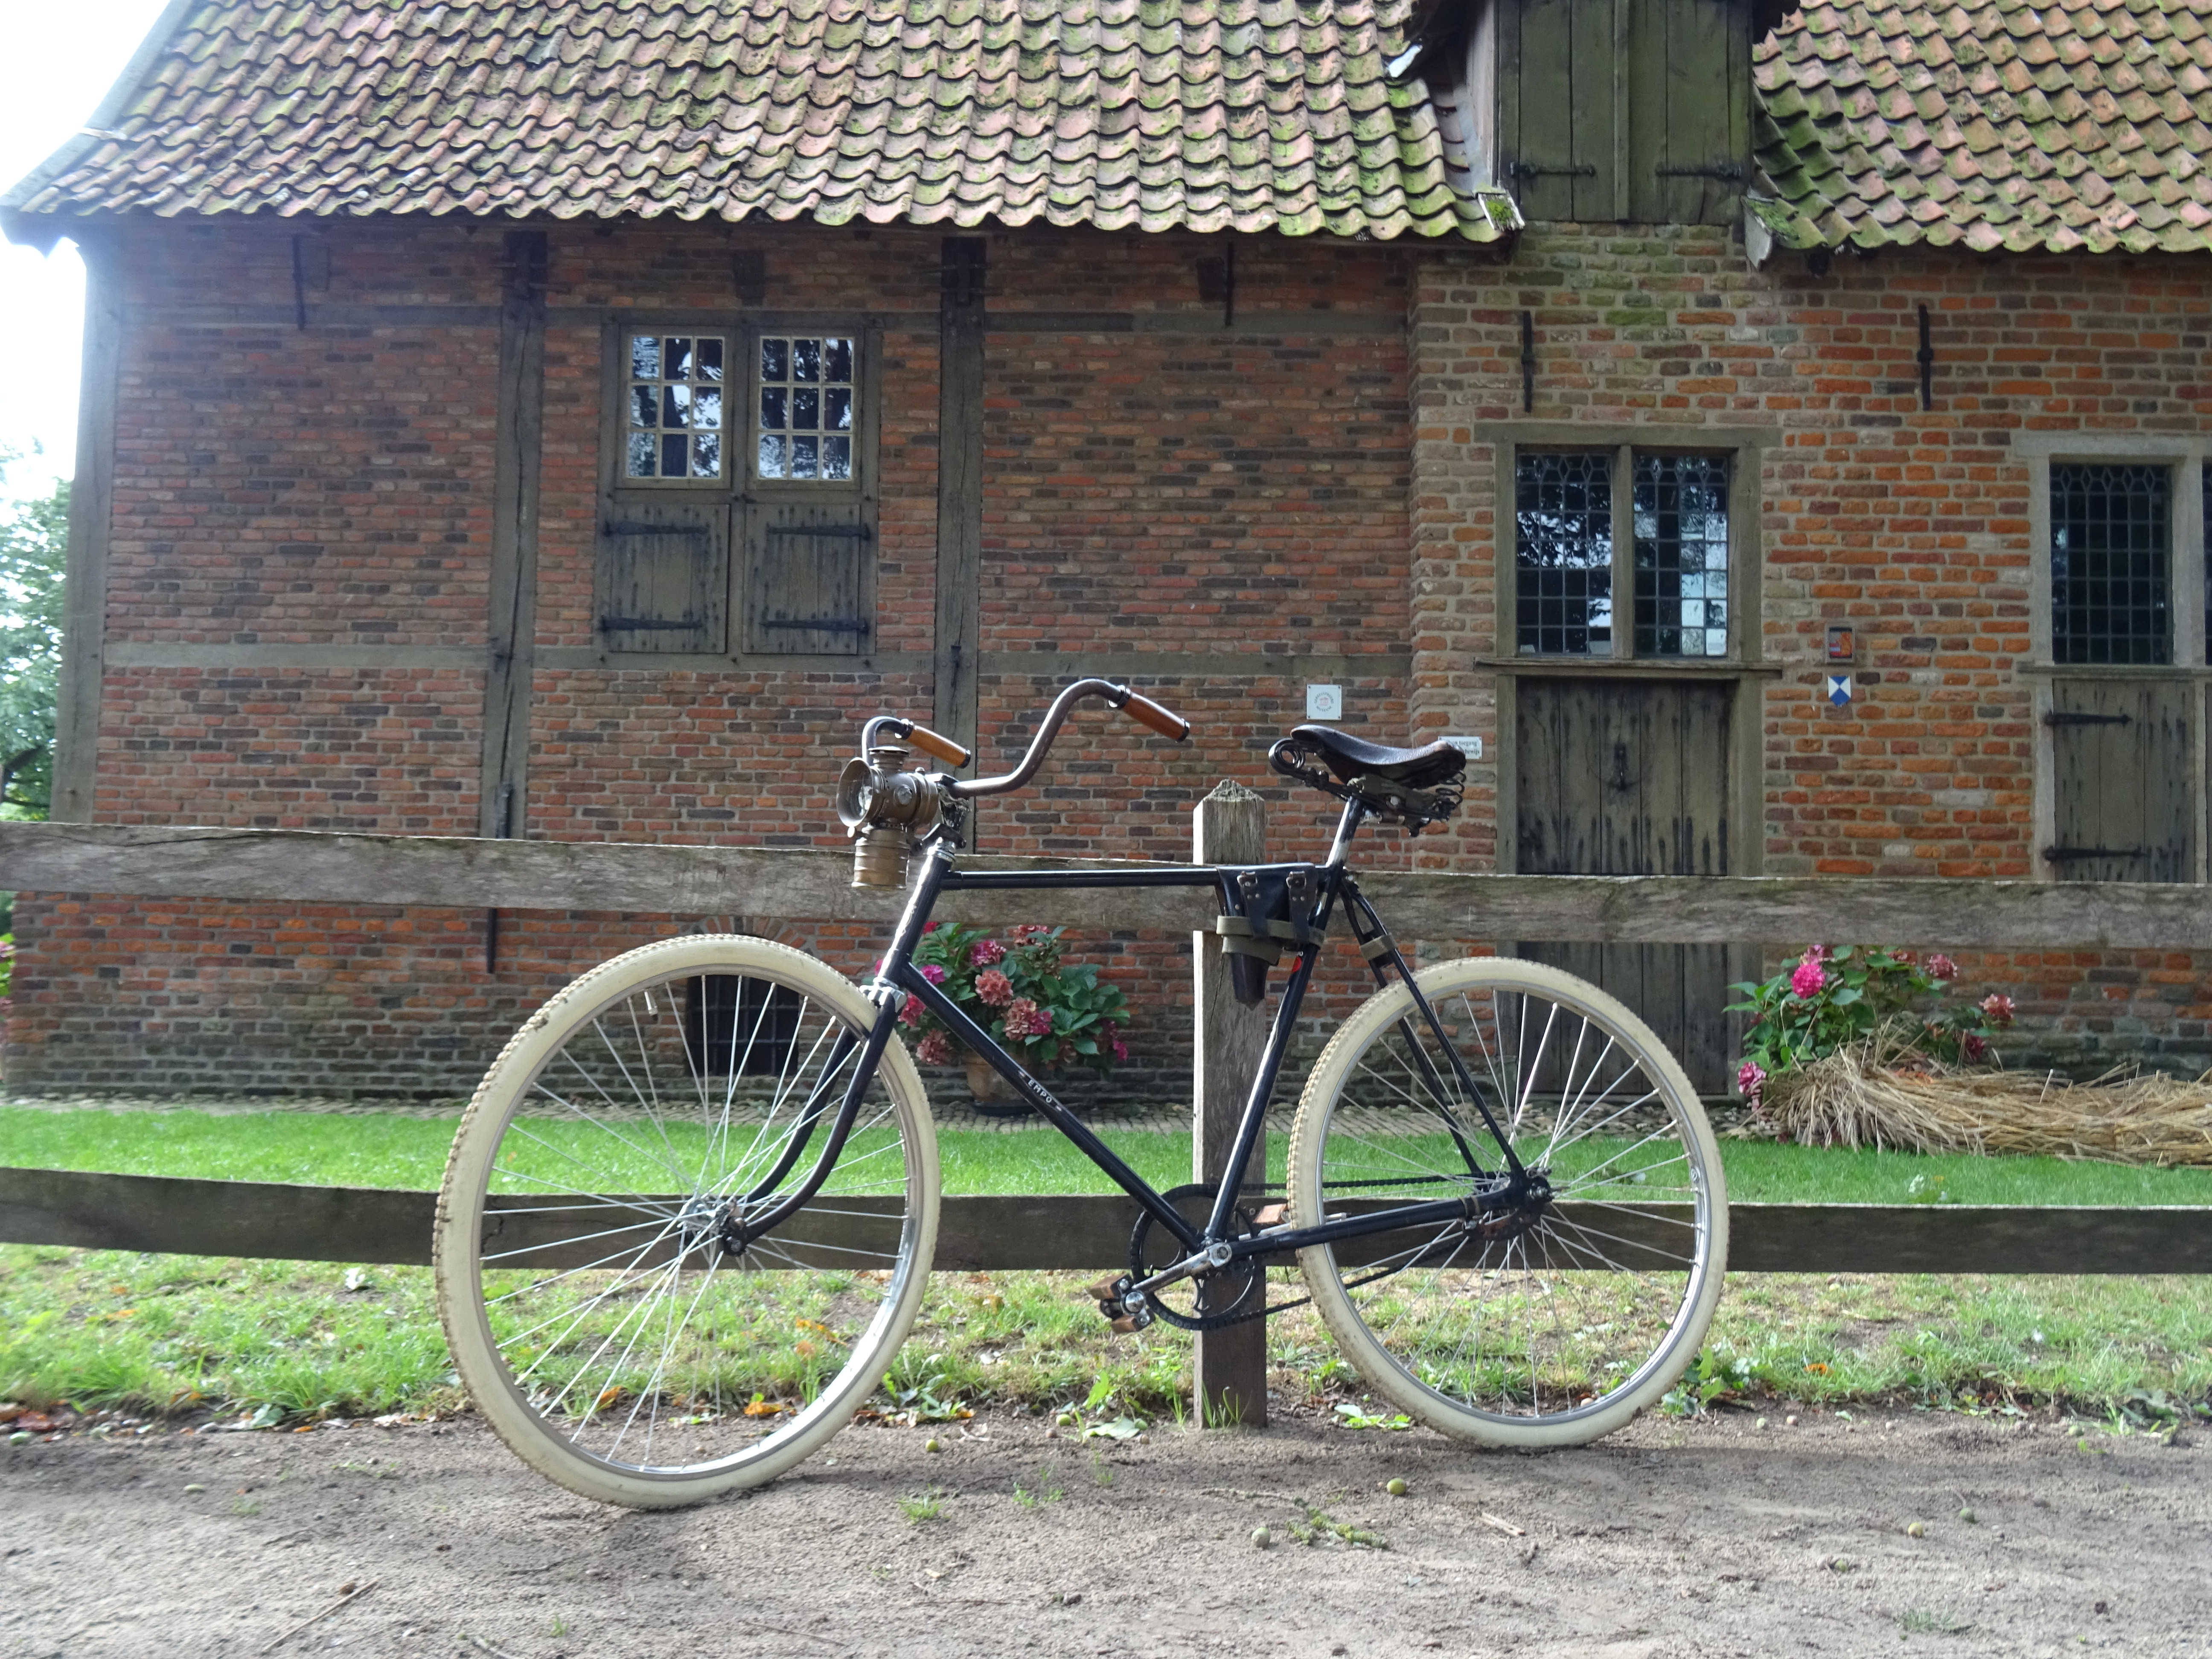
Old farm and inn from 1679.
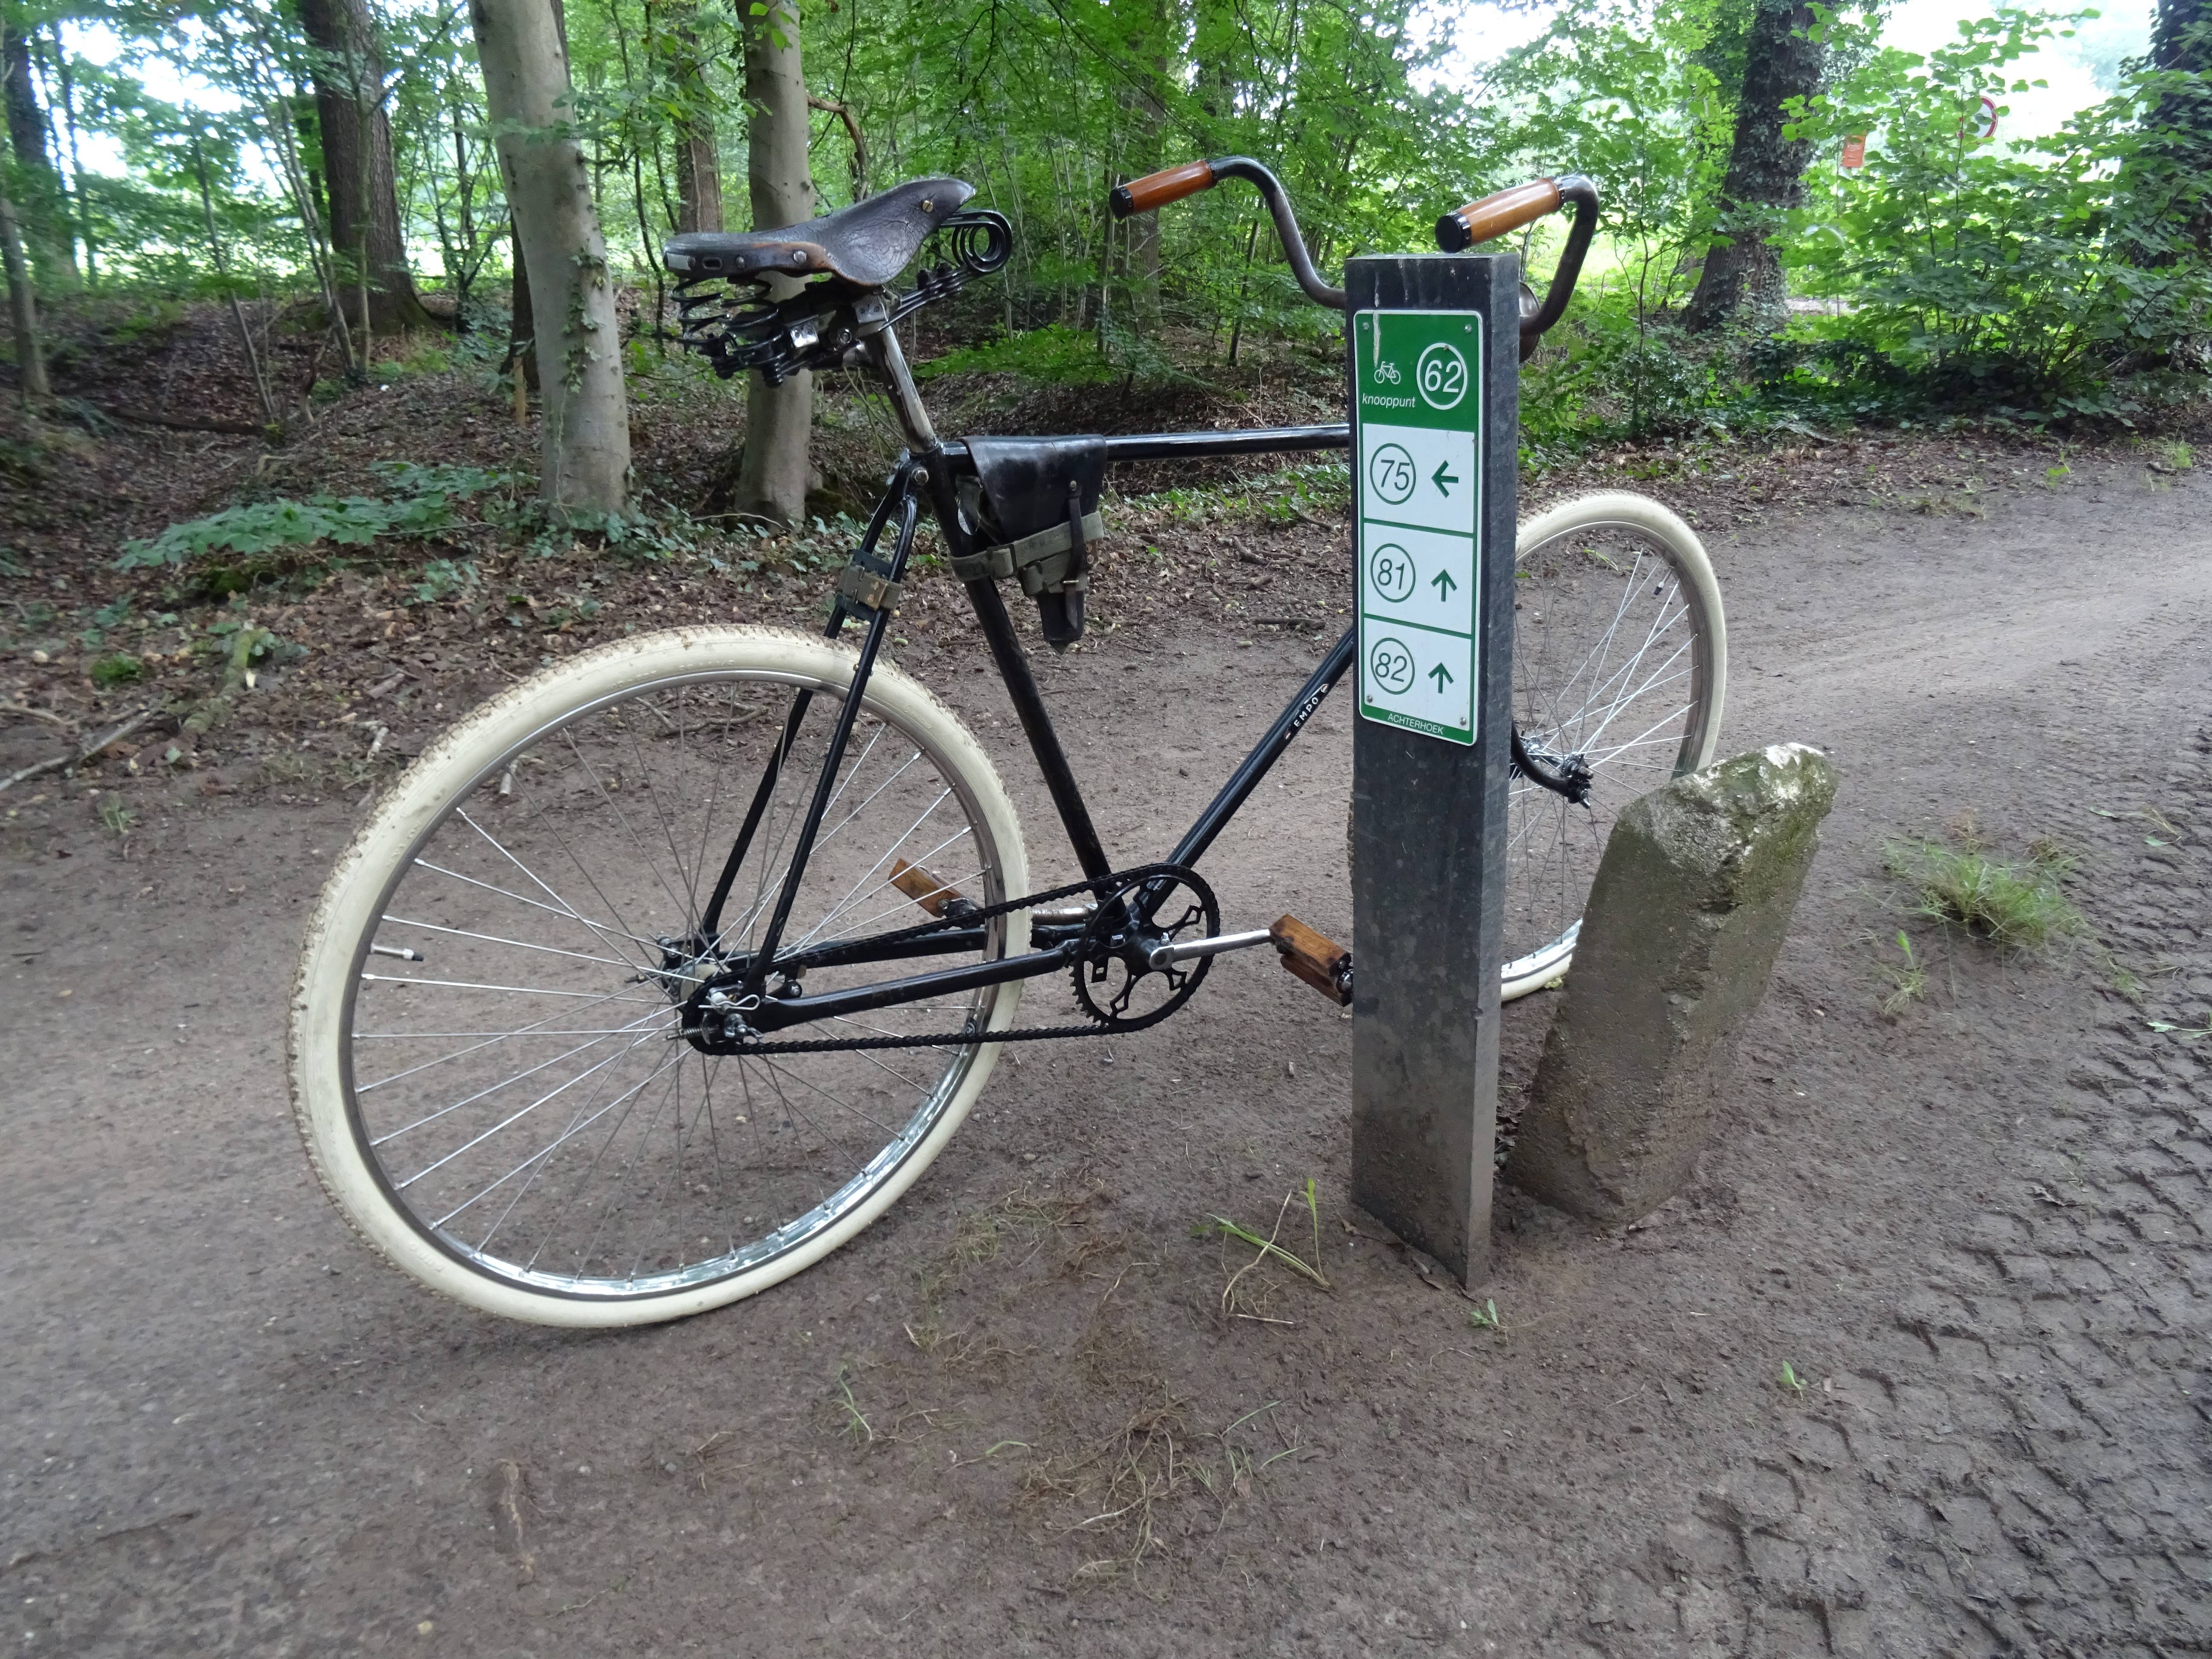
Junction number 62 near the Farm.
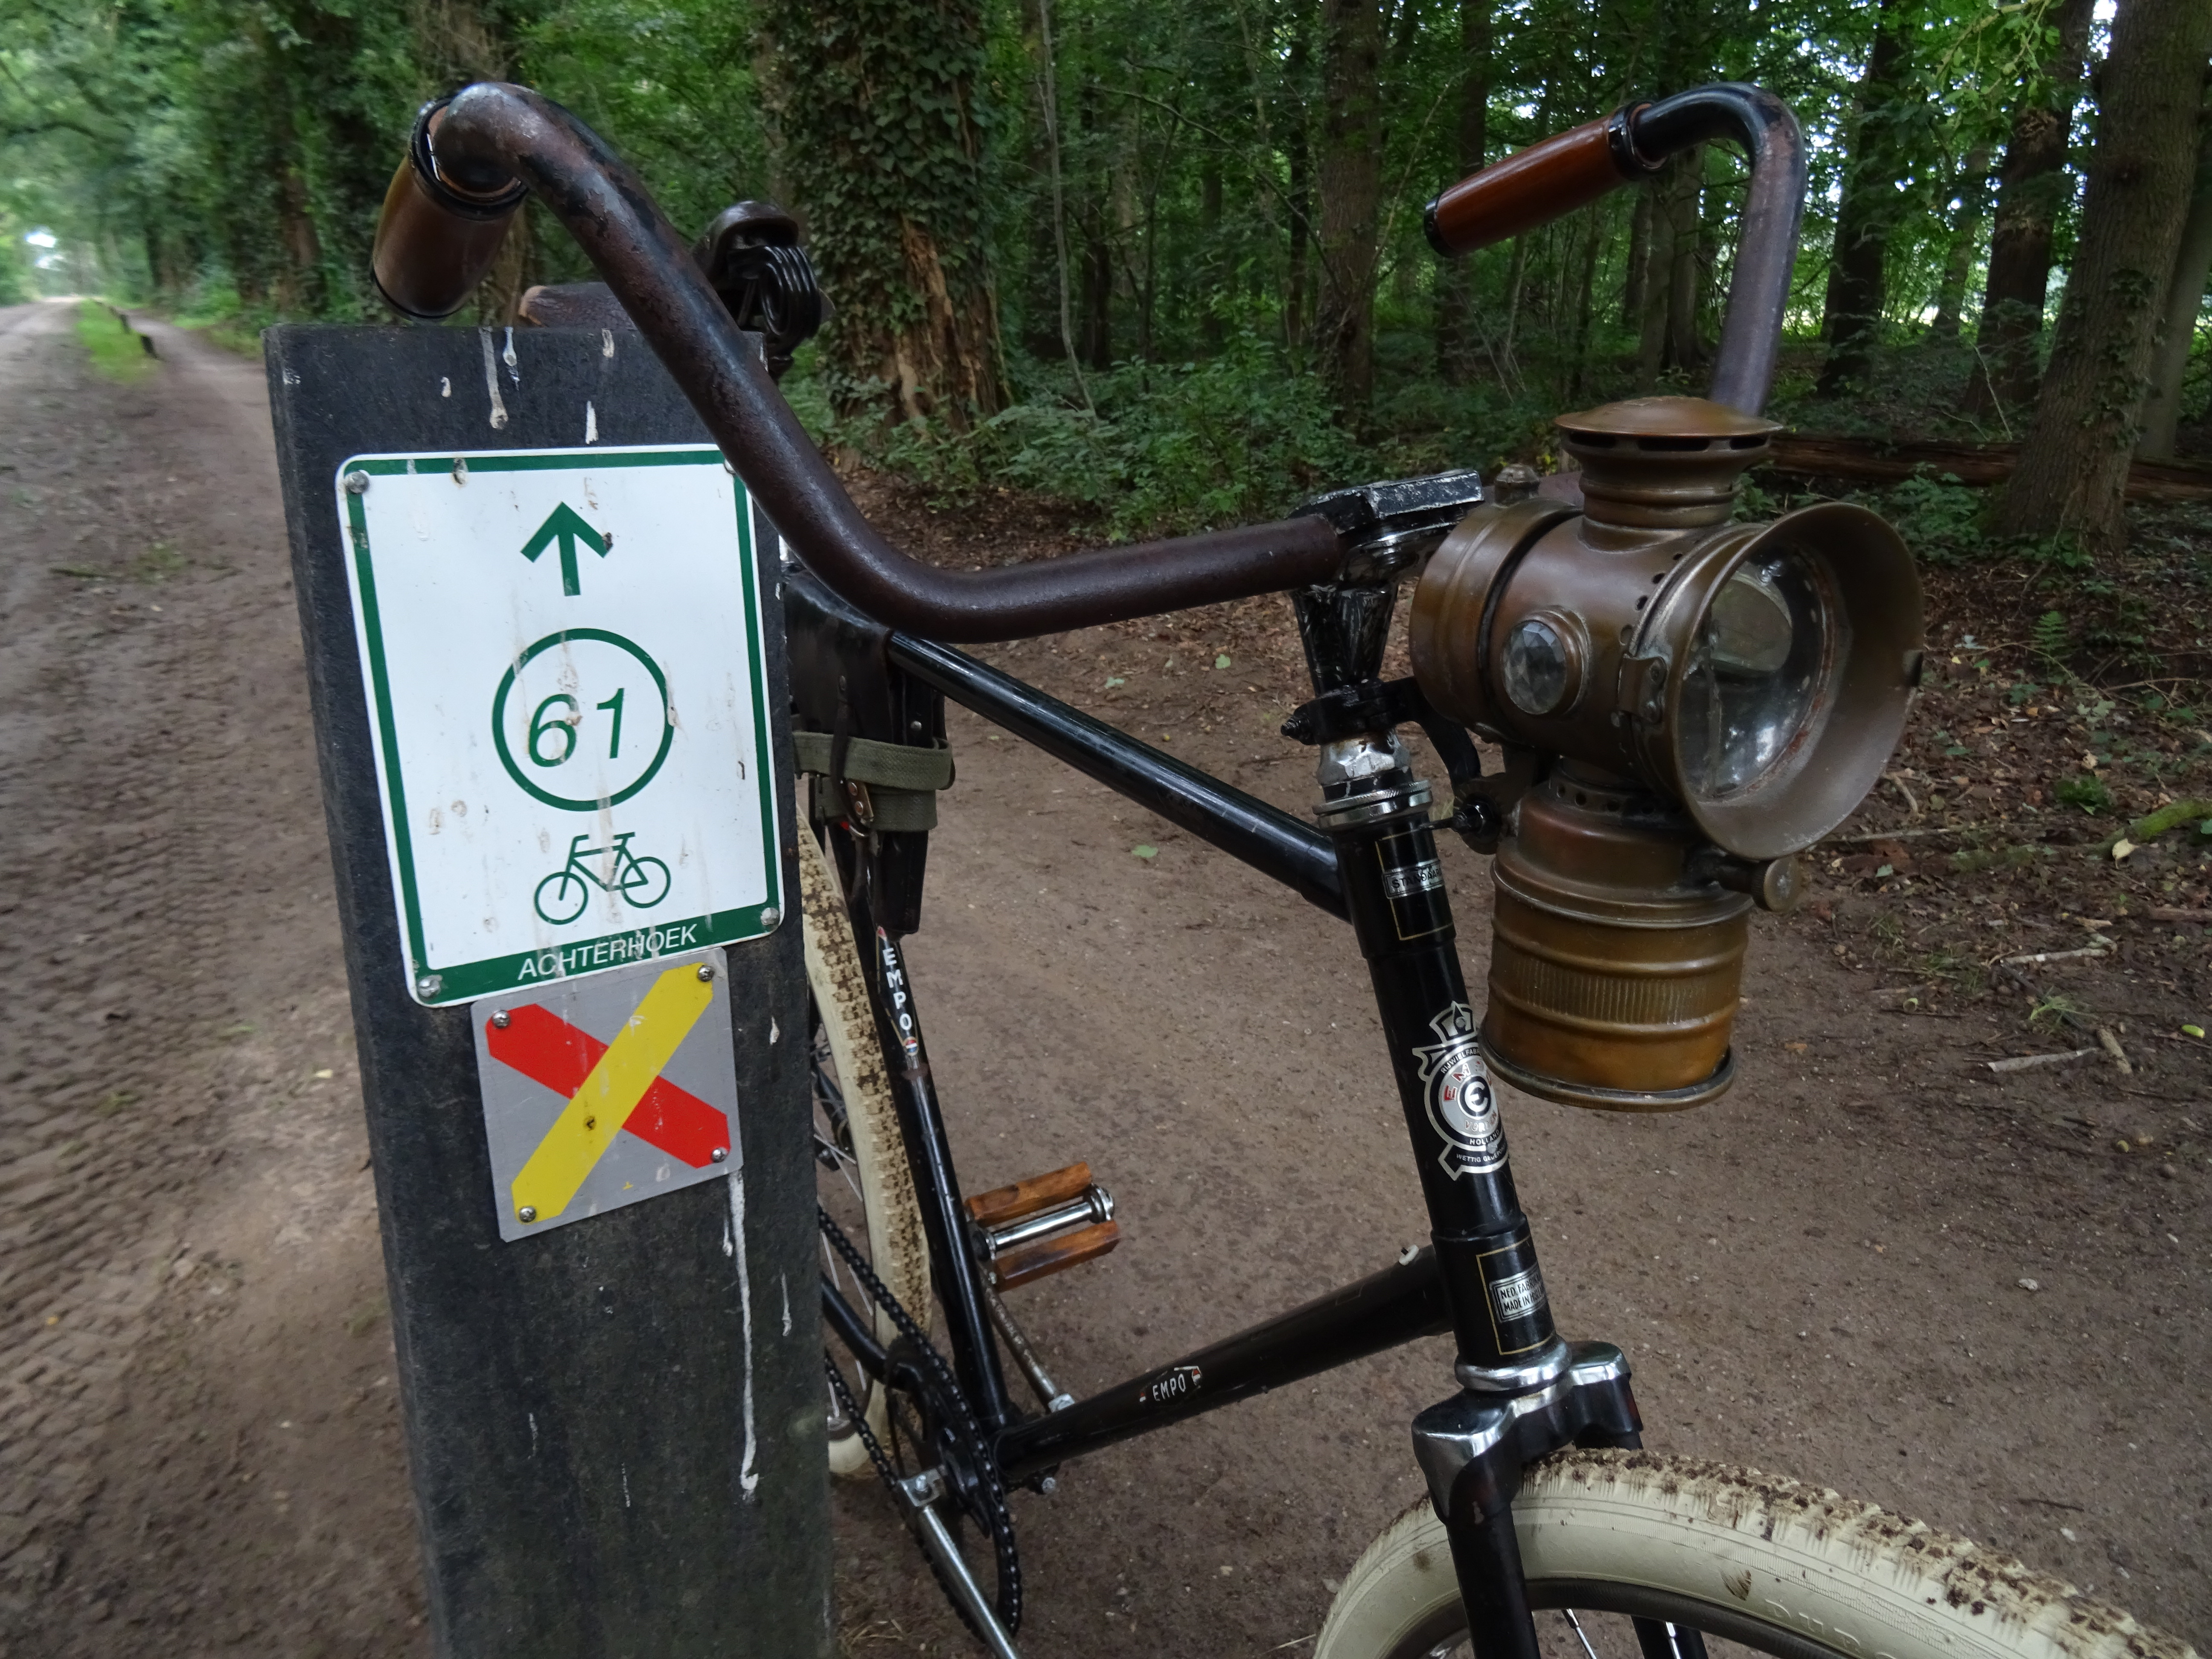
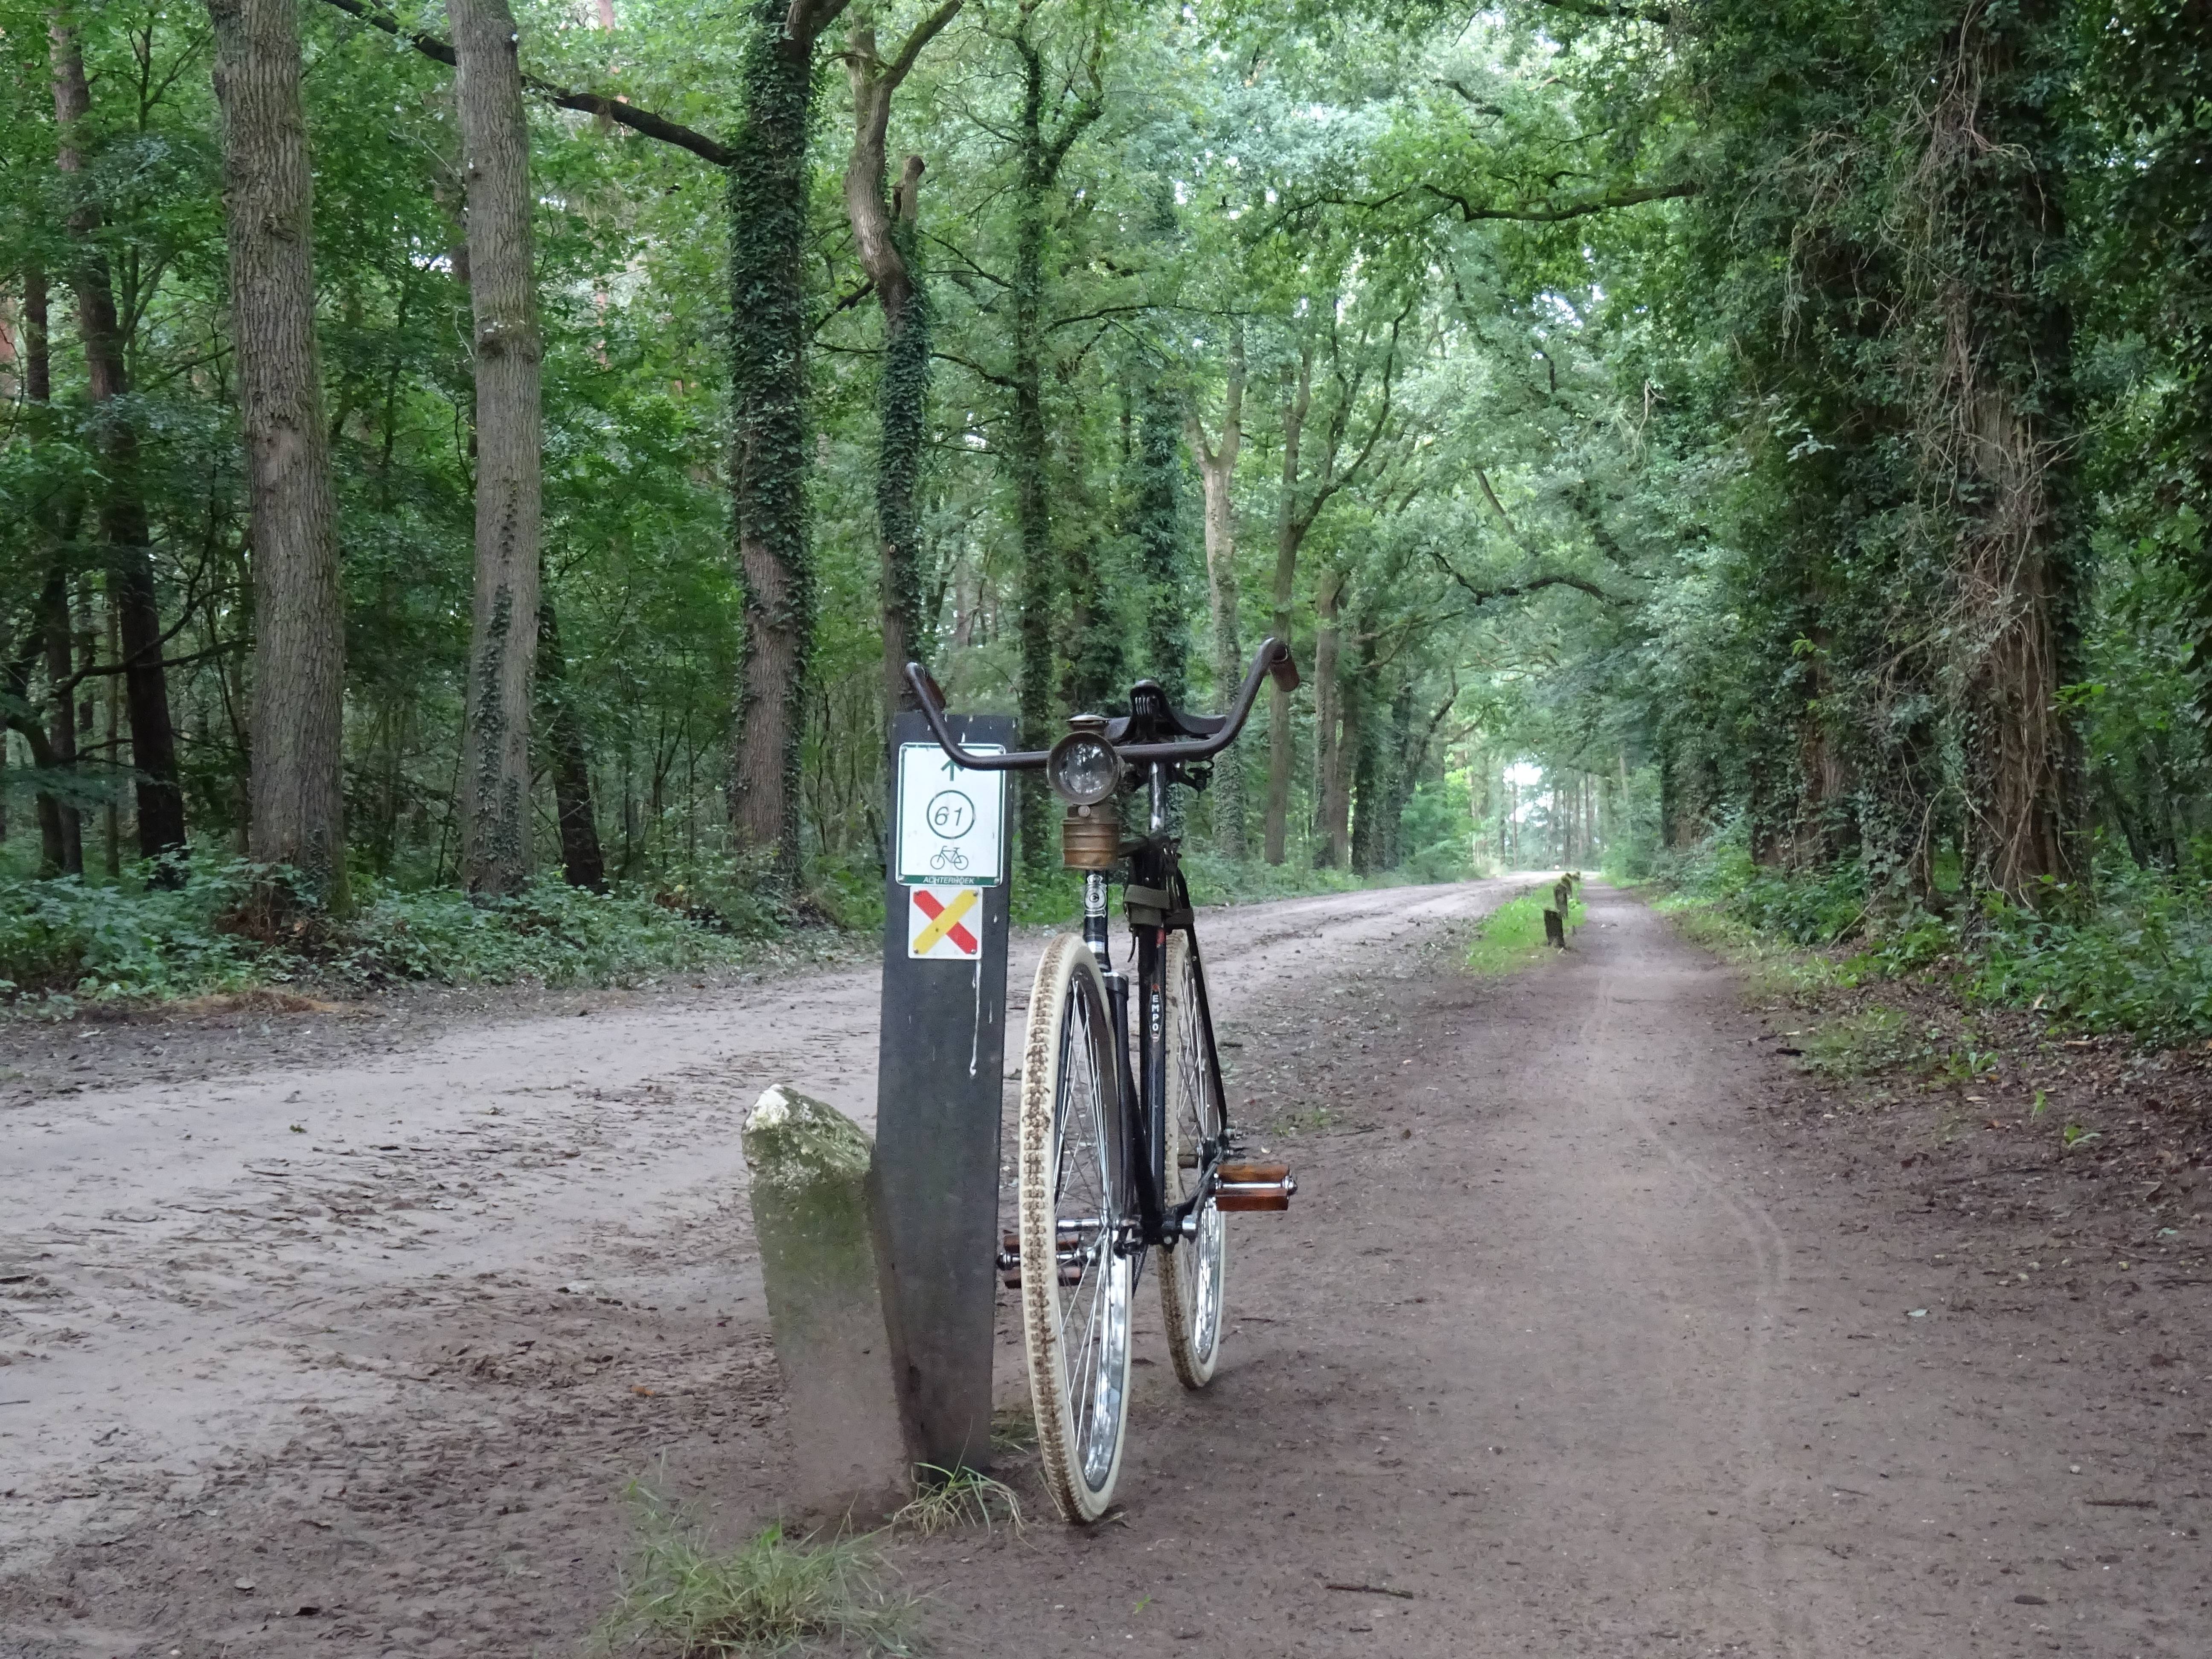
Junction 61 (where I had to go) straight ahead!
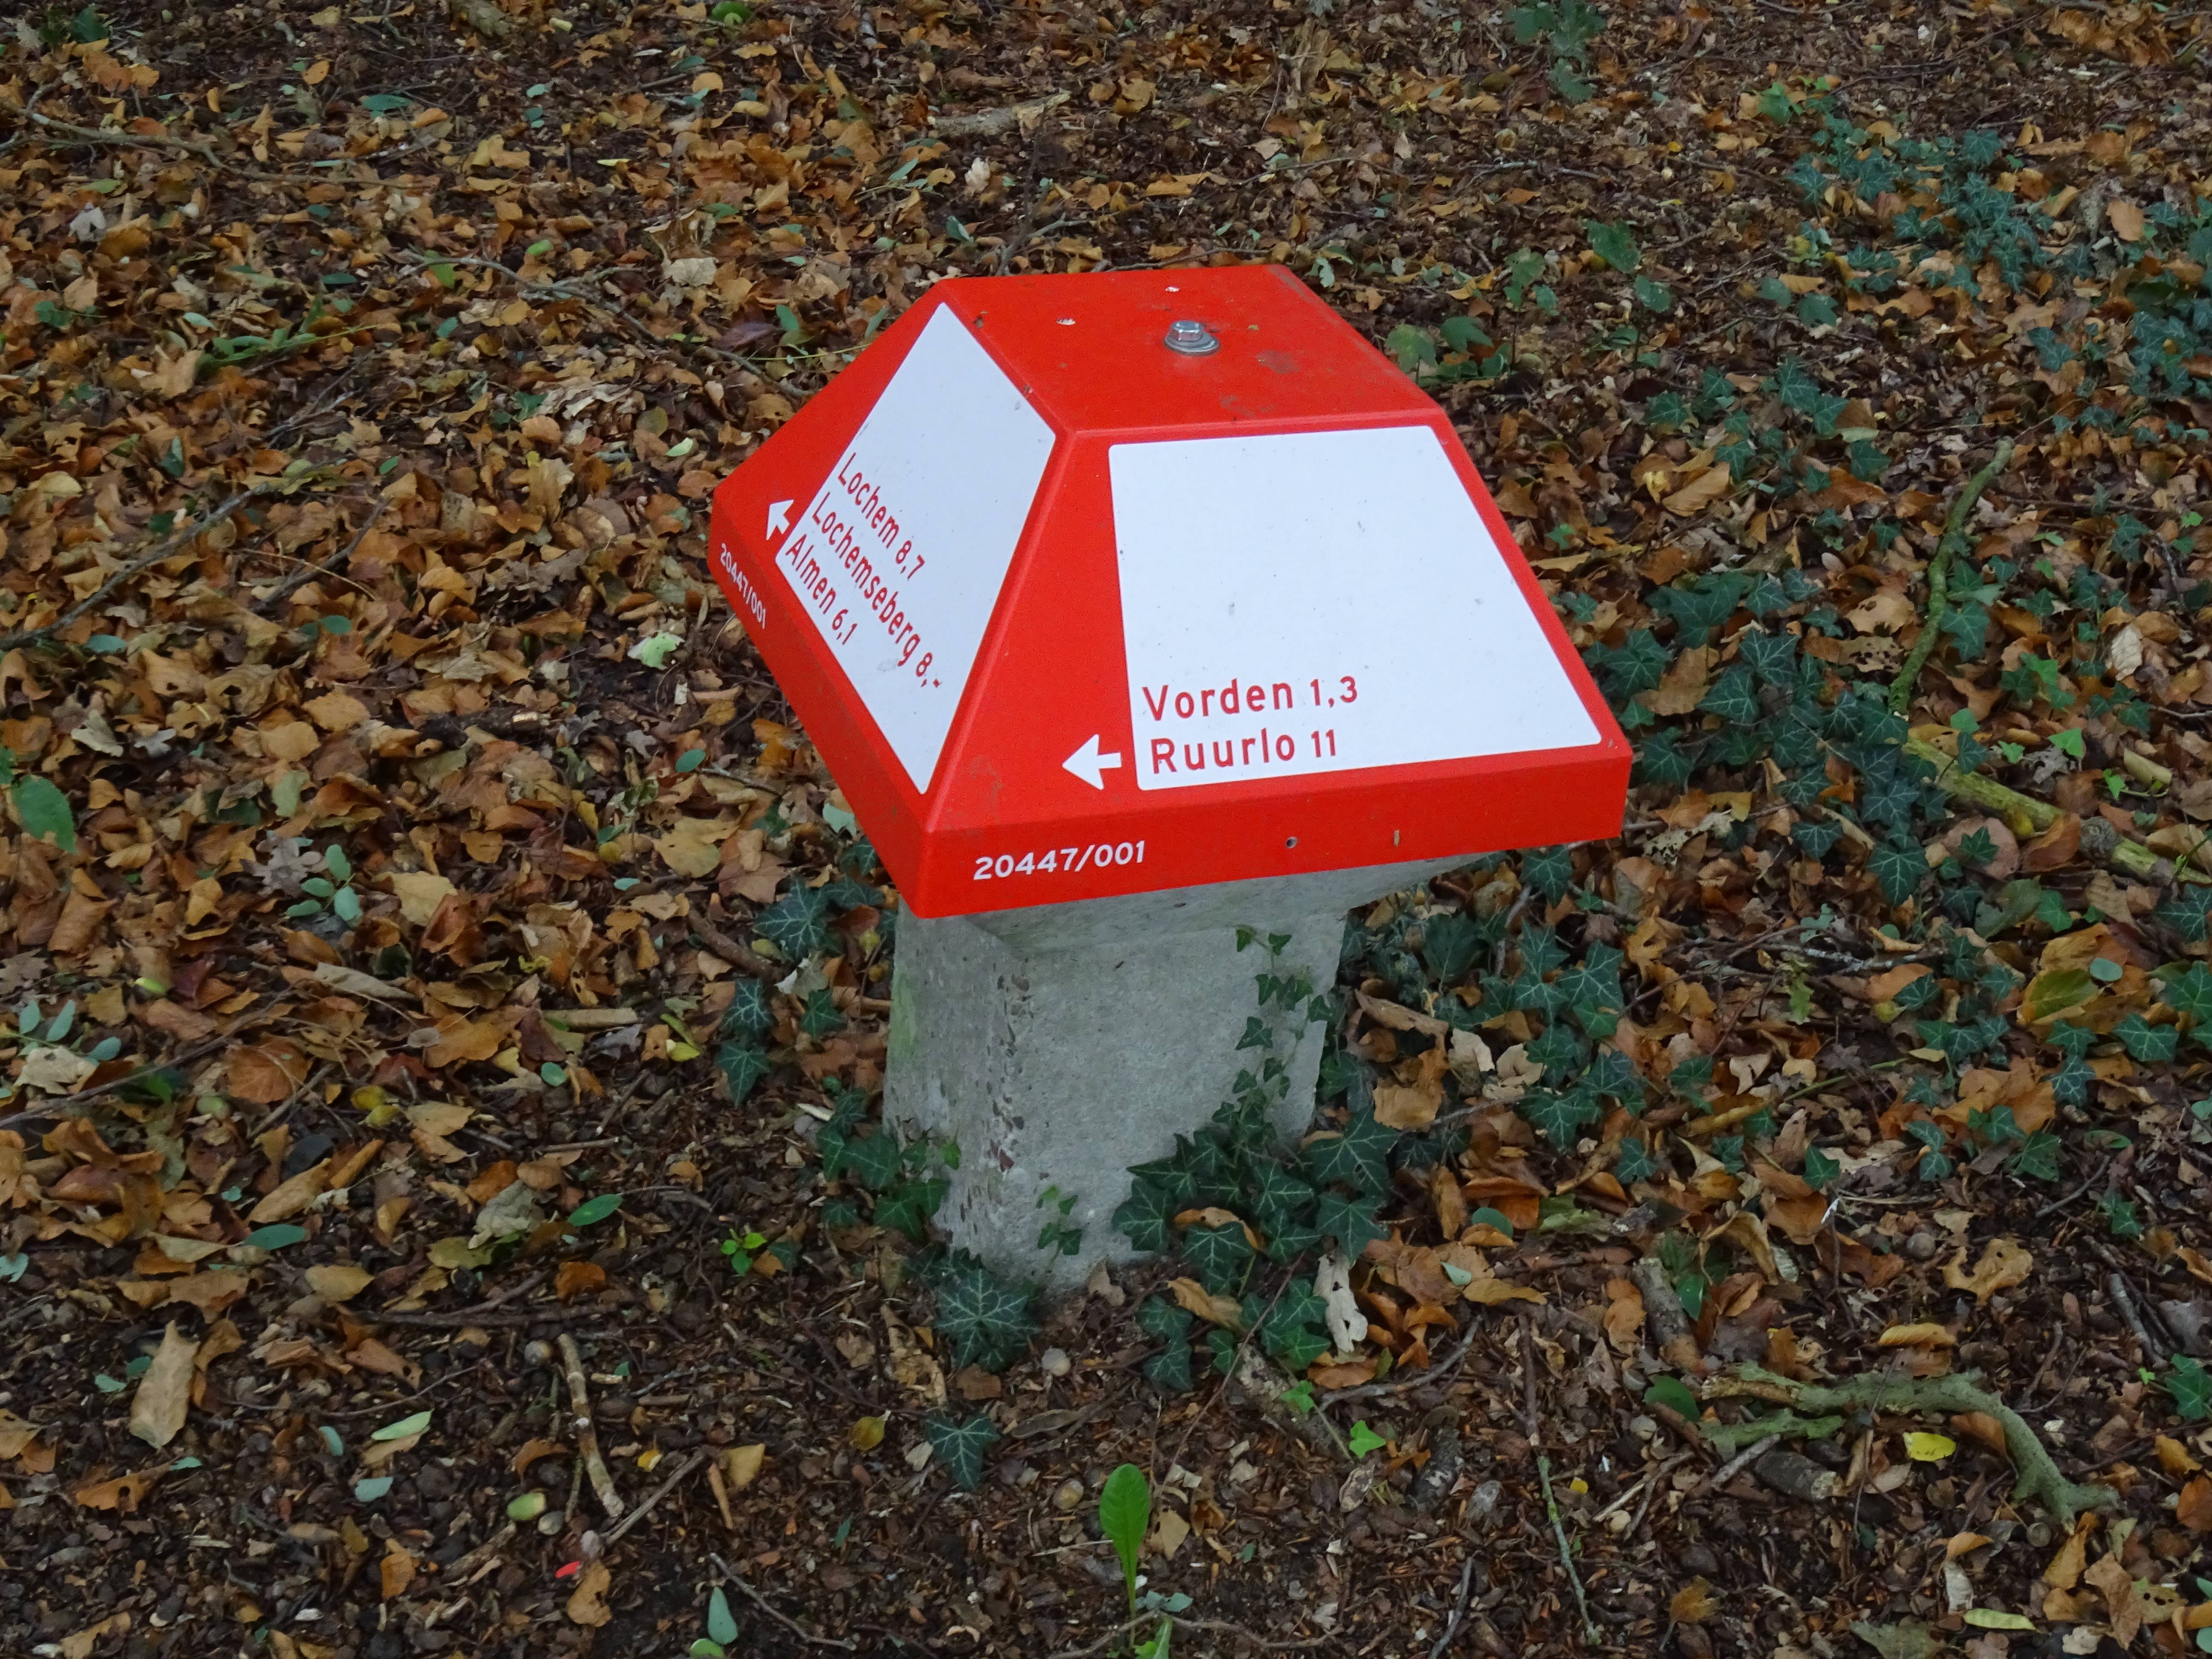
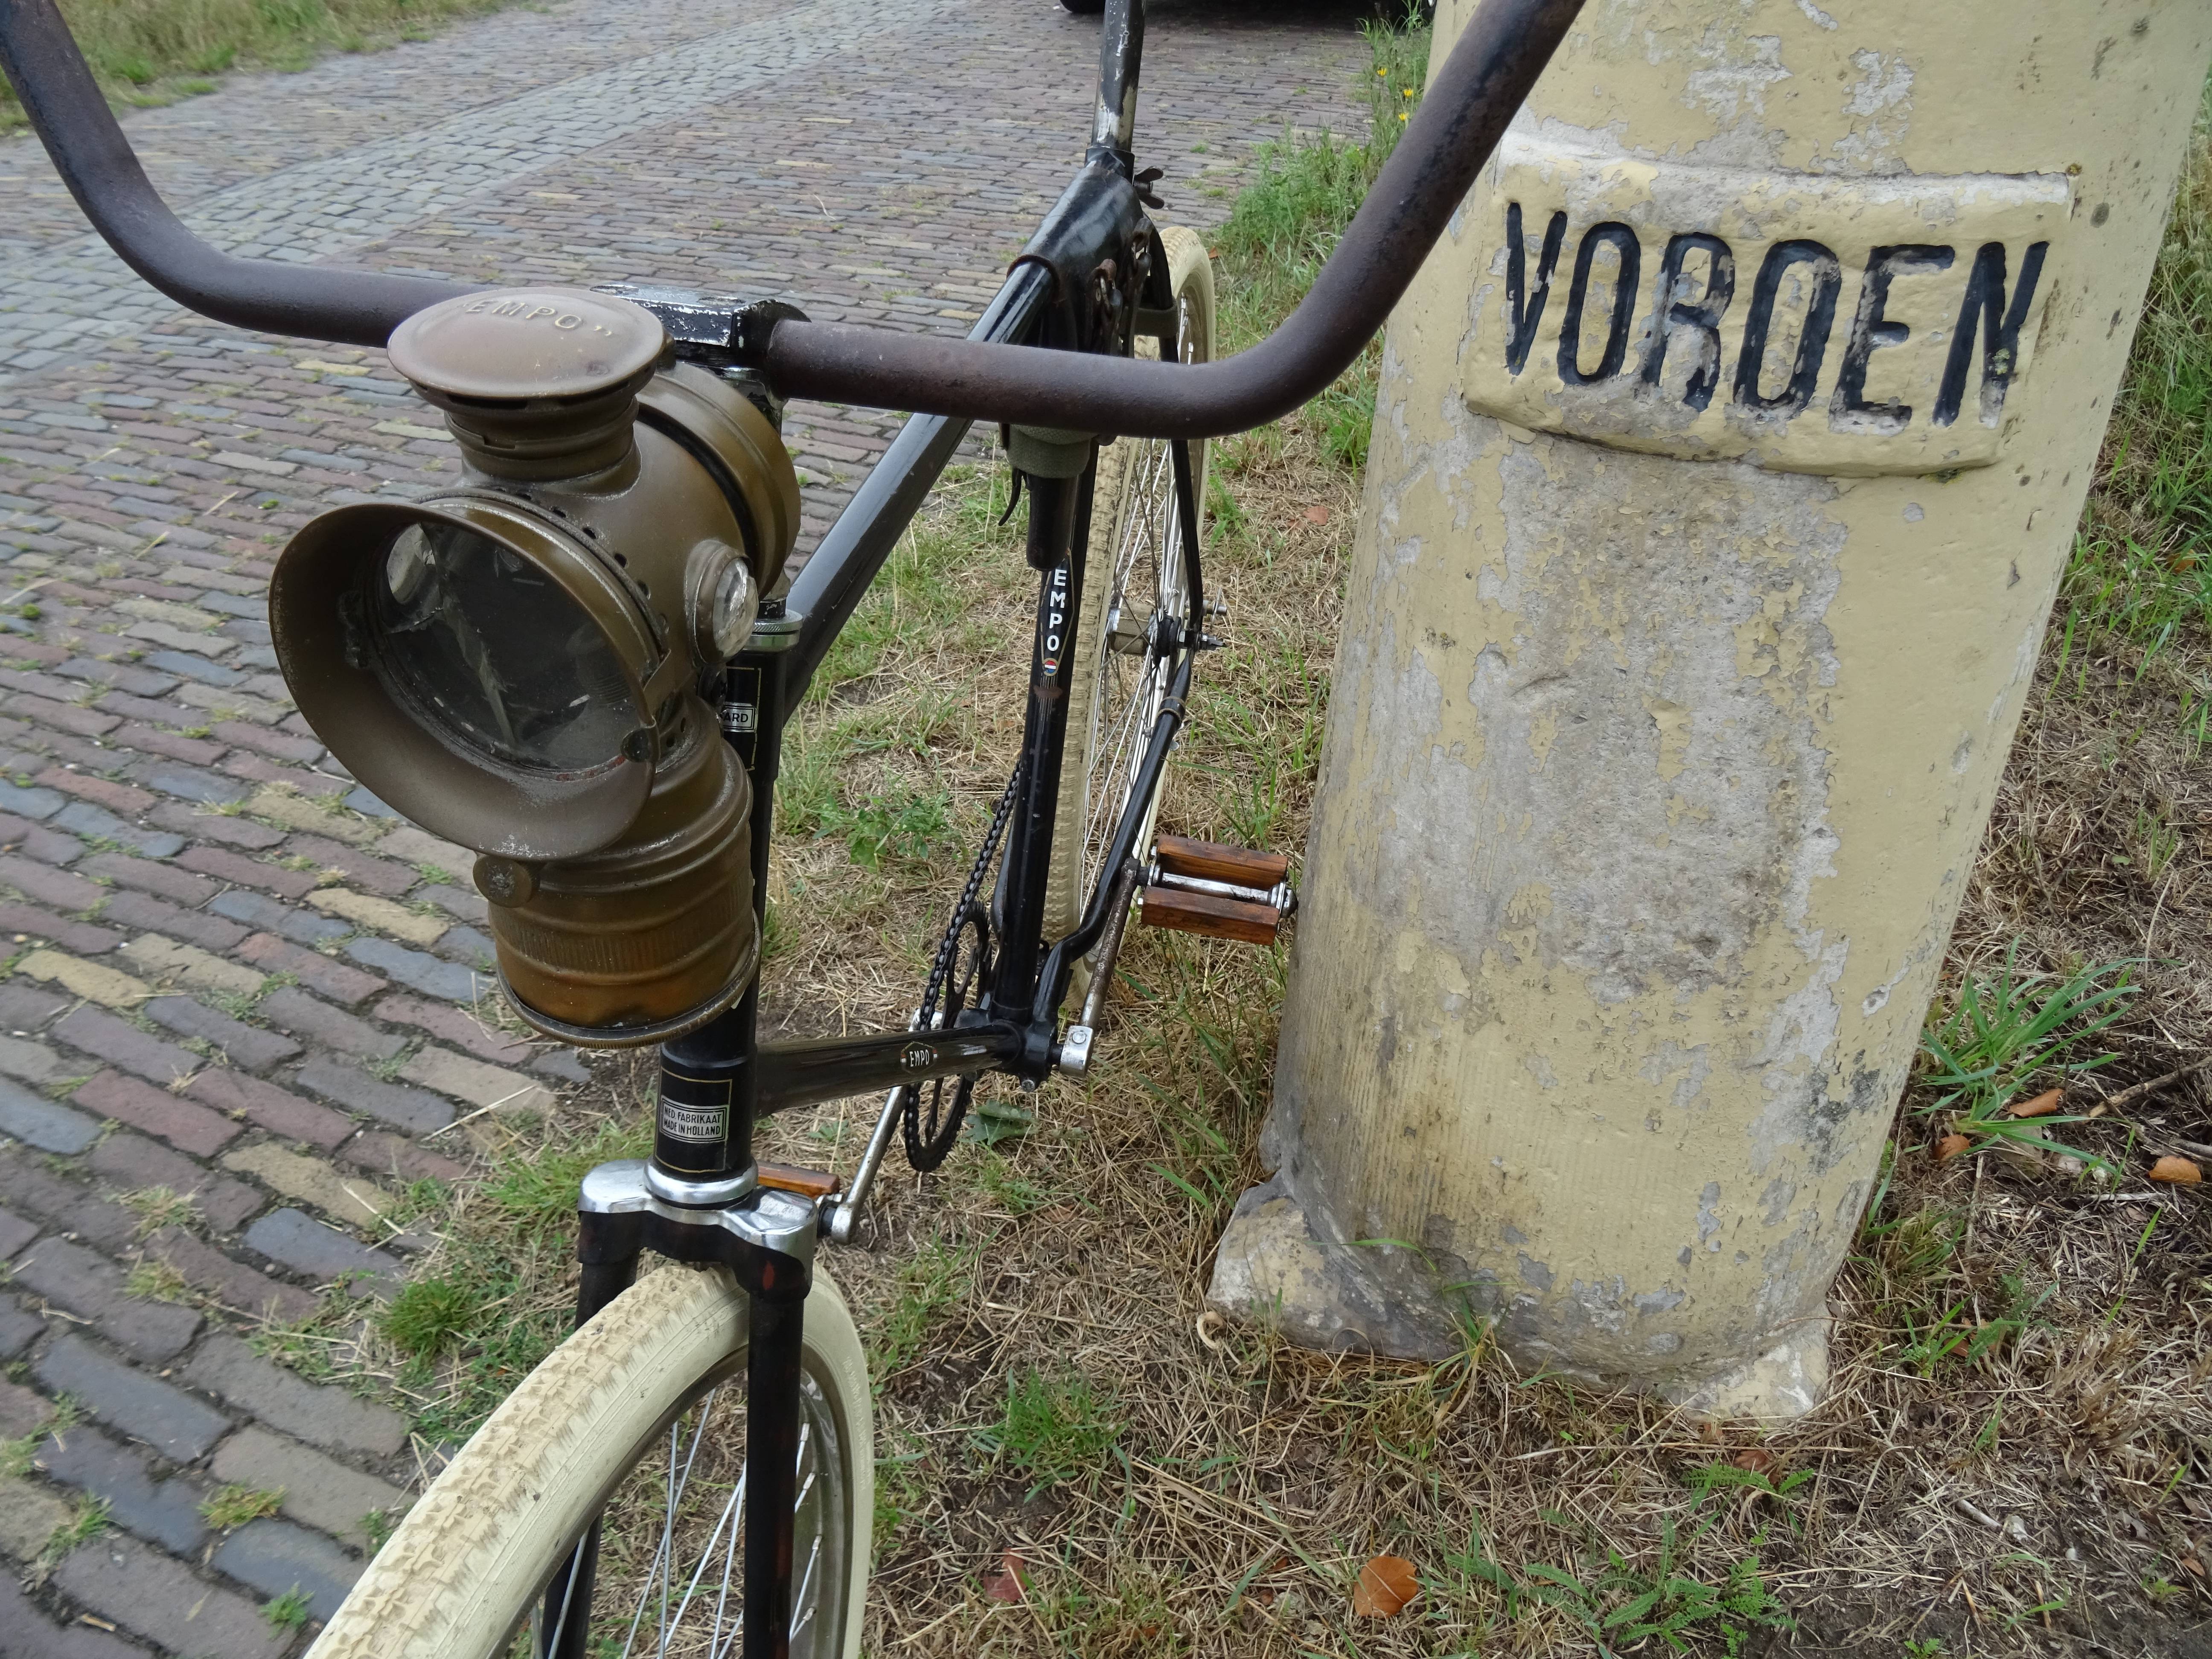
Mushroom post directions: They tell me "Vorden" is 1,3km away!
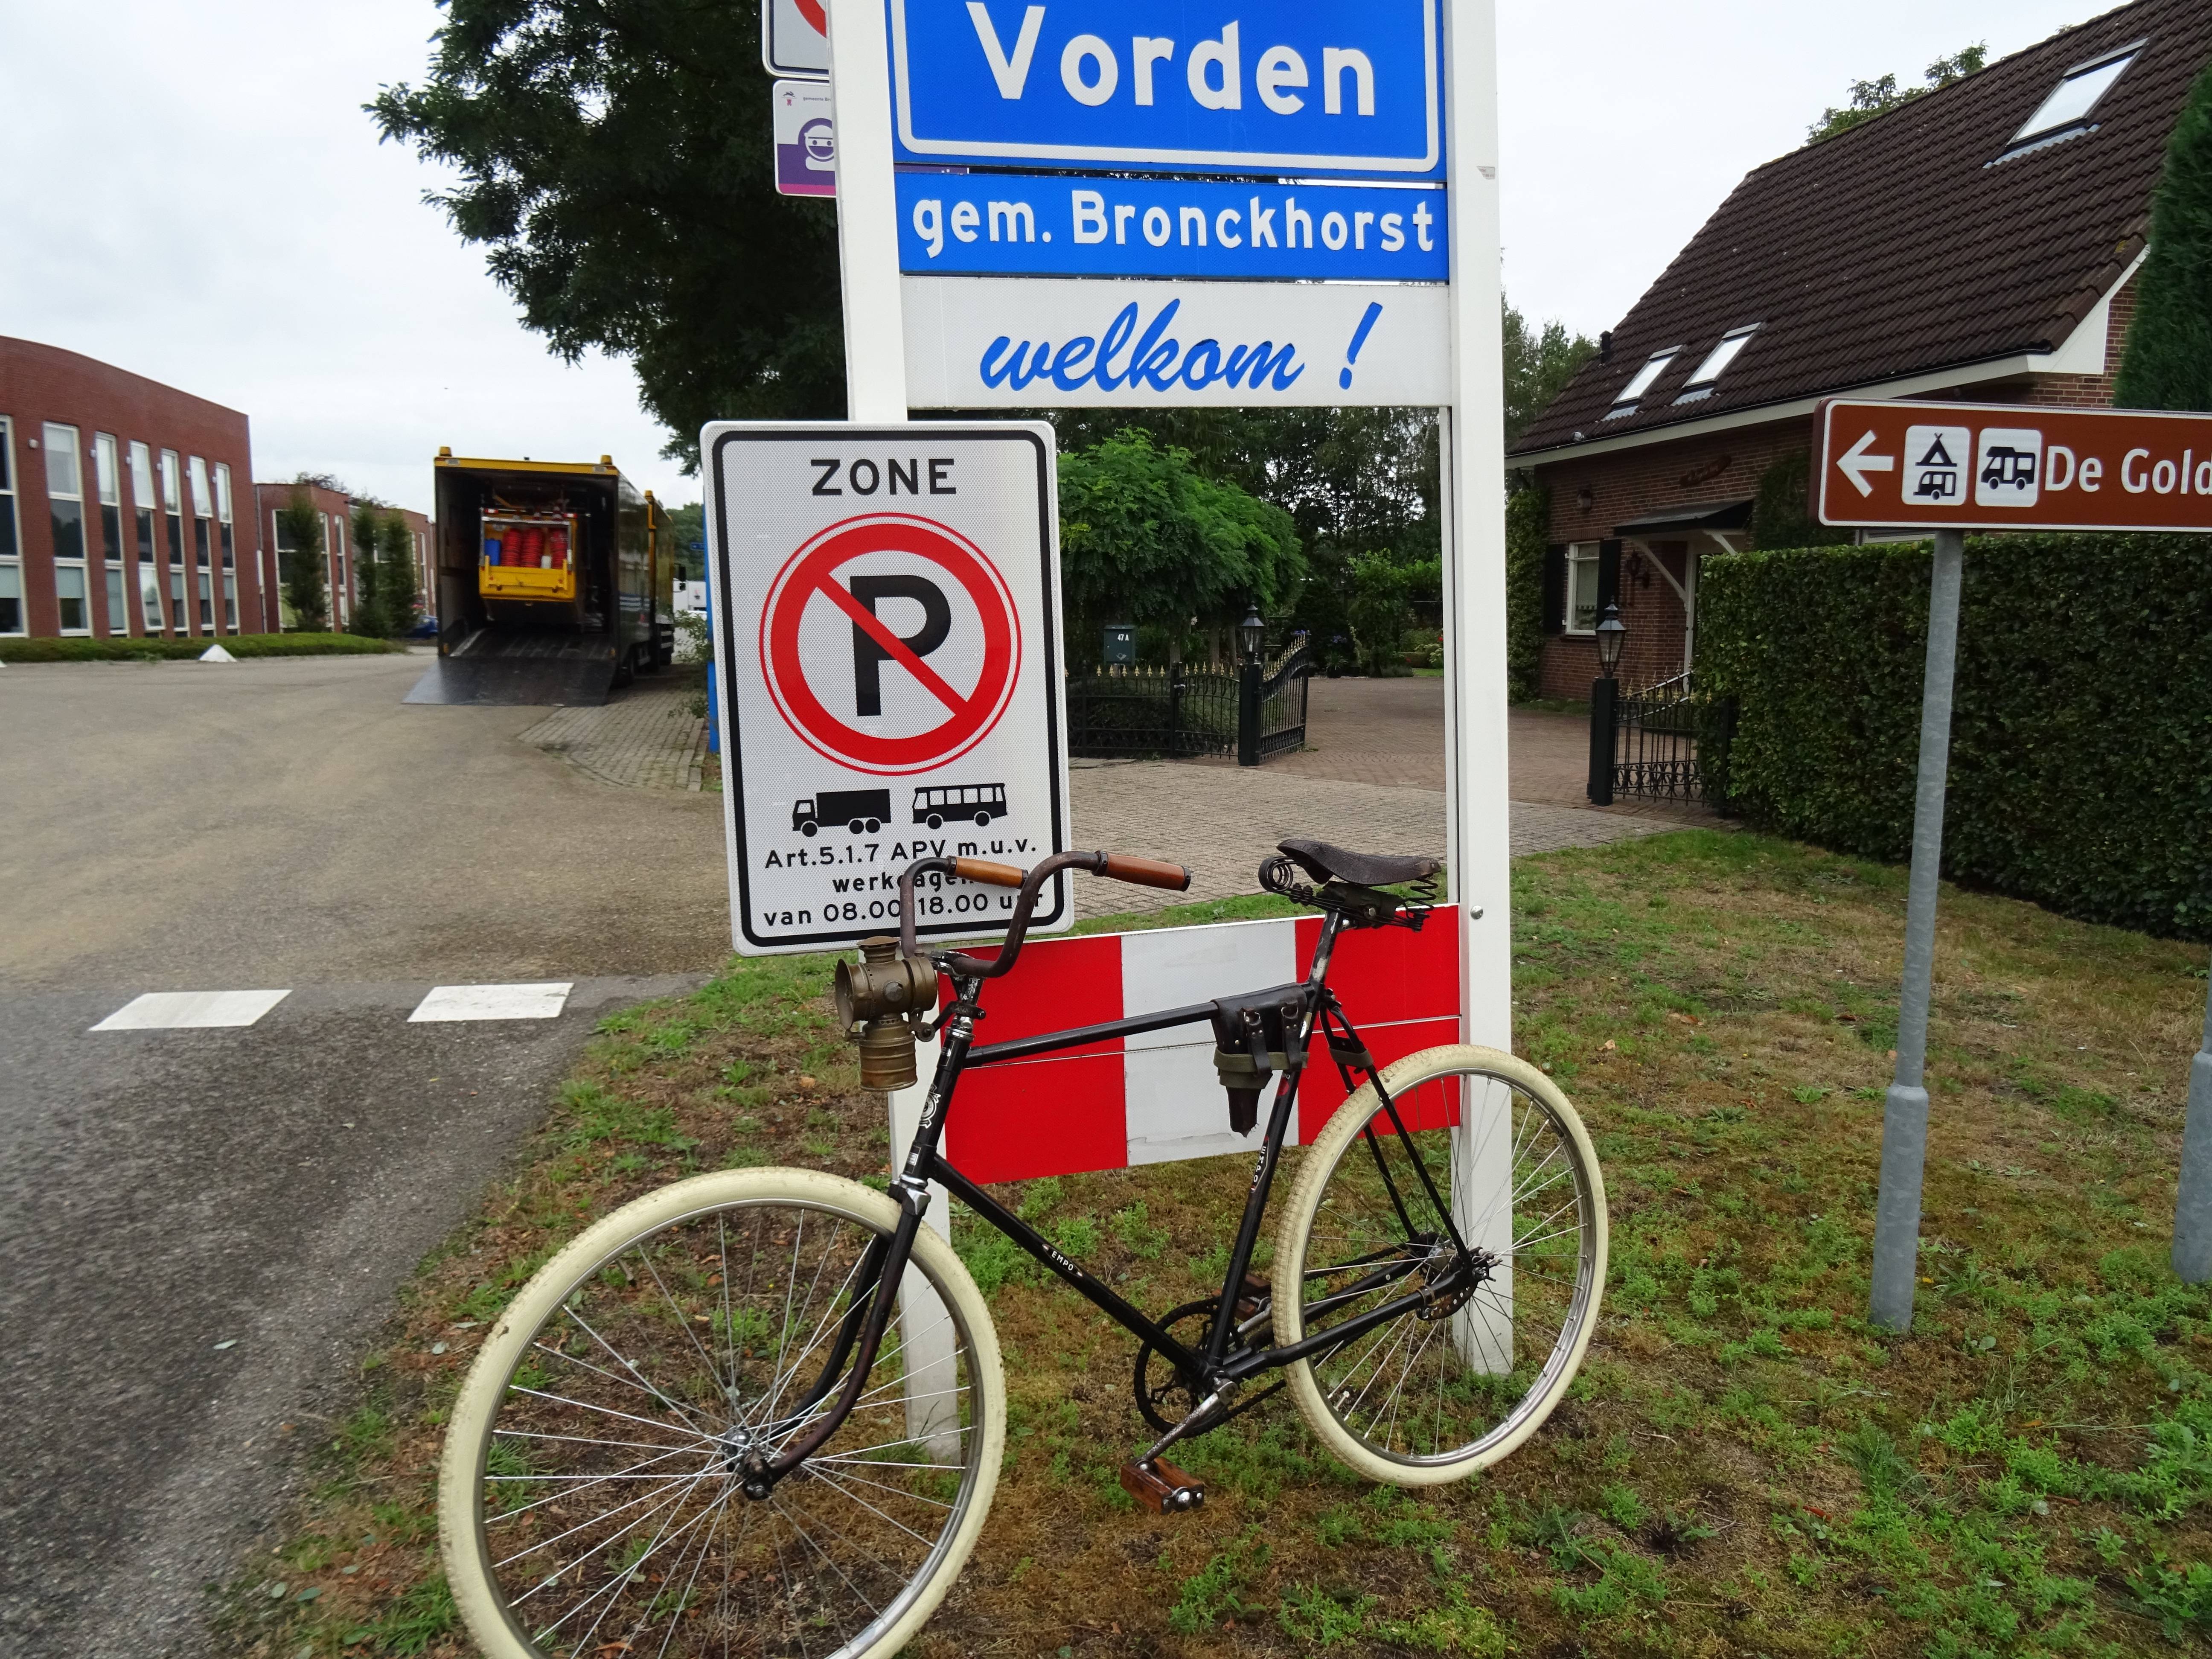
Entering the village of "Vorden"!
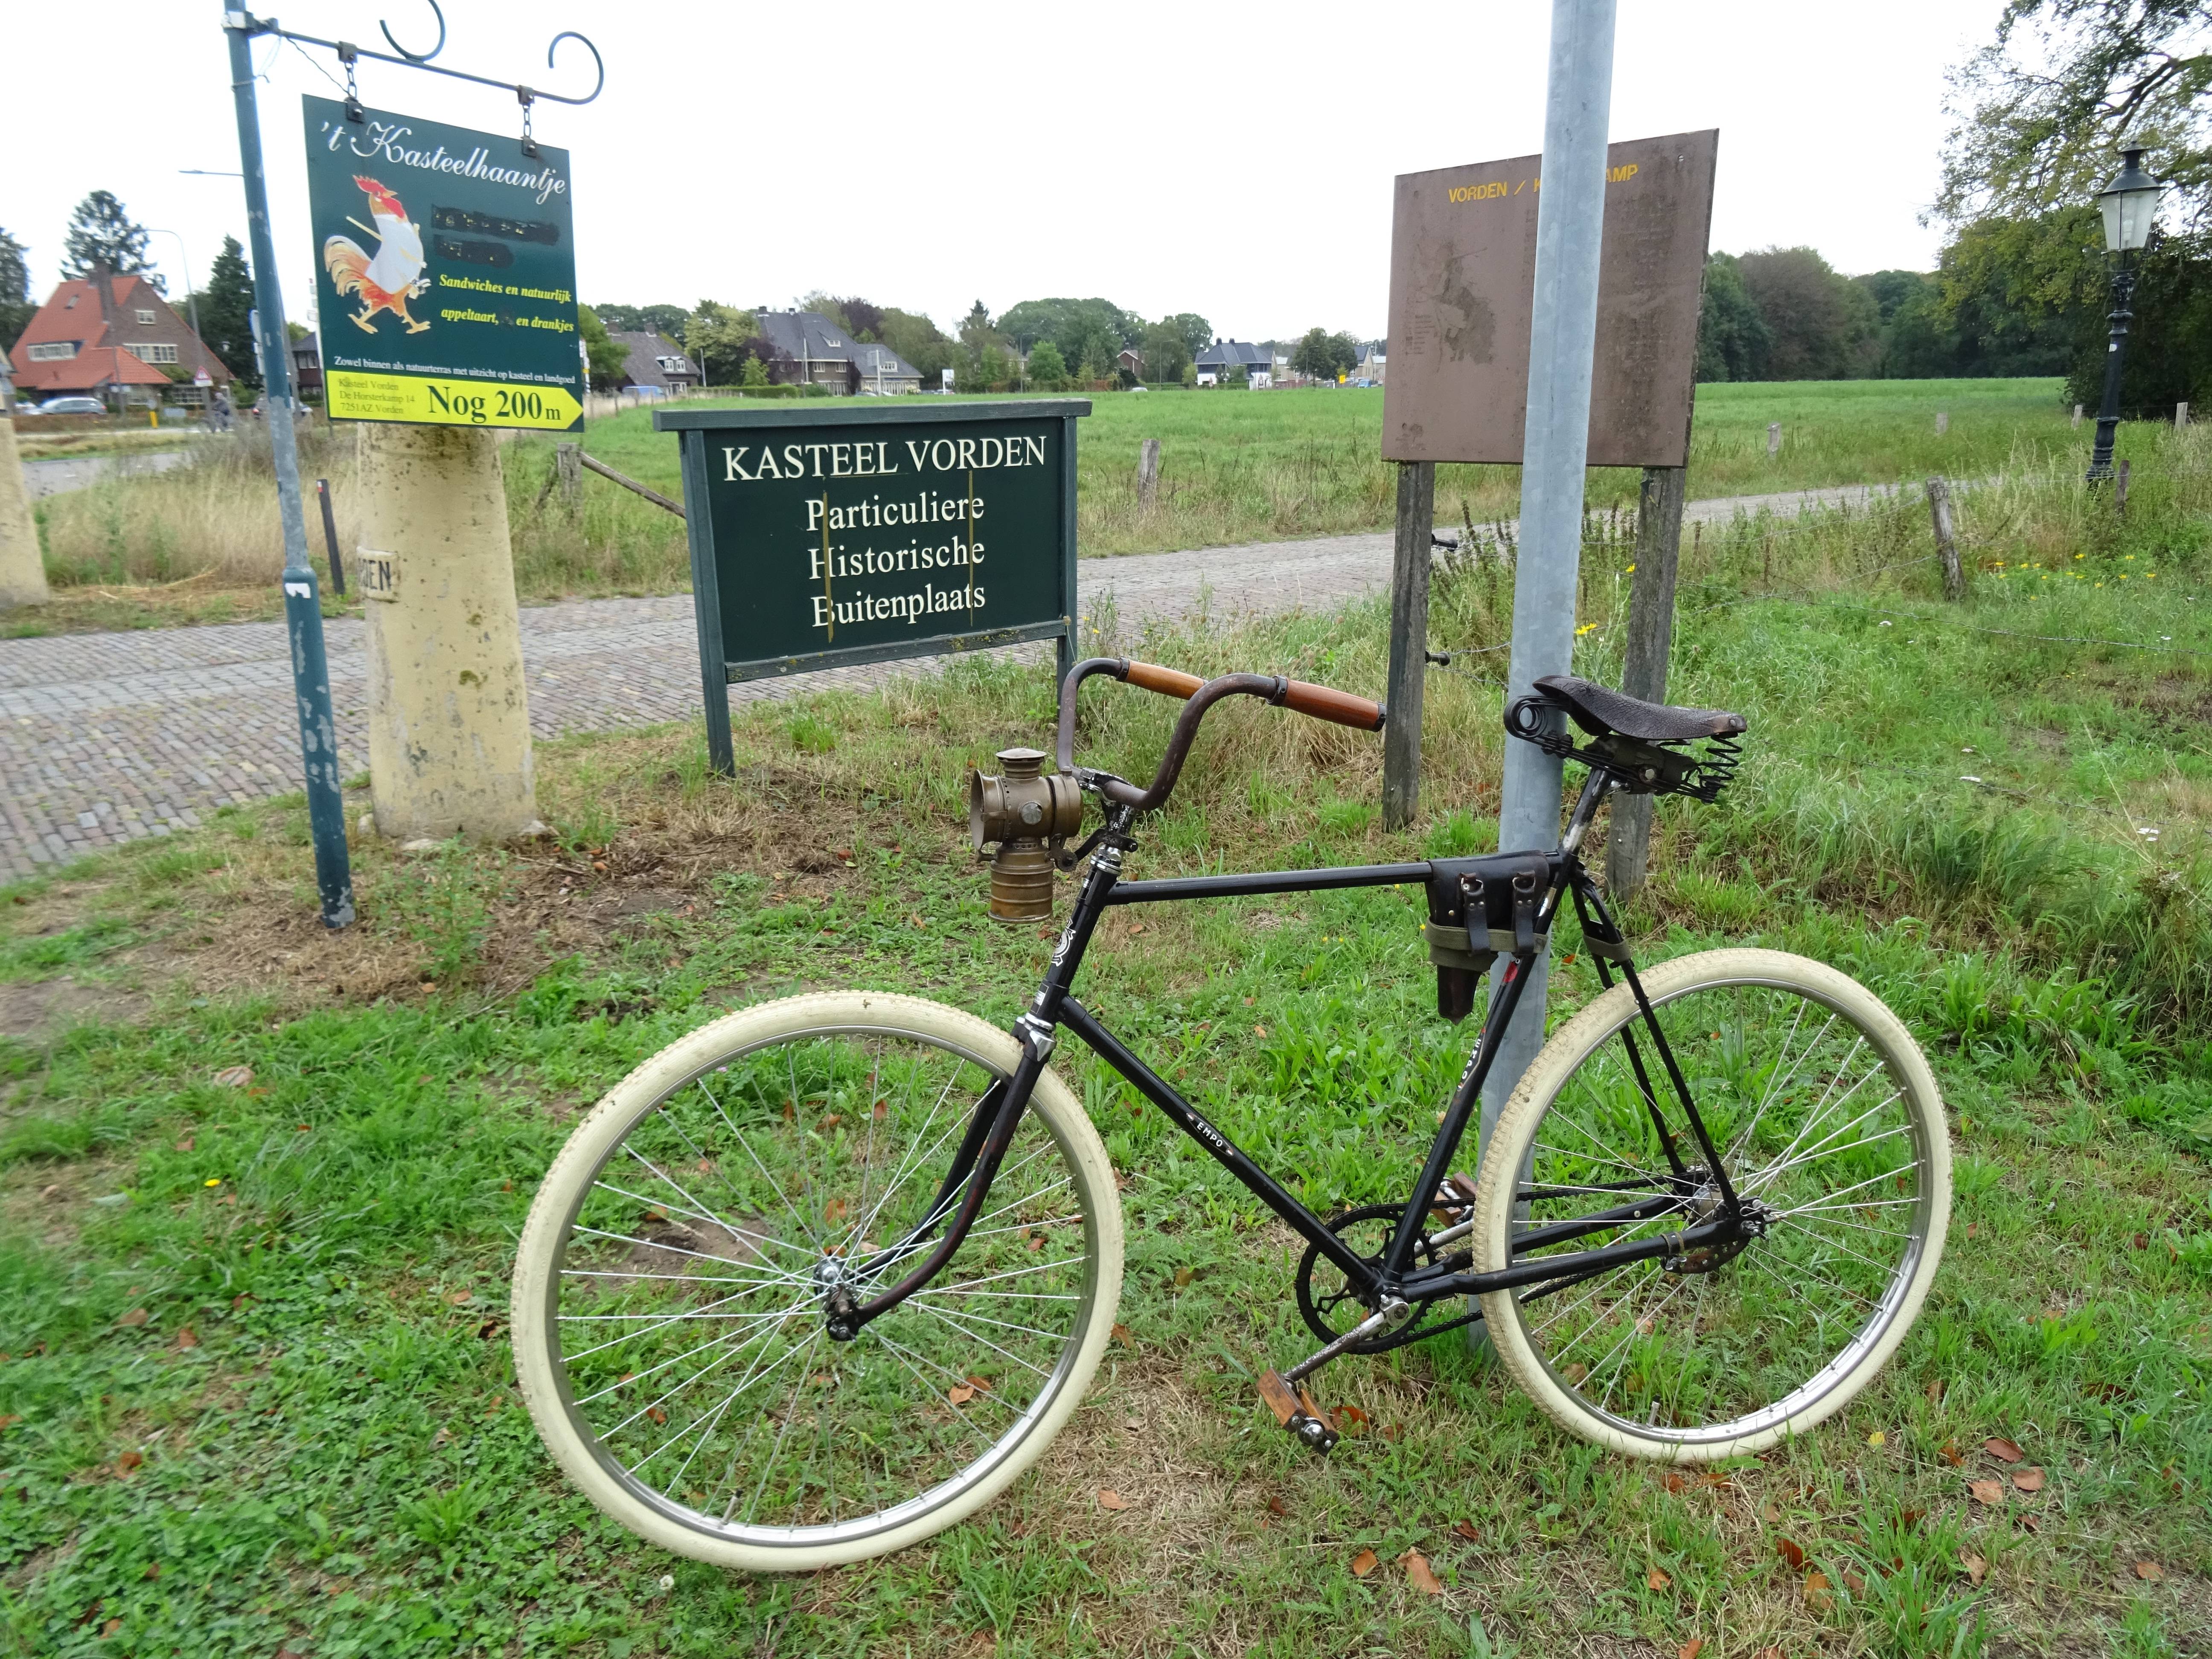
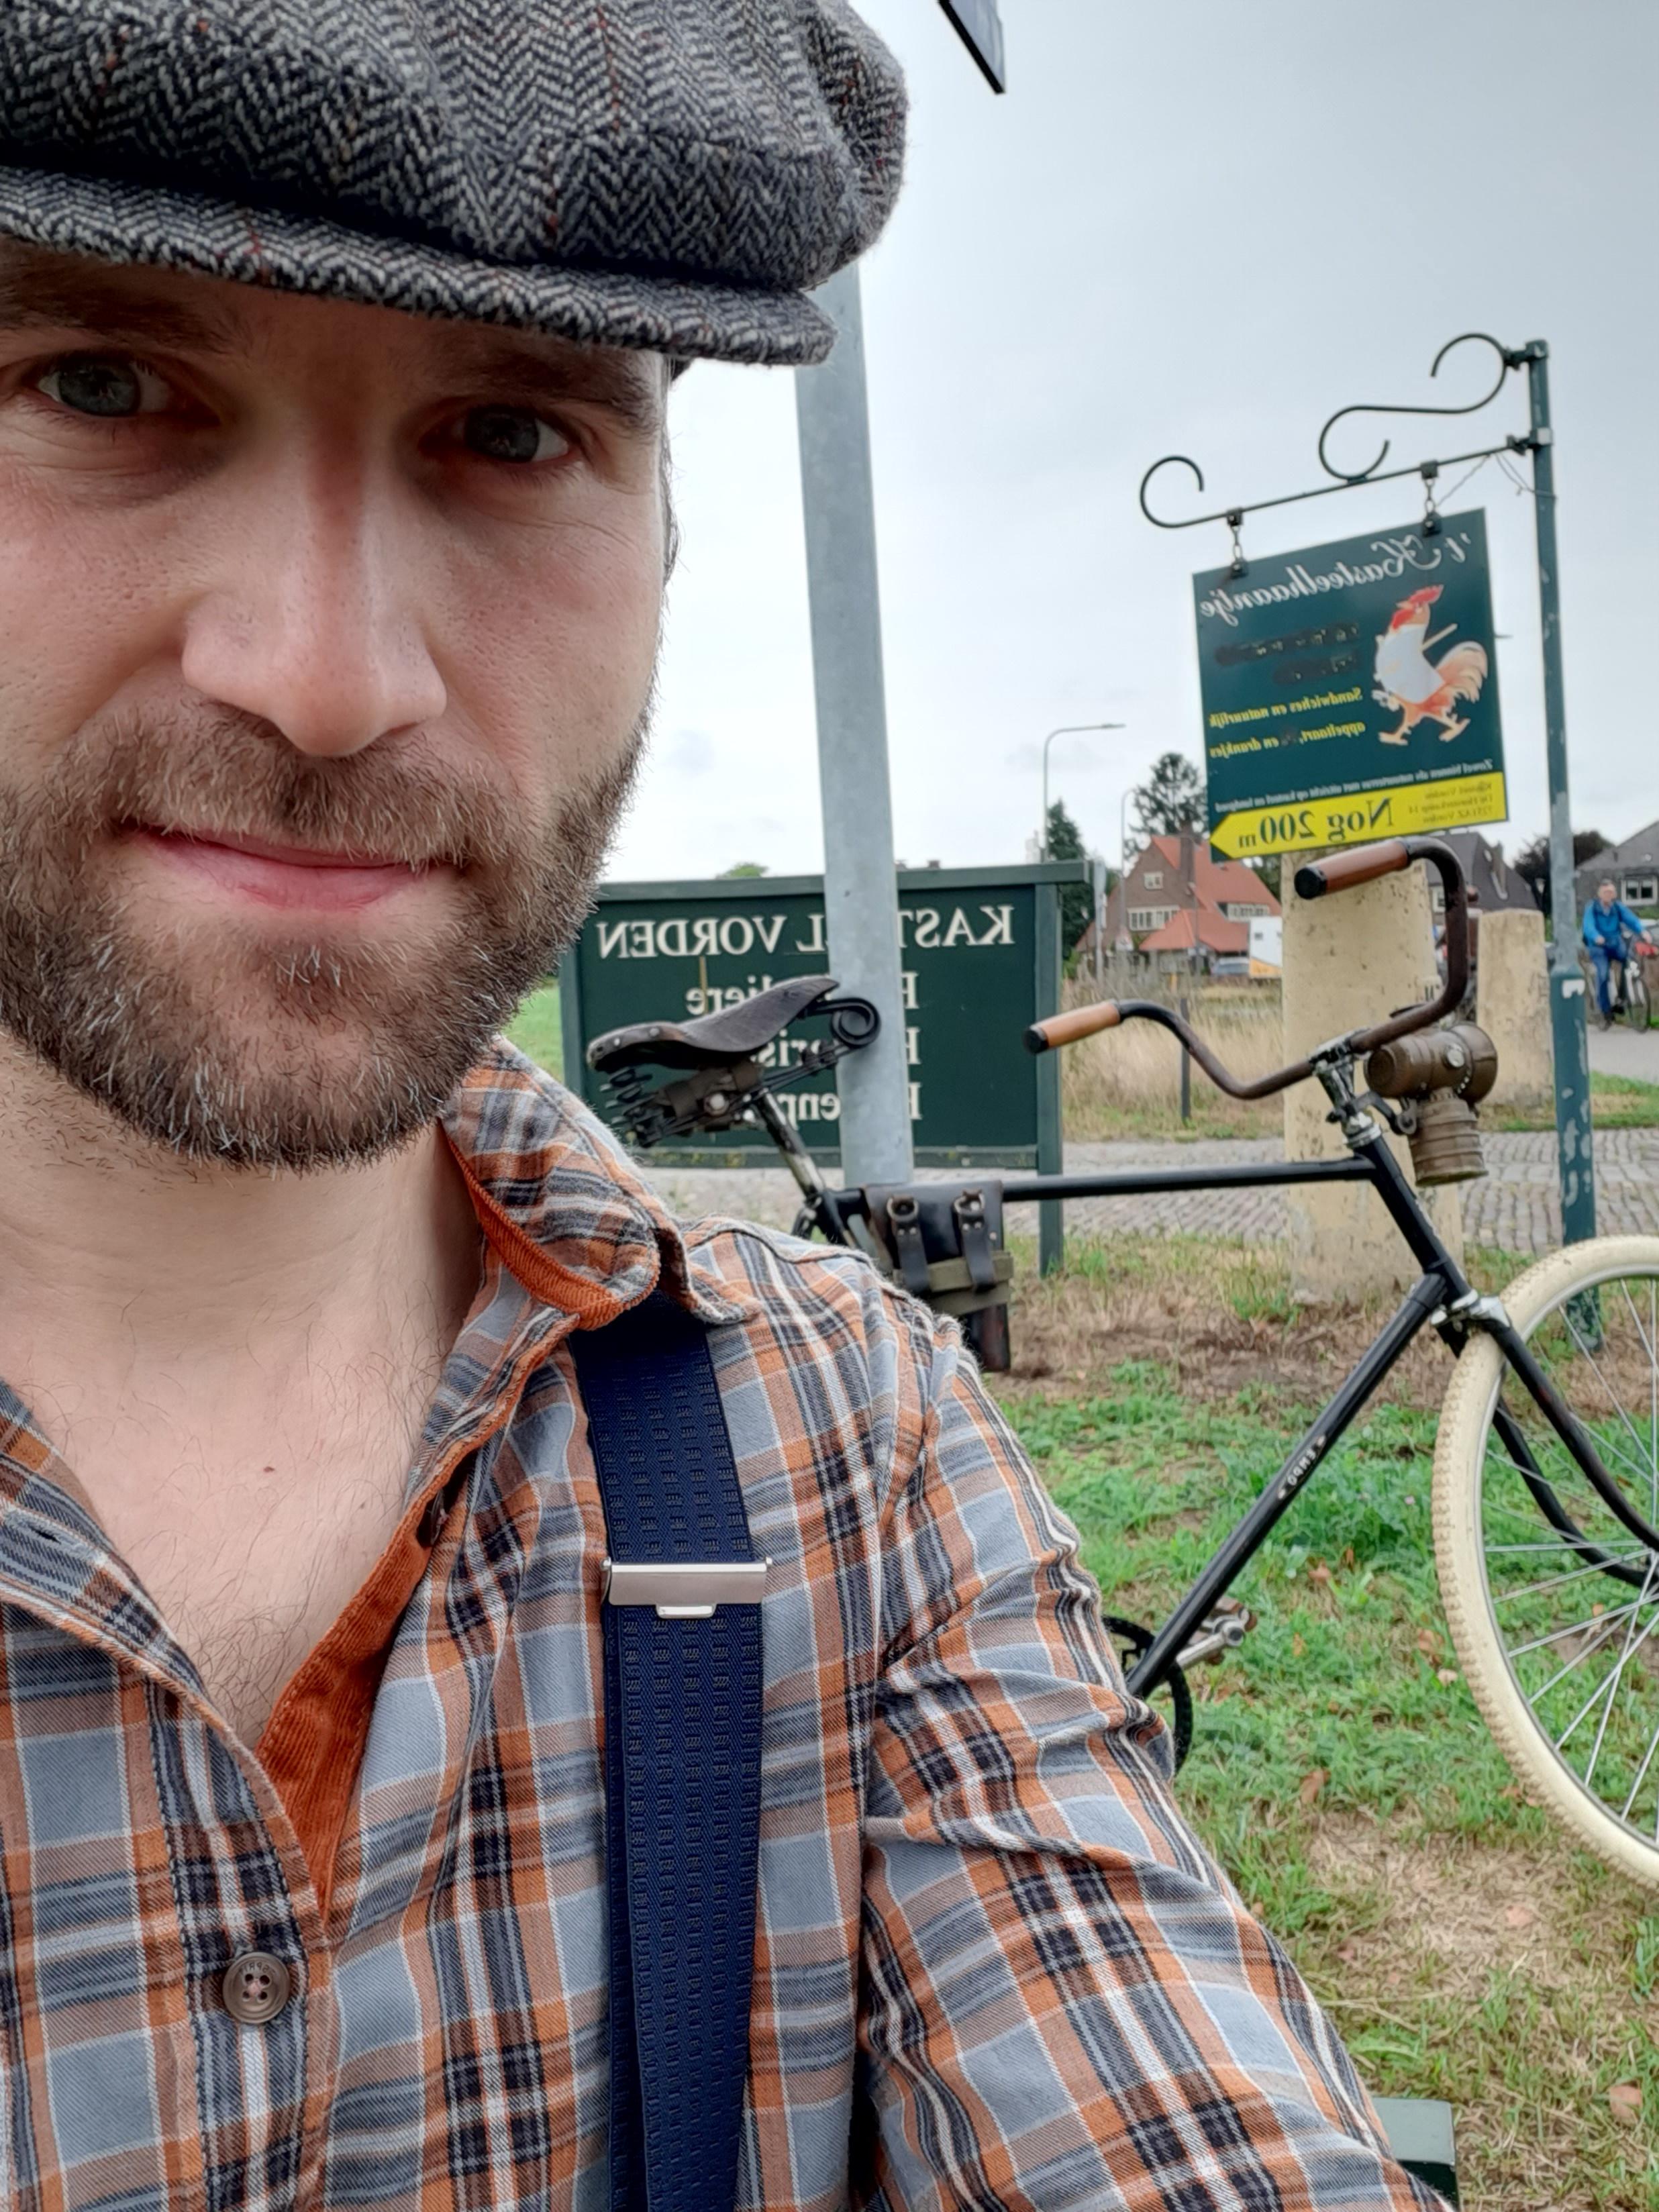
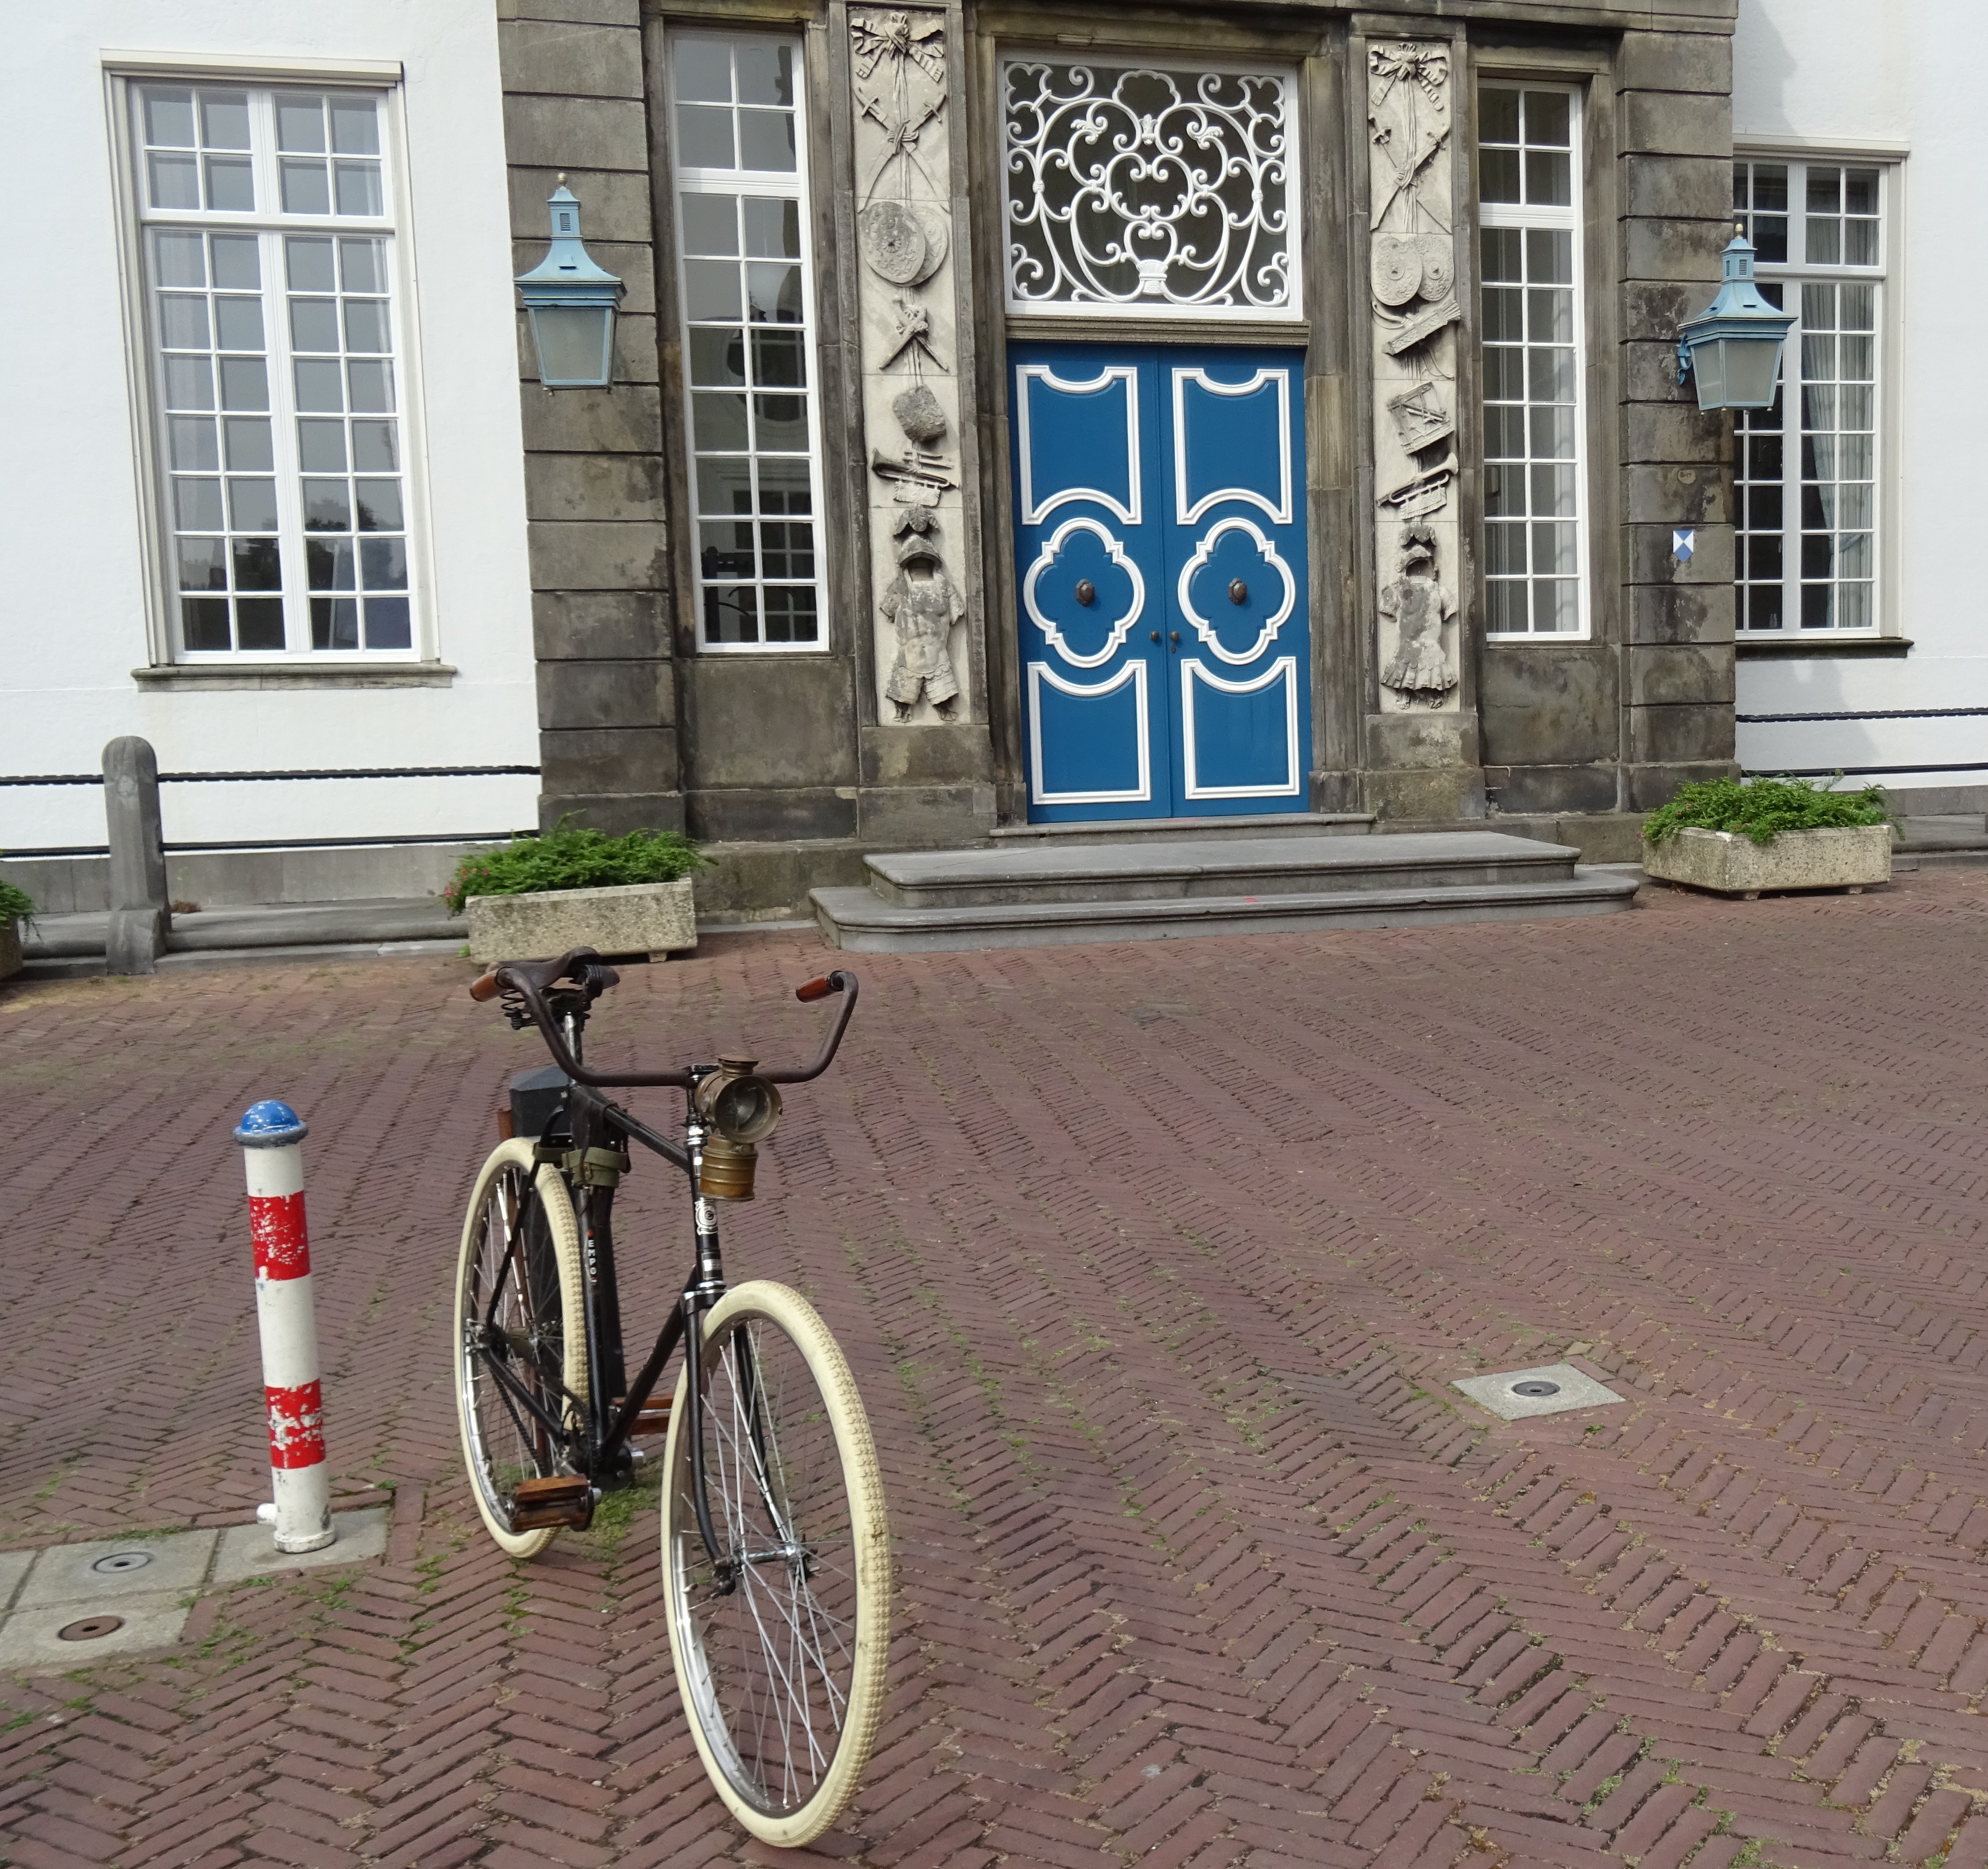
A quick stop at the castle. My Nephew joined me for some nice ride videos (more on that later in the finished thread).
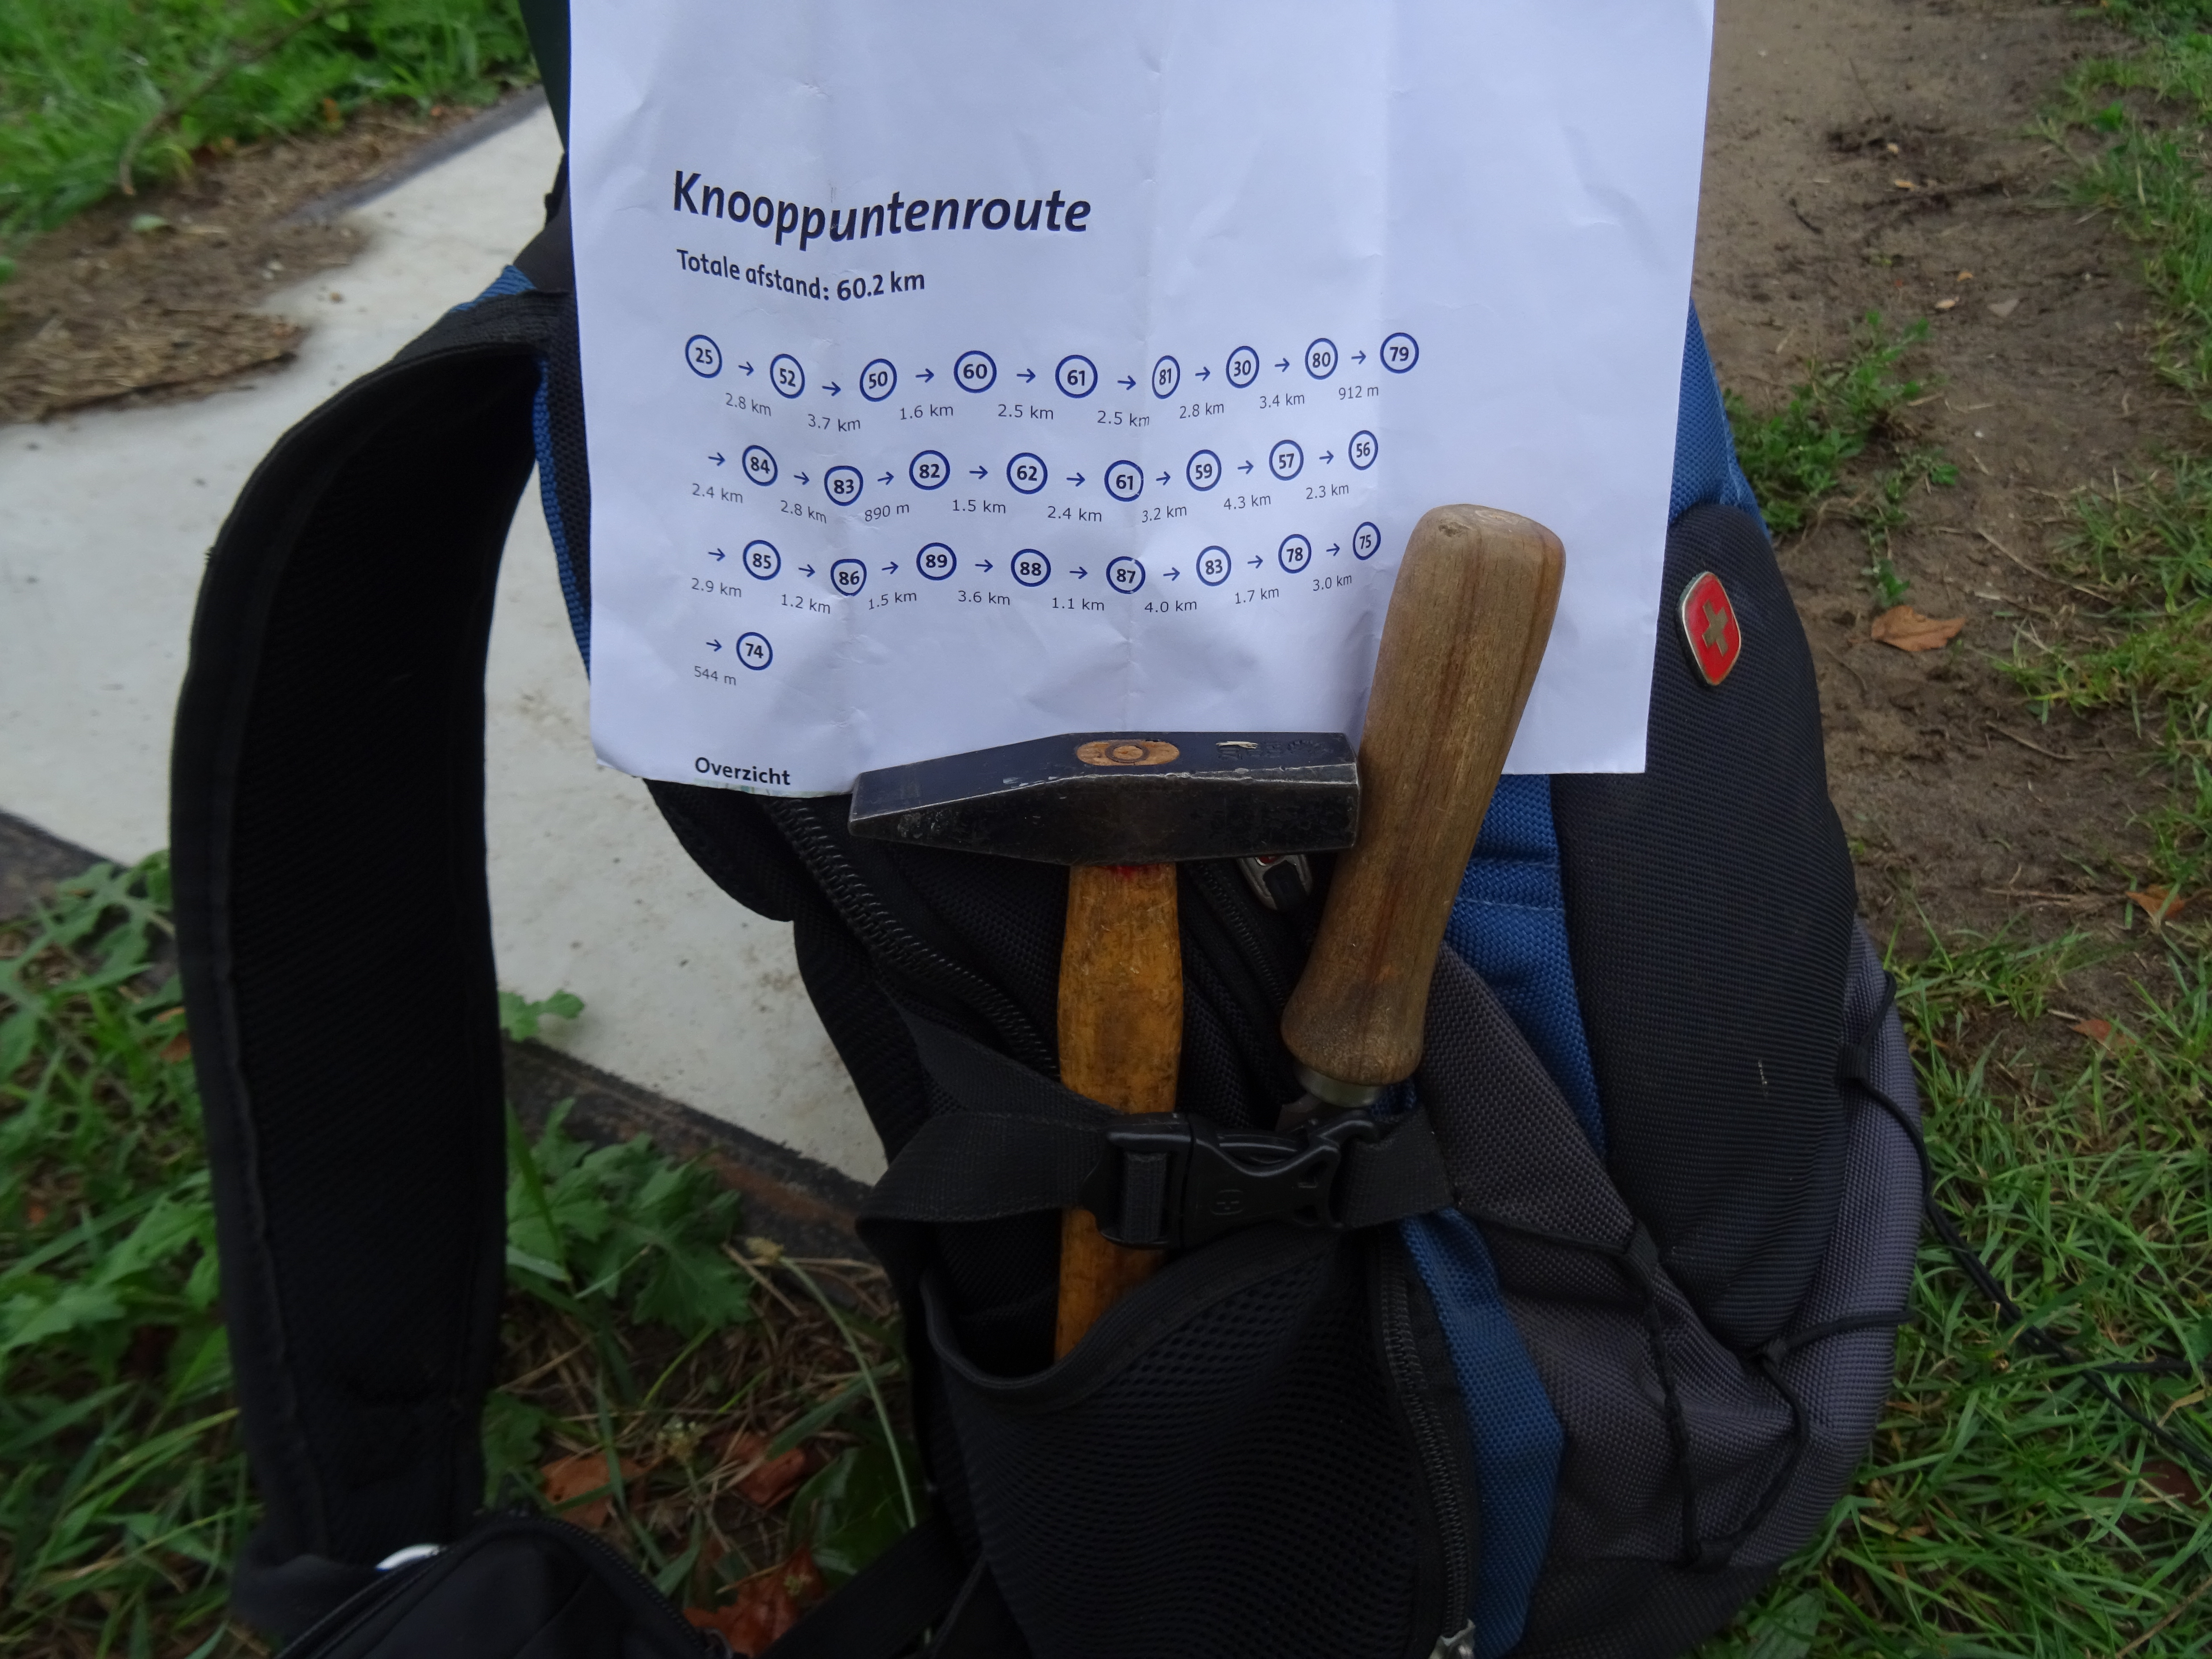
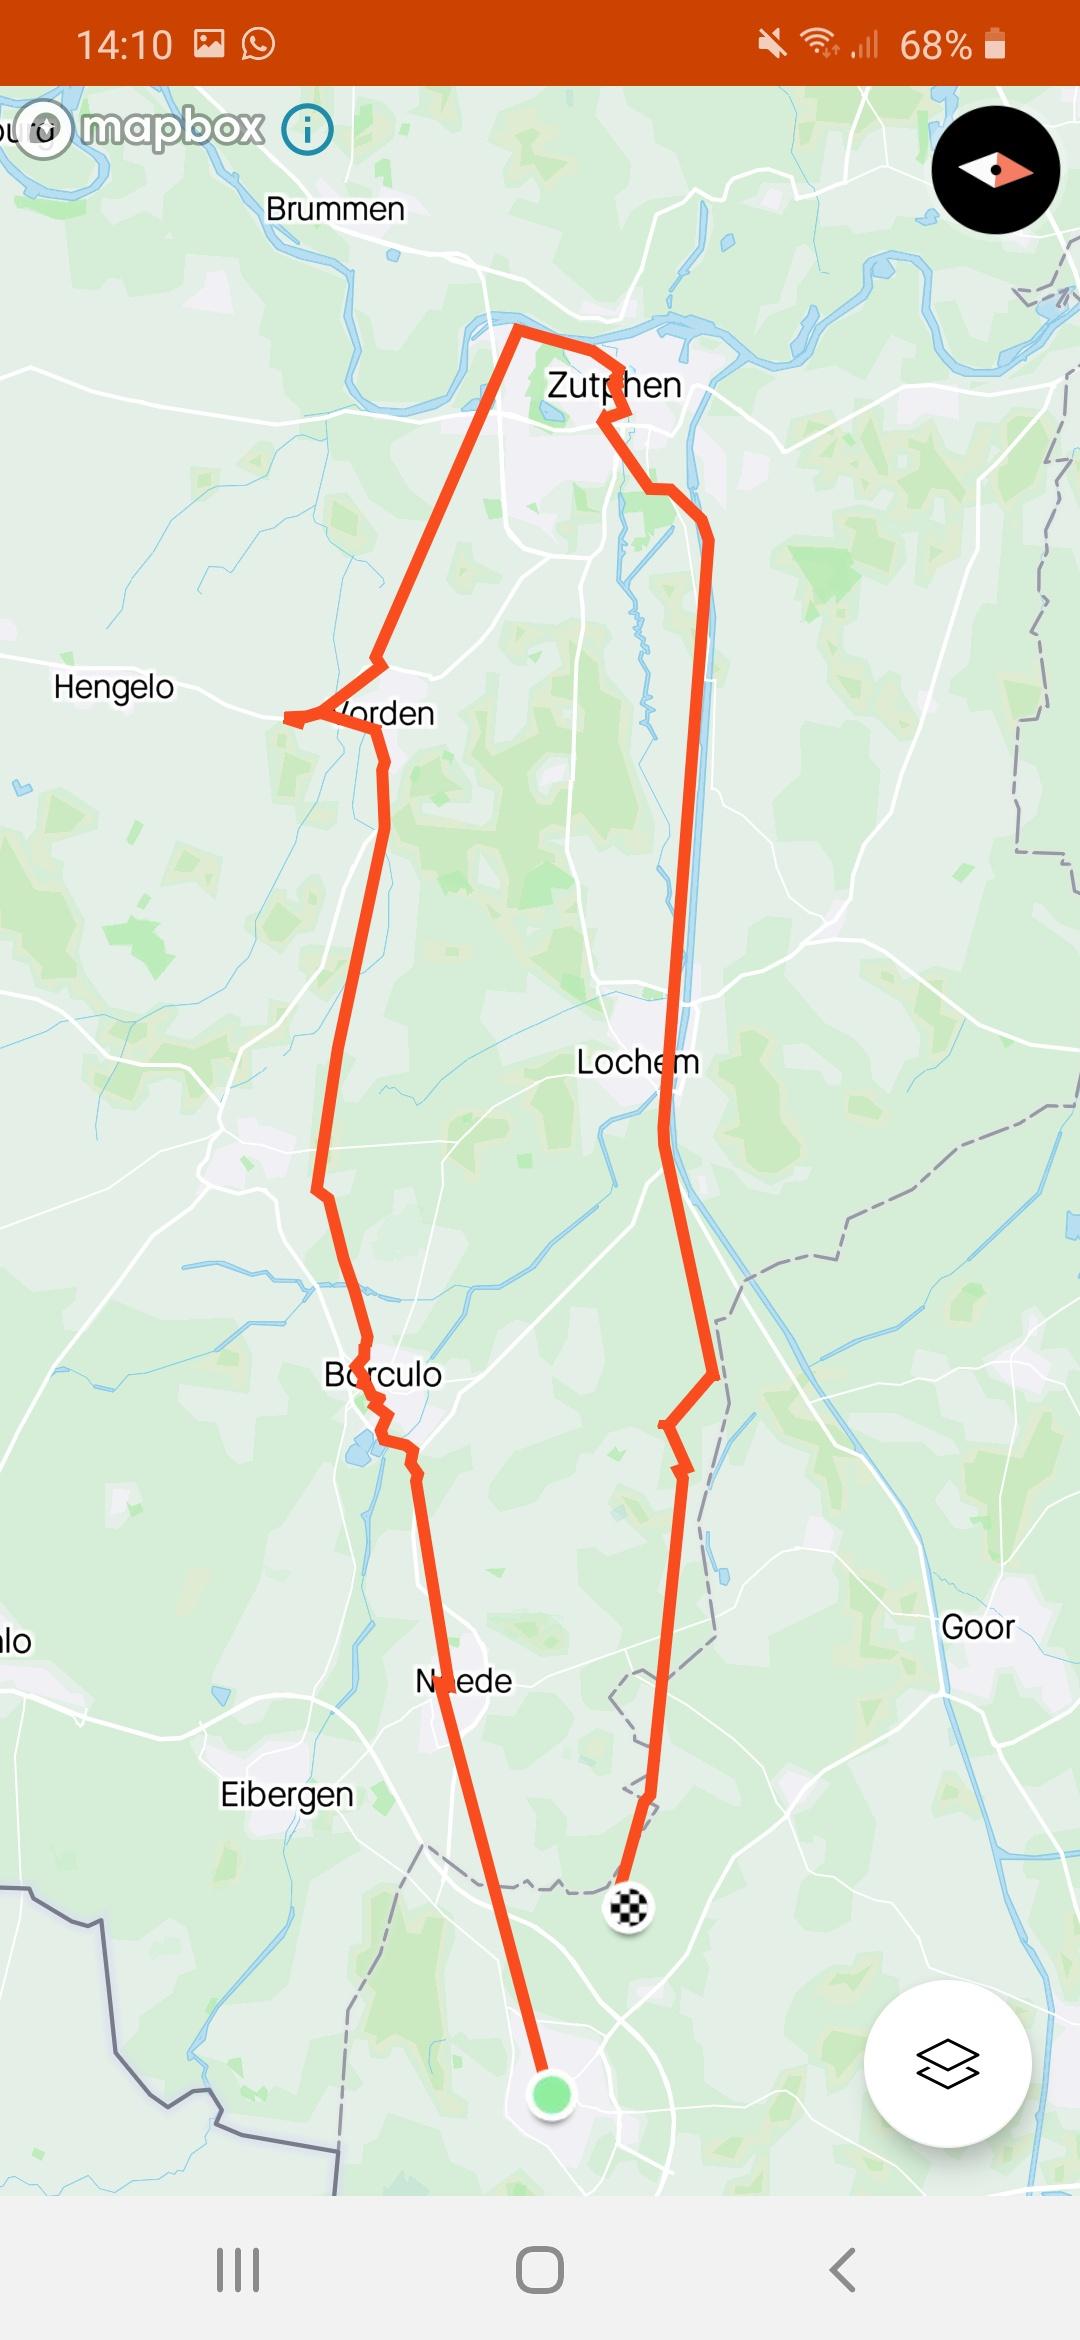
This is my sheet with the Junction route from Haaksbergen to Zutphen. The way back is another sheet.
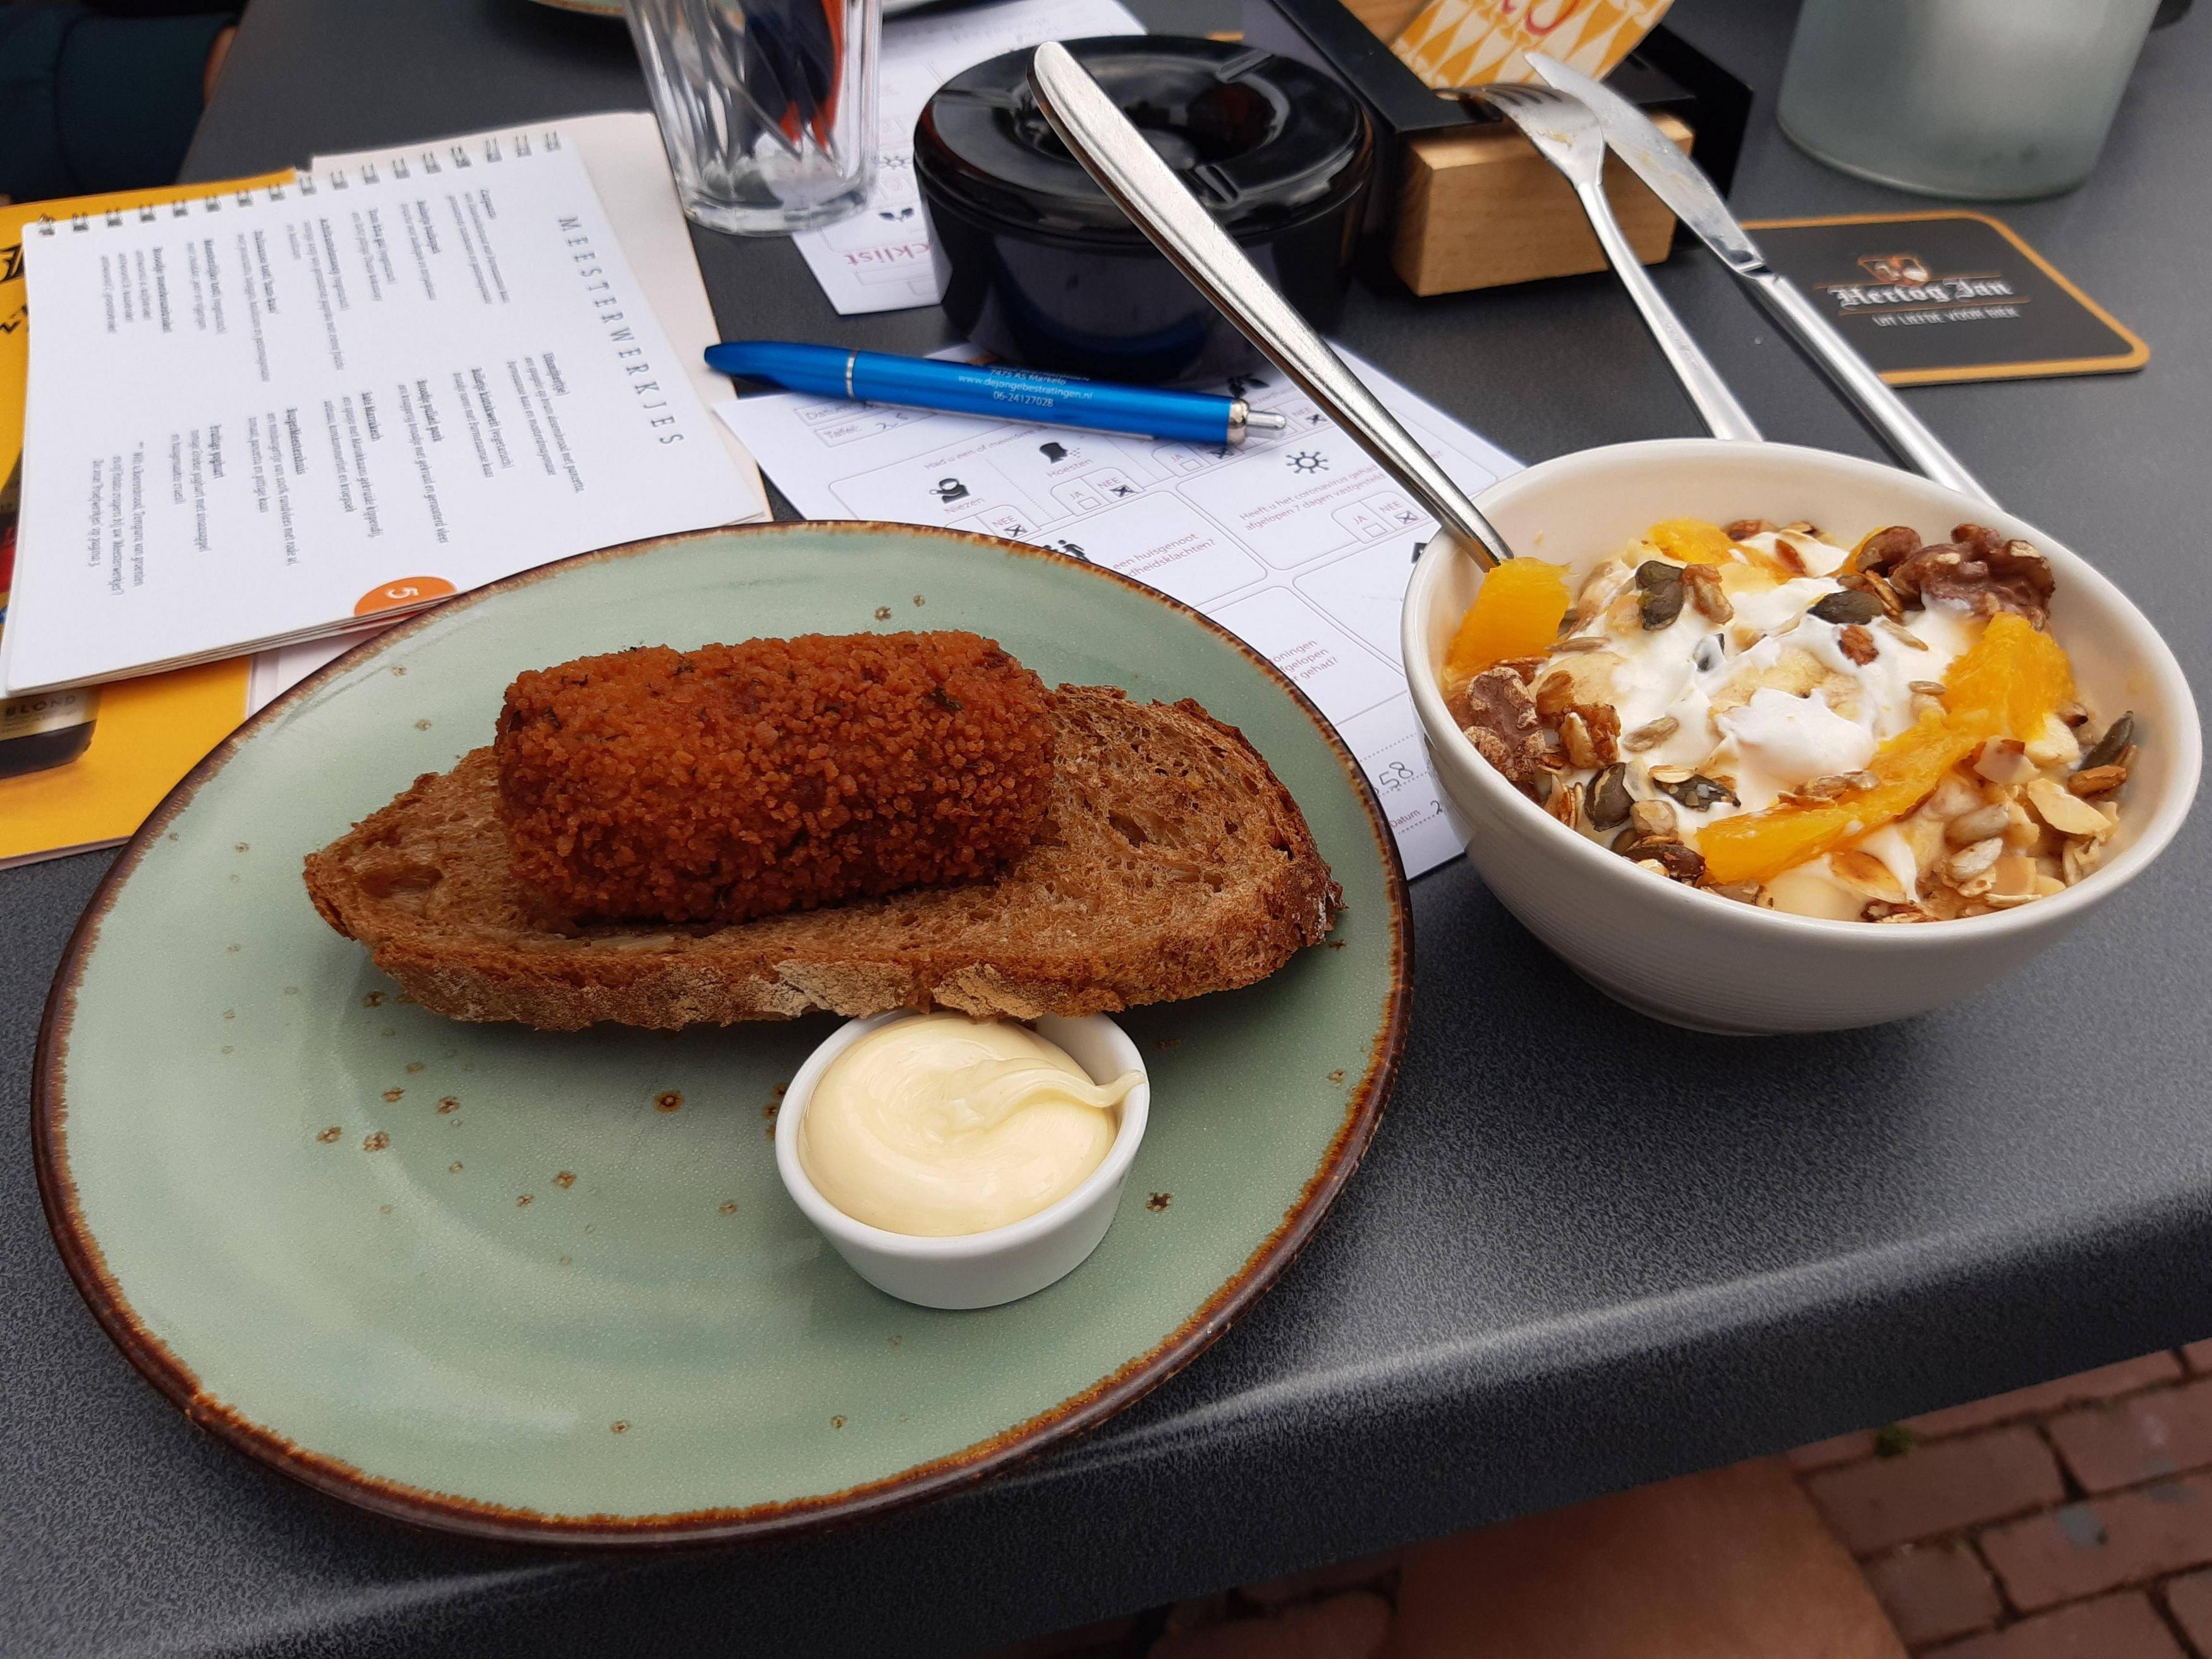
Sustenance! That thing on the left is called a "Kroket", its great!
In the beautiful village of "Zutphen" after 70km of cycling.
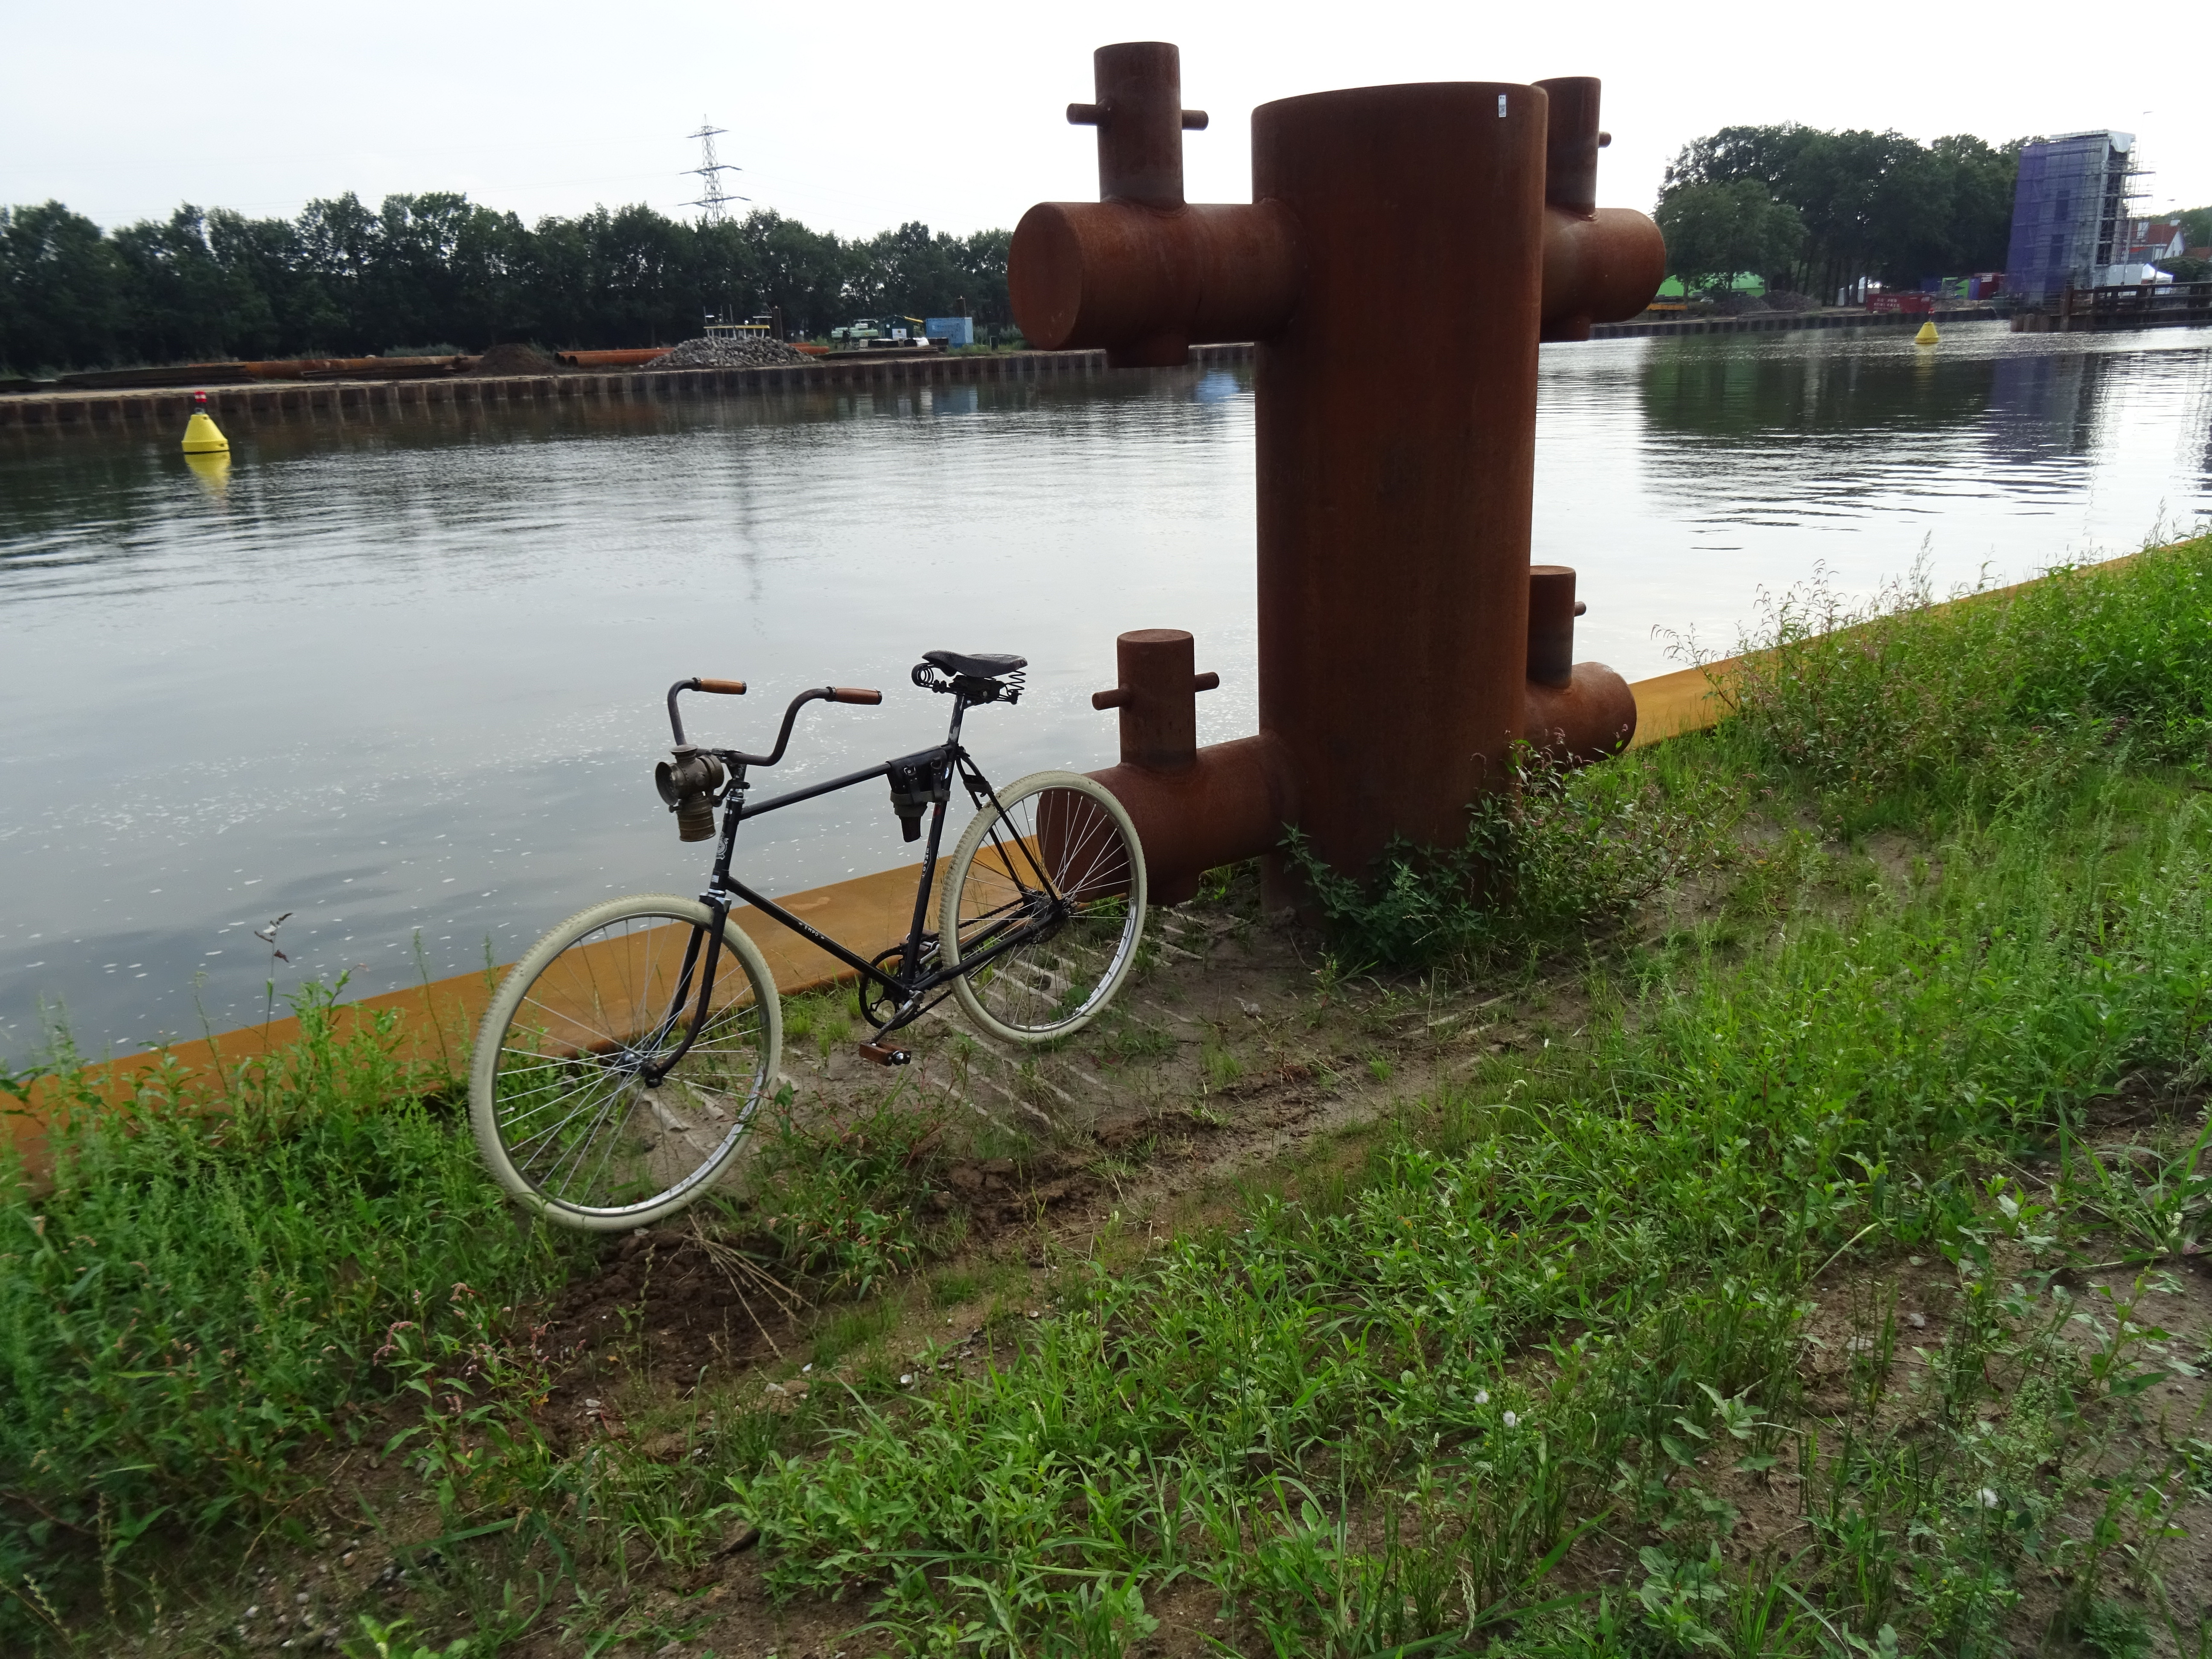
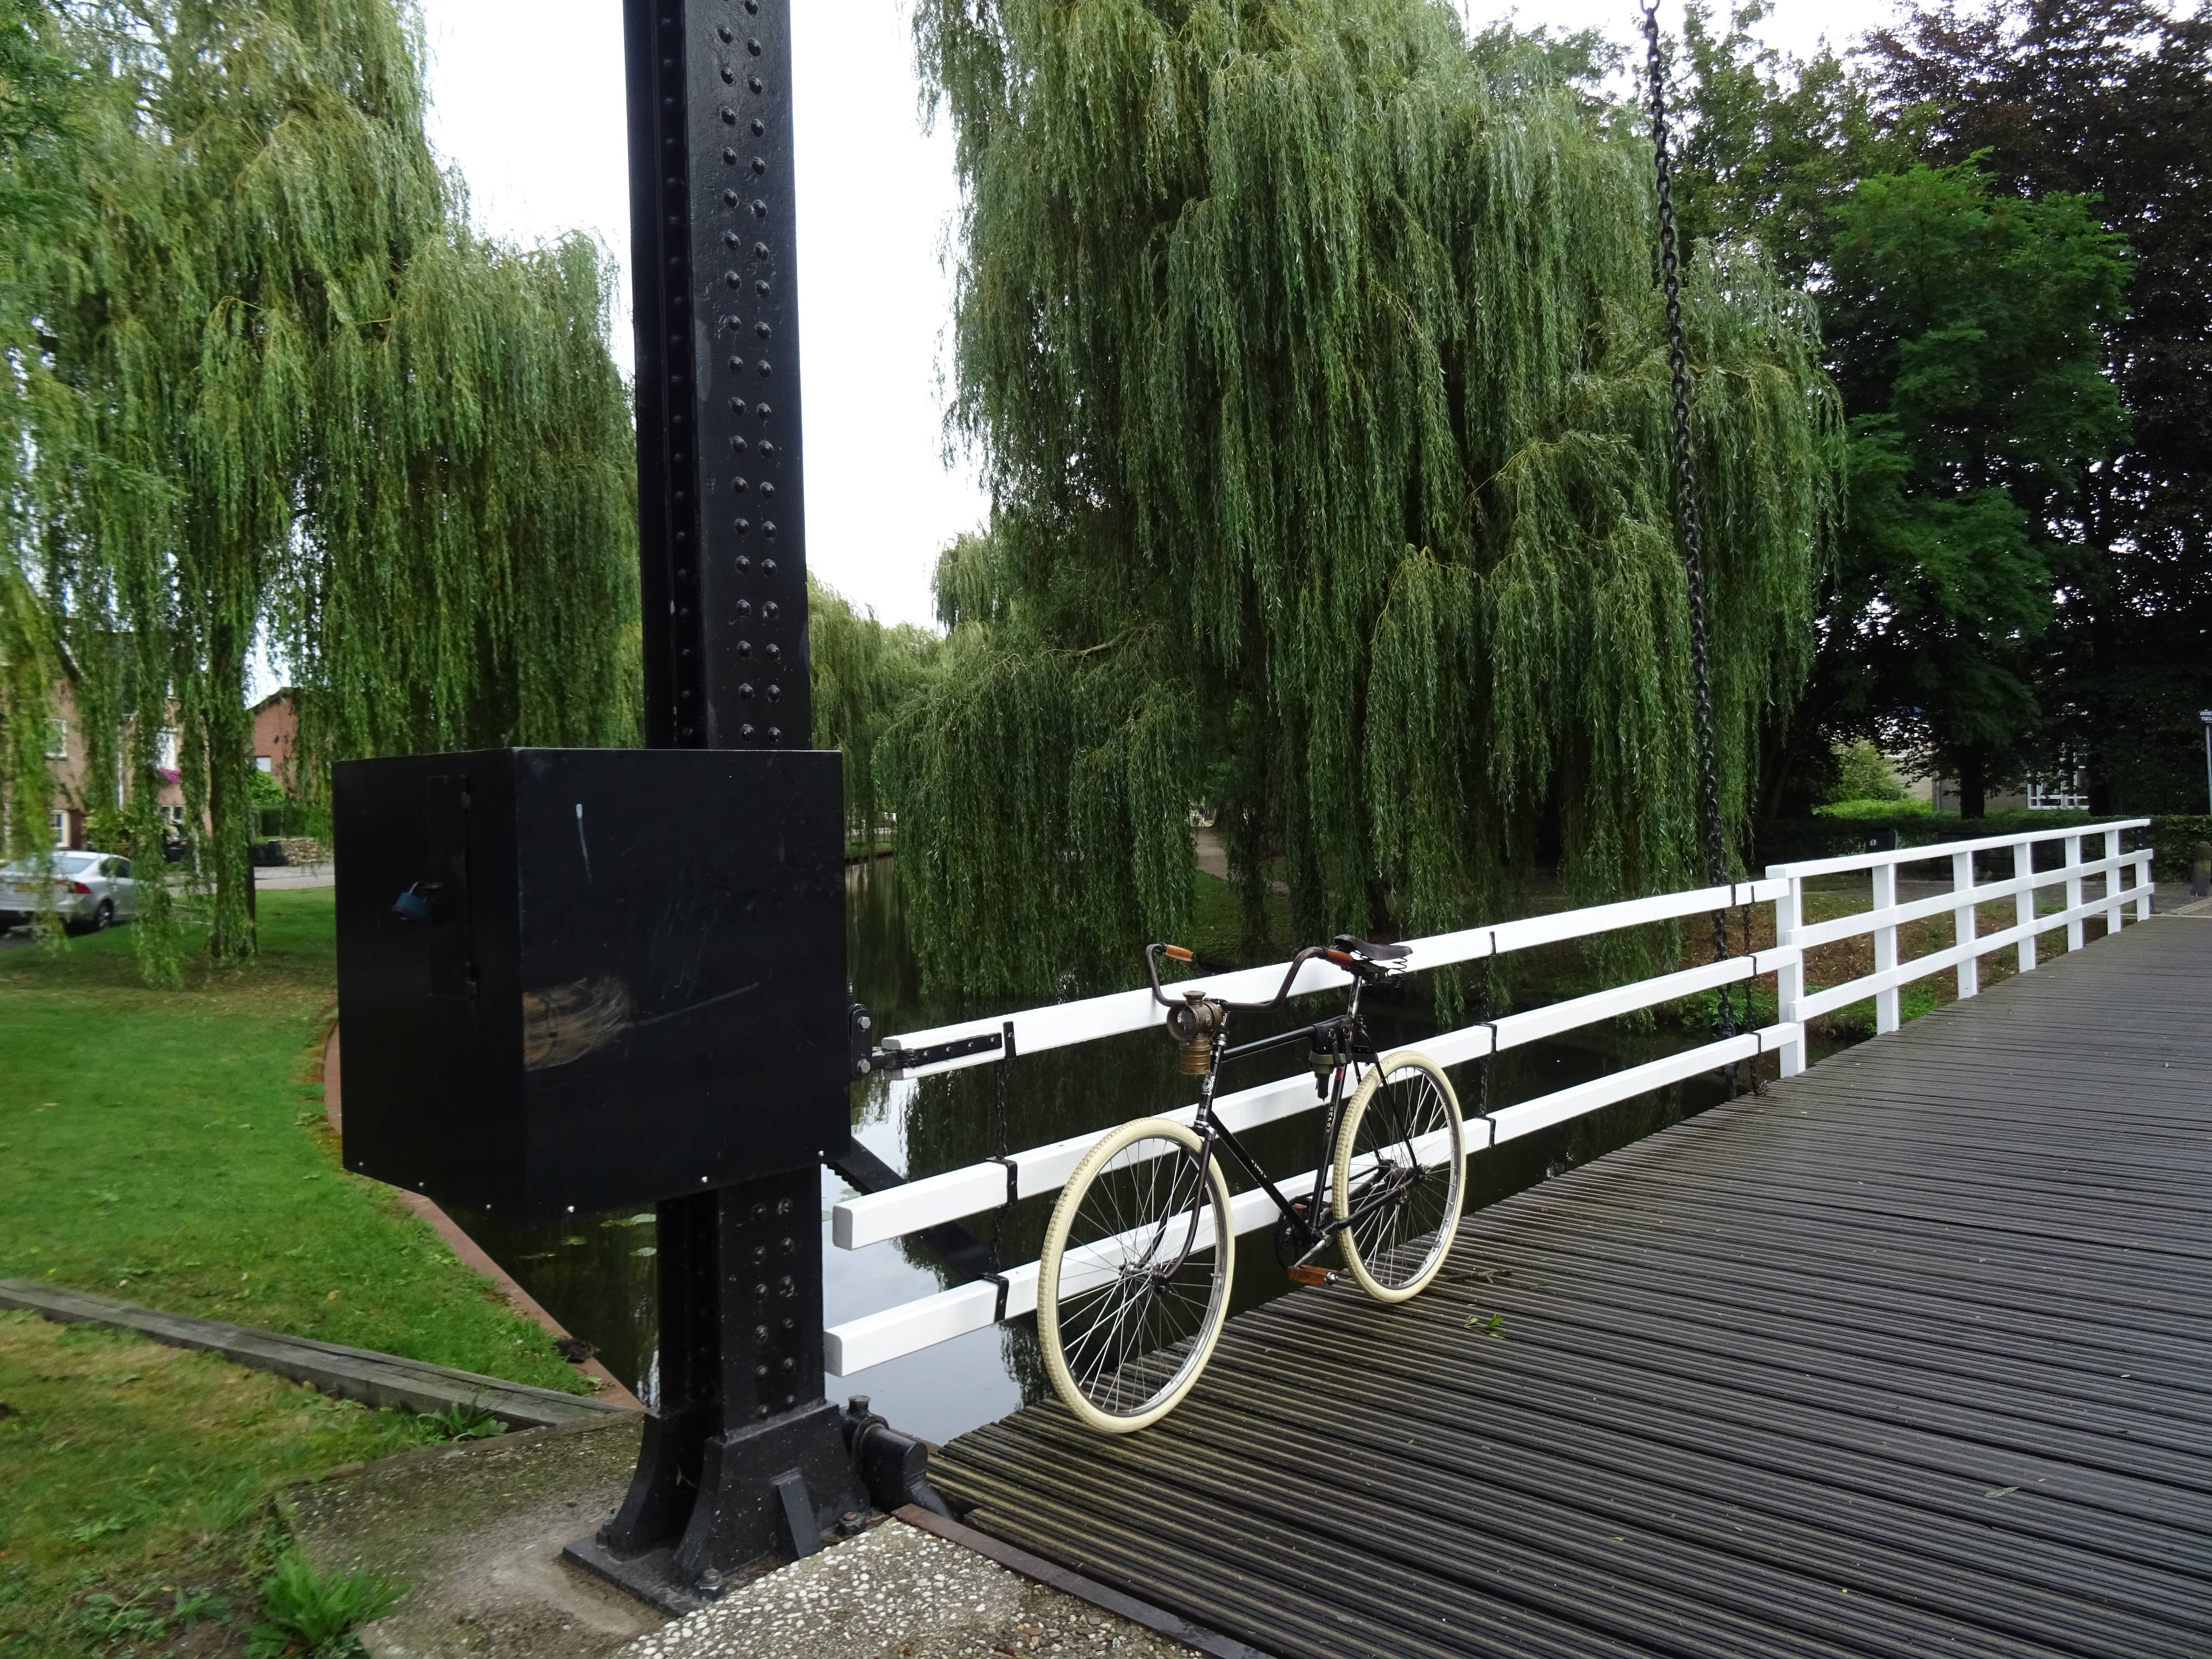
On the way back, a route alongside a river.
The ending point after 141,5km or 87.92 miles of cycling
I was very tired, sore and my butt hurt like heck, butt it was worth it!
My trip with the ol' EmPo bicycle!
I took my tools, checked the bicycle, took some loafs of heavy whole wheat bread, a "junction route description" and some old looking clothes and started cycling.
The weather was great, around 20 degrees celcius.
My goal was to reach "Vorden", the village where the bicycle is originally built. And continue to "Zutphen", which is one of the old hanseatic cities of the Netherlands and in my opinion, together with "Deventer" one of the most beautiful cities in the Netherlands.
I started at "Museum Buurt Spoorweg" in Haaksbergen, my boring home town. Took some pictures and started cycling.
A sign of the "junction cycling route" in the Netherlands. They are mostly easy to follow. When in doubt: straight ahead! This one, number 25, was the first one I had to follow.
A short stop in the village of "Borculo".
A lot of dirt and forest roads!
Old farm and inn from 1679.
Junction number 62 near the Farm.
Junction 61 (where I had to go) straight ahead!
Mushroom post directions: They tell me "Vorden" is 1,3km away!
Entering the village of "Vorden"!
A quick stop at the castle. My Nephew joined me for some nice ride videos (more on that later in the finished thread).
This is my sheet with the Junction route from Haaksbergen to Zutphen. The way back is another sheet.
Sustenance! That thing on the left is called a "Kroket", its great!
In the beautiful village of "Zutphen" after 70km of cycling.
On the way back, a route alongside a river.
The ending point after 141,5km or 87.92 miles of cycling
I was very tired, sore and my butt hurt like heck, butt
it was worth it!
Wow!
Amazing trip and photos!
Sent from my iPhone using Tapatalk
Amazing trip and photos!
Sent from my iPhone using Tapatalk
MattiThundrrr
Rattus All Terrainus
That must have been a HOOT on the old forest roads. The bike is awesome. Thanks so much, Bart
Wow!
Amazing trip and photos!
Sent from my iPhone using Tapatalk
That must have been a HOOT on the old forest roads. The bike is awesome. Thanks so much, Bart
Thank you guys! Also thanks for the awesome tips and kind words during this build
Epic ride! You took a handmade, rat rodded, bicycle to the pinnacle of accomplishment; you rode it on an extended, epic trip! 
This photo, while it doesn't show the 'physical' aspects of your build, completely embodies the 'spirit' of your build. Since it was taken with a real camera, I had to modify it a bit to make the size acceptable. Brought the bike up a little closer.

This photo, while it doesn't show the 'physical' aspects of your build, completely embodies the 'spirit' of your build. Since it was taken with a real camera, I had to modify it a bit to make the size acceptable. Brought the bike up a little closer.
Last edited:
Latest posts
-

-
 Bike from the Dead's Freshly-Exhumed Finds (Everything I've dug up since 6/15/21)
- Latest: Bike from the Dead
-
-

-

-
-
-
-
-
