Cycle Therapy

Rat Rod Bikes Bicycle Forum

Help Support Rat Rod Bikes Bicycle Forum:

This site may earn a commission from merchant affiliate links, including eBay, Amazon, and others.
Joined
Aug 5, 2008
Messages
641
Reaction score
579
Location
The Land of Three Mile Island, PA
I was going to sit this one out but I've been parked on the sidelines watching you guys have too much fun. It finally got the best of me so I figured it was time to jump in...

I'm doing another klunker this year. They're not super exciting visually but they are practical and great fun to ride. This will be a fairly traditional geared hybrid and the parts selection will be mostly old school with a few modern items mixed in. The name comes from the relaxation and enjoyment achieved by building something like this then taking it out and using it. It's great therapy!


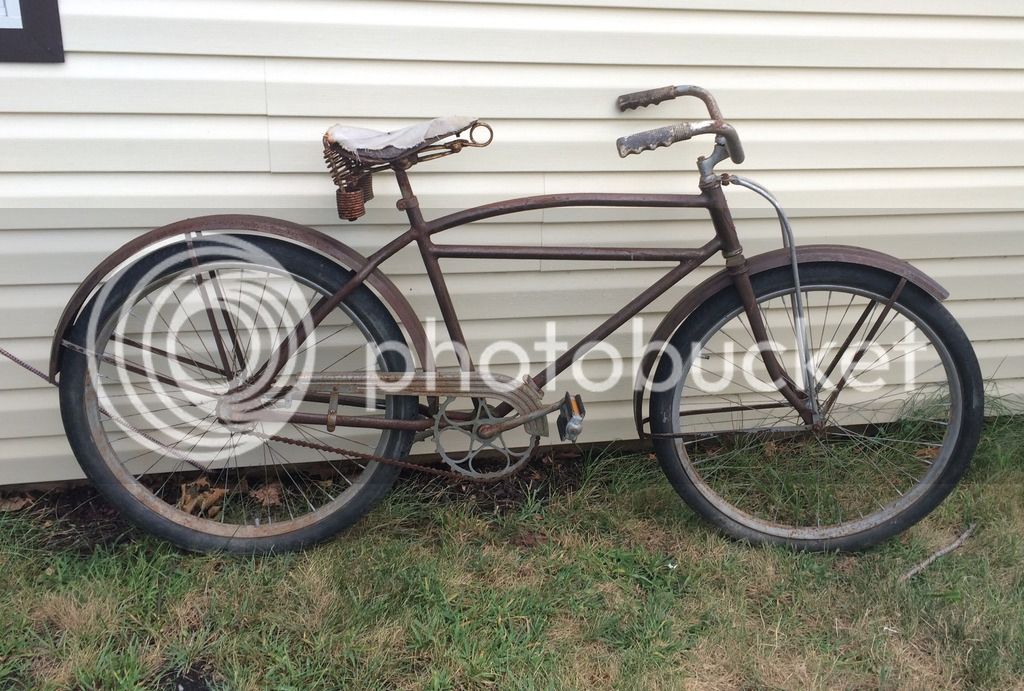
I'm starting out with this. A 1937ish BF Goodrich-badged Schwinn "C model".

I bought the bike back in 2015. It was going to be my candidate for the Off Road Buildoff but adult things got in the way. I got the bike parted out, stripped the ugly brown spraypaint, and primed then it was forgotten about. I was too busy last year to enter it in BO11 so it just got buried a little deeper in storage. Fast forward to today and I'm going to rattle can it matte black and see what kind of parts I have for it... I've been picking up klunker parts here and there for the last couple years. Now the trick will be seeing if I can remember what I did with them.
 
I was going to sit this one out but I've been parked on the sidelines watching you guys have too much fun. It finally got the best of me so I figured it was time to jump in...

I'm doing another klunker this year. They're not super exciting visually but they are practical and great fun to ride. .

Great Philosophy for a RRBBO. Make something that YOU will use. I've built a bike or two that was visually exciting, but they weren't great fun to ride. Some people will push the envelope on building something that looks good, but not comfortable...That's "art", and that's great also. But to me a bike that has a function and is comfortable to ride is just as attractive.
 
I find a vintage straight-bar frame, truss rods, a long spring saddle, skip tooth sweetheart chain wheel, sweet chain guard and original full fenders quite visually exciting, even if some of them have to go.
 
Great Philosophy for a RRBBO. Make something that YOU will use. I've built a bike or two that was visually exciting, but they weren't great fun to ride. Some people will push the envelope on building something that looks good, but not comfortable...That's "art", and that's great also. But to me a bike that has a function and is comfortable to ride is just as attractive.
This is why I keep building bikes like this. They get used! My first Rat Bike was long and low but it was a knee killer to ride more than a few miles.
 
Let the scavenging begin! Frame is now black but will get a "patina sanding" to make it look weathered. I test fit my new Tange headset and fork as well as spread the rear triangle to accommodate a rare 36 hole atom drum brake hub. Also had a derailleur hanger welded on.

klunk2_zpsdn6pjalx.JPG


Checking frame alignment after spreading the stays... I'm skipping a lot of the "tool porn" shots this time...

klunk3_zpsydkmoord.JPG


These little adapters work well on postwar frames with forward-facing dropouts but not so hot on the rear facing ones used on prewar frames. The angle is wrong and it makes removing the wheel tricky. Since we're going to be using index shifting, one of these was cut and welded to the frame.

IMG_6034_zpsbjveifaj.JPG
 
Last edited:
More parts scavenging has yielded a donor wheelset with Deore XT hubs and Araya RM-20 hard anodized rims with stainless spokes. I'll save the hubs for another project since I have some picked out for the build.

IMG_6001_zps7wwsjmyr.JPG


Found this set of old, slightly bent motorcycle bars. We'll see how they work...

IMG_6044_zpshhqhnpuh.JPG


I love these Suntour thumbies and have been saving them for a project like this.

IMG_6045_zpsrhgwtk8o.JPG


Got an index compatible Suntour rear derailleur to go with the thumb shifters and a Shimano Deore XT front derailleur.

IMG_6043_zpsxblxdht2.JPG


Got a nice Deore DX triple crankset to give this heavy thing plenty of gears. This will be mated to a Truvativ adapter and sealed cartridge bottom bracket.

IMG_6023_zpsflcvlye5(1).JPG


I've had these Pederson self-energizing brakes gathering dust in my house for almost twenty years. Never found a use for them. Maybe I'll try them on this bike...

IMG_6049_zps9zpjuuya.JPG
 
Last edited:
Like your parts choices!~ I haven't seen those Pederson brakes for a long time. Had them on a Gary Fisher Gemini tandem back in the day. They did slow that big two man bike down pretty well for a rim brake. RaT oN!
 
I found these Vans grips that I bought for my BO#9 entry. They looked awful on it and got put away but they might work here...

IMG_6047_zpsavtt7wzt.JPG


These way cool finned Scott Mathauser brake pads are getting used if I can figure the Pedersons out...

IMG_6053_zpsogfay5do.JPG


I always liked these SR pedals. They're still fairly easy to find and affordable when they do turn up.

IMG_6057_zpsap5l97jg.JPG
 
Last edited:
Excellent parts going on. Looks like with a bit of spit n polish you will be finished before everyone else....
 
Excellent parts going on. Looks like with a bit of spit n polish you will be finished before everyone else....

I still have to build both wheels and find a lot of the little trinket parts that tie everything together. This will be the sixth Klunker I've done and they get easier each time (I hope)... :wink1:
 
Last edited:
I always try to match the color of my socks with my shirt.....I never thought of matching my brake pads with with the grips!
 
Next up will be the wheels. The rear drum brake will require different length spokes than are on the current wheel or in my stash.

I used a couple online spoke calculators to come up with the proper size. If your hub and rim measurements are close, these are very accurate. Just plug in your numbers and it spits out a spoke length, sometimes two (Different lengths for left and right side.)

http://www.bikeschool.com/tools/spoke-length-calculator

https://leonard.io/edd/

I was going to buy the 252 mm spokes that calculator calls out for but I have a lot of expensive tools laying around so I decided to cut the 261's that were on the old wheel and roll new threads on them. We'll see if my measurements were right as the wheel builds are coming up next...

IMG_6002_zpsdnew6mxz.JPG
 
Last edited:
Loving the build so far, great parts choices! My buddy rides those Vans waffle pattern grips on his dirt jumper and loves them. What is the story behind the Self Energizing brake? Have not seen those before, but love the color.

One of my favorite online spoke calculators is Freespoke. Allows you to customize a lot of the aspects of the calculations, came in handy when calculating spokes for fatbike wheels that offset to both sides instead of one, and when Surly was doing offset 135 hubs on Moonlanders. When you finish calculations it gives a little diagram of the hub flanges, spokes, and rim that helps me visualize the wheel build and ensure calculations look correct. There are a lot of measurements for different hubs and rims, but I always double check to make sure mine are the same as theirs. Also, they allow you to create an account so you can save calculations, and hub/rim measurements for future reference.

http://www.kstoerz.com/freespoke/fullcalc

I have used a few spoke calculators over the years and I am enjoying this one!

Love your avatar by the way!

keep the rubber side down!
 
What is the story behind the Self Energizing brake? Have not seen those before, but love the color.

Love your avatar by the way!

The Pedersons move in and forward on an internal cam when you squeeze the lever. The rotation of the wheel continues to pull the brake inward giving it a little more power.

Thanks! The avatar is my 72' Mini Clubman with a giant chrome Raleigh Roadster on the roof rack.

 
Got the rear wheel all laced up, trued, and round. The online spoke calculators told me to use 252mm spokes and they were dead on!


Took the front one apart to replace the hub and all the spokes stayed in place. Thought it was kinda neat...


The old XT hubs are pretty popular with the vintage mountain bike crowd. Since it matched the rear one I'll keep them as a set for another project (Or to fund another project) I'm using a much newer XTR hub in a rare 36 hole configuration. It's not really something you would expect to see on a klunker but I like it and it's buttery smooth!
One of the trademarks of a good wheelbuilder is being able to see the label through the valve hole. I'm not a good wheelbuilder but I can fake it from time to time...


Tires are mounted and the freewheel is installed. Wheels are ready!

 
Unique part selection and a good looking frame, youre gonna have folks doing a double take. Very cool build.
I like the tan /brown, Ive been gathering brown parts too, to go with a tan springer seat, itll all come together on a future build.
 
Love the parts mix on this one. How did you roll the threads on the spokes? Have you been leaving out more tool porn?
I did leave out a lot of shots of the tools in action with this build but I used the Hozan spoke threader in the left of this photo...

IMG_6002_zpsdnew6mxz.JPG
 
Last edited:

Latest posts

Back
Top