Tribute to our friends

Rat Rod Bikes Bicycle Forum

Help Support Rat Rod Bikes Bicycle Forum:

This site may earn a commission from merchant affiliate links, including eBay, Amazon, and others.
This thread is better than watching American Chopper on the Discovery Chanel. The Tuttles have nothing on you two! WOW!
 
This is some serious Work of Design!!!

The details are so professional and meticulous, i'm very very impressed
and more important then that I'm learning!!

Thank you for such a good "report" about this project of yours!!

Inspiring is the word :D
 
When I first saw this thread I was like Hmmm :? :?: but after seeing the top tube done it's more like :shock: then the taillight is just :shock: :shock: :shock:
 
Thanks again everyone for all your positive comments! They really help fuel our creativity! We are trying to put new twists on old tricks, and we are happy you dig what we’re doing!

RatRodDad said:
I do have a question, though. How to you turn Lampy on?
Do you just reach up under the fender and push the button? Or did you rig up some sort of switch to turn it on?
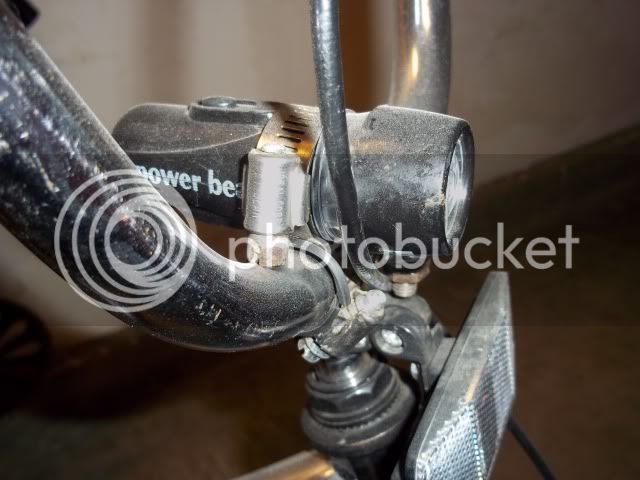
Good call RatRodDad! We knew that we would need to be able to switch Lampy the taillight remotely because we want to have the fender hugging the tire as tightly as possible. Your idea is in line with what we want to do. You will have to stay tuned though because we still need to figure out exactly HOW to accomplish our plan. In case you haven’t noticed, we are making this stuff up as we go. :wink:
 
Blinky

Speaking of making stuff up, I started working on an item that is not on my daughter’s list. She has compassion for ALL things, living or not (well . . . except for spiders!), so I knew it would not be long before she started worrying about Lampy being lonesome. :cry:
Won’t be a problem now . . . this is Blinky the headlight. A new friend for Lampy! :)
This one is a little different than the LED flashlight used for the rear, but it too is just an inexpensive aluminum job that uses three AAA batteries.
cda1c025.jpg


I put it the lathe and turned the end to spiff it up a little.
cad8a1f3.jpg


I’m thinking it would be pretty easy to mount it to the bars like I did with my son’s BMX. A couple stainless steel hose clamps. A far cry from duct tape, these clamps are strong and handsome . . . ya just gotta love the beauty of their simplistic functionality!
What do ya think? Will it work?
72c4d169.jpg
 
Re: Blinky

Fireproof said:
I’m thinking it would be pretty easy to mount it to the bars like I did with my son’s BMX. A couple stainless steel hose clamps. A far cry from duct tape, these clamps are strong and handsome . . . ya just gotta love the beauty of their simplistic functionality!
What do ya think? Will it work?

I say go for it! It would be Blinkey's Ying to Lampy's Yang. (Or should that be the other way round? :? )

On a more serious note. This is inspirational stuff, it's a credit to you both and the community on these forums.
If either of my daughters put half the effort into a project when they're older. I'll be a proud father.
 
Hmmm i think if you just straped it on there it would stick out like a sore thumb!
Maybe intergret some leds to the bars? Something cool like that im sure you can come up with better ideas :mrgreen:
 
Here's a thought. Get a second Lampy or something similar - and mount it on the frame somewhere - maybe on the seat tube down under the seat.

Take the bulb out of that one and in it's place, solder some wires to the bulb connections. Then run those wires under the fender to the original Lampy - and pull the back end off of that one and remove the batteries and solder the wires to the back of that bulb connection.

So that way you could keep the batteries and the off / on button on the second Lampy out on the frame - and only have the bulb in the original one. Then you could use the off / on switch on the second one to turn it off and on. And you could easily change out the batteries whenever they needed changing.

That's one idea and I'm sure there are lots of other ways to "get 'er done". :D

It will be fun to see what you finally decide to do.
 
RatRodDad said:
Here's a thought. Get a second Lampy or something similar - and mount it on the frame somewhere - maybe on the seat tube down under the seat.

Take the bulb out of that one and in it's place, solder some wires to the bulb connections. Then run those wires under the fender to the original Lampy - and pull the back end off of that one and remove the batteries and solder the wires to the back of that bulb connection.

So that way you could keep the batteries and the off / on button on the second Lampy out on the frame - and only have the bulb in the original one. Then you could use the off / on switch on the second one to turn it off and on. And you could easily change out the batteries whenever they needed changing.

That's one idea and I'm sure there are lots of other ways to "get 'er done". :D

It will be fun to see what you finally decide to do.

So the second lamp would be the switch and batteries to the first? Seems like you'd just remote mount a power source and switch to the original tail light.
 
if you can find a touch switch [like the touch desk lamp]
or maybe you can get some information for the specialist in electronics they work with diod ,sensors and micro switchis :idea:
I think exist evan touch torchlight
try chinese products in google maybe you will find somethink :wink:
the bike it is turn verrrry good 8) I have one aye on you guys :mrgreen:
 
Zoso, that's pretty much what I suggested. The second light would not really be another light - but just a remote power source and switch for the original light.

I just thought it might be easier to make it up from another light than to come up with a different type of power source and switch.

Fireproof and his daughter will probably come up with something even more creative. :D :D
 
RatRodDad said:
Fireproof and his daughter will probably come up with something even more creative. :D :D

This is why I've not made any suggestions. I couldn't come up with anything better than what they are doing. 8)
 
Thanks to all for checking in and for your nice complements. My daughter wanted to give an update tonight, but as she was finishing her homework, little bro informed us that he needed a report typed for tomorrow. While I typed, those two fell asleep, so I’m doing the
update.


RatRodDad said:
I just thought it might be easier . . . than to come up with a different type of power source and switch.
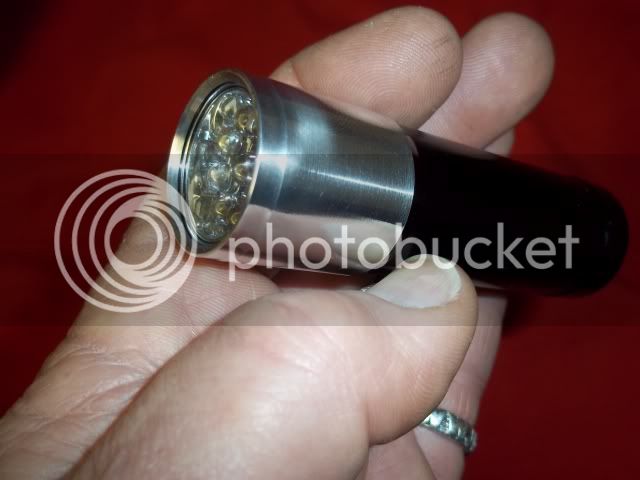
We like your idea RatRodDad. The flashlights we are using have sealed switches and the batteries are held in a removable cartridge. Be a shame to waste good stuff like that!
We did a little experiment with the flashlight and found that your idea will work great, but I also found out that we can solder one wire to the bulb (actually, it’s a printed circuit board with the LEDs on it) and the other end of the wire to the battery cartridge. Since the bulb holder is held to the fender with two set screws, it will be grounded. All we need to do is ground the “switch/battery holder” when we mount it and the circuit will be complete using only the one wire. Thanks for your help! :wink:


druggedonions said:
. . . If either of my daughters put half the effort into a project when they're older, I'll be a proud father.
Don’t wait! Time flies, so get them involved with what ever you are working on (or better yet, get them their own projects that you can work on together), but do it as soon as you can. If they’re too young to do the actual work, teach the names of tools/equipment, safety habits, etc. Have some old clothes for them to wear for when they help dad. Buy them some gloves and goggles that fit. Let them have fun while they learn some cool stuff. "Train children to live the right way, and when they are old, they will not stray from it".
 
Blinky's new disguise

druggedonions said:
I say go for it! It would be Blinkey's Ying to Lampy's Yang.
nick_ish said:
Hmmm i think if you just straped it on there it would stick out like a sore thumb!
Thanks for backin’ me up Druggedonions, but I would have felt bad takin’ my son’s clamps. Gotta side with Nick-ish on this, so we will be doing something a little different here. Again, wanting to utilize the sealed switch and removable battery cartridge that these flashlights have, I thought it would be nice to have "Blinky" hidden in plain sight! Hope you like this little game of Hide-N-Seek as we do our best to camouflage this thing! :wink:


This is some of the stuff we'll use . . . those circles are MDF (that’s a fancy way of saying sawdust mashed into the shape of a board! :lol: ) They get stuck in the hole saw after cutting through the board. Elmer’s Carpenter’s glue will stick them together, and the 1/4" holes in the center gets a temporary dowel to keep them aligned while the glue dries overnight. The hole will come in handy again latter.
I’ll be using a couple short pieces of that white rod . . . it’s 3/4" diameter fiberglass.
Those four little pieces in the lower left were cut from that dark brown sheet of .062" phenolic.
BlinkytheHeadlight081.jpg


A few more things . . .
styrene, the black is .062", and the white is .25" thick;
acrylic, the blue stuff is actually .090" clear with blue masking, and the other is .25" mirrored;
on the right is 3/16" aluminum.
ae022c4e.jpg
 

Latest posts

Back
Top