=D---- Laprise E-BTR

Rat Rod Bikes Bicycle Forum

Help Support Rat Rod Bikes Bicycle Forum:

This site may earn a commission from merchant affiliate links, including eBay, Amazon, and others.
That's a nice fit! Is it custom made?

The 28t - 32t will give you some added low end torque but will also take some top end speed away.
i know , i dont plan on going 40mph wich is the rated speed on 36v , i may in fact have to get a larger rear sprocket , only need to go 32KMH and have torque for the hills here .

the sprocket seem to be production made , there were a few of different tooth count listed , its stainless (motorized bike diskbrake mount sprocket) was pretty lucky with the fit , very happy about that :)
 
Well , i thought progress was going to start but it will wait a little bit more , i got a superbe vintage cutterpin crank from a friend , but unfortunately one of the arm was slightly bent and the it was a bit to narrow , so i tried to bend it wider , annnnnd it broke in half :doh::confused:
the good thing is i was abble to see that the chainring had the perfect spacing on the 68mm BB and that i only need about 1/2'' offset in the crank arms :)
they actually sell these wide/offset cranks for motorized bikes , but they all seem to be out of stock :oops:

so yeah , by the time i find/order/recieve a other month will have passed :20:
and i dont want to weld stuff up before having all the peice of the puzzle to make sure everything lines up properly
 
got the crank, tandem bb and grips
the bb was bigger :doh: so i made a big cylinder to house it and will use set-screw to lock it
18342763_1027901884011687_615946867950796910_n.jpg

18403351_1027901897345019_2955845507430768229_n.jpg
18342279_1028299390638603_6206141350916923388_n.jpg

welded to the chainstays
 
I am in the Cad design (Cardboard Aided design) for the motor mount. :)

also my neibor dumped a old jigger that had almost the perfect curve 1'' tubing on the handle :praise: gods of freecycling ar with me :21:
18425188_1030217283780147_699311801792045217_n.jpg
18485651_1030217263780149_640134521541082584_n.jpg
18485394_1030217280446814_7473423647356247154_n.jpg
18446890_1030217300446812_963120497092314821_n.jpg
 
found a good place for alluminum
got myself some 6061-t6 3/16'' thick plate and a possible new job:)
my initial idea was to waterjet the peices , but just decided to take the time and do it with my jigsaw and save rare dollars.
took about 30min to cut the first part but on the plus side i end up with massive biceps form the force needed to keep the saw down and the vibration :21: :showingbiceps:
18486255_1032302243571651_4347491048764622819_n.jpg
 
looks great. How long did it take to cut them all out?
thanks , i would say a good intensive 6h total with the edge filing.
its a heck of a workout ill tell you that. but hey still better than working 2days for someone else to pay for cad drawing and waterjet , thats how i see it
i am surprized i only needed 1 blade and its still perfectly fine,
fist timer cutting metal with a jigsaw
 
Last edited:
Loop tube = done!
made with table legs+jigger handle+Elgin seat tube
so much work , i just pray it will hold strong.
''gotta do what ya gotta do'' when no tube bender

18622371_1034447096690499_257171047485843778_n.jpg
18664267_1037433973058478_46576648152832592_n.jpg
 
starts to shap up :happy:
its all tacked , ill make sure everything is 'straight' before final welding
18670923_1037819419686600_8078574365674207534_n.jpg

camera bug :oops:
18670868_1037822329686309_95369463840953091_n.jpg
 
here the set screws , decided to go with 4 just to make sure
18813223_1039214426213766_1506518561445611309_n.jpg

and a better view of the frame , now all welded and mostly cleaned.
i added plates to reinforce the headtube joint , and we can't really see here , but the top tube was made flat so i can have more steering angle since the tabs on the top of the fork are pretty close to the head tube
18700098_1039214412880434_129300670944552898_n.jpg

now it time to make a bunch of mounts for motor/tank/fenders/seat/etc..
 
Last edited:
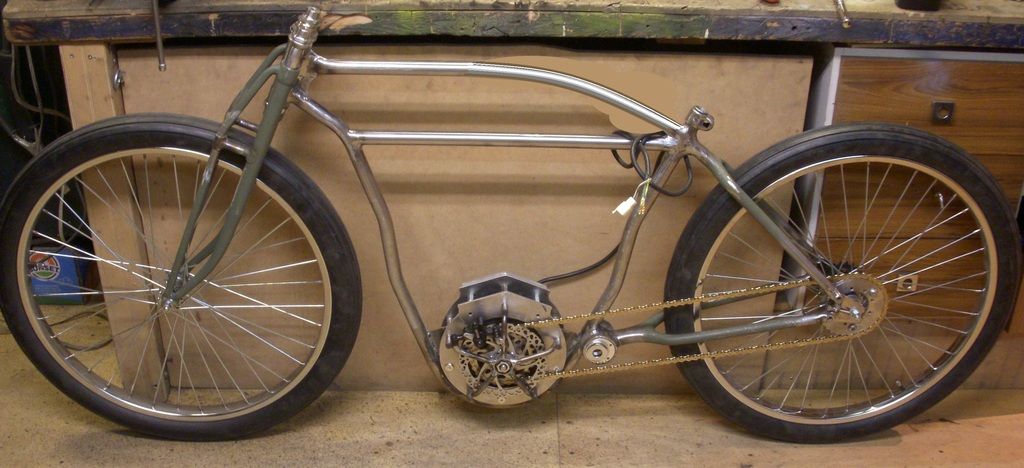
finally done the motor mount and made things work:crazy2::whew::113:
18813430_1043979819070560_6939218842084812332_n.jpg

it also reinforce the loop , was done in 3 parts plates welded together ,holes drilled in it , screwed extention nuts on both sides then welded.
i left about 3/16 space for washers to dial-in the offset of the motor.
18813251_1043479695787239_2374855567665207608_n.jpg

I re-cut the ''motor drive side'' aluminum support plate to use as spacer for the crank side . now its super strong!:113:
18920629_1043979805737228_3314415232947425194_n.jpg

as for the motor side , decided to make a star shape steel support that is thinner/stronger and allowed me to mount the disk brake caliper. it also look awesome imo
18881865_1043979862403889_1018840441700539470_n.jpg

modified the caliper to remove the cable hanger cause it was sticking out and looked bad (ill make one on the motor mount) .. also grinded it a little to clear the the sprocket and chain behind ... and finally to drilled a new tiny hole for the spring inside the swing arm to rotate it where i wanted it
18893255_1043979795737229_771462539433395021_n.jpg

and here is why i wanted to put the weight in the loop instead of playing it easy using it as a rear hub .. 50lbs about 17 for the motor and 33 for the frame+wheels .. the battery is about +10lbs ..
still not bad to lift . about the same as my cargobike i think
18893400_1043979872403888_6530601909123187233_n.jpg

Battery is finally ordered , going with 48v 20ah:)
 
Last edited:
i might mod the top tube , thought the straight top tube would look beter , but not so sure now
top%20tube%20mod_zpspbrlrwrj.jpg
 

Latest posts

Back
Top