Custom 2 Speed Motered Cruiser

Rat Rod Bikes Bicycle Forum

Help Support Rat Rod Bikes Bicycle Forum:

This site may earn a commission from merchant affiliate links, including eBay, Amazon, and others.
Joined
Sep 8, 2009
Messages
317
Reaction score
1
Rating - 0%
0   0   0
Worlklog for the 2 Speed Thudster Box Equipped Cruiser


Please Note:- The Original of this Worklog
Can be Found on Endless Sphere Forums, this below
is a copy from that thread as such some names and events mentioned
may make little sense, my apologies in advance.


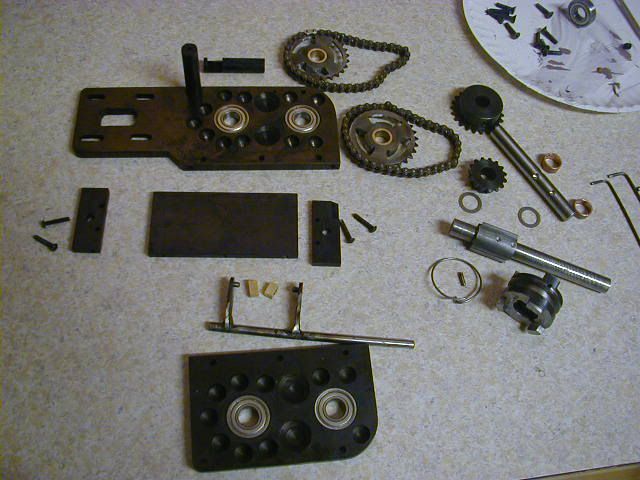
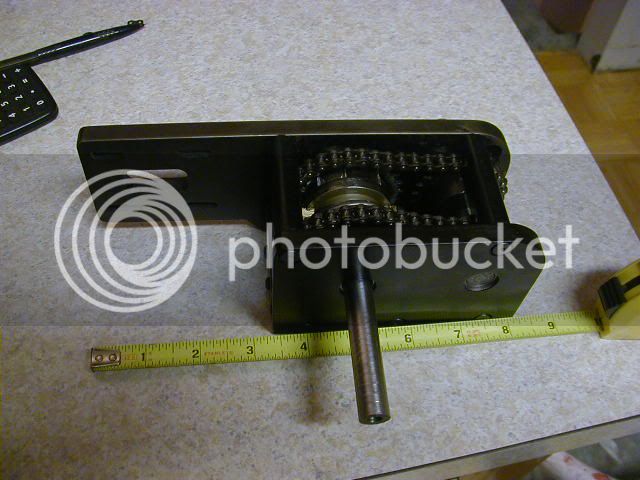
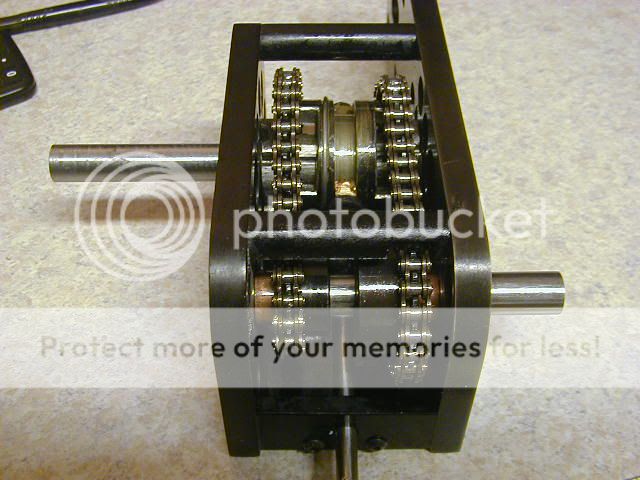
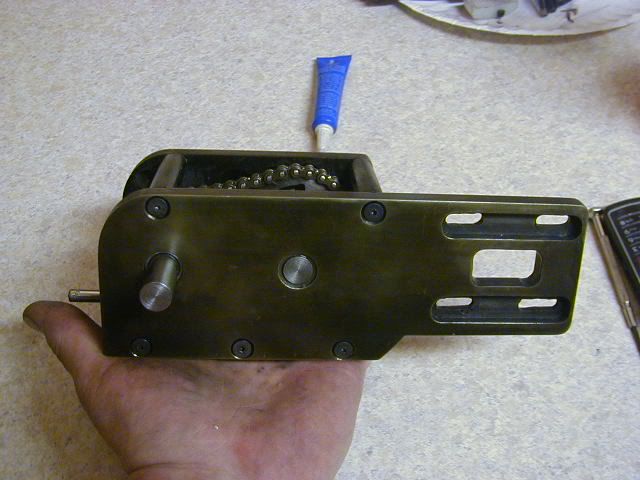
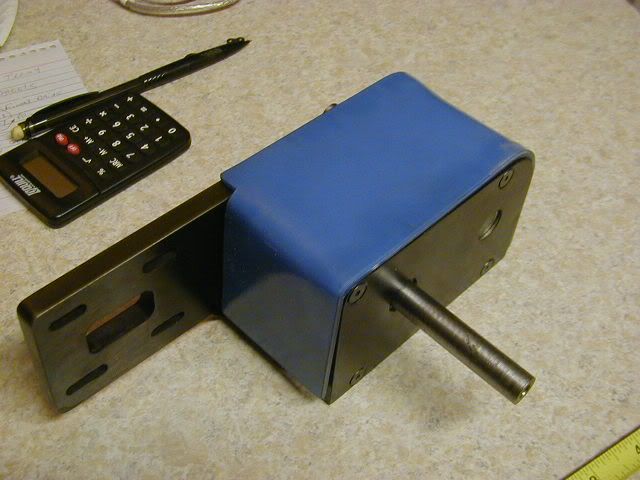
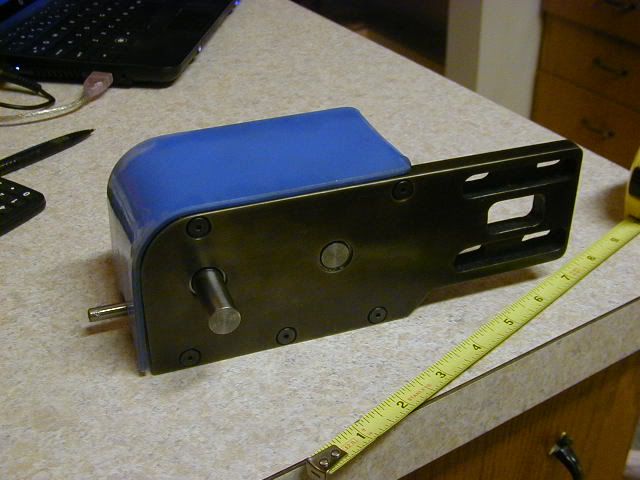
As many are aware i have started a new build that will be home for a 2 Speed box Thud has generously
offered to build for me, along with a re-winding of the old HXT Turnigy to give it some more beans and reliability
Huge thanks to Thud for this, i believe there is a limited number of these boxes being made
i am extremely appreciative that Thud has offered one of them to me for my bike, the generosity of the people
of this forum constantly blows me away, i freaking love this hobby and the die hard developers that continue to
push it forward...Thankyou Todd :)

The bike, I am loosely basing the frame on a Basman frame-->
33aflmp.jpg


^^^This is similar to what i am chasing, i want a lil more ground clearance
and slightly smaller rear end to better fit a 24in rim/ tire combo i will be using.

I made a few rough sketches to get the sizing and placement of components, CAD
buffs are in for a treat here BEHOLD :mrgreen: -->

Capture.PNG


:mrgreen: As you can see i still haven't warmed to using AutoCAD (or any other CAD software LoL)
hey! i used a rule this time!...and mathomat mines a lil different
but has circles i used for the wheels :lol:

Not having a certain"member from Costa Rica's skills" to build frames accurately without a jig, i decided another frame jig was
needed, this time however a i wanted a re-usable jig for future builds-->

I used a couple of pieces of exercise equipment i found during kerbside rubbish collection

Exercise_equipment.jpg


The addition of a new hydraulic height adjustable bench in my workshop has been a god send makes things so
much easier for me, the jig sits upon it.

IMG_5474.jpg


Currently its set for this new frame, but could easily be altered for next build. I shall keep it stored away between builds.

IMG_5482.jpg


One issue i have had with the last 2 frame builds is sourcing a 1 1/8 I.D head tube, on both occasions Matt.P has come to the rescue
donating first a OCC Chopper frame and now a West Coast Chopper frame, the headset was cut and cleaned
HUGE props to Matt, thanks again mate :) -->

IMG_5489.jpg


IMG_5505.jpg


IMG_5507.jpg


I started bending tubes couple of days ago, taking it slow and steady, the tubing being used
is ~31 OD with a 1.6mm wall thickness for the front of the frame, chain stays will us ~21in 1.6mm wall thickness

IMG_5488.jpg


After making a mess of a couple of pieces i finally got the 'lines' i was looking for
in this frame, i roughly cut the tubing to length before I laid the frame out on the
concrete for a better look-->

IMG_5509.jpg


Happy with the bends i then went about mounting the frame into the jig
notching the ends of the tubing and tacking it together-->

IMG_5521.jpg


All the tubes lined up beautifully, they are very 'sturdy' tacs :D this combined with the jig
holding the frame in position for full welding will see the frame stay in this exact shape :) FYI: Frame has ~30 degree of rake for the curious amongst you ;-) ...

I intended to work on the rear of the frame yesterday afternoon but a mate getting me metal plate
for the rear dropouts didn't come through (his boss was on the lookout all day apparently LOL)
I have some RHS beam here i use as an Anvil i will chop into instead , these will be some more
seriously thick dropouts to make Hyena'sfrock fan bois jealous LoL

So...I positioned some scrap tubing on the rear to get an idea how the rear will come together-->

IMG_5524.jpg


Hopefully next update will see pretty much complete frame ready for full welding...

As always the build will be delayed due to $$$ and freight wait times, but i shall endeavor
to have this bike finished ALOT quicker time than the cruiser has taken, looking at 3 months
MAX hopefully sooner for full mock up ride. I guess some will be wondering colours i will be using
for this frame? well.. I am going with Satin Black (differs slightly from GangSTa 8) black)...All alloy
parts not polished to chrome finish will
be anodized Blue...Sun Ringle DoubleWide Disc Rim will be used supporting either Schwalbe Tyres Crazy BoB 2.35in or
2.5in Maxxis Hookworms depending how the $$$ situation is going...likely 26in up front 24in rear like pictured bike above...
The drive train...obviously a 2 Speed Thudster box driving via chain on the left side of the bike to
rear sprocket, manual pedal will be right side...very simple.. Hydraulic disks all round
8in front 6in rear..Forks...am on the lookout for some 5-6 year old triple
crown Downhill forks for ~300 bucks...hear of any let me know...
Cruiser will run a sensor ed setup (eventually)
what controller this will be remains to be seen, when time comes to purchase i will see what is going
if it was now, a 18fet infineon most likely with magic from Mr Edward Lyen wavved over it, he is working
on sensorless infineon for these HXT motors hopefully that will materialize sooner rather than later now
he has a pair of these motors to work with...Will run 66v (initially) Lithium Polymer batter config
using GGoodrum boards and balancing system.

Thats about it for now...any thing not covered above ask me and i'll be more than happy
to answer any questions...

Back soon with update...

KiM
 
..I Had a bit of an interrupted day as such didn't get as much done as
i would have liked.

Trimmed my template up a lil marked the shape of the desired dropout on
steel and ripped into it-->

IMG_5540.jpg


IMG_5541.jpg


IMG_5542.jpg


IMG_5544.jpg


IMG_5546.jpg


IMG_5547.jpg


IMG_5548.jpg


IMG_5553.jpg


As i only managed to get the rear droputs cutout today i slipped out to the workshop
this evening and bent up a couple of chain stays... shall do the remaining
two and tack it all in place...

IMG_5555.jpg


IMG_5557.jpg


Apologies this is shocking pic i should of used flash...shall get better pics
when shes all tacked up anyhoot...

IMG_5559.jpg


Cheers all...

KiM
 
The rims i ordered from Chain Reaction Cycles on Friday are here ......5 days from England to West OZ only 3 of them working days BRILLAINT service IMO...

IMG_5715.jpg


IMG_5714.jpg


Hub, headset and rims are all very nice quality rapt in all of them... shall organize some spokes next pension cheque
and lace them up...might be able to get some tires to shall see how funds go..

I also got the chainstays and seat stays all welded, great mate of mine Snapper lent his expertise and together we knocked over the fab of the rear in quick time-->

IMG_5718.jpg


IMG_5726.jpg


Can see in above pic, only one set of welds on the dropouts have been cleaned up, the welds were extremely good after hit with some grinder and flap disk love the turned out very nice ALSO note, there is no longer 'open' tubing Snaps turned the welder up to HI and filled the ends in beautifully! i am well pleased with the result :)

IMG_5725.jpg


With the anti spatter spray liberally applied cleaning up the spatter was much easier affair ...Of course after it was all nicely welded we had to see how it all sat upright with the forks in! Using the threaded rod from the jig we pressed in the cups/sealed cartridge bearings into the frames headtube before fitting the forks and mocking it up-->

IMG_5729.jpg


Frame with forks weighs in at ~9kilo ! Frame alone is ~5.4kilo HEAP HEAPS lighter than the cruiser frame/fork combo...

IMG_5735.jpg


IMG_5747.jpg


Rear dropouts are also now 180mm lots a a room for the big extra wide sturmey archer then some, need to be fitting sprocket AND disk rotor on the left side!
Back with more soon

KiM
 
Thanks for the positive comments fellas :)

My mate Snapper Fish dropped off the gussets he plasma cut for me from 3-4mm steel plate,
snaps made paper templates last weekend to take to work with him, not all the plates will be
used, the front gusset for the head tubes a definite along with the plate for the bottom bracket
the rest unsure but have them if needed...

IMG_5754.jpg


IMG_5755.jpg


^^lil added security seeing the front might be taking a bit more of a hammering than your
average bicycle hahaha...

I have been working on mates 16 odd foot surf ski last few days sanding it and spraying it with Gelcoat shall take a few
pics later today of it hings HUGE...will get back onto the bike over the weekend...

ciao for now

KiM
 
another awesome build, i love your work! your bench, is that an old hospital bed?
 
Another first rate build in the making Kim. Your bench looks suspiciously like a physio plinth, does your PT make house calls now? Is this bike going to have the outrigger setup similar to your last cruiser build? As with everyone else, looking forward to seeing this one progress. :mrgreen:
 
Seems like I remember someone telling me how easy it would be to build that style of frame. :lol: :lol: :lol: :lol: Like I could do it in the dark with my eyes closed. Nice work. :mrgreen:
 
The workbench is in fact a shower table used in hospitals, you were all close haha...my mate gets them through his work damaged thus ending up in the scrap teel bin, this one had side rails that had a few welds broken, soon as they have any damage even minor they are scrapped, i scored this for free. It does have ~2 feet lopped off the end and a 3mm steel top on it now...the whole thing below that is stainless steel too!. The lockable wheels and hydraulic height adjustment makes it very handy for me when welding frames i can lower and raise and swing the table to get to where i want to weld mush easier.

HAHA Uncles Stretch...took me less than half a day to cut, bend and tack it together, & i did have my eyez closed too....I don't use a shield when tacking up frames :p :p :p

Thanks for the positive feedback fellas much appreciated...

KiM

p.s yes it will have stabilizing wheels i couldn't ride a two wheeler without them i am a paraplegic the bike would fall over when i stop :)
 
Glad your back building and posting. As always you do nice work on the build and the details are always spot on , even if you have that funny accent. :lol: :lol:
 
I just got pmed from ThudSTaR 8) The 2 Speed Thudster box is nearing completion...Thud has actually made a complete new unit :shock: due to some alignment issues with shafts and bearings i believe...this has been rectified in the plans also IIRC Thud?

... I have been sent a lil clip of the 2 speed box showing the gear changing lever in action-->


^shot with one of the 808 remote control look-a-like spy cameras ...still waiting on my 2 to be delivered grrrr...

I am so pleased with the whole thing, as i have said to Thud it is alot smaller than i had envisaged after viewing the plans of the box
only requires some polishing and anodizing before its shipped my way! So excited .... Awesome work Thud :D

I have about 1/4 left of this surf ski to sand, i have my spray painter buddy coming tomorrow to spray it seeing he offered and will likely do a better job than i... Is coming up nice anywayz.

I will get back to the bike as said in previous post over this weekend....My hv160 should also be here any day, 2 speed box and rewound Turnigy on route early next week will see the blue cruiser mobile again very soon WOOOTz so missing the bike the weather has been beaudiful...

Big thanks to the ThudSTaR 8) for his efforts...back soon chaps

KiM
 
GOT Lipo? Got room for 22 packs?

So i finished the surf ski over the weekend turned out really well looks alot like a GIANT banana hahaa
either way my mate is very happy with the job, took me best part of two days to sand the bloody thing and thats WITH an orbital sander
all good, mate Mick is a top fella always doing me favors, I didn't hesitate to offer to do the surf ski when he asked if i would give him a hand.
No payment for the work, hes a mate i dont charge mates for my labor but next time i break down i'll be calling Mick
as he has a big van LoL...

So with my workshop back i went out and continued fab on the 2 speed cruiser frame...in particular the aluminum
plates that will hold the electronics...GOT Lipo? Got room for 22 packs within your frame? I HAVE :mrgreen:

Firstly though the front gusset needed trimming to remove some weight, i am ever wary of that 75lb weight limit :p

Head_gusset_pic2.jpg


After the front gusset was added i simply laid the frame upon the 3mm aluminum plate and marked
out the aluminum that will be the mounting plate to hold lipo packs/electronic speed controller etc...

IMG_5758.jpg


IMG_5760.jpg


Same procedure for the lower aluminum mounting plate...

IMG_5759.jpg


The top aluminum sheet I can go ahead and mount, i will use steel tabs welded to the frames tubing to secure
the ali plate to the frame. The lower sheet i will obviously need to cut out sections to allow for the 2 speed Thudster Box
bottom bracket and stabilizer /actuator setup. I did a quick sketch onto the plates to see how we are looking for room hehehe
keep in mind, the lipo 'rectangles' inked on the aluminum represent TWO LIPO PACKS as i will be using 2 packs side by side :p

IMG_5762.jpg


Jealous much Hyena? thats room for TWENTY TWO PACKS within the frames triangle my dress wearing lippy applying, frock mounting friend :mrgreen:

Just having a bite to eat and heading back out, hopefully have the top aluminum plate mounted by days end...
Once i have all the tabs welded to the frame i will be moving to the construction of the carbon fiber/fiberglass
tank and lower battery enclosure...

Back soon

KiM
 
I have a few more pics from this afternoons happenings, not alot but took me all afternoon grrr...

I made 4 aluminum 'tabs' i guess you could call them? to fasten the top aluminum plate
to the frame, i will be fixing another two plates to the frame towards the center of the ali plate
to complete the fastening.

Marked and roughly cut-->

IMG_5766.jpg


2 of the 4 tabs bolted and matched...

IMG_5767.jpg


2 down 2 to go...two tabs are used front and rear to fasten the plate, could of used the one but i am fussy
even though when the fiberglass/carbon fiber enclosures/tank is made none of this will be visible :-S

IMG_5768.jpg


Positioned these on the ali and drilled and fastened using 6mm stainless steel button head cap screws/nyloc nuts-->

IMG_5776.jpg


IMG_5772.jpg


IMG_5775.jpg


IMG_5774.jpg


The alumnium mounting plate still requires a lil 'love' on the edges so the gap between frame tubing and plate is equal
all the way around the plates perimeter...

I plan to use a 10mm threaded rod through the single hole (the hole drilled into the gussets of frame) this threaded rod will
fasten a sheet of thin ply wood in the shape i wish the base of the top 'tank' to be,
when complete this threaded rod will be replaced with 'stand offs' simplier to those used in your pc case to
fasten your motherboard to the case...cept ALOT bigger, i will then use ~8mm
stainless steel button head cap screw to fasten the tank/enclosure to the frame, should be a neat solution i think.

Back with more soon

KiM
 
Too keep the worklog upto date i will copy Thuds latest post from the original log on Endless Sphere-->

"Just droping by to polute AJ's build thread a little bit... 8)

doing a bit of anodising tonight.....turns out the black & deep blues are the toughest colors for an at home set up....may need to invest in comercial dyes & sealers if i ever set my heart on those.

here is a bucket with 20% SULFURIC acid solution, you can see the part already in there anodising away..I have the bucket in a larger bucket with some water & ice to keep the heat in check


P9210015.jpg


The haze in the fluid is a fine stream of hydrogen bubbles coming off the cathode (aluminum flashing)

I have found the icharger 1010+ is an excelent tool for a multitude of re-pourpousing...here the hot wire function works wonderfully as a power supply for this set up.


P9210013.jpg


I bought some liquid "NEGRO" dye on the recomndation of some one on the internet......best I can get looks like s a very deep patina on bronze or "browned" gun metal...not what I would call black....dark chocolate maybe.


P9210004.jpg


personaly I like it.....it is what it is.
back to your regulary schedualed mega build update........... 8)
back to caustic chemicals for Thud..."


Thudster is doing a superb job, the drive and motor will be in the post to me this week! Very excited to get my hands on this one of only a few to be made 2 speed boxes!

Back with an update on the bike this evening...

KiM
 
2 Speed Box COMPLETE

ThudSTaR:leet: has come through with pic as he said he might
again i shall copy Thuds post directly from my Endless Sphere worklog including pics...

Thuds Post

This may be the last post of my contributions to this build.......TRANNY COMPLETE!!!!!!!
TAAA DAAAA!

here is a lay out with all the lil pcs N partzzzzzzz

P9220012.jpg


a close up of the dog hub/detent pin hole & spring groove

P9220016.jpg


P9220017.jpg


P9220018.jpg


P9220019.jpg


P9220020.jpg


so prity....Black & blue :lol:

I will get everything finished up tomorrow eave & Friday we'll post it out to OZ :mrgreen:
its been run in on the lathe & spins free, shifts easily & rock solid....I need to make the washers for the motor mounting screws, & freewheel adapter but for all practical purpose....I am done....only 2 weeks later than I had hoped (motor slowed me way down with monkey business).


I am absolutely RAPT at how its turned out!!! OH FYI: the blue cover is only being used as a mould i.e I will be making a carbon fiber cover that will replace the blue plexi cover...

HUGE thanks to Thud for his time and effort in this project words cannot convey how pleased and appreciative i am... Thanks Todd, your a freakin STAR :leet:

KiM
 
Revved up with the latest pics of the new 2 Speed Thudster Box i hit the garage
and got into shaping the polystyrene for the top tank/enclosure, i will likely
use this space for big mofo Infineon down the track, theres room enough there for
dual 24fet or 36fet controllers....anywayz...now i have Photochop re-installed heres
the 'usual' series pics of the next step in the project-->

Shaping_Polysteryene_series_pic_1.jpg

Yes HiGHSiDE Hyena my frilly frock wearing ladyboy there are o scoops....YET ...but there will be... :mrgreen:

I decided i would make the plug in one whole, prep it fiberglass it then cut it in half and pop the
foam out, trim my mold to size then ill be right o lay up the carbon fiber :)

The shaping was done with an old rusty saw (seen in pic above) and a worn out piece of
sandpaper i used on the surf ski last week, (and yes before anyone suggests it i know you can use a
12v car battery and wire to cut polystyrene but i wasnt about to mess about for 20 minutes
knocking something up when it took all of a minutes to cut it with a saw LoL
) i need to pop
to the hardware store in the a.m to get a few things before i can continuez...back tomorrow with an update

KiM
 
I have a couple of things to report this morning,
firstly a lil something our own Jeremy Harris has very very kindly knocked up for me
and secondly a few more updated shots of the enclosure.

I had the idea to use a high torque metal geared servo to operate the 2 Speed ThudSTaR 8) Box
but other than a dial on a servo tester no means (i could come up with myself) to
operate it with a simple push button switch, enter the electric guru Jeremy Harris
I asked Jeremy last Friday? i believe if he would be able to, well i knew he
would be able to haha the question really was if the man had time to with all his other projects
thankfully he did! Jeremy has built me a lil 'doohickey' that i will plug
into my dc-dc converter (same one that will operate the linear actuator for stabilizers)
and with the push of a button change gears, Jeremy even sent me a lil video of it-->

[youtube]t9lDemfDdRY[/youtube]

LED is to show which gear is selected! How neat is that haha

The high torque servos used on the cyclic of rc helis are ooooober strong
i plan to set linkages up same as throttle/brake linkages are done on
rc nitro cars i.e spring either side of the lever the rod pushes, this compensates
for any extend push pull rather than straining anything... I'm extremely happy with the result a
HUGE HUGE thank you to Jeremy for taking time out from his own projects... aaand
apologies to Mrs Harris for taking her hubby away from the many chores i am sure she must
be finding for him to do around the house now he's recently retired hehe...Thank you Jeremy :D

I have also managed to get the top enclosure to a shape i am happy with
also, we changed tack a lil as to how i explained in my previous posts Knoxie
the enclosure will be constructed and mounted. Rather than glassing the enclosure as a whole
and then slicing it i have now decided to cut the enclosure in half now its shaped
and mount both halves to make sure they look and fit EXACTLY right. The plan now is to use
some more 3mm aluminum at either end of the enclosure, these mounting plates
will actually be glassed into the finished enclosure, for the actual fastening the
same method will be used as previous explained in the worklog.

Few pics of of how the enclosure is now shaped

top_enclosure_final_shape_series_pic_1.jpg


Johnrobholmes said:
So you want to race to completion of a tank? You win :lol: I forgot how much I absolutely hate sanding and shaping. Almost as much as I hate painting and fiberglass work.

LoL@ Johnrobholmes Sounds like you like fiber glassing
and sanding as much as i like playing with anything electronic. Have you not
heard of orbital sanders John they really cut the sanding time down :p

I'll have some money tomorrow so i can pick up some more resin lil short after
fixing mates surf ski for him last week (OH FYI: Mick was out last weekend on
the surfski when we all went fishing, it looks awesome in the water he is very
pleased with the result:)
) today i plan to coat the foam with a combo of body
filler and spray putty to get both a smooth finish and protect it from the resin
eating it away...Come Thursday i can get to glassing the two sides up to make
the mold i will use to lay the carbon fiber in that will produce the smooooth
finished enclosure we are looking for this time round...

Shall be back with more soon..

KiM
 

Latest posts

Back
Top