BOARDTRACKER BOMBER XIII * FINISHED *

Rat Rod Bikes Bicycle Forum

Help Support Rat Rod Bikes Bicycle Forum:

This site may earn a commission from merchant affiliate links, including eBay, Amazon, and others.
Thanks Buddy! :)

I looked at the pic of your springer and went out into the garage to look at Gumby Rumpus for comparison ..... Looks the same to me the way you have it set up. ( only difference is mine was a girls springer [ which I shortened the head tube to fit a Schwinn frame] and yours is a mens ). The only thing I can think of... are the bolts you used on the lower end the ones with a collar? ( which is what you want to use). Mine came complete , I just took it apart , modified , and reassembled mine. rides nice!
Thanks again! Great Build too by the way!

Hope my jibber jabberin helps ;)


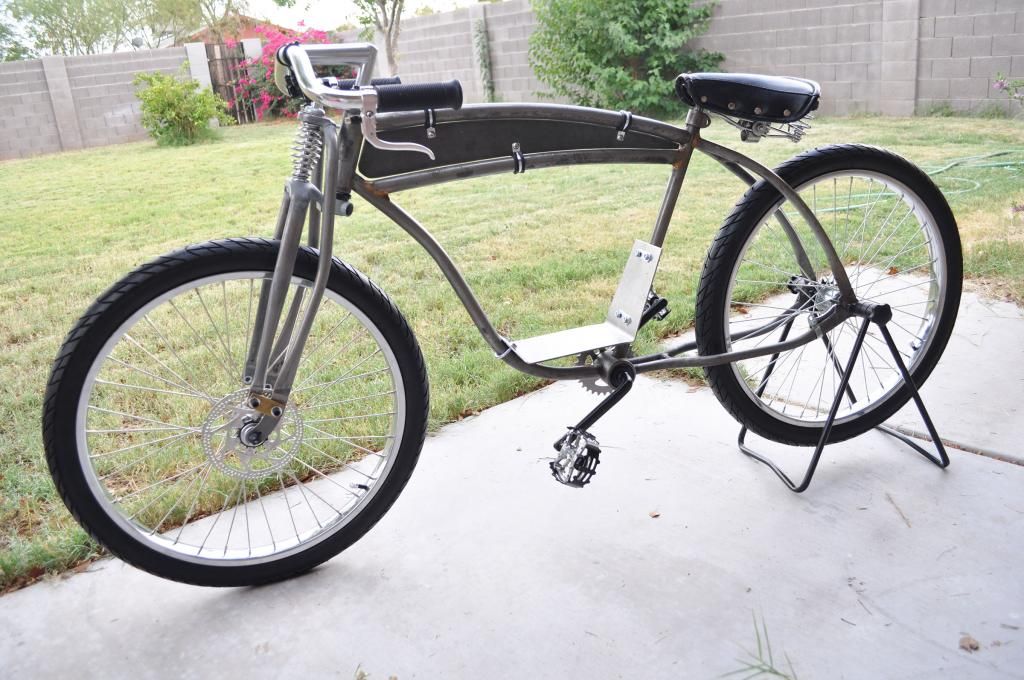
So, I have these columbia springer forks that I am using and I am going with the 24" wheels. I am thinking about duplicating the bottom of these about a inch and a half up from where they are now (where the the wheels bolt on) to shorten. Drill cut grind. I do not see it affecting anything except height. If anyone has done this or knows of a pitfall I am about to step into please let me know.
63c749e6-5156-456d-8782-c6f52c12d77c_zpsb06c0cb3.jpg
 
Thanks Buddy! :)

I looked at the pic of your springer and went out into the garage to look at Gumby Rumpus for comparison ..... Looks the same to me the way you have it set up. ( only difference is mine was a girls springer [ which I shortened the head tube to fit a Schwinn frame] and yours is a mens ). The only thing I can think of... are the bolts you used on the lower end the ones with a collar? ( which is what you want to use). Mine came complete , I just took it apart , modified , and reassembled mine. rides nice!
Thanks again! Great Build too by the way!

Hope my jibber jabberin helps ;)

I actually did not get that exact springer in the mail. Mine had none of the front hardware. I drilled some bronze 1/8" bar and used some hex bolts to nut. it gives a little play. I have no idea where to get the bolts you mentioned with a collar. I was thinking lock tight on the nuts. I have some other springers that has the same set up and it seems alright. I may hit you up on a conversation if when I go for the full assemble I have problems. I am waiting on everything to grease and tighten at this stage. With the engine I have a long way to go. Thank Odin we have more than a month to finish these things!
 
I actually did not get that exact springer in the mail. Mine had none of the front hardware. I drilled some bronze 1/8" bar and used some hex bolts to nut. it gives a little play. I have no idea where to get the bolts you mentioned with a collar. I was thinking lock tight on the nuts. I have some other springers that has the same set up and it seems alright. I may hit you up on a conversation if when I go for the full assemble I have problems. I am waiting on everything to grease and tighten at this stage. With the engine I have a long way to go. Thank Odin we have more than a month to finish these things!

I was working on my Elgin Build Off Bike today. This is a collared bolt from my Beehive springer to show you what I meant :)
Hope this helps

 
I was stumped on where I could find something like that but while looking at the photo a company came to mind that should have them. I am wondering how key they are in the correct function of the fork. I am using a softer metal for the joining supports so maybe I should not push my luck considering disk brakes and speed of a motor will come into play. Thanks again!
 
Ok, so not a lotta progress but I do have a crappy photo for ya. It basically shows where the seat will mount and on what level and basically where the engine will mount. I am going to try to weld up the seat bracket this weekend. I am chipping away on the motor. The gas tank I am going to use is a small round tank that will set under the seat between the wheel and seat tube at the top. I just picked up a glass fuel filter to run under the carb instead of the factory bulky attached gas tank. I also am using the braided steel brake and throttle cables. I should be a little further along but still waiting on parts (cranks lost in mail) and a few other things.

enginemountsideII_zpsec507231.jpg

sideenginewhole_web_zpsca96f641.jpg
 
Last edited:
Great looking bike, that under seat gas tank will look awesome, far too often I see really nicely done bikes ruined with those peanut tanks that come with most motor kits. Also, I think with standard bolts snugged tight you may end up making a rigid fork out of a springer, TuckTuck used cut down tee-nuts on standard bolts to make rocker bolts for his build, that's one option that might be worth looking into.
 
Great looking bike, that under seat gas tank will look awesome, far too often I see really nicely done bikes ruined with those peanut tanks that come with most motor kits. Also, I think with standard bolts snugged tight you may end up making a rigid fork out of a springer, TuckTuck used cut down tee-nuts on standard bolts to make rocker bolts for his build, that's one option that might be worth looking into.

Thanks, I think I have solved my issue with the springer. Should be cake. I have never really liked the stock gas tanks too much for my rides.
 
So I figured out how to fab an air breather that will look tight and take minimal room. It is in the photo, the dome (not quite finished). I modified the muffler with the addition of the copper pipe. I am going to check out how that sounds soon. I attached the fuel filter which will allow a gas tank off the engine. It is in the photo as well towards the back and centrifuge clutch in the front. Chippin away.

drivetrain_web_zps5c095d0d.jpg
 
Last edited:
I received some parts in today and went to town on the bike (well after a 3 hour ride on my other motorized). So, I bought a 32 tooth BMX sprocket that does not fit on cruiser cranks took a dremil and opened it up. U-Bolted the motor mount on the frame and it fits well but points out a few problems with clearance for the cranks. I am thinking heating the crank arms and bending with a pipe and vice. I have 10 ft of heavy duty 410 roller chain that is next on the agenda.
enginemountsideII_web_zps2f30f6fe.jpg

frontview_web_zpse0303f19.jpg
sideenginewhole_web_zpsca96f641.jpg

enginemount_progress_web_zps33fa845f.jpg
 
I really hope you can get a video of this thing running, I am so looking forward to hearing that motor run out that straight pipe!

Luke.
I will definitly do that. I have not fired it up yet with the new muffler. I am doing that this weekend. Have to get on some minor welding as well.
 

Latest posts

Back
Top