1978 CCM Voodoo MX 850 Canadian BMX Bicycle

Rat Rod Bikes Bicycle Forum

Help Support Rat Rod Bikes Bicycle Forum:

This site may earn a commission from merchant affiliate links, including eBay, Amazon, and others.
Joined
Aug 26, 2016
Messages
327
Reaction score
1,291
http://www.ratrodbikes.com/forum/in...anadian-bmx-bicycle-1978.100613/#post-1015658

Above you'll find the thread I started for another bike that got held up by paint. This wasn't in any particular build-off, but now it is. I was born in 1978 and this is one of the bikes I remember desperately wanting to own. I rode one a couple times because someone in the neighbourhood had one, but that's not the same as calling it your own.

Anyway, I pretty much have everything ready to go for this bike. I have a few design decisions to make. I have a set of chrome bars I might try, and I also have to decide whether or not I like the NOS OGK mag rims. Maybe after I get this and my fastback put together, I'll have time to start a third bike. There are several oldies but goodies hanging upside down in the garage like sleeping bats, waiting for their turn to see the road again. Can't wait!!

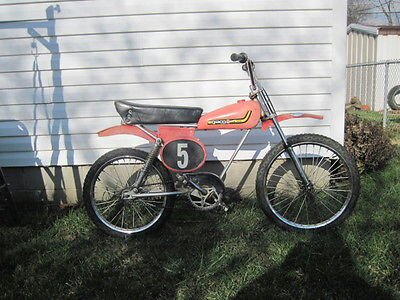
Here are a few summary pics from the original build thread, along with my newly finished gloss black powder coated frame.

IMG_5077.JPG
IMG_4907.JPG IMG_5079.JPG IMG_5082.JPG IMG_5083.JPG IMG_5087.JPG IMG_5091.JPG IMG_5098.JPG IMG_5100.JPG IMG_5102.JPG
IMG_6266.JPG
IMG_6267.JPG
 
Some of these bikes come up from time to time here,even with shifters. Okay all 20", but something about them,that draws you to them.. Me likey.
 
Yeah, this thing drools cool! I'll be the black mags will give it a unified look in the color scheme, but I'm a generation ahead of you, and partial to the spoked wheels. Either way, you have a gem on your hands!
 
Yeah, this thing drools cool! I'll be the black mags will give it a unified look in the color scheme, but I'm a generation ahead of you, and partial to the spoked wheels. Either way, you have a gem on your hands!
Yeah, I think I'm leaning toward the spokes as well. Good thing it's an easy switch and I'll be able to try both. Might have to have a vote later on.
 
I took my Fastback 100 off the stand and decided to start building up the CCM MX bike because it's a little more straightforward to put back together. This bike was in pretty good shape, although someone along the way spray bombed it black and I had to clean a lot of over spray off of parts.

IMG_6376.JPG IMG_6377.JPG

The nice thing about these old CCM bikes is the availability of parts that were used on old exercise bikes. I have several sets of these old one piece cranks with sprockets that are in mint condition. I picked the nicest set and started to put the bottom bracket together. Ten minute job at most right?? Three hours later I had a functioning bottom bracket. Every time I put everything together, I was getting serious wobble on the crank and couldn't figure out which part was the culprit. I was also getting clearance issues with the head of the bolt on swing arm. This all happened around midnight and I was determined to fix the problem before I went to bed. Finally on the fifth mix of parts, the problem disappeared and I'm still not sure what it was, since all of the parts appear to be identical. Might have been bearing cones, but I lost track of the variables in this late night crank wobble science experiment.

IMG_6379.JPG IMG_6380.JPG IMG_6381.JPG

Bottom bracket done! On to the fork. Thankfully this one went a lot smoother. I picked up this NOS fork from a guy that I routinely buy parts from and I got a pretty good price on it. It's identical to the original except for the handlebar clamps. The new ones are nice and shiny new chrome, but I think I'm going to have to go with the original top clamp which isn't in bad shape at all.

IMG_6382.JPG IMG_6384.JPG IMG_6389.JPG

Unboxed the NOS fender before I went to bed and I always get a kick out of these old parts when they still have the original price tag on them. I was lucky to get this one for $35, but would have been nice to get it for $2.95. These are really hard to find these days, and the original was a little faded for my liking, even though it is still in decent shape.

IMG_6390.JPG IMG_6391.JPG
 
Very cool bike way to keep it alive. I remember them as a kid it was the one you wanted if you wanted be like Evil Knievel.


Sent from my iPhone using Tapatalk
 
Got most of the bike put together. Put the mag on the bike for literally 30 secs. That's how long it took me to decide that I was going to go with the original spoke wheels which cleaned up very nicely for a bike from 78. I have about 4 of these old loaf seats. Strangely enough the one that is NOS seems to be the worst one because of the quality of the stitching. Since time should not be an issue with this build, I'm going to sew my own cover with nicer vinyl and better stitching. More on that later.....

IMG_6392.JPG IMG_6395.JPG IMG_6396.JPG IMG_6397.JPG IMG_6406.JPG IMG_6407.JPG

Still need chain, number plates, grips, kickstand, new tires, and decals at this point. I also have a few accessories in mind.

IMG_6408.JPG
 
I bought this old horn light combo on Ebay last year fully intending to use it for this bike. Again, check out the original price tag. Anyway, I think this light matches the bike perfectly. I've been working on bikes for a long time and one of my pet peeves is the cables that people zip tie to frames for generators and lights. My goal with the horn button on this light was to cut the cable and run new wires through some black brake cable to make it look like it belongs on the bike.

IMG_6393.JPG IMG_6394.JPG

I made use of the 3d printer again for this part of the job. The first thing I printed was a bracket to hold the light itself. This was fitted by making use of the fender mounting holes. I have two bolts from the bottom side holding the fender in place, and there's enough room from the top to fit two separate bolts to hold the light bracket in place.

IMG_6409.JPG IMG_6413.JPG IMG_6414.JPG IMG_6415.JPG IMG_6416.JPG IMG_6417.JPG
IMG_6418.JPG


With the light fitted to the new bracket I had to figure out how to mount the horn button and run it through a brake cable. I decided to put the wire into the top of the light and screwed a brake ferule into the top of the light housing to accept the cable. I also decided to run the cable through the existing reflector bracket hole in the top triangle. The original horn button was simply re-wired and fit into the 3d printed housing I designed. Each part took a few minutes to draw in CAD. The light bracket took 45 minutes to print, and the horn button housing took an hour and 15 minutes. Although they both represent new technology on an old bike, I think they both blend nicely into the original aesthetic.

IMG_6426.JPG IMG_6427.JPG IMG_6431.JPG IMG_6432.JPG IMG_6434.JPG IMG_6435.JPG
IMG_6438.JPG

IMG_6439.JPG

IMG_6441.JPG
 

Attachments

  • IMG_6429.JPG
    IMG_6429.JPG
    247 KB · Views: 194
  • IMG_6437.JPG
    IMG_6437.JPG
    316.5 KB · Views: 185
And now the seat. The funny thing about this build is I have four loaf seats that are nearly identical, the worst of which is the seat that came on the bike, and it really wasn't that bad. One of the seats is NOS but in my opinion it was the worst quality and the stitching was kind of wonky. As some of you saw with my Fastback 100 that has also migrated to this build off, I learned how to use a sewing machine to make my own covers. So this is officially my second recovering job where it's not just a flat piece of vinyl stretched over a pan.

I bought a couple yards of 1" heat pleated vinyl and it was quite pricey and hard to find. I ended up getting it on EBAY. Most places stock 1.5" pleats, but it just looks too big and most of the old seats use 1" pleats. This stuff is great because it saves me the time of having to sew all of those pleats which is what I did on the Fastback seat. I took the old seat apart and used it to make templates for the new cover. The vinyl stretches over time, so I find the best way to make a pattern is to lay the vinyl flat and tape it to a piece of cardboard. With all of the pieces cut, it was off to the sewing machine. The seat pan uses sharp little tabs to clamp the cover in place. It also had a strip wire piping stitched to the entire bottom edge of the cover to help hold it in place. I actually reused the wire by sewing it into some strips of vinyl. This step is easier if you use double sided tape.

IMG_6447.JPGIMG_6446.JPG IMG_6448.JPG IMG_6449.JPG IMG_6450.JPG IMG_6451.JPG
IMG_6452.JPG IMG_6453.JPG IMG_6455.JPG

I reused the main seat foam because it was in good shape, but cut some new 1/4" foam to wrap the whole seat in. I use the spray adhesive the upholstery guy swears by. It works really well. He also told me to make sure to wrap the foam around the edge of the pan, and also suggested using spray adhesive on the vinyl in conjunction with the metal tabs. Putting the cover on is pretty easy. It's just a matter of stretching it out evenly. I'm pretty happy with how this one turned out, and I think my next one will be even better.

IMG_6464.JPG IMG_6466.JPG IMG_6467.JPG

The grommets were pretty easy to put in place, and I recommend putting the cover on first before you punch any holes through the vinyl. I simply poke a hole through with an awl and then installed the grommet. I simply put the whole assembly in a vise and clamp it down.

IMG_6468.JPG IMG_6469.JPG IMG_6470.JPG
IMG_6475.JPG


If you're going to get into recovering seats, I suggest you make a trip to your local upholstery shop. I buy scrap off-cuts of vinyl and foam, and I even get the grommets there. Anyway, I get a little better at this each time. Here is the finished seat next to a NOS one in front.
 

Attachments

  • IMG_6454.JPG
    IMG_6454.JPG
    262.9 KB · Views: 194
  • IMG_6456.JPG
    IMG_6456.JPG
    253.5 KB · Views: 188
  • IMG_6465.JPG
    IMG_6465.JPG
    223.4 KB · Views: 187
  • IMG_6474.JPG
    IMG_6474.JPG
    308.8 KB · Views: 175

Latest posts

Back
Top