1936 WOMAN'S CWC

Rat Rod Bikes Bicycle Forum

Help Support Rat Rod Bikes Bicycle Forum:

This site may earn a commission from merchant affiliate links, including eBay, Amazon, and others.
Joined
Sep 17, 2013
Messages
4,201
Reaction score
9,080
Location
The middle of the Upper Peninsula of Michigan
Rating - 100%
3   0   0
THIS WOMAN'S CWC BIKE WAS GIVEN TO ME LAST SUMMER. MY DAUGHTER WANTS ANOTHER VINTAGE LOOKING BIKE TO RIDE.
8ddebc54-b907-4c08-abb8-6b668d84fbc0_zpsssfbp7wy.jpg

I STRIPPED AND CLEANED IT IN THE DRIVEWAY WITH OVEN CLEANER. TOOK OFF ALL THE GREASE AND PAINT. I DID IT ON TOP OF THE SNOW SO IT WOULD WASH AWAY WITHOUT KILLING MY GRASS. STRIPPER IS TOO MESSY AND SLOW IN THE COLD AND OVEN CLEANER IS CHEAP.
IMG_1181 1.JPG

THE CHAIN STAY BRACE ABOVE WAS PREVIOUSLY FIXD CROOKED WITH HALF A PIECE OF TUBING. I WELDED IN A NEW PIECE.
IMG_1188 1.JPG

FIRST A COAT OF GUN RUST REMOVER, THEN A COAT OF PENETROL DRYING OIL AS A PROTECTANT AGAINST RUST. IT'S DRYING ON MY WOOD STOVE. I USED A TORCH, FLUX AND ACID CORE SOLDER TO FILL IN THE FRAME DENTS. LEAD IS EASIER TO WORK WITH THAN BONDO ON STEEL THAT IS THICK ENOUGH TO AVOID WARPING. IT FILES EASIER THAN BONDO WITH A BODY FILE AND WON'T GUM UP YOUR FILE OR SANDPAPER. I FORGOT HOW NICE IT IS TO WORK WITH LEAD. IT IS TOO COLD TO SOAK THE FRAME IN PHOSPHORIC ACID IN MY JET SLED SO I USED HARSHER CHEMICALS AND WIDPED IT OFF THEN RINSED IT IN BOILING WATER OUTSIDE IN THE DRIVEWAY THEN I SCRUBBED IT IN OUR SPARE BATHROOM BATHTUB. THE RUST TREATMENT IS A COMBINATION OF PHOSPHORIC ACID, SULFURIC ACKD AND MURIATIC ACID. THE FRAME WAS SMOKING IN THE COLD WHILE THE ACID WORKED. THIS IS AN EXPERIMENT TO SEE IF I CAN DO PREP IN A SIMPLER WAY OUTSIDE IN THE COLD.
DSCN0006.JPG

MOCK UP SO I CAN WELD ON THE CHAIN GUARD MOUNTS. IT WILL HAVE A DIFFERENT FORK AND TRUSS RODS AS I STILL HAVE TO STRIP THE PAINT FROM THAT FORK. I NEED TO GET SOME MORE WELD THROUGH SPLATTER PROOF SELF ETCHING PRIMER. I MAINLY USE IT AROUND WHERE I WELD TO KEEP THE SPLATTER FROM STICKING.
DSCN0008.JPG
 
Loving the look of this build, and the lines of the frame so sweet.
 
I fabed up some chain tensioners out of carriage bolts.. I finished the second one today. It's been in the single digits F for the last two days so I can't work in my shop long as my fingers freeze. Short work sessions with no coat and slippers. Your hands freeze before anything else so why bother dressing up with a coat, hat or shoes. Sometimes I work in my stocking feet when it is 0 F, but not for long. My assembly work is done inside and fab in the outdoor shop.
DSCN0023.JPG
 
Nice work man, if ya need any parts this troll (MI troll, not the internet variety) can hook ya up, love the old CWC's.......
 
Nice work man, if ya need any parts this troll (MI troll, not the internet variety) can hook ya up, love the old CWC's.......
There are a lot of CWCs around here too as they were sold by Wards. The only thing I might be interested in is skirt guards. I haven't decided on a seat yet either. I had to change gearing for the chain to clear the curved stays. It looks like 44 x 23 will give her lower gearing for our hills and still clear. Thanks.
 
I don't like how a lot of chain guards and kick stands move around. I welded on an L brace on the BB to mount the chain guard. I also welded on the the bottom of kick stand bracket. I have welded on chain guard mounting brackets before and always have a hard time fitting it. Clamps don't work on the BB as there is stuff in the way and the clamps don't hold. I ended out fitting it by hand and fine tuning it by filing. I tried to hand hold it while welding. The bracket moved a little, but still nothing is rubbing and it looks OK. You can see the top part of the homemade L bracket sticking up towards the camera on the left side of one of the chain guard braces. The bottom of the L faces toward the non drive side and I can't seem to clamp it in place. I have to leave the mocked up chain guard in place to make sure it is OK. After tacking it can be welded solid, which I did already from the bottom side. Has anyone got a better way to hold a small L shaped bracket to the bb for welding? I have also drilled and tapped the BB and screwed in the L bracket before welding but if you don't get it perfect you have to fill, drill and tap again. Welding is hard so it doesn't tap well. On the one occasion I drilled and taped I was lucky and all I needed was a slightly wedged shaped washer spacer to get the mount perfect. Got to be a better way.
DSCN0034.JPG
 
Last edited:
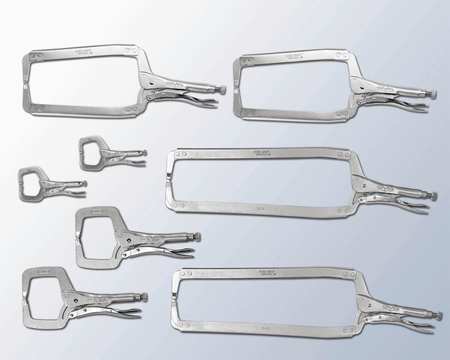
Long nose vicegrips/locking pliers are handy for holding small items for welding.
Good idea, I have many vice grips but no long nose. I'll have to see if they can bridge a BB. I bet I can find a pair that will. None of the standard original type ones I have opened far enough to bridge the BB. They would have interfered with the welding anyway so I dismissed the idea of vice grips. I have seen very small needle nose ones but I bet there is a type that would work.
 
I found another before picture. I stripped this bike, used the skip tooth drive and handlebars on another frame and hung this frame in my garage at camp, where my daughter saw it and wanted it. The lucky seven post was donated to the Chicago Tail Draggers raffle build. The fenders are on a bike with a bent frame and fork that is chained to a tree on our single track trail called the "Rusty Bike Trail". Someone stole the original rusty bike when scrap was high so I donated two old maggots, one for each end of the trail.
IMG_0489 1.JPG
 
The fork and truss bars I am using have been painted red in the distant past with a brush. Holy wah! I can't get the red paint off. I tried oven cleaner which didn't faze it, then aircraft remover, which didn't faze it and then the thick goop paint remover. The thick goop took a minuscule amount off the top of the chrome plated parts when they were submerged. I put some shiny chrome pieces in the bucket of thick goop paint remover for 5 hours and it removed some of the red paint. I am just going to sand the chips out of the fork and not bother stripping or wire brushing it as the existing red pain is so hard. I sanded the red truss bars with 60 grit to remove the red. There is quite a lot of rust that was rust painted over on the truss rods. I can't believe how well the old red paint covered, stopped rust and bullet proofed these old rods. EPA hobby paint just can't hold a candle to this old oil based stuff.
 
Last edited:
I just completed 5.5 more hours submerged in the goop, steel wooled it and the paint isn't soft, won't come off. I'm leaving the truss bars soaking in the goop overnight. It's an old thick brush on coat, but no brush marks or drips. It's rock hard and impervious. Probably lead in it. We need this paint back, whatever the heck it is. I'll sand the remaining paint off tomorrow. I sanded most of it off earlier today. I thought soaking in the goop would make the hard to reach parts easier to sand or steel wool the red paint off. No luck so far. The only paint I have come across that is more tenacious is the factory black on old English 3 speeds. That stuff has to we taken off with a wire wheel. No primer, just red paint over rust that may have been plated at one time?
 
I soaked the ends of the truss rods overnight in paint remover goop and the paint won't wrinkle or lift, it just gets a little soft and tacky on the surface so I use corse steel wool and than 60 grit and then back in the goop. The truss bars are almost free of paint so one more soak and sanding will do it. Like I said, I'm not going to strip the fork, just sand and repaint.
 

Latest posts

Back
Top