1930 Hartford by Westfield - Finally on the Road!!!!!!!!

Rat Rod Bikes Bicycle Forum

Help Support Rat Rod Bikes Bicycle Forum:

This site may earn a commission from merchant affiliate links, including eBay, Amazon, and others.
Re: 1930 Hartford by Westfield Mfg/Pope

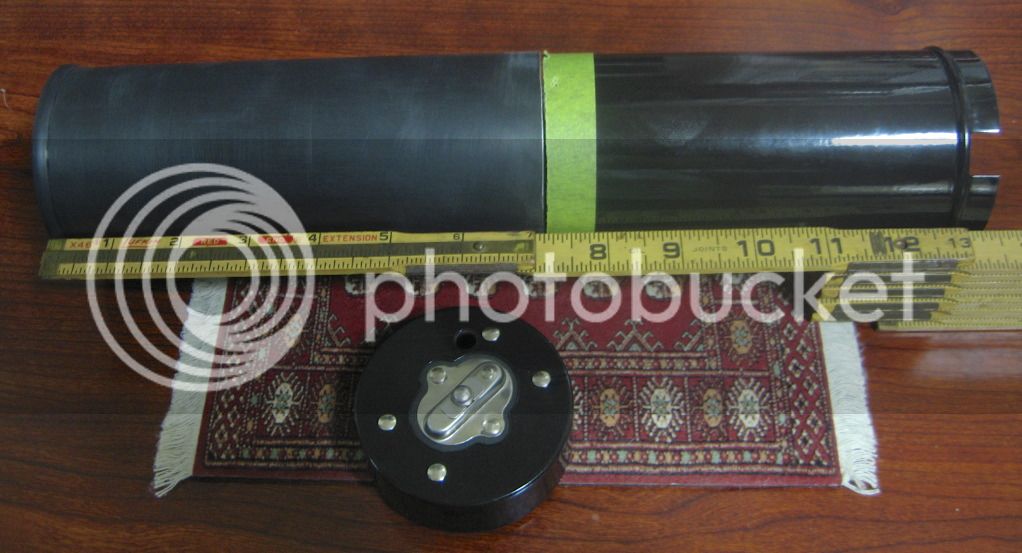
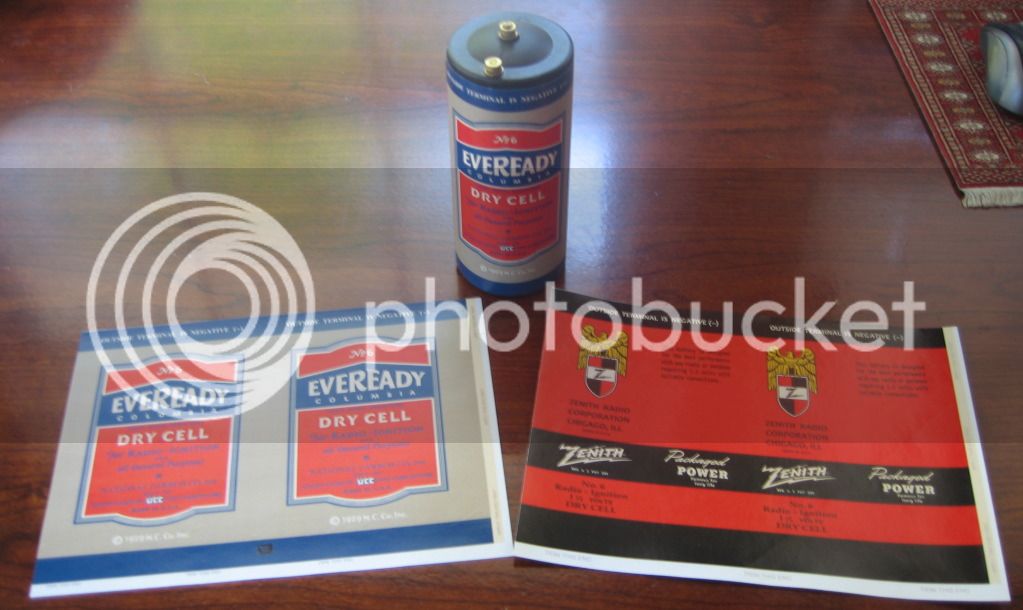
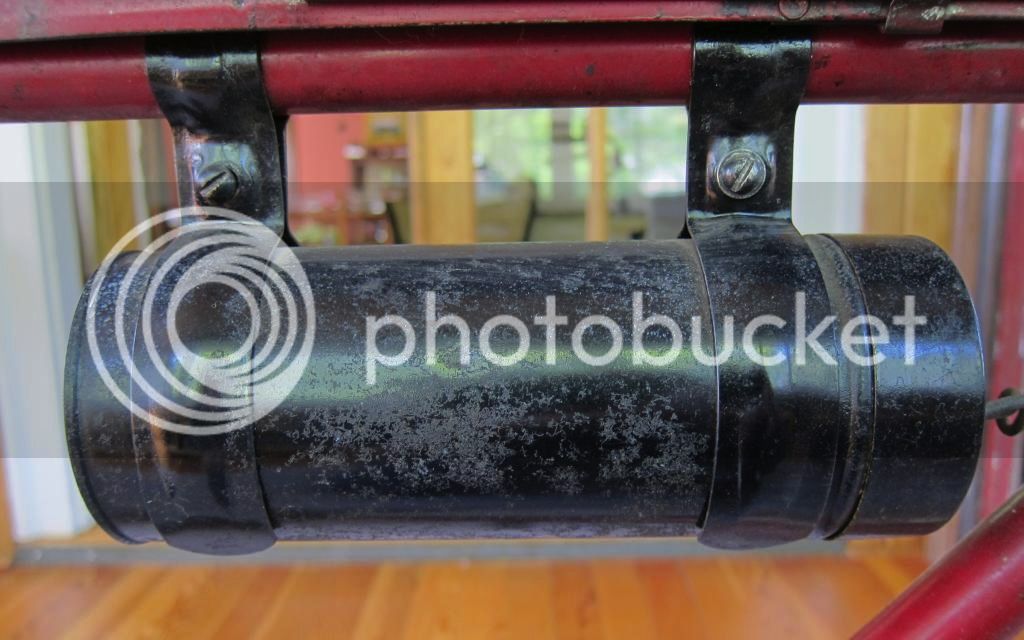
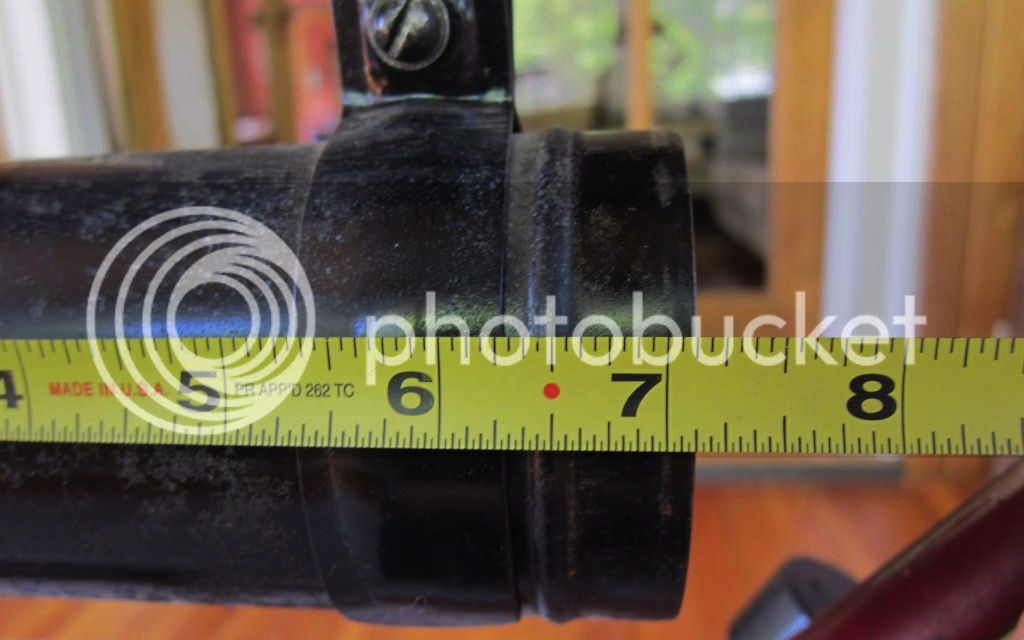
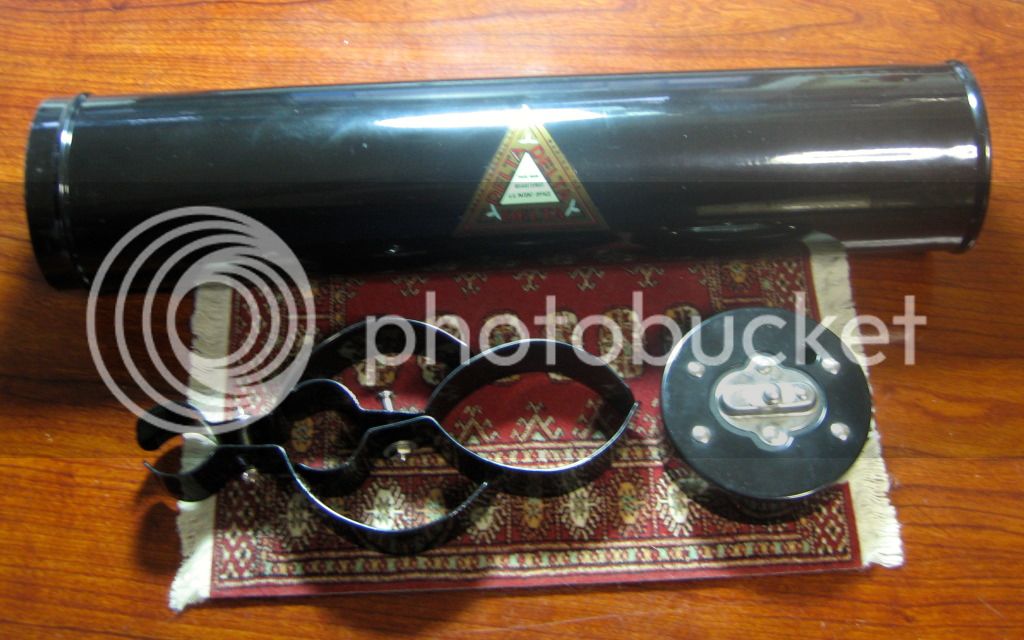
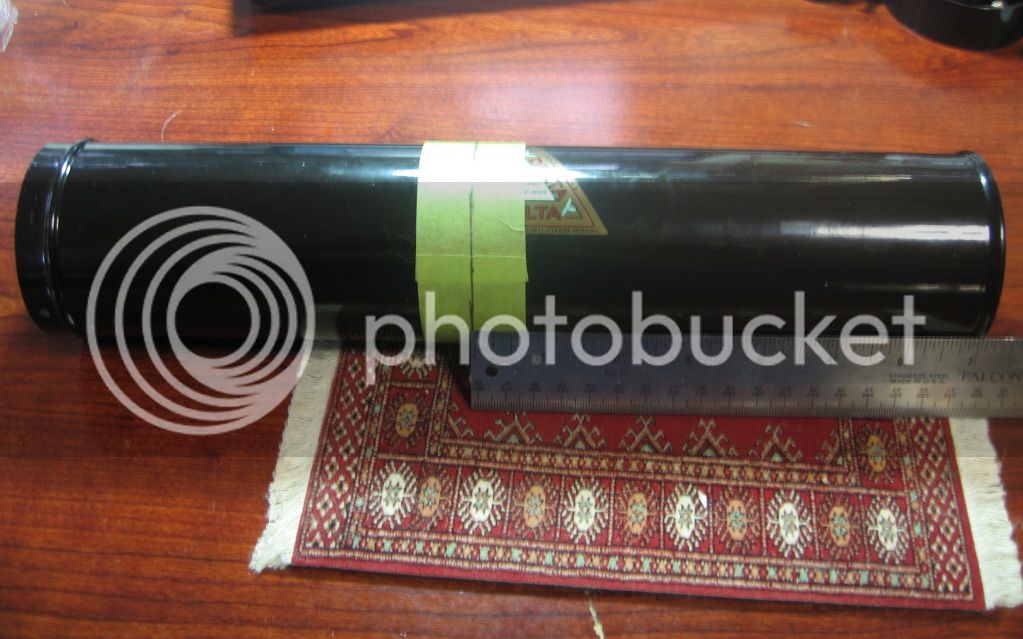
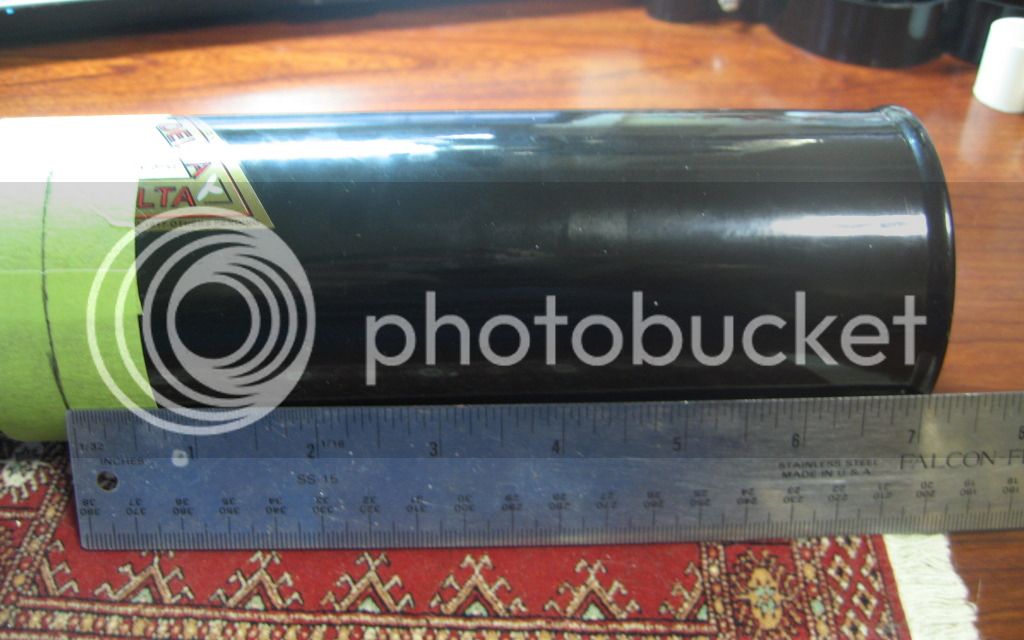
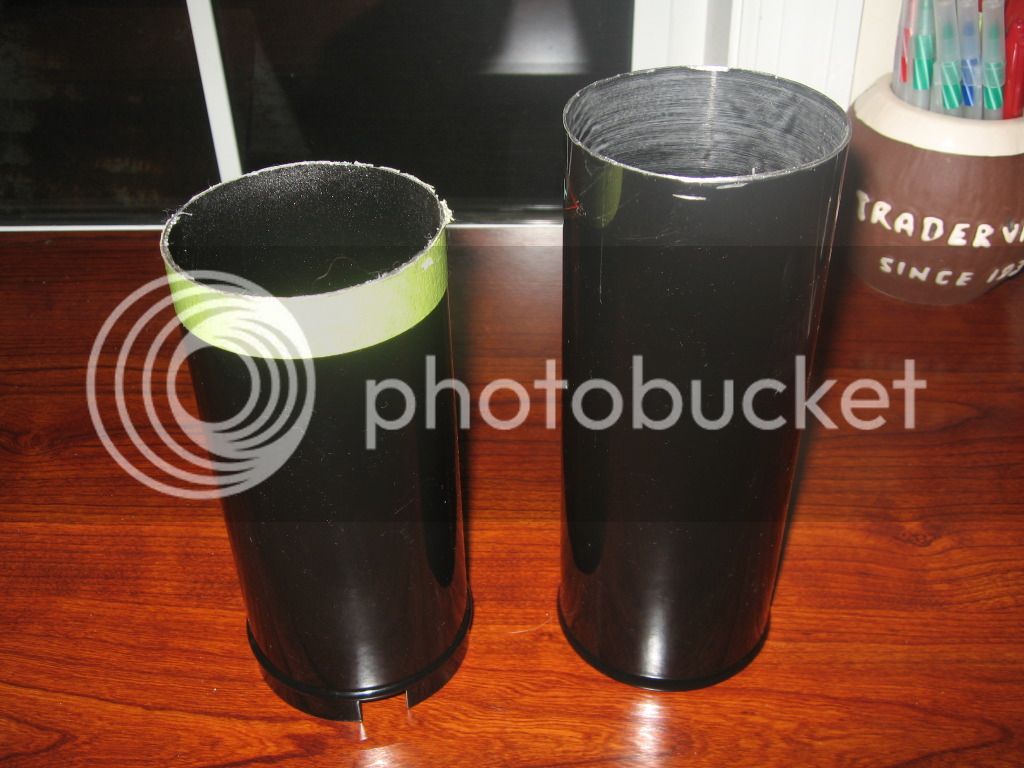
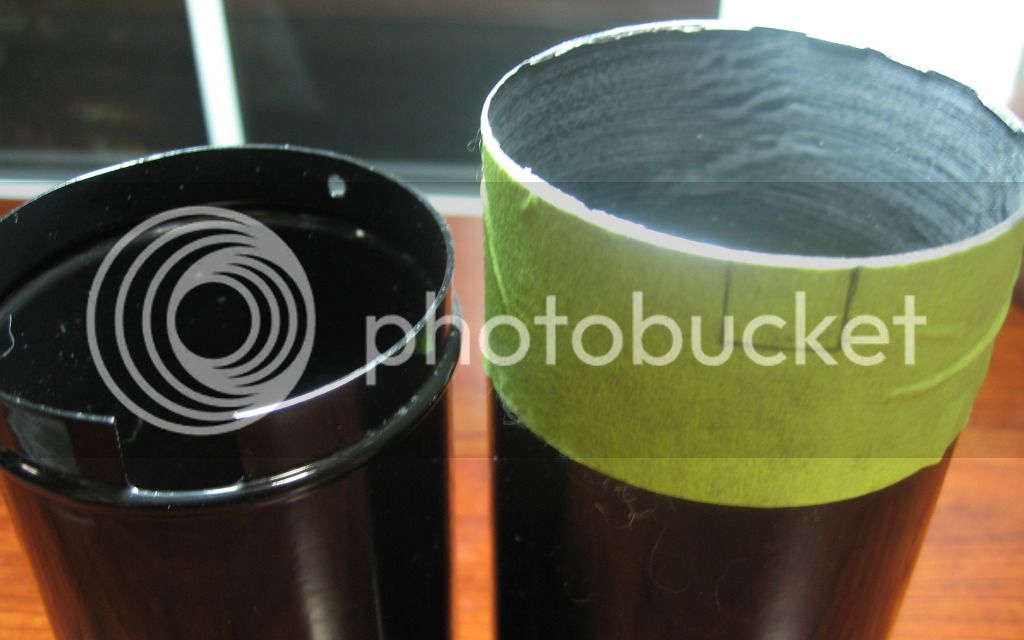
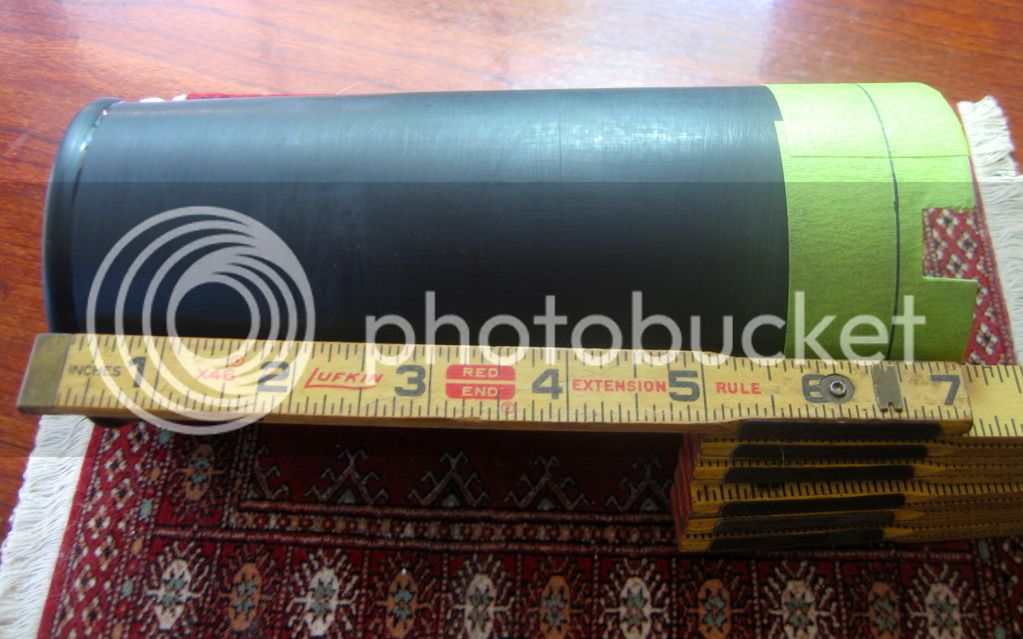
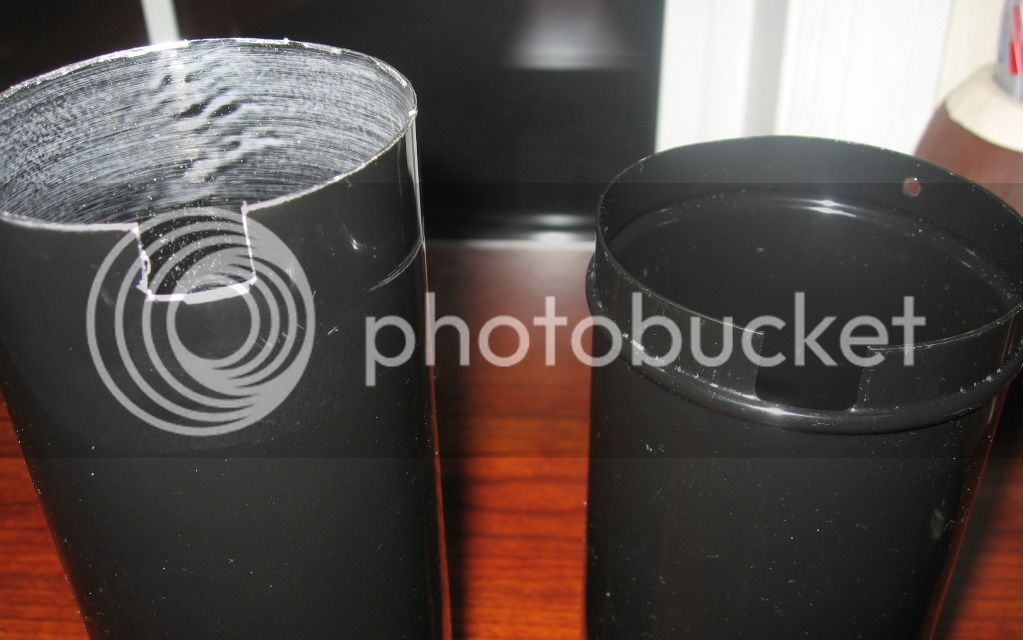
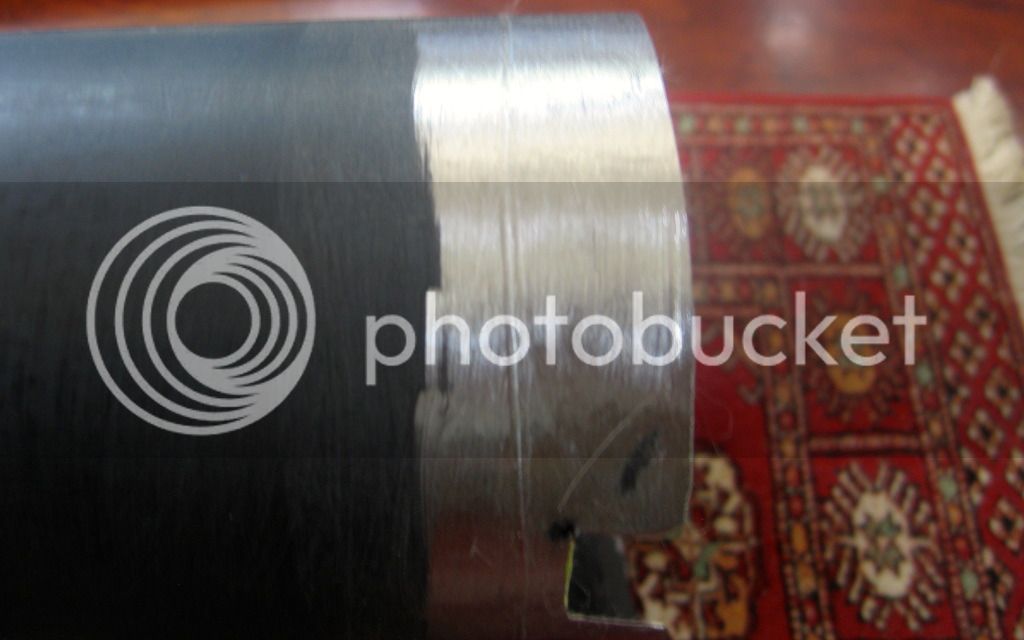
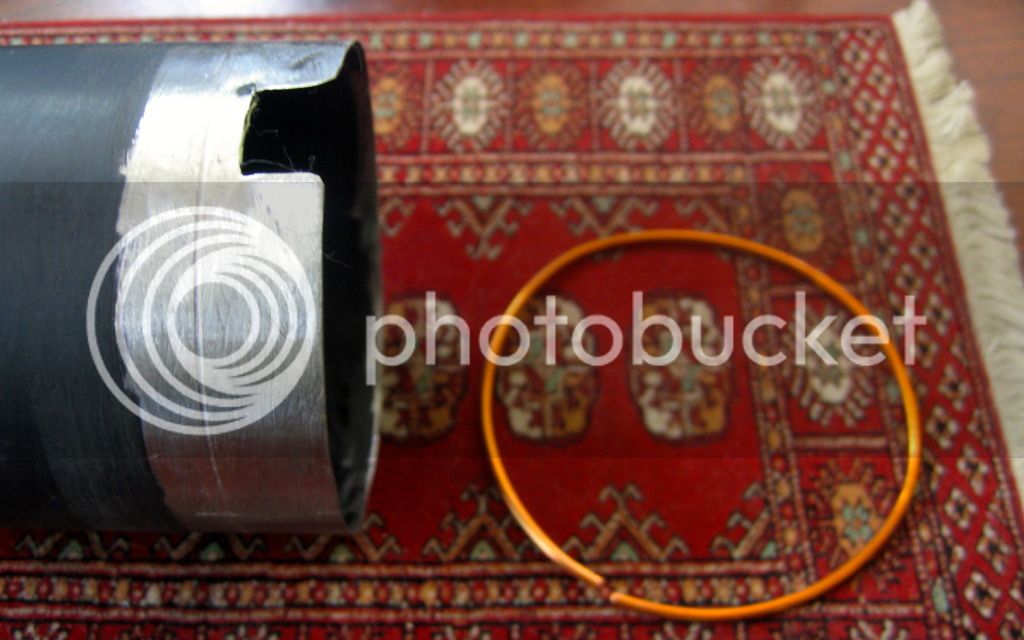
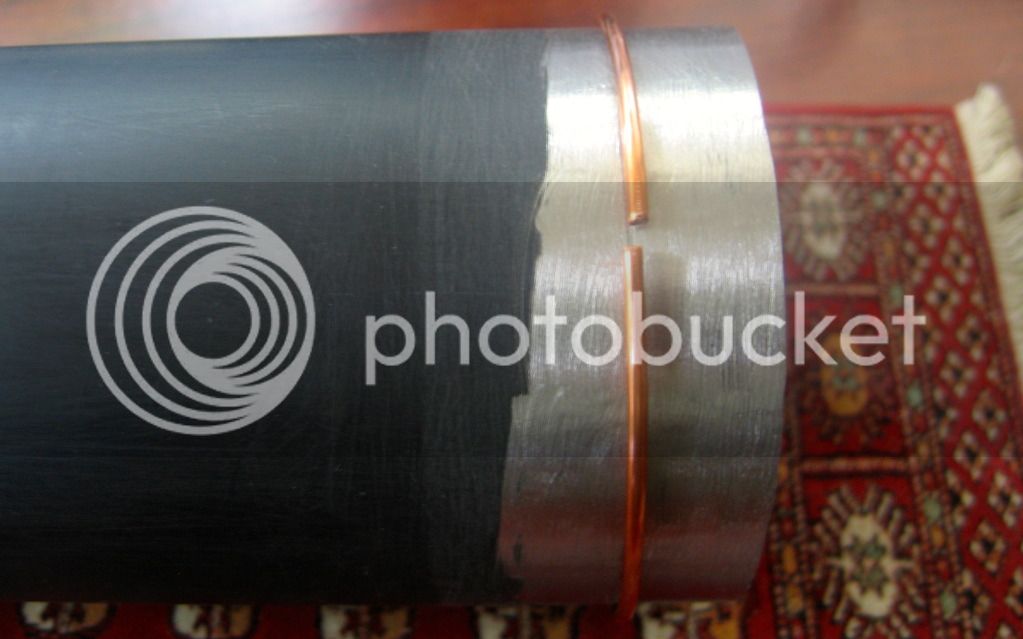
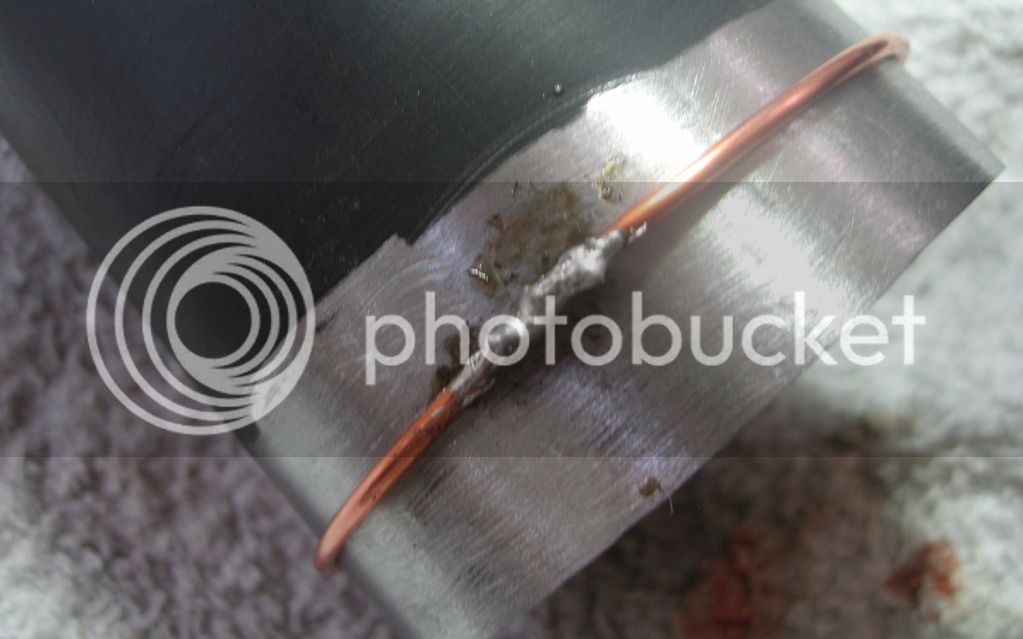
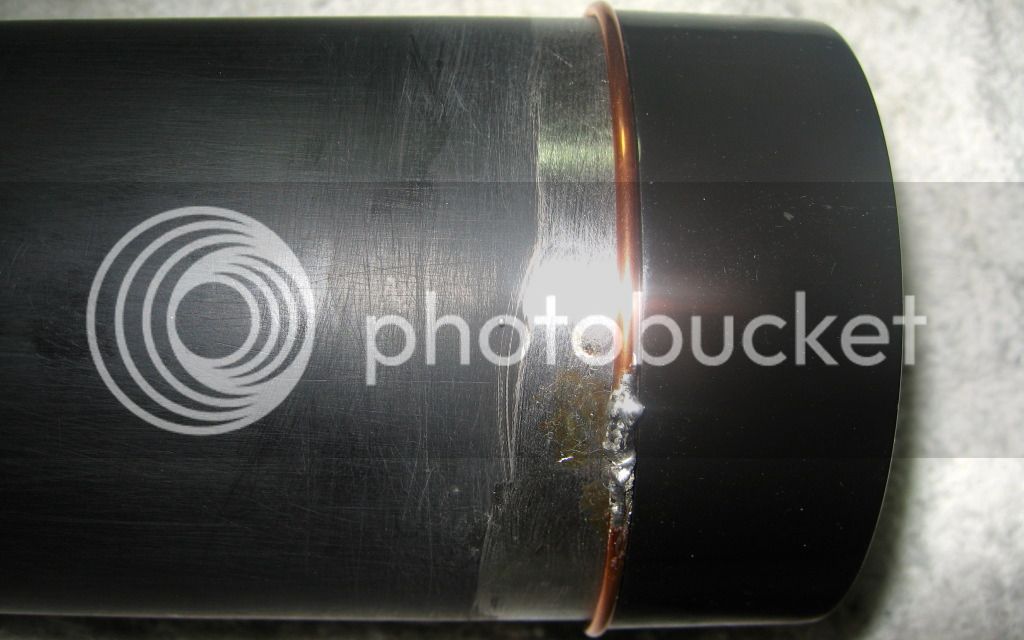
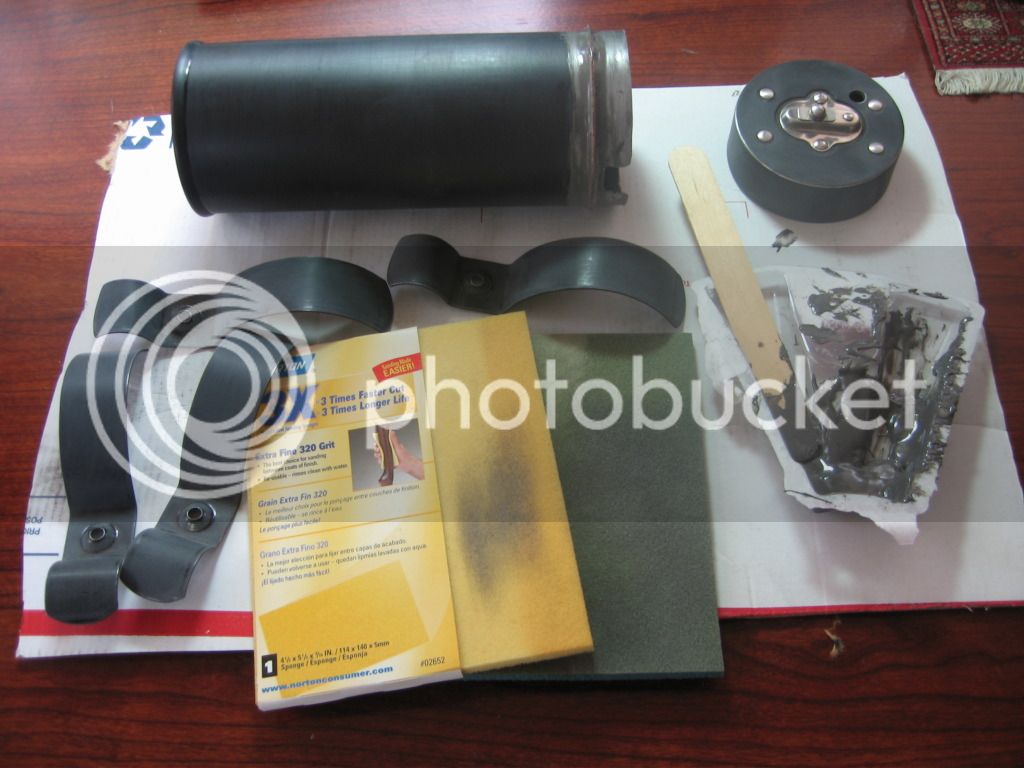
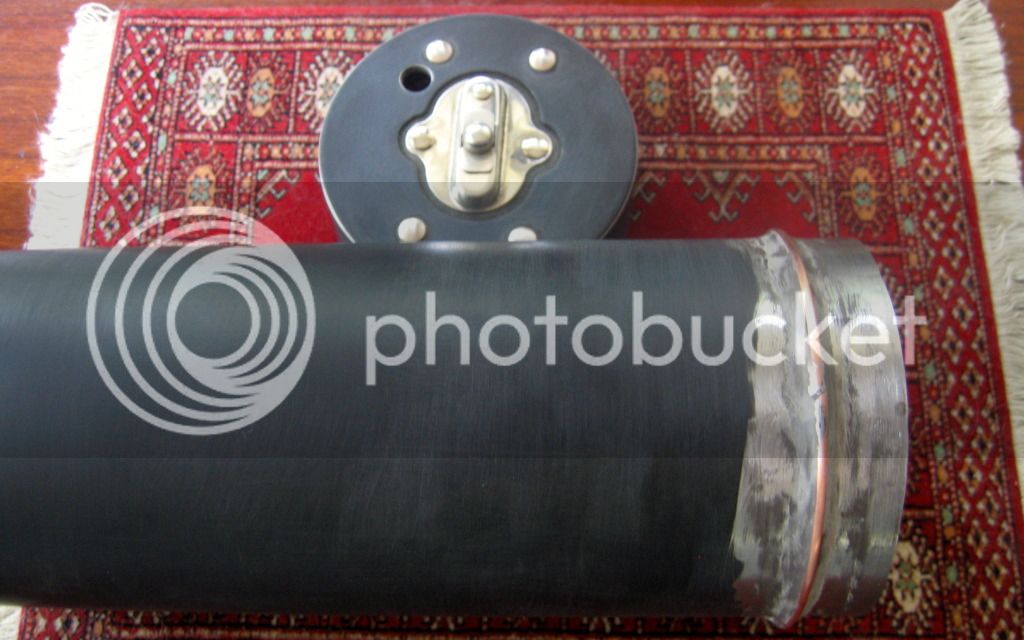
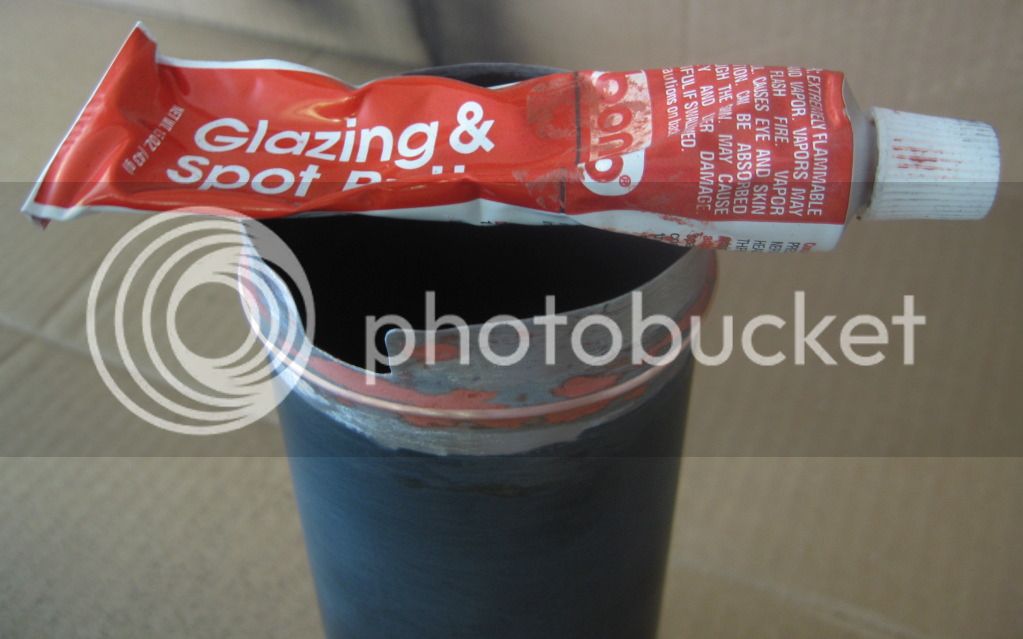
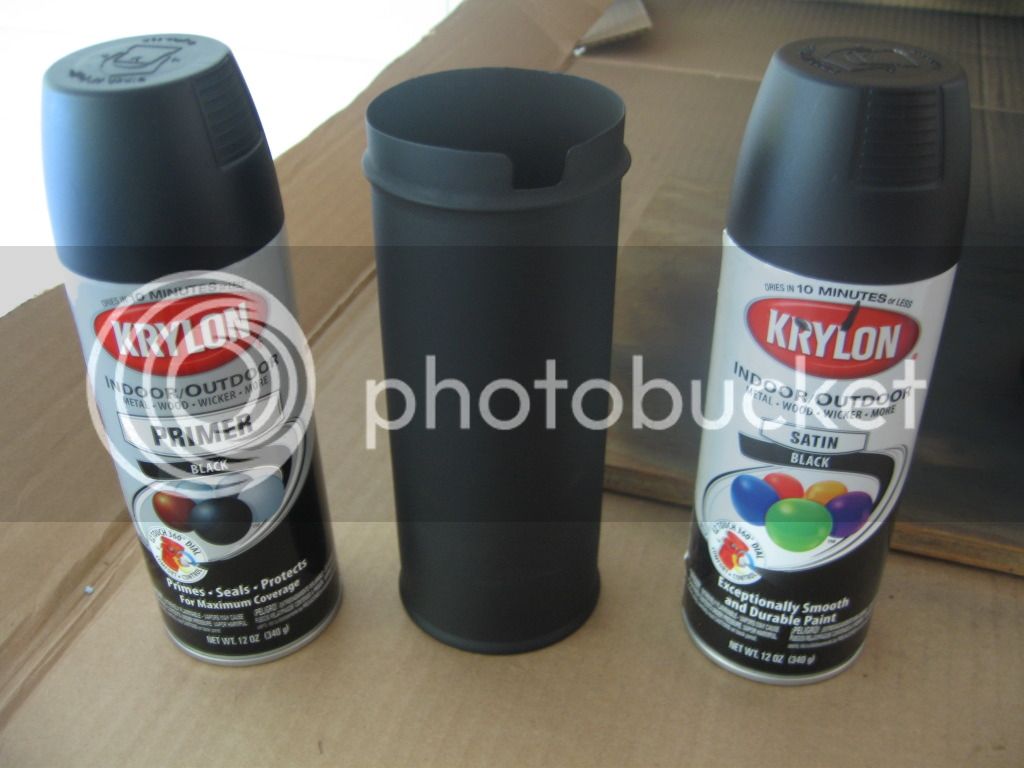
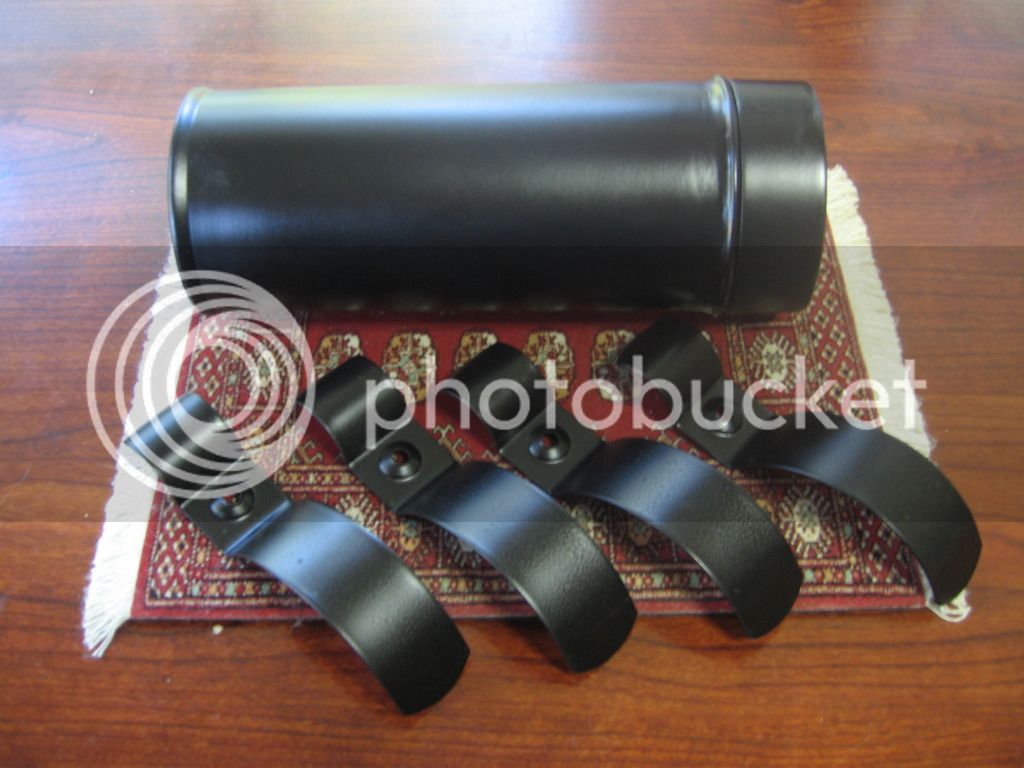
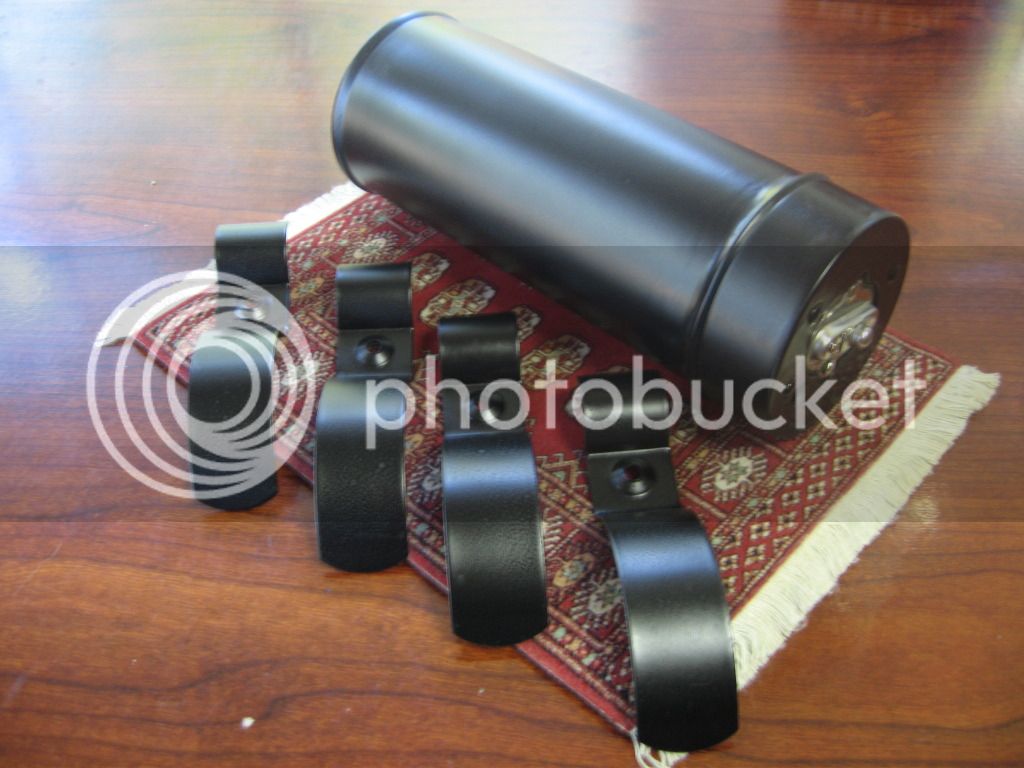
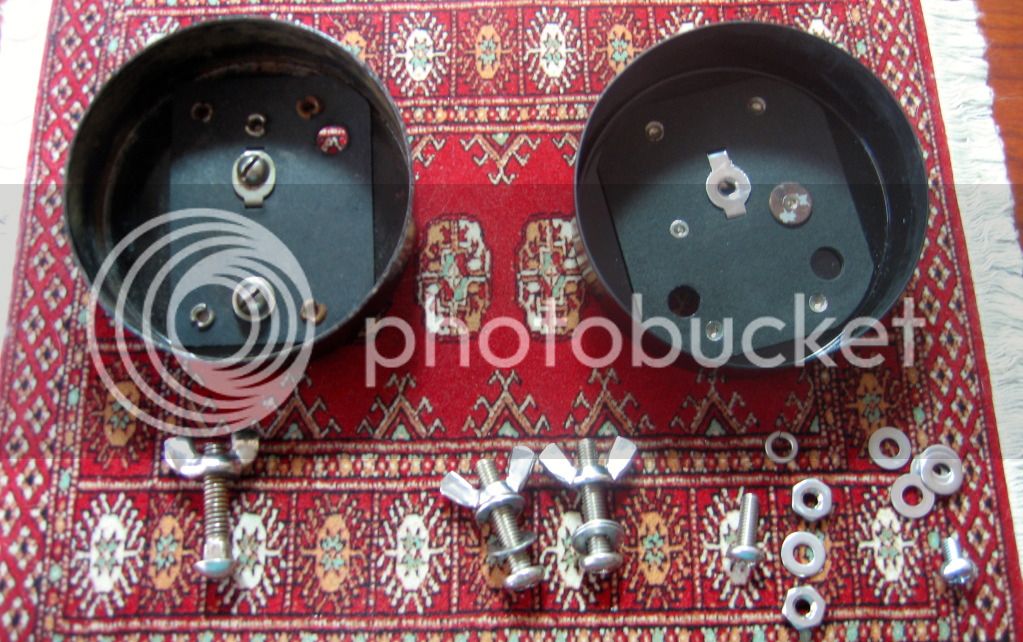
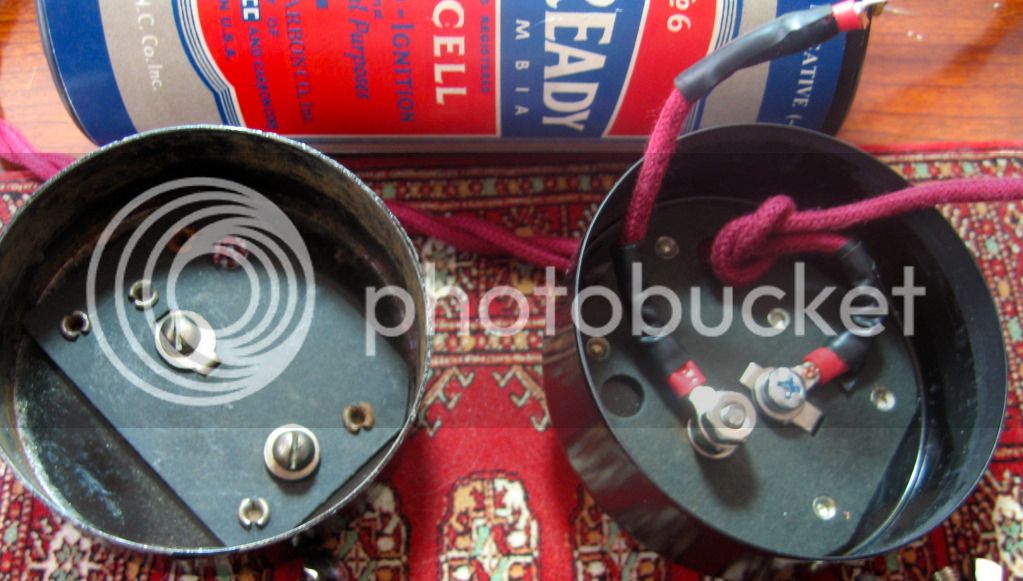
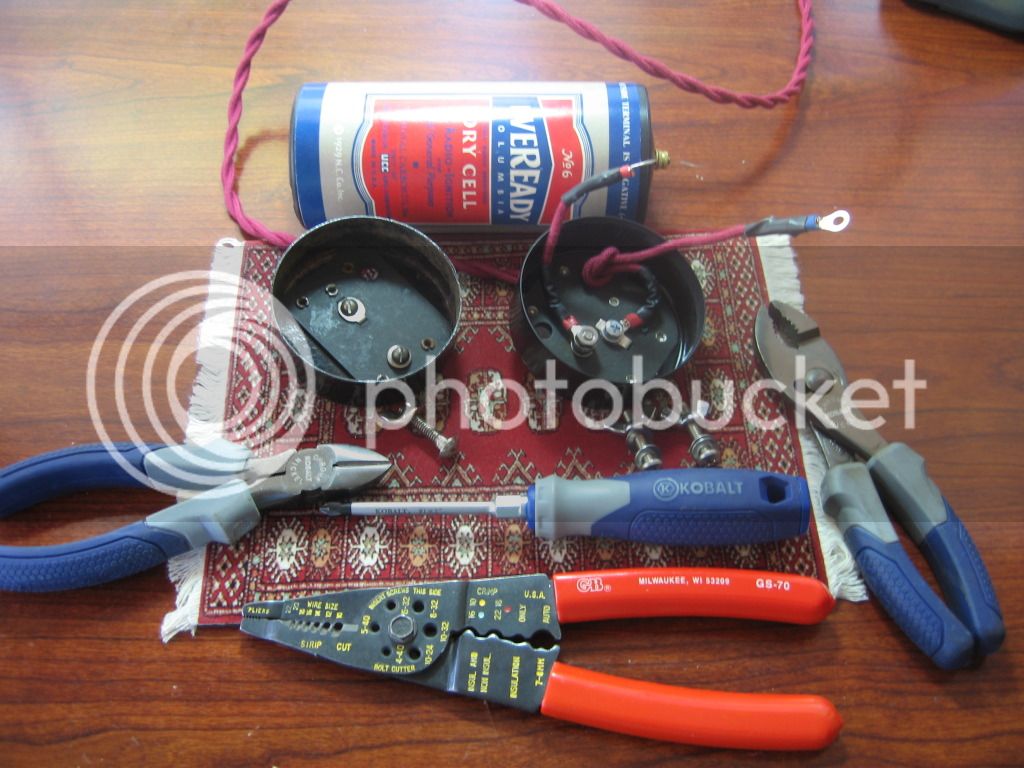
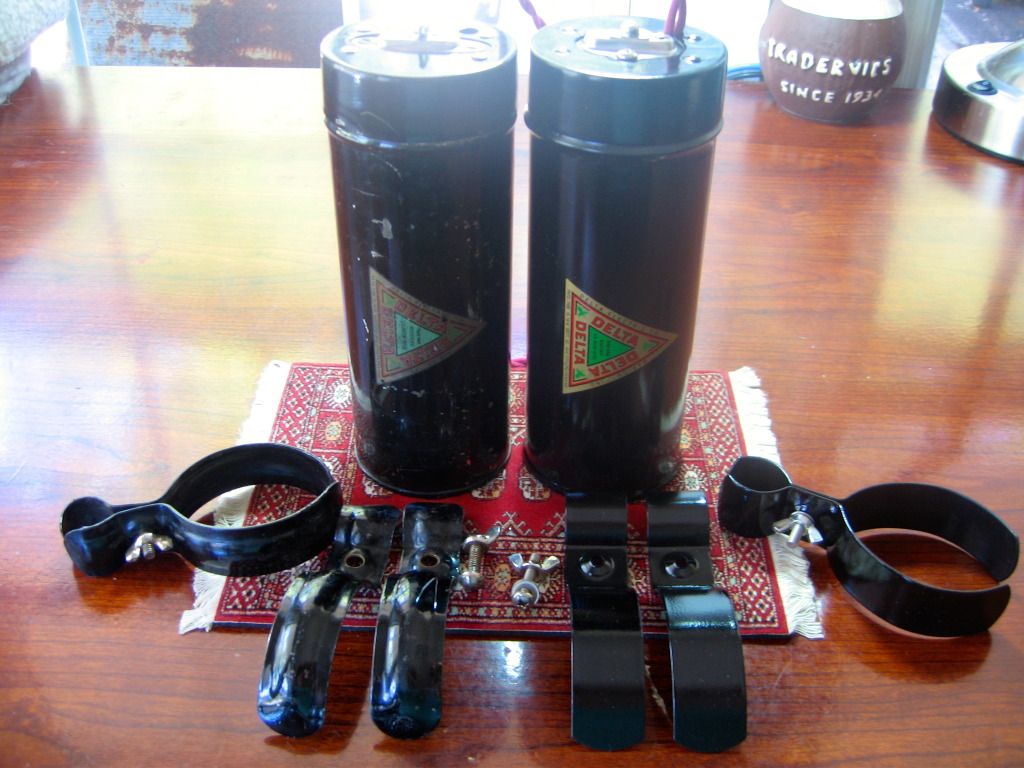
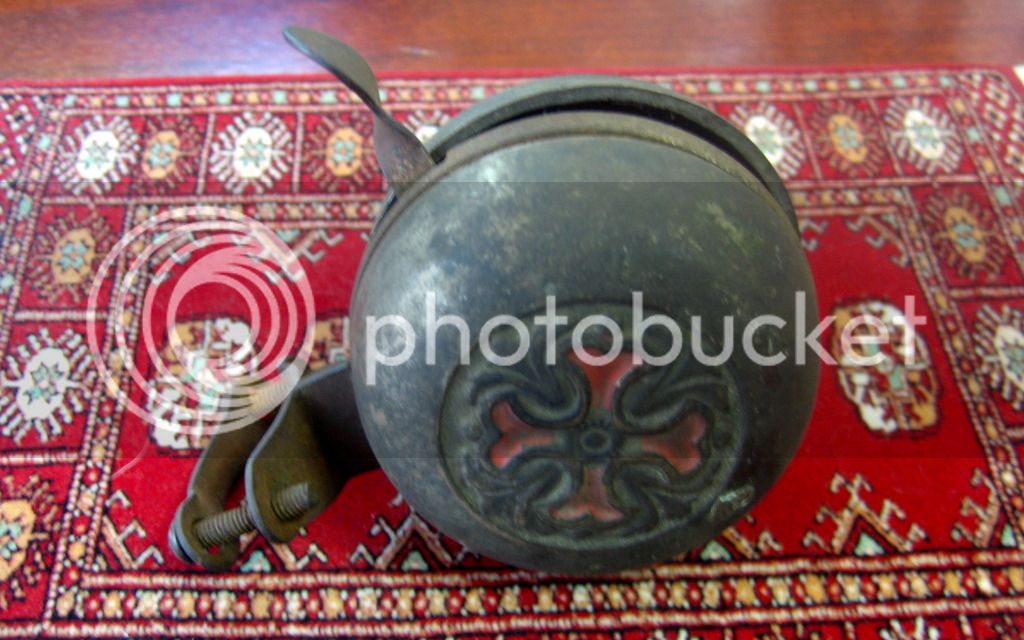
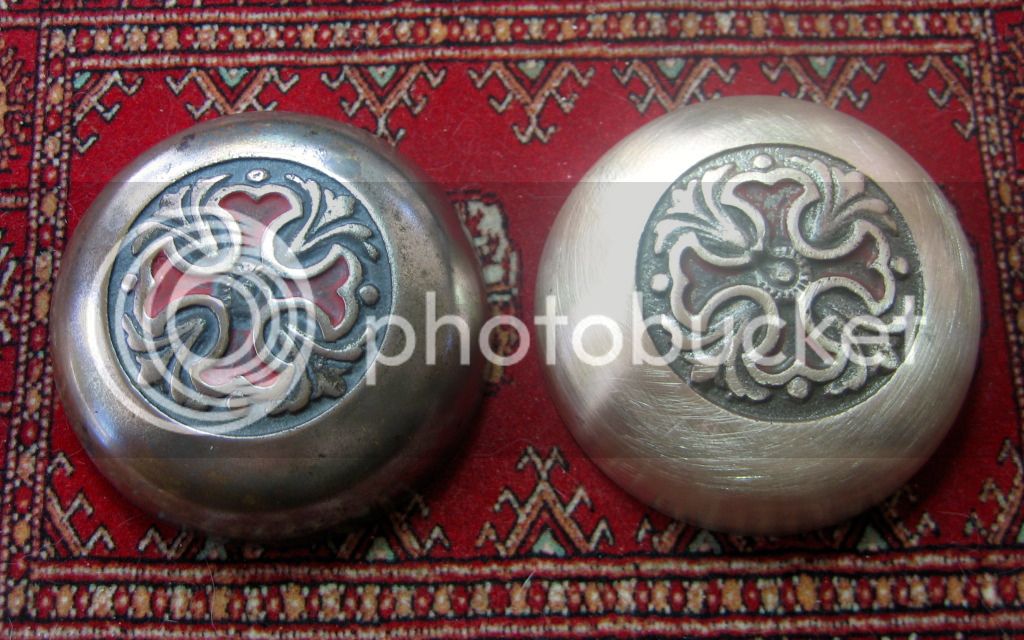
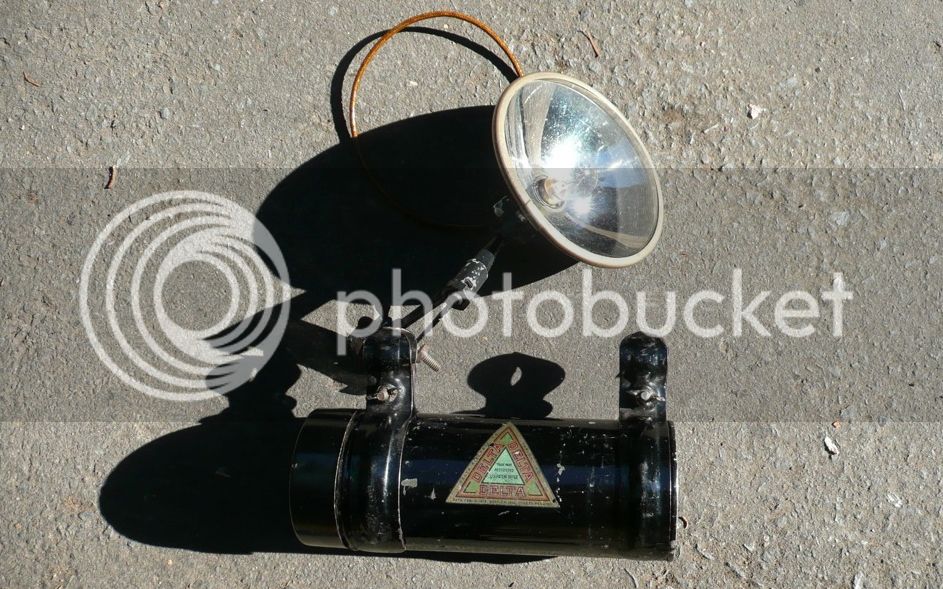
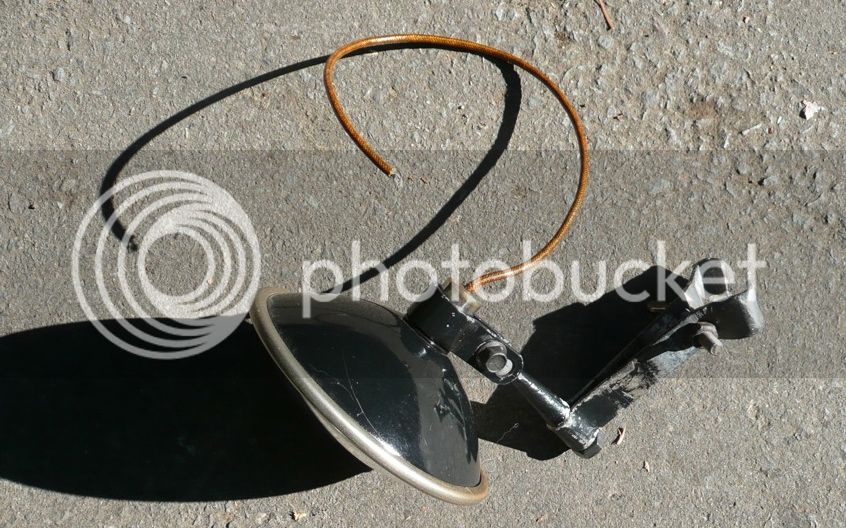
Found the correct original Delta light and battery can yesterday so two missions accomplished!!!!!! These were the last two accessories I needed for this bike to get the bike back exactly as it was before it was parted out and should be in the mail to me this week. Last week I had started fabricating a Delta single cell battery canister from a reproduction double cell canister. I will still complete that project and document it here for anyone wishing to do something similar as these are so hard to find but the original will go on the Hartford.

P1050338.jpg


P1050335.jpg


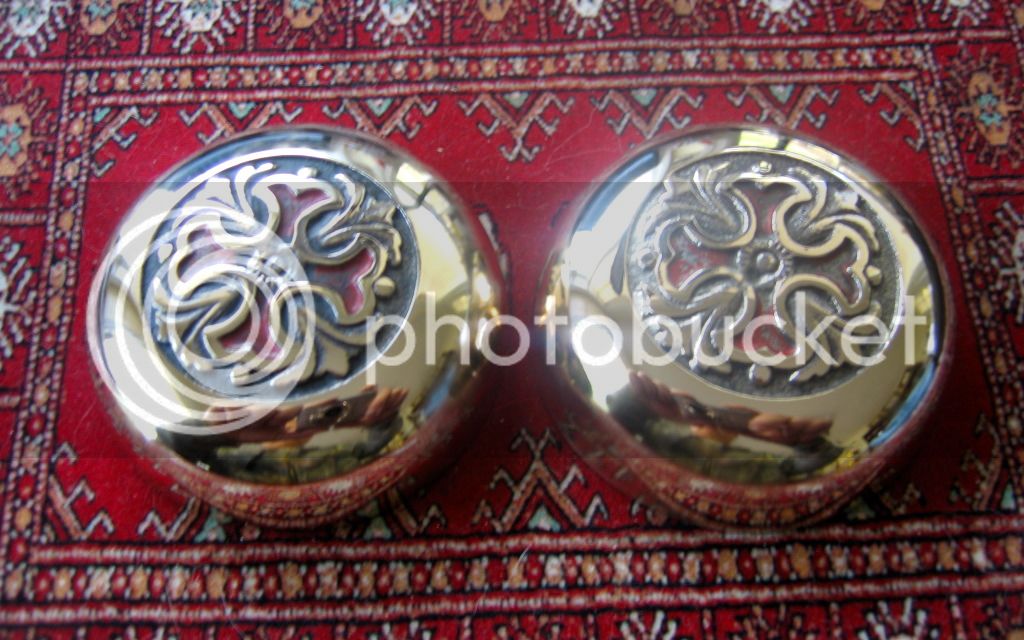
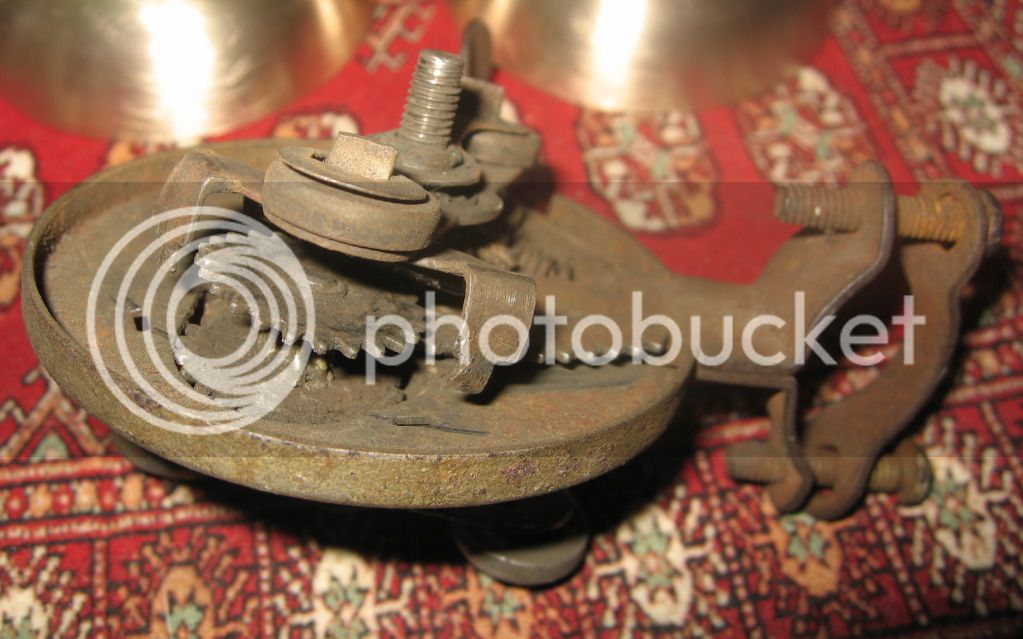
It's really funny how things show up in spurts as I had looked for these accessories for over a year and found them all over a 3 week period. I looked for the Persons speedo unit for over a year with no luck & now have ended up with parts for three of them in the last 3 weeks. Both the 2 latest had original cables, one had the mounting brackets, and both work so now I have three of these speedometer heads, two cables, and one set of brackets. I'll take the best parts to make the unit for the Hartford. I am going to try to find or fabricate the additional parts to get all three back working. I still need the piece for the wheel & may have to fabricate those parts but all is good as this bike will now have all the original rare accessories back on it.

IMG_1095.jpg


IMG_1099.jpg


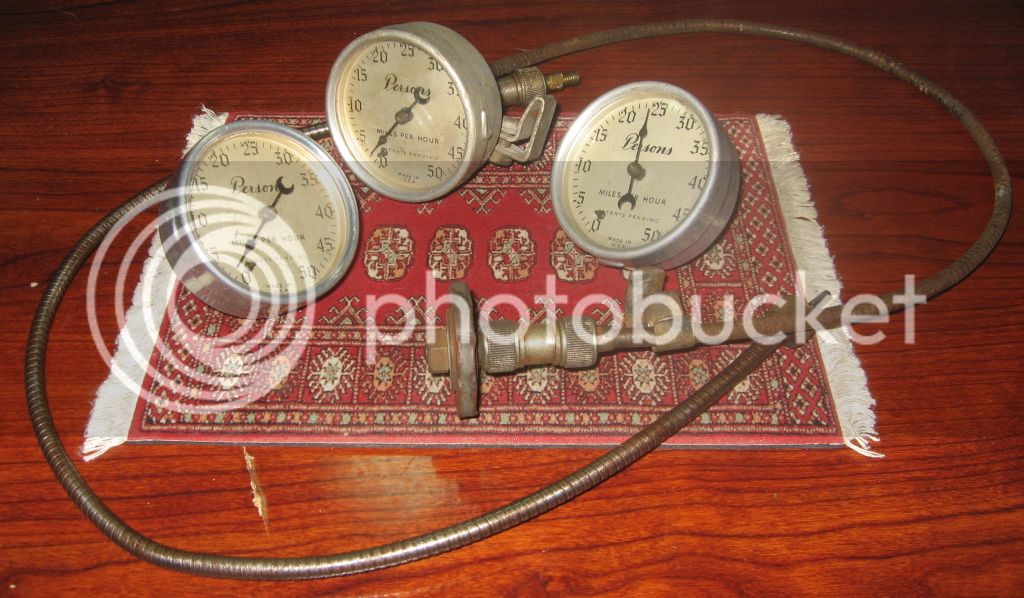
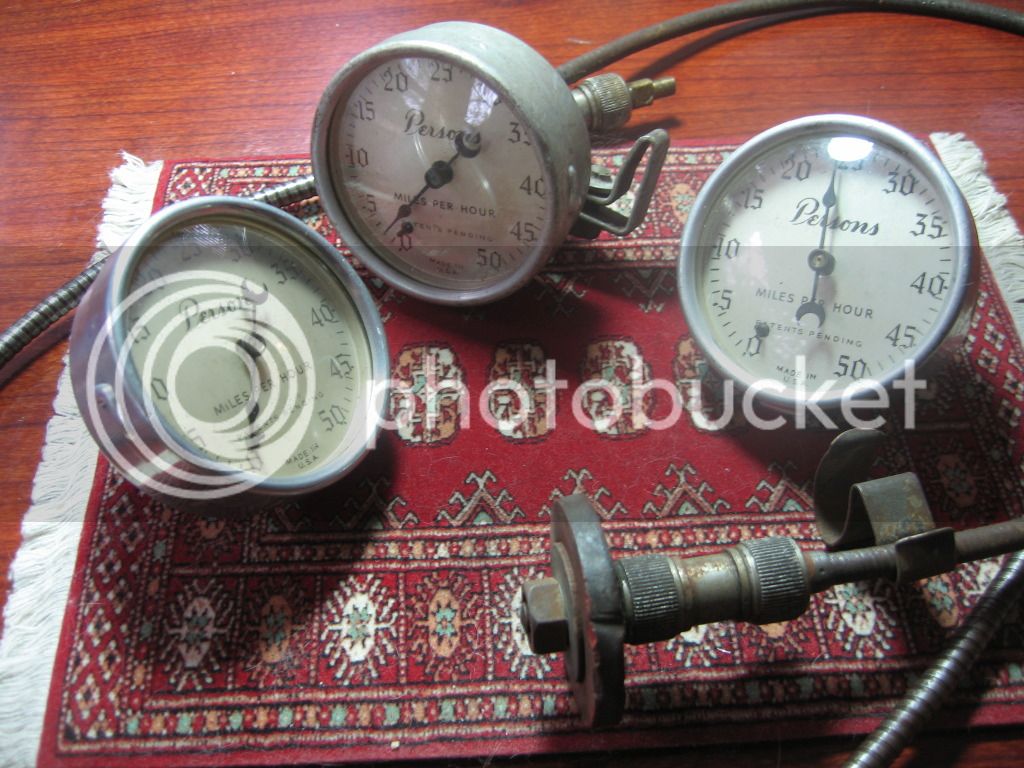
Not sure what I'll do with the two extra Persons speedos, one may go on my Columbia, and the other one may go up for sale just not sure yet.

Had family commitments all weekend so didn't get any real work done on the bike but it was still a very productive weekend!!!!!!!! Thanks. - Gary
 
Re: 1930 Hartford by Westfield Mfg/Pope

Would you be able to pass on the dimensions of the Double cell
Delta battery can?

I want to build one for my Elgin, and I'm mostly curious about the length.

I'll be using 'The Republic of Tea' canisters as a basis for the can. $10
for a reproduction decal from bicyclebones and I got to enjoy some
very pleasant tea :D

I think I should be able to fit a 3800 AH/14 Volt LiFePo in it if my guess
about the length is correct

Thanks
 
Re: 1930 Hartford by Westfield Mfg/Pope

spectratone said:
Would you be able to pass on the dimensions of the Double cell
Delta battery can?

spectratone,

The canister diameter is 2-7/8".

Single cell length cans without cap is 7-1/8". This measurement came from an original unit.

Two cell length cans without cap is 13-3/8"

The cap with the switch is 1" deep and only 1/2" of it slides onto the cell canister.

The cutout in the canister at the end to bend out to hold the cap on is roughly 1/2" x 1/2"

You can see I had already cut this 2 cell can down to single cell size at the end of the green tape. Hope this helps. Thanks. - Gary

IMG_1107.jpg
 
Re: 1930 Hartford by Westfield Mfg/Pope

Ordered & received yesterday a NEW No. 6 Battery from RadiolaGuy with a reproduction Eveready Radio-Ignition 1929 label and two other reproduction labels to build my own batteries when I get time. The reproduction labels are a little larger than the ones on the Japanese made battery I got & were:

  • Eveready Radio-Ignition 1929 (to be used on this 30' Hartford)
  • Zenith Radio-Ignition (to be used on the 27' Stutz)

I'll detail the battery building project when I get time to get to it. Went ahead & just ordered the battery in case I do not get time before I get the bike together. Superfast shipping from him BTW. RadiolaGuy battery website is at:

http://www.radiolaguy.com/info/Vintage_Batteries.htm

Here's what I received & look like great products:

IMG_1149.jpg
 
Re: 1930 Hartford by Westfield Mfg/Pope

Sitting here bored stiff waiting on paint and bondo to dry so thought I'd go ahead & start posting the details of this little project. I know there are many of you out there trying to find Delta single cell battery canisters for your pre-1933 bikes & projects. I decided to fabricate or more aptly convert a reproduction two cell canister into a single cell battery canister and began the project last week trying to finish it this weekend. So here are the steps:

Delta Reproduction Two Cell Battery Canister to Single Cell Battery Canister conversion

The first two photos were provided by CABE member “msreust” aka Mike in a request I had for measurements of the canister without the cap on the unit. I need to thank Mike for the great pictures facilitating my ability to attempt this conversion.

IMG_1834.jpg


IMG_1838.jpg


This is the reproduction two-battery canister I purchased off ebay. The difficulty in this conversion is not simply cutting the unit down but replicating the original that had a raised bead to stop the cap when it is slid on. Much of this conversion with focus on how to replicate the look and maintain that raised bead.

IMG_1067.jpg


Step 1) The original single battery canister is 7-1/8” without the cap on as seen in the second photo on this post. To cut down the two-battery unit wrap a strip of auto body masking tape with its center at roughly 7-1/8”s from the solid end of the canister. Then go around the tape measuring off 7-1/8” from the solid end to roughly the center of the tape placing a mark in 1”-2” increments. Next use a flexible ruler to create a line all the way around the canister as seen in the photo. This is your template to make the cut with a hacksaw.

IMG_1071.jpg


IMG_1073.jpg


Step 2) I will be using a hacksaw purposefully to make the cut as I want to show this can be done with cheaper tools most people have around the house and also you are much less likely to have an errant cut using a hacksaw carefully. Be careful after making your cuts, as the edges will be sharp. Also I would recommend going slowly around the canister with the hacksaw first making a slight cut into the metal all the way around first. This will help guide deeper cuts as you then work your way around. I left the cap on the open end for support as well but you will need to support the unit with you hand somewhat after you get over half way through to keep from pushing too hard and bending the canister. Key here is just go slow, take your time, and have good light to maintain your focus on your line.

Using care to stay on the line, cut the canister in half at the line with the hacksaw. Remember use real care here or you will ruin your entire project as this is a critical step.

NOTE: Cutting through the tape gives you a guide in all your cuts & makes all cuts much easier so your hacksaw is not just randomly sliding around.

IMG_1078.jpg


This photo is what we will be trying to mimic on the left, in the next few steps. First is the slot and second is the beaded cap stop. The slot is used to be bent slightly out to keep the cap on tight. The bead is the stop when you slide the cap on. Please note the cap is 1” deep on the reproduction & the original. The cap however is meant to only slide on ½” on the original if you look at the placement of the bead in photo 2 above.

IMG_1080.jpg
 
Re: 1930 Hartford by Westfield Mfg/Pope

Delta Reproduction Single Cell Battery Canister fabrication pre-1933 (cont.)

Step 3) Use the piece to be discarded at the end of the project to measure the slot at the end of the original tube. We will recreate this slot on the newly shortened tube by cutting out the slot with a hacksaw. Be exact here for best results and again use care with your cuts. This slot is ½” around the tube and will be ½’ deep. My repop was 3/8” deep and the bead is inset 3/8” but I noticed the original bead in inset ½” so we will alter here to original specs so mark out ½” by ½” slot and cut the sides with your hacksaw. You can then use pliars to bend the remaining tab until it breaks off. Again be careful of sharp edges.
NOTE: Cutting through the tape gives you a guide in all your cuts & makes all cuts much easier so your hacksaw is not just randomly sliding around.

IMG_1109.jpg


Step 4) Now you have to deal with the rough sharp edges & this requires 2 fine files, one flat to smooth the outer edges & one rounded to smooth the inside edges of the can. Try to file these areas smooth so as to not get cut on the can inserting and removing batteries later. Again just take your time & get it right.

NOTE: Use gloves to keep from getting cut on the sharp edges!!!!!

IMG_1082.jpg


Step 5) Sand off the remainder of the decal & sand down to bare metal 1” of the tube from the open end. It is also a good time to go ahead & rough up all the remaining paint as we will be repainting the entire unit in a later step. Don’t remove more paint than you have too as the reproduction paint is fairly nice and will still be a really good base for your final coats. You can sand this by hand which I did where just scuffing the paint but I used a Dremel tool with sanding attachment to get down to bare metal finish quickly on the 1” end.

Step 6) The next step is to create a straight line indentation or “score” all the way around the canister at 6-1/2” from the closed end. Again I used masking tape measuring as done in step 1 to have a guide to go by. Then I sawed around this line through the masking tape being careful to only “score” the canister as a guide for our “bead” cap stop. Be real careful to only score this line, you do not want to cut through the metal. The scored line will be strengthened in the next few steps. Remove the masking tape.
NOTE: Cutting through the tape gives you a guide in all your cuts & makes all cuts much easier so your hacksaw is not just randomly sliding around.

IMG_1113.jpg


Step 7) Obtain a roughly 10” piece of ground wire, I used AWG 12 (gauge) I had around the house in common electrical line. AWG 14 would probably be better as the diameter is smaller but I didn’t want to have to go buy new wire. Wrap the copper ground wire around the canister at your scored line & cut it at the point where it just meets. You want it to be really tight. The next step requires a soldering iron. Fashion the ground wire into a perfect circle, you can use the canister for this but be sure to keep the wire straight side to side so it will lay perfectly flat. Slightly bend the ends of the wire inward with pliars. Holding the two ends together solder the two ends together fashioning a ring. Don’t’ worry too much about extra solder we’ll file in off in a later step. Let the solder harden good so that you have a solid copper ring and then slide it on the canister to the scored line. The solder will not hold it to the can and it is much easier to just solder the ring when it is not on the can. You need to be precise here, you want it to be tight on the can with no gaps. If you got it tight which you needed to do, it will take a little time to force it onto the can & into the scored line. Be patient but forceful here, you do not want your solder joint to come apart. Now you have the start of the cap stop bead.
CAUTIONARY NOTE: Use thick leather gloves when soldering to keep from getting burned holding the wire or soldering it together.

IMG_1121.jpg


IMG_1115.jpg


IMG_1125.jpg


IMG_1122.jpg


Step 8- Next, put a bead of “JB Weld” on either side of the copper wire. You are gluing the copper wire in this step to the canister all the way around on both sides of the copper wire. This will strengthen the canister at your scored line and securely attach the wire to the canister. Be careful with the JB Weld. You want enough to hold the copper wire in place & glue it down well but not a lot of excess you have sand or file off. I used a tongue depressor to apply it and smooth it to a correct look rounded profile detail to avoid a lot of additional work getting off excess. A Popsicle stick would work just as well. Wipe off any excess as this stuff dries hard & is hard to get off after it cures. Put aside to let the JB Weld dry & “cure” overnight.
NOTE: If you do a good job molding the profile of the JB Weld you will have to use less Bondo later. Also by using enough to get close to the correct profile you with have strengthened the copper wire bond to the canister.

IMG_1131.jpg


Here is the canister with the JB Weld applied. I also went ahead & scuffed up the cap & brackets to repaint to insure everything matches when painted. I personally like the little foam backed sanding pads for sanding these parts. They are flexible and work much better on rounded and hard to get to areas when sanded. They are available at most hardware stores in different “grit” grades. The pads I use are made by Norton (http://www.NortonConsumer.com). They also can be used to wet sand. I went ahead & filed/sanded the JB Weld to my desired bead profile in this step as well. Also noted the solder joint was filed and barely noticeable at this stage.

IMG_1140.jpg


That's it for now, I'll finish this up no later than the beginning of the week but hope to finish tomorrow. More to come......

Thanks for following!!!!!! - Gary Mc
 
Re: 1930 Hartford by Westfield Mfg/Pope

Delta Reproduction Single Cell Battery Canister fabrication pre-1933 (cont.)

Step 9) See pics above^^^^^. Sand or file off any excess JB Weld glue and get the profile close to the original. I started with a flat file, next used a small rounded file to get the profile correct followed up with a sanding pad to clean up. Pay attention to your copper wire solder joint here and file carefully to remove the excess solder from Step 7.

Step 10) Next we will be looking back at the cap stop on the original canister. Lay down a bead of “Bondo” around both sides of the copper wire covering partially the wire & completely covering the JB Weld and the solder joint. Form the Bondo to the desired bead shape around the can leaving a little excess. I shaped a small piece of plastic to get the form I wanted and dragged it around the can at the copper wire removing excess to have a smooth bead & desired profile. The closer you get to your desired shape, the less you will have to sand off later so use patience here. Let the canister again sit per directions for the Bondo to cure.

Step 11) File & sand the Bondo after it has dried forming your desired shape to match the original cap stop bead. Lightly sand the entire canister again & wash it to remove any contaminants such as grease or dust. Here's an after bondo was sanded pic.

IMG_1156.jpg


Now you are ready for primer & paint.....
 
Re: 1930 Hartford by Westfield Mfg/Pope

Delta Reproduction Single Cell Battery Canister fabrication pre-1933 (cont.)

Step 12) Dry the canister off with a lint free towel & now you are ready to repaint the canister. I also scuffed up the cap and mounts & repainted them as well to insure I had a good color match on all components. I primed everything first allowing it time to dry & sand. Next apply two coats of GLOSS (updated from satin) black paint with sanding in between coats. Glossy black is closer to the original. You could also “age” the battery can during painting if desired if you have those painting skills and it would be more appropriate look for your project bike. Here's just the can after primer (black) & I am using Krylon paints.

IMG_1160.jpg


Next the GLOSSY gloss black.....
 
Re: 1930 Hartford by Westfield Mfg/Pope

Delta Reproduction Single Cell Battery Canister fabrication pre-1933 (cont.)

Step 13) Give the canister a few days for the paint to cure then apply a new “large” size Delta reproduction decal. Mine came from “bicyclebones” off ebay but I believe Memory Lane has them cheaper. I also replaced the nuts on the mounting clamps with Wing Nuts like the originals had. I’ll post pics of this step next week after the paint cures to put on the decal. Here are pics of the painted can, cap, & brackets.

IMG_1163.jpg


IMG_1165.jpg


PROJECT SUMMARY

Total Work Time Involved: About 3 hours of actual work time plus 3 separate days of drying/curing time on subsequent days with the JB Weld, Bondo, & Paint steps.

Cost:
  • Reproduction 2-cell canister $80
  • Reproduction Decal $10
  • Paint & Supplies (Auto Grade Masking Tape, JB Weld, Bondo, sandpaper) free in my case as I had this stuff laying around but I would guess less than $25
  • Wing Nuts $2
  • AWG 14 Copper Wire - 1 foot length - $1
TOTAL COST: Between $92 & $117 (dependent on what supplies you have available)

Tools Required:
  • Hacksaw with a good sharp blade
  • Soldering Iron
  • Pliars
  • Files (small rounded & small flat)

Supplies Required:
  • Reproduction 2 cell battery canister
  • Reproduction decal
  • 10” of copper ground wire (AWG #12 or #14)
  • Sanding pads or sand paper
  • Auto Grade Masking Tape
  • JB Weld
  • Bondo Spot Putty (I used a small tube)
  • Primer Spray Paint (I used black)
  • Black Spray Paint (I used GLOSS-updated)

I really hope some of you needing single cell Delta canisters can use these instructions & try this project. The most difficult step for most will be soldering the 2 ends of the copper ring together, it just take a little patience and using 2 people here would help, one to hold the wire together & one to solder. This is also a much cheaper route for those on a budget than an original which have been selling on ebay for $200 & up with canister/light combos going for $500-$600. The only other thing I can say is pretty sure the repop canister was powder coated rather than painted so it pays to use primer first on all the parts you intend to paint. I’ll post pics of the finished product with decals sometime next week.

Good luck in all your projects & thanks for following along. - Gary Mc
 
Re: 1930 Hartford by Westfield Mfg/Pope

highship said:
good work Gary. You got some skills.

Thanks highship!!!!!!!!!!
 
Re: 1930 Hartford by Westfield Mfg/Pope

:shock: Wow! Awesome work there man,keep them coming. :wink: - Owen
 
Re: 1930 Hartford by Westfield Mfg/Pope

Cherryboxx said:
:shock: Wow! Awesome work there man,keep them coming. :wink: - Owen

Thanks Owen!!!!!
 
Re: 1930 Hartford by Westfield Mfg/Pope

Delta Reproduction Single Cell Battery Canister fabrication pre-1933 (Conclusion)


I made one change to my original instructions after I got my original from fordsnake and that was to change from satin to gloss paint. The original is definitely glossy and so I added 3 more light coats of gloss paint.

The terminal connections on the new cap switch unit are just not good to non-existent. No screw terminal included on the threaded place for one & no 2nd connection point at all unless you just solder your wire to the bottom of the rivet. Below are an original on the left and the repop unit on the right.

IMG_1197.jpg


I went to my hardware store and found an 8-32 x 1/4" screw and washers for spacers to rectify the threaded connection point. On the other one I decided to drill out the rivet and use a 8-32 x 1/2" screw in place of the rivet with the screw head on the exterior and a lock washer, nut, washer, and a 2nd nut for the terminal. I also bought wing nuts & screws for the brackets as close to the originals as possible while I was there. I bought some cloth covered wire off ebay a while back to replicate original wire and for a custom touch I bought it in crimson color to match the bike it is going on. Standard black would probably have been more original but the crimson will stand out less so that was the choice I made. Cut the wires appropriately, added a knot to keep it in the canister cap, added crimped wire connectors & here's the inside of the cap with the "fixes" & new wiring, much better and will make life easier when replacing batteries.

IMG_1202.jpg


This conversion requires a drill & appropriate bit, screwdriver, wire strip/crimping pliers, wire cutters, and pliers.

IMG_1201.jpg


Here's the final product on the right & my original on the left. I am more than satisfied the new canister is almost a duplicate of the original. The only real issue is the mounting brackets as can be seen in the photo as they leave a lot to be desired. I may at some point try to duplicate the originals but right now too many other projects need to come first and who knows a set of original brackets might pop up for use.

IMG_1207.jpg


Thanks for following & this concludes this Delta single battery canister fabrication project. Now back to getting the Hartford back together. - Gary
 
Re: 1930 Hartford by Westfield Mfg/Pope

MORE LITTLE PROJECTS......

Bought this circa 1900 bell for my 1927 Stutz but may use it on the Hartford instead. I am thinking about mounting the battery can on the handlebars like it was originally which means no room for the EA Labs horn. If I do I'll use this bell on the Hartford and find another one for the Stutz. I know it's not 1920-1930 era but I really like this style of bell so it's going on one of the bikes. The bell was in really bad condition but I got it really cheap and nice ones seem to sell for $150-$200 so I'll restore it if possible. It was originally nickel coated but I have seen original brass ones as well. The nickel on half of it was almost gone so I am removing the nickel and will polish the brass. I was going to just clean it up but it looked too rough after cleaning so it will get a full restore. It has a severely worn gear I'll have to try to address as well but hopefully it will come out nice. Anyway it's my project for this week since I am still waiting on rims.

Here's the "sad" before condition when I purchased it. It actually looks worse than the pic and has some internal issues to be addressed. This was the "good" side.

IMG_1184.jpg


Here's the 2 halves after cleaning. On the left after cleaning only, had the side on the right looked anywhere near this good I would have stopped at cleaning it but the side on the right was down to nickel or copper on well over half of it so I went ahead & removed the thin nickel & copper plating. Used a little course sandpaper to get it down to brass as seen here. I'll keep using finer grit sandpaper to get out the sand marks & completely polish/buff it to a smooth finish. The left half will get the same treatment.

IMG_1234.jpg


More to come.....
 
Re: 1930 Hartford by Westfield Mfg/Pope

Bell Restoration Continued.....

It took less than 30 minutes to disassemble the bell, remove the nickel & copper plating, & finally restore/polish the brass. Used 320 grit, 400 grit, & last 800 grit sandpaper to remove the nickel & copper, then finished up with Dremel tool polisher using Meguiars Marine/RV metal polish. Most of the red paint in the cross design remained intact & is now cleaned. This view should make a lot of people take a second look at really bad brass based bells most people would discard or bypass.....

IMG_1255.jpg


Next up is the bell frame & mechanism restoration, with a wore out gear which may be a little "challenging". We'll see if my idea on how to restore that works whens its back together if the bell will ring. If it doesn't I'll have to find a donor. First up more disassembly, degreasing, & a distilled white vinegar bath......

IMG_1240.jpg


More to come later......
 
Re: 1930 Hartford by Westfield Mfg/Pope

With all of the projects I've seen you do Gary... you give a guy a LOT to think about... thanks for not always going at your stuff with 4o grit and a spray can.
 
Re: 1930 Hartford by Westfield Mfg/Pope

Wow! Top notch work! Great choice of parts and patina is great. Truly an inspiration, I'm taking notes.
 
Re: 1930 Hartford by Westfield Mfg/Pope

Mole said:
With all of the projects I've seen you do Gary... you give a guy a LOT to think about... thanks for not always going at your stuff with 4o grit and a spray can.

Thanks Mole!!!!!! What can I say, I love old stuff but am not a fan of rust or new, so I refurbish what I can & hopefully leave a little patina in the process.

outskirtscustoms said:
Wow! Top notch work! Great choice of parts and patina is great. Truly an inspiration, I'm taking notes.

Thank You outskirtcustoms!!!!!! I'm ready for this one to be back together if I can ever get rims from Italy, hopefully in next couple of weeks.
 

Latest posts

Back
Top